
Owner's Manual
Page 5
Contents 1 About Your Printer Understanding the Printer Parts 12 Setting Up Your Printer 14 Setting the Language on Your Printer 14 Resetting the Language on Your Printer 14 Using the Operator Panel 15 Operator Panel Menus 16 Loading Paper 23 Understanding the Automatic Paper Type Sensor 25 2 Printing Printing a Document 27 Printing Photos 28 Printing Borderless Photos 29...
Contents 1 About Your Printer Understanding the Printer Parts 12 Setting Up Your Printer 14 Setting the Language on Your Printer 14 Resetting the Language on Your Printer 14 Using the Operator Panel 15 Operator Panel Menus 16 Loading Paper 23 Understanding the Automatic Paper Type Sensor 25 2 Printing Printing a Document 27 Printing Photos 28 Printing Borderless Photos 29...
Owner's Manual
Page 6
... Documents 54 5 Faxing Installing Microsoft Fax Console in Windows XP 57 Configuring Microsoft Fax Console (Windows XP) or Fax Service Management (Windows 2000 58 Faxing a Paper Document Using the Operator Panel 59 Faxing a Paper Document Using Your Computer 60 6 Contents
... Documents 54 5 Faxing Installing Microsoft Fax Console in Windows XP 57 Configuring Microsoft Fax Console (Windows XP) or Fax Service Management (Windows 2000 58 Faxing a Paper Document Using the Operator Panel 59 Faxing a Paper Document Using Your Computer 60 6 Contents
Owner's Manual
Page 8
... Problems 80 Fax Problems 80 Paper Problems 80 Error Messages and Lights 82 Improving Print Quality 84 9 Contacting Dell Technical Assistance 85 Automated Order-Status Service 86 Contacting Dell 86 10 Appendix U.S. Only 108 Total Satisfaction Return Policy (U.S. Only 111 Dell™ Printer Consumables Limited Warranties 112 Export Regulations 112 Dell™ Software License Agreement 113...
... Problems 80 Fax Problems 80 Paper Problems 80 Error Messages and Lights 82 Improving Print Quality 84 9 Contacting Dell Technical Assistance 85 Automated Order-Status Service 86 Contacting Dell 86 10 Appendix U.S. Only 108 Total Satisfaction Return Policy (U.S. Only 111 Dell™ Printer Consumables Limited Warranties 112 Export Regulations 112 Dell™ Software License Agreement 113...

Owner's Manual
Page 9
... suppressor, line conditioner, or uninterruptible power supply cord (UPS). • Do not use your printer in a wet environment, for instructions on or tripped over. • Use only the power... set up this product or the manufacturer's authorized replacement power cable. Dell disclaims liability associated with the use of non-Dell-authorized components. • Refer to your Owner's Manual for example,...cables are not located where they can be stepped on the proper way to clear paper jams. CAUTION: SAFETY INSTRUCTIONS 9 CAUTION: SAFETY INSTRUCTIONS Use the following safety guidelines...
... suppressor, line conditioner, or uninterruptible power supply cord (UPS). • Do not use your printer in a wet environment, for instructions on or tripped over. • Use only the power... set up this product or the manufacturer's authorized replacement power cable. Dell disclaims liability associated with the use of non-Dell-authorized components. • Refer to your Owner's Manual for example,...cables are not located where they can be stepped on the proper way to clear paper jams. CAUTION: SAFETY INSTRUCTIONS 9 CAUTION: SAFETY INSTRUCTIONS Use the following safety guidelines...

Owner's Manual
Page 12
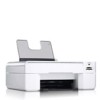
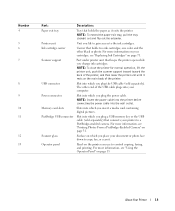
www.dell.com | support.dell.com Understanding the Printer Parts 2 1 3 13 12 4 11 5 10 6 Number 1 2 3 7 Part: Paper support Paper guide Top cover 12 About Your Printer 89 Description: Part that helps the paper feed into the printer properly. Guide that supports loaded paper. Top of printer that holds your document or photo flat while you scan it.
www.dell.com | support.dell.com Understanding the Printer Parts 2 1 3 13 12 4 11 5 10 6 Number 1 2 3 7 Part: Paper support Paper guide Top cover 12 About Your Printer 89 Description: Part that helps the paper feed into the printer properly. Guide that supports loaded paper. Top of printer that holds your document or photo flat while you scan it.
Owner's Manual
Page 13
... USB cable (sold separately) that holds two ink cartridges, one color and the other end of the printer. Slots into which you change ink cartridges. Slot into which you plug the power cable. NOTE: To extend the paper exit tray, pull the tray straight out and flip out ...face down to control copying, faxing, and printing. Part under printer unit that holds the paper as it . For more information on page 31. Surface on page 71. Number 4 5 6 7 8 9 10 11 12 13 Part: Paper exit tray Printer unit Ink cartridge carrier Scanner support USB connector Power connector Memory card...
... USB cable (sold separately) that holds two ink cartridges, one color and the other end of the printer. Slots into which you change ink cartridges. Slot into which you plug the power cable. NOTE: To extend the paper exit tray, pull the tray straight out and flip out ...face down to control copying, faxing, and printing. Part under printer unit that holds the paper as it . For more information on page 31. Surface on page 71. Number 4 5 6 7 8 9 10 11 12 13 Part: Paper exit tray Printer unit Ink cartridge carrier Scanner support USB connector Power connector Memory card...

Owner's Manual
Page 16
www.dell.com | support.dell.com Number 4 Use the: Arrow buttons 5 Power button To: • Navigate menus and menu items. • Decrease/increase number of copies. • Change the selected ...; Cancel a scan, print, or copy job in progress. • Cancel a copy job (using only the printer), and eject a page. • Exit a menu, and return to scroll through the options available in Photo mode). • Initiate a paper feed by holding the button for 3 seconds. again to save the setting and move to be...
www.dell.com | support.dell.com Number 4 Use the: Arrow buttons 5 Power button To: • Navigate menus and menu items. • Decrease/increase number of copies. • Change the selected ...; Cancel a scan, print, or copy job in progress. • Cancel a copy job (using only the printer), and eject a page. • Exit a menu, and return to scroll through the options available in Photo mode). • Initiate a paper feed by holding the button for 3 seconds. again to save the setting and move to be...

Owner's Manual
Page 21
Photo menu item Paper Size Paper Type Crop Rotate 90 Degrees Preview Red Eye Reduction Automatic Image Enhancement Sepia Tone Print * Factory default setting Settings • 3 x 5 in. • 3½ x 5 in. • 4 x 6 ... image for cropping. Press the Select button . Press the Select button . • On • Off* • On • Off* • On • Off* About Your Printer 21
Photo menu item Paper Size Paper Type Crop Rotate 90 Degrees Preview Red Eye Reduction Automatic Image Enhancement Sepia Tone Print * Factory default setting Settings • 3 x 5 in. • 3½ x 5 in. • 4 x 6 ... image for cropping. Press the Select button . Press the Select button . • On • Off* • On • Off* • On • Off* About Your Printer 21
Owner's Manual
Page 23
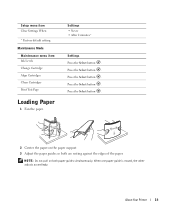
Press the Select button . 2 Center the paper on both are resting against the edges of the paper. NOTE: Do not pull on the paper support. 3 Adjust the paper guides so both paper guides simultaneously. Settings • Never • After 2 minutes* Settings Press the Select button . Press the Select...Maintenance Mode Maintenance menu item Ink Levels Change Cartridge Align Cartridges Clean Cartridges Print Test Page Loading Paper 1 Fan the paper. Press the Select button . About Your Printer 23 When one paper guide is moved, the other adjusts accordingly. Press the Select button .
Press the Select button . 2 Center the paper on both are resting against the edges of the paper. NOTE: Do not pull on the paper support. 3 Adjust the paper guides so both paper guides simultaneously. Settings • Never • After 2 minutes* Settings Press the Select button . Press the Select...Maintenance Mode Maintenance menu item Ink Levels Change Cartridge Align Cartridges Clean Cartridges Print Test Page Loading Paper 1 Fan the paper. Press the Select button . About Your Printer 23 When one paper guide is moved, the other adjusts accordingly. Press the Select button .

Owner's Manual
Page 24
Photo paper should be loaded short-edge first with the glossy/photo side facing up. 24 About Your Printer The paper should be flat against the paper support surface, and the edges should be flush against both paper guides. www.dell.com | support.dell.com NOTE: Do not force paper into the printer.
Photo paper should be loaded short-edge first with the glossy/photo side facing up. 24 About Your Printer The paper should be flat against the paper support surface, and the edges should be flush against both paper guides. www.dell.com | support.dell.com NOTE: Do not force paper into the printer.
Owner's Manual
Page 25
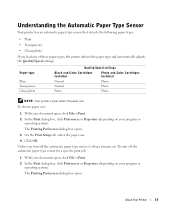
...one of these paper types, the printer detects the paper type and automatically adjusts the Quality/Speed settings. The Printing Preferences dialog box opens. Paper type Plain Transparency Glossy/photo Quality/Speed settings Black and Color Cartridges Installed Photo and Color Cartridges Installed Normal Photo Normal Photo Photo Photo NOTE: Your printer... cannot detect the paper size. About Your Printer 25 To choose paper size: 1 With your document open , click File→ Print. 2 ...
...one of these paper types, the printer detects the paper type and automatically adjusts the Quality/Speed settings. The Printing Preferences dialog box opens. Paper type Plain Transparency Glossy/photo Quality/Speed settings Black and Color Cartridges Installed Photo and Color Cartridges Installed Normal Photo Normal Photo Photo Photo NOTE: Your printer... cannot detect the paper size. About Your Printer 25 To choose paper size: 1 With your document open , click File→ Print. 2 ...
Owner's Manual
Page 26
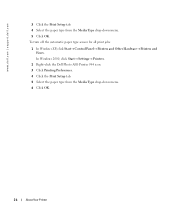
In Windows 2000, click Start→ Settings→ Printers. 2 Right-click the Dell Photo AIO Printer 944 icon. 3 Click Printing Preferences. 4 Click the Print Setup tab. 5 Select the paper type from the Media Type drop-down menu. 6 Click OK. 26 About Your Printer www.dell.com | support.dell.com 3 Click the Print Setup tab. 4 Select the paper type from the Media Type drop-down menu. 5 Click OK. To turn off the automatic paper type sensor for all print jobs: 1 In Windows XP, click Start→ Control Panel→ Printers and Other Hardware→ Printers and Faxes.
In Windows 2000, click Start→ Settings→ Printers. 2 Right-click the Dell Photo AIO Printer 944 icon. 3 Click Printing Preferences. 4 Click the Print Setup tab. 5 Select the paper type from the Media Type drop-down menu. 6 Click OK. 26 About Your Printer www.dell.com | support.dell.com 3 Click the Print Setup tab. 4 Select the paper type from the Media Type drop-down menu. 5 Click OK. To turn off the automatic paper type sensor for all print jobs: 1 In Windows XP, click Start→ Control Panel→ Printers and Other Hardware→ Printers and Faxes.

Owner's Manual
Page 27
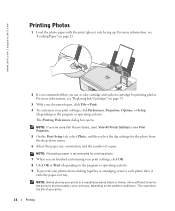
b On the Print Setup tab, select the print quality/speed, paper size, black and white or color printing, borderless printing, orientation, and number of the screen to return to the Print dialog box. 5 Click OK or ..., layout, and the use of Automatic Image Sharpening. For more information, see "Loading Paper" on page 23. 3 With your document open, click File→ Print. 4 To customize your computer and printer, and make sure they are connected. 2 Load paper with the print side facing up. The Printing Preferences dialog box opens. 2 Printing Printing...
b On the Print Setup tab, select the print quality/speed, paper size, black and white or color printing, borderless printing, orientation, and number of the screen to return to the Print dialog box. 5 Click OK or ..., layout, and the use of Automatic Image Sharpening. For more information, see "Loading Paper" on page 23. 3 With your document open, click File→ Print. 4 To customize your computer and printer, and make sure they are connected. 2 Load paper with the print side facing up. The Printing Preferences dialog box opens. 2 Printing Printing...
Owner's Manual
Page 28
... customizing your print settings, click OK. 8 Click OK or Print (depending on the program or operating system). NOTE: Photo/glossy paper is recommended that you are using Dell Picture Studio, select View All Printer Settings to 24 hours, depending on page 23. 2 It is recommended for printing photos. 7 When you use a color cartridge...
... customizing your print settings, click OK. 8 Click OK or Print (depending on the program or operating system). NOTE: Photo/glossy paper is recommended that you are using Dell Picture Studio, select View All Printer Settings to 24 hours, depending on page 23. 2 It is recommended for printing photos. 7 When you use a color cartridge...
Owner's Manual
Page 29
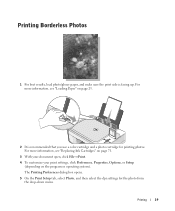
... the program or operating system). Printing Borderless Photos 1 For best results, load photo/glossy paper, and make sure the print side is recommended that you use a color cartridge and a photo cartridge for the photo from the drop-down menu. The ...
... the program or operating system). Printing Borderless Photos 1 For best results, load photo/glossy paper, and make sure the print side is recommended that you use a color cartridge and a photo cartridge for the photo from the drop-down menu. The ...

Owner's Manual
Page 30
NOTE: For Japanese customers: If you are mailing within Japan, the envelope can load a single envelope into the paper support without removing plain paper. 3 With your computer and printer, and make sure they are mailing internationally, print landscape orientation with the stamp in the upper left corner. 6 After... orientation with the stamp in the lower right corner or with landscape orientation with the stamp in the lower left corner. www.dell.com | support.dell.com 6 Select the Borderless check box, orientation of the photo, and the number of copies you are connected. 2 Load ...
NOTE: For Japanese customers: If you are mailing within Japan, the envelope can load a single envelope into the paper support without removing plain paper. 3 With your computer and printer, and make sure they are mailing internationally, print landscape orientation with the stamp in the upper left corner. 6 After... orientation with the stamp in the lower right corner or with landscape orientation with the stamp in the lower left corner. www.dell.com | support.dell.com 6 Select the Borderless check box, orientation of the photo, and the number of copies you are connected. 2 Load ...

Owner's Manual
Page 39
Copying 39 For more information, see "Loading Paper" on your printer. 2 Load the paper. 3 Copying Copying Documents Using the Operator Panel 1 Turn on page 23. 3 Open the top cover.
Copying 39 For more information, see "Loading Paper" on your printer. 2 Load the paper. 3 Copying Copying Documents Using the Operator Panel 1 Turn on page 23. 3 Open the top cover.

Owner's Manual
Page 41
Make sure the upper left corner of the front of copies (1-99) and color setting from the Copy drop-down on the printer. 5 Close the top cover. 6 Click Start→ Programs or All Programs→ Dell Printers→ Dell Photo AIO Printer 944→ Dell All-In-One Center. For more information, see "Loading Paper" on page 23. 3 Open the top cover. 4 Place the document you want to copy face down menus. Copying 41 2 Load the paper. The Dell All-In-One Center opens. 7 Select the number of the document aligns with the arrow on the scanner glass.
Make sure the upper left corner of the front of copies (1-99) and color setting from the Copy drop-down on the printer. 5 Close the top cover. 6 Click Start→ Programs or All Programs→ Dell Printers→ Dell Photo AIO Printer 944→ Dell All-In-One Center. For more information, see "Loading Paper" on page 23. 3 Open the top cover. 4 Place the document you want to copy face down menus. Copying 41 2 Load the paper. The Dell All-In-One Center opens. 7 Select the number of the document aligns with the arrow on the scanner glass.

Owner's Manual
Page 42
Lighten or darken your settings, click Copy Now. Choose a copy quality. - Select the original document size. - Reduce or enlarge your document. 9 When you are finished customizing your document. - For more information, see "Loading Paper" on your printer. 2 Load photo paper with the print (glossy) side facing up. Select the blank paper size. - Copying Photos Using the Operator Panel 1 Turn on page 23. 3 Open the top cover. 42 Copying www.dell.com | support.dell.com 8 Click See More Copy Settings to: -
Lighten or darken your settings, click Copy Now. Choose a copy quality. - Select the original document size. - Reduce or enlarge your document. 9 When you are finished customizing your document. - For more information, see "Loading Paper" on your printer. 2 Load photo paper with the print (glossy) side facing up. Select the blank paper size. - Copying Photos Using the Operator Panel 1 Turn on page 23. 3 Open the top cover. 42 Copying www.dell.com | support.dell.com 8 Click See More Copy Settings to: -

Owner's Manual
Page 43
For more information, see "Loading Paper" on page 16. 7 Press the Start button . For more information, see "Operator Panel Menus" on page 23. Make sure the upper left corner of the front of the photo aligns with the print (glossy) side facing up. Copying Photos Using Your Computer 1 Turn on your computer and printer, and make sure they are connected. 2 Load photo paper with the arrow on the scanner glass. Copying 43 4 Place the photo you want to copy face down on the printer. 5 Close the top cover. 6 From the Copy Quality submenu, select Photo.
For more information, see "Loading Paper" on page 16. 7 Press the Start button . For more information, see "Operator Panel Menus" on page 23. Make sure the upper left corner of the front of the photo aligns with the print (glossy) side facing up. Copying Photos Using Your Computer 1 Turn on your computer and printer, and make sure they are connected. 2 Load photo paper with the arrow on the scanner glass. Copying 43 4 Place the photo you want to copy face down on the printer. 5 Close the top cover. 6 From the Copy Quality submenu, select Photo.


