
Quick Reference Guide
Page 1
Dell 5230/5350 Quick Reference Loading paper and specialty media Loading the 250-sheet or 550-sheet tray 1 Pull the tray out. Do not overload the tray. 3 Notes: • Use the size indicators on the bottom of paper was loaded than the type previously loaded in the tray, then change the Paper... side of the tray. 1 Clearing jams 200 and 201 paper jams 1 Push the release latch, and then lower the multipurpose feeder door. 2 5 Load the paper: 2 1 • For single-sided printing, load the paper print side facedown with the leading edge of the paper toward the back of the tray. Note...
Dell 5230/5350 Quick Reference Loading paper and specialty media Loading the 250-sheet or 550-sheet tray 1 Pull the tray out. Do not overload the tray. 3 Notes: • Use the size indicators on the bottom of paper was loaded than the type previously loaded in the tray, then change the Paper... side of the tray. 1 Clearing jams 200 and 201 paper jams 1 Push the release latch, and then lower the multipurpose feeder door. 2 5 Load the paper: 2 1 • For single-sided printing, load the paper print side facedown with the leading edge of the paper toward the back of the tray. Note...

Quick Reference Guide
Page 2
...printer might be covered with unfused toner which can stain garments and skin. 5 Remove the jammed paper. 2 Slowly remove the jammed paper to avoid tearing it. 3 Close the top rear door. 4 Press . 241-245 paper jams 1 Pull out the tray indicated on the underside of the printer. Warning-Potential Damage:... the release latch, and then open the rear door and remove the paper from there. 6 Align and reinstall the toner cartridge. 7 Close the front cover. 8 Close the multipurpose feeder door. 9 Press . 202 and 203 paper jams If the paper is not exiting the printer: 1 Pull down the top rear door...
...printer might be covered with unfused toner which can stain garments and skin. 5 Remove the jammed paper. 2 Slowly remove the jammed paper to avoid tearing it. 3 Close the top rear door. 4 Press . 241-245 paper jams 1 Pull out the tray indicated on the underside of the printer. Warning-Potential Damage:... the release latch, and then open the rear door and remove the paper from there. 6 Align and reinstall the toner cartridge. 7 Close the front cover. 8 Close the multipurpose feeder door. 9 Press . 202 and 203 paper jams If the paper is not exiting the printer: 1 Pull down the top rear door...

User Guide
Page 6
... default settings...139 Clearing jams 140 Avoiding jams...140 Understanding jam numbers and locations...141 200 paper jam...141 201 paper jam...142 202 and 203 paper jams...143 230 paper jam...144 231-239 paper jams (optional external duplex unit 146 241-245 paper jams...148 250 paper jam...148 260 paper jam...149 271-279 paper jams...150 280 paper jams...150 281 paper jam...151 282 paper jam...151 283 staple jam...152 Troubleshooting 154...
... default settings...139 Clearing jams 140 Avoiding jams...140 Understanding jam numbers and locations...141 200 paper jam...141 201 paper jam...142 202 and 203 paper jams...143 230 paper jam...144 231-239 paper jams (optional external duplex unit 146 241-245 paper jams...148 250 paper jam...148 260 paper jam...149 271-279 paper jams...150 280 paper jams...150 281 paper jam...151 282 paper jam...151 283 staple jam...152 Troubleshooting 154...

User Guide
Page 8
... ...173 Flash memory card...173 Hard disk with adapter...173 Internal Solutions Port ...173 Solving paper feed problems...174 Paper frequently jams ...174 Paper jam message remains after jam is cleared ...174 Page that jammed does not reprint after you clear the jam 174 Solving print quality problems...175 Isolating print quality problems...175 Blank pages...175 Clipped...
... ...173 Flash memory card...173 Hard disk with adapter...173 Internal Solutions Port ...173 Solving paper feed problems...174 Paper frequently jams ...174 Paper jam message remains after jam is cleared ...174 Page that jammed does not reprint after you clear the jam 174 Solving print quality problems...175 Isolating print quality problems...175 Blank pages...175 Clipped...

User Guide
Page 141
...-203, 230 231-239 241-245 250 260 271-279 280-282 283 Area Printer Optional external duplex unit Paper trays Multipurpose feeder Envelope feeder Optional output bins Staple finisher Staple cartridge 200 paper jam 1 Push the release latch, and then lower the multipurpose feeder door. 2 Push the release latch, and then open...
...-203, 230 231-239 241-245 250 260 271-279 280-282 283 Area Printer Optional external duplex unit Paper trays Multipurpose feeder Envelope feeder Optional output bins Staple finisher Staple cartridge 200 paper jam 1 Push the release latch, and then lower the multipurpose feeder door. 2 Push the release latch, and then open...

User Guide
Page 142
... the risk of injury from there. 6 Align and reinstall the toner cartridge. 7 Close the front cover. 8 Close the multipurpose feeder door. 9 Press . 201 paper jam 1 Push the release latch, and then lower the multipurpose feeder door. 2 Push the release latch, and then open the front cover. 4 1 2 3 3... out of the printer. Warning-Potential Damage: Do not touch the photoconductor drum on a flat, smooth surface. Warning-Potential Damage: The jammed paper may be hot. CAUTION-HOT SURFACE: The inside of the printer might be covered with unfused toner which can stain garments and skin. ...
... the risk of injury from there. 6 Align and reinstall the toner cartridge. 7 Close the front cover. 8 Close the multipurpose feeder door. 9 Press . 201 paper jam 1 Push the release latch, and then lower the multipurpose feeder door. 2 Push the release latch, and then open the front cover. 4 1 2 3 3... out of the printer. Warning-Potential Damage: Do not touch the photoconductor drum on a flat, smooth surface. Warning-Potential Damage: The jammed paper may be hot. CAUTION-HOT SURFACE: The inside of the printer might be covered with unfused toner which can stain garments and skin. ...

User Guide
Page 143
... cartridge exposed to cool before touching. Clearing jams 143 CAUTION-HOT SURFACE: The inside of injury from there. 6 Align and reinstall the toner cartridge. 7 Close the front cover. 8 Close the multipurpose feeder door. 9 Press . 202 and 203 paper jams If the paper is not easy to remove, then open... the rear door and remove the paper from a hot component, allow the surface to light for extended periods. To reduce the risk of the...
... cartridge exposed to cool before touching. Clearing jams 143 CAUTION-HOT SURFACE: The inside of injury from there. 6 Align and reinstall the toner cartridge. 7 Close the front cover. 8 Close the multipurpose feeder door. 9 Press . 202 and 203 paper jams If the paper is not easy to remove, then open... the rear door and remove the paper from a hot component, allow the surface to light for extended periods. To reduce the risk of the...

User Guide
Page 144
If the paper is not exiting the printer: 1 Pull down the top rear door. 2 Slowly remove the jammed paper to avoid tearing it. 3 Close the top rear door. 4 Press . 230 paper jam Rear paper jams 1 Remove the standard tray from the printer. Clearing jams 144
If the paper is not exiting the printer: 1 Pull down the top rear door. 2 Slowly remove the jammed paper to avoid tearing it. 3 Close the top rear door. 4 Press . 230 paper jam Rear paper jams 1 Remove the standard tray from the printer. Clearing jams 144
User Guide
Page 146
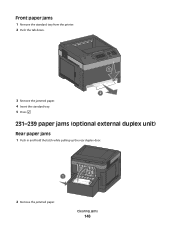
Clearing jams 146 Front paper jams 1 Remove the standard tray from the printer. 2 Push the tab down. 1 2 3 Remove the jammed paper. 4 Insert the standard tray. 5 Press . 231-239 paper jams (optional external duplex unit) Rear paper jams 1 Push in and hold the latch while pulling up the rear duplex door. 2 1 2 Remove the jammed paper.
Clearing jams 146 Front paper jams 1 Remove the standard tray from the printer. 2 Push the tab down. 1 2 3 Remove the jammed paper. 4 Insert the standard tray. 5 Press . 231-239 paper jams (optional external duplex unit) Rear paper jams 1 Push in and hold the latch while pulling up the rear duplex door. 2 1 2 Remove the jammed paper.

User Guide
Page 147
Front paper jams 1 Remove the standard tray from the printer. 2 Remove the duplex jam access tray. 3 Raise the recessed duplex bar. 4 Remove the jammed paper. 5 Replace the duplex jam access tray. 3 Close the rear duplex door. 4 Press . Clearing jams 147
Front paper jams 1 Remove the standard tray from the printer. 2 Remove the duplex jam access tray. 3 Raise the recessed duplex bar. 4 Remove the jammed paper. 5 Replace the duplex jam access tray. 3 Close the rear duplex door. 4 Press . Clearing jams 147
User Guide
Page 148
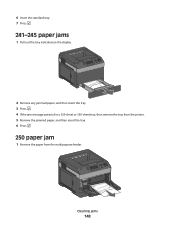
6 Insert the standard tray. 7 Press . 241-245 paper jams 1 Pull out the tray indicated on the display. 2 Remove any jammed paper, and then insert the tray. 3 Press . 4 If the jam message persists for a 250-sheet or 550-sheet tray, then remove the tray from the printer. 5 Remove the jammed paper, and then insert the tray. 6 Press . 250 paper jam 1 Remove the paper from the multipurpose feeder. Clearing jams 148
6 Insert the standard tray. 7 Press . 241-245 paper jams 1 Pull out the tray indicated on the display. 2 Remove any jammed paper, and then insert the tray. 3 Press . 4 If the jam message persists for a 250-sheet or 550-sheet tray, then remove the tray from the printer. 5 Remove the jammed paper, and then insert the tray. 6 Press . 250 paper jam 1 Remove the paper from the multipurpose feeder. Clearing jams 148

User Guide
Page 149
... all the envelopes. 2 If the jammed envelope cannot be removed. Make sure it clicks into the multipurpose feeder. 4 Slide the paper guide toward the inside of the tray until it aside. 3 Remove the envelope from the bottom of the paper. 5 Press . 260 paper jam The envelope feeder feeds envelopes from the... printer. Do not fold or crease the paper. 2 Flex the sheets of paper back and forth to be pulled out, lift the envelope feeder up and ...
... all the envelopes. 2 If the jammed envelope cannot be removed. Make sure it clicks into the multipurpose feeder. 4 Slide the paper guide toward the inside of the tray until it aside. 3 Remove the envelope from the bottom of the paper. 5 Press . 260 paper jam The envelope feeder feeds envelopes from the... printer. Do not fold or crease the paper. 2 Flex the sheets of paper back and forth to be pulled out, lift the envelope feeder up and ...

User Guide
Page 150
... output bin door or doors. 5 Press . 280 paper jams 1 Pull down the staple finisher door. 2 Remove the jammed paper. 3 Close the staple finisher door. 4 Press . Clearing jams 150 6 Load the envelopes in the envelope feeder. 7 Adjust the paper guide. 8 Lower the envelope weight. 9 Press . 271-279 paper jams To clear a jam in the output expander, high-capacity output stacker...
... output bin door or doors. 5 Press . 280 paper jams 1 Pull down the staple finisher door. 2 Remove the jammed paper. 3 Close the staple finisher door. 4 Press . Clearing jams 150 6 Load the envelopes in the envelope feeder. 7 Adjust the paper guide. 8 Lower the envelope weight. 9 Press . 271-279 paper jams To clear a jam in the output expander, high-capacity output stacker...

User Guide
Page 151
281 paper jam 1 Clear the jam from the stapler output bin. 2 Press . 282 paper jam To prevent paper jams, the stapler motor does not run when the stapler door is open. 1 Close the stapler door until it clicks into place. 2 Press . Clearing jams 151
281 paper jam 1 Clear the jam from the stapler output bin. 2 Press . 282 paper jam To prevent paper jams, the stapler motor does not run when the stapler door is open. 1 Close the stapler door until it clicks into place. 2 Press . Clearing jams 151

User Guide
Page 172
..., wait about 10 seconds, and then turn the printer on page 39. THE PAPER CONSISTENTLY JAMS IN THE DRAWER • Flex the paper. • Make sure the drawer is properly installed. • Make sure paper is loaded correctly. • Make sure the paper or specialty media meets specifications and is empty, then load...drawer. • If the tray is not damaged. • Make sure the guides are aligned against the edges of the following: MAKE SURE THE PAPER IS LOADED CORRECTLY 1 Open the paper tray. 2 Check for paper jams or misfeeds. 3 Make sure paper guides are positioned correctly for the...
..., wait about 10 seconds, and then turn the printer on page 39. THE PAPER CONSISTENTLY JAMS IN THE DRAWER • Flex the paper. • Make sure the drawer is properly installed. • Make sure paper is loaded correctly. • Make sure the paper or specialty media meets specifications and is empty, then load...drawer. • If the tray is not damaged. • Make sure the guides are aligned against the edges of the following: MAKE SURE THE PAPER IS LOADED CORRECTLY 1 Open the paper tray. 2 Check for paper jams or misfeeds. 3 Make sure paper guides are positioned correctly for the...

User Guide
Page 174
... Move the guides in the tray to the correct positions for network printing, see the chapter about installing software for the paper size loaded. Set Jam Recovery to Off. Paper jam message remains after you load does not exceed the maximum stack height indicated in its original wrapper until Continue appears, and then press...
... Move the guides in the tray to the correct positions for network printing, see the chapter about installing software for the paper size loaded. Set Jam Recovery to Off. Paper jam message remains after you load does not exceed the maximum stack height indicated in its original wrapper until Continue appears, and then press...

User Guide
Page 188
...Numerics 1565 Emulation error, load emulation option 168 2000-sheet tray loading 57 250-sheet tray (standard or optional) loading 54 281 paper jam 151 282 paper jam 151 30.yy Invalid refill, change cartridge 162 31.yy Replace defective or missing cartridge 162 32.yy Cartridge part number unsupported ...by device 163 34 Short paper 163 35 Insufficient memory to support Resource Save feature 163 37 Insufficient memory for Flash Memory Defragment ...
...Numerics 1565 Emulation error, load emulation option 168 2000-sheet tray loading 57 250-sheet tray (standard or optional) loading 54 281 paper jam 151 282 paper jam 151 30.yy Invalid refill, change cartridge 162 31.yy Replace defective or missing cartridge 162 32.yy Cartridge part number unsupported ...by device 163 34 Short paper 163 35 Insufficient memory to support Resource Save feature 163 37 Insufficient memory for Flash Memory Defragment ...
User Guide
Page 189
... port 36 exit bins linking 65 exterior of the printer cleaning 129 e-mail notice of low supply level 137 notice of paper jam 137 notice of paper needed 137 notice that different paper is needed 137 F factory defaults, restoring printer control panel menus 139 fiber optic network setup 45 finding information 13 publications ...203 143 230 144 231-239 (optional duplex) 146 241-245 148 250 148 260 149 271-279 150 280 150 283 staple jam 152 stapler 152 L labels, paper tips 78 letterhead loading, 2000-sheet tray 57 loading, multipurpose feeder 60 loading, trays 54 tips on using 76 linking exit bins ...
... port 36 exit bins linking 65 exterior of the printer cleaning 129 e-mail notice of low supply level 137 notice of paper jam 137 notice of paper needed 137 notice that different paper is needed 137 F factory defaults, restoring printer control panel menus 139 fiber optic network setup 45 finding information 13 publications ...203 143 230 144 231-239 (optional duplex) 146 241-245 148 250 148 260 149 271-279 150 280 150 283 staple jam 152 stapler 152 L labels, paper tips 78 letterhead loading, 2000-sheet tray 57 loading, multipurpose feeder 60 loading, trays 54 tips on using 76 linking exit bins ...

User Guide
Page 190
... 52 setting type 52 storing 69 unacceptable 68 Universal Paper Size 95 Universal size setting 53 paper and specialty media, loading paper size, detecting 52 paper drawers installing 35 paper feed troubleshooting message remains after jam is cleared 174 page that jammed does not reprint 174 paper jams avoiding 140 paper jams, clearing 200 141 201 142 260 149 271-279...
... 52 setting type 52 storing 69 unacceptable 68 Universal Paper Size 95 Universal size setting 53 paper and specialty media, loading paper size, detecting 52 paper drawers installing 35 paper feed troubleshooting message remains after jam is cleared 174 page that jammed does not reprint 174 paper jams avoiding 140 paper jams, clearing 200 141 201 142 260 149 271-279...
User Guide
Page 191
... than expected 169 jobs do not print 168 Large jobs do not collate 170 multiple-language PDFs do not print 168 paper curl 177 paper frequently jams 174 tray linking does not work 170 unexpected page breaks occur 171 printer configurations 14 minimum clearances 16 models 14 moving ...control panel 17 factory defaults, restoring 139 printer hard disk installing 31 printer messages 1565 Emulation error, load emulation option 168 281 paper jam 151 282 paper jam 151 30.yy Invalid refill, change cartridge 162 31.yy Replace defective or missing cartridge 162 32.yy Cartridge part number unsupported ...
... than expected 169 jobs do not print 168 Large jobs do not collate 170 multiple-language PDFs do not print 168 paper curl 177 paper frequently jams 174 tray linking does not work 170 unexpected page breaks occur 171 printer configurations 14 minimum clearances 16 models 14 moving ...control panel 17 factory defaults, restoring 139 printer hard disk installing 31 printer messages 1565 Emulation error, load emulation option 168 281 paper jam 151 282 paper jam 151 30.yy Invalid refill, change cartridge 162 31.yy Replace defective or missing cartridge 162 32.yy Cartridge part number unsupported ...


