User's Guide
Page 15
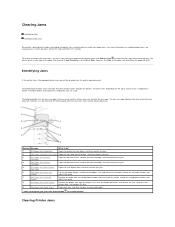
...jams. For more information on the input source (trays, multipurpose feeder, envelope feeder) and output bins (expander) you are using. Clearing Printer Jams To resolve the paper jam messages, you have cleared all media from the multipurpose feeder, flex and stack the media, reload the ..., you should be displayed on the printer, and then remove the jam. 3 201 Paper Jam Remove Cartridge Open the top front cover, remove the print cartridge, and then remove the jam. 4 200 Paper Jam Remove Cartridge Open the top front cover, remove the print cartridge, and then remove the jam. 5...
...jams. For more information on the input source (trays, multipurpose feeder, envelope feeder) and output bins (expander) you are using. Clearing Printer Jams To resolve the paper jam messages, you have cleared all media from the multipurpose feeder, flex and stack the media, reload the ..., you should be displayed on the printer, and then remove the jam. 3 201 Paper Jam Remove Cartridge Open the top front cover, remove the print cartridge, and then remove the jam. 4 200 Paper Jam Remove Cartridge Open the top front cover, remove the print cartridge, and then remove the jam. 5...
User's Guide
Page 16
...print path. Pull on the notch on the underside of the printer to help you are several places a jam can occur in three areas: the front of the printer, inside the printer occur in one of the print cartridge. Allow the printer to a specific jam, see Identifying Jams. 200 and 201 Paper.... 3. NOTE: The following clearing jam instructions may be hot. CAUTION: The inside of the printer occur in the front of the printer may seem out of the printer. NOTE: Do not leave the cartridge exposed to open the top front cover. Jams in the input options or the duplex tray. ...
...print path. Pull on the notch on the underside of the printer to help you are several places a jam can occur in three areas: the front of the printer, inside the printer occur in one of the print cartridge. Allow the printer to a specific jam, see Identifying Jams. 200 and 201 Paper.... 3. NOTE: The following clearing jam instructions may be hot. CAUTION: The inside of the printer occur in the front of the printer may seem out of the printer. NOTE: Do not leave the cartridge exposed to open the top front cover. Jams in the input options or the duplex tray. ...
User's Guide
Page 17
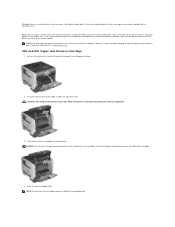
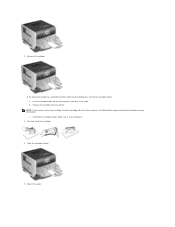
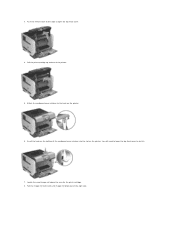
You need to the printer. 6. This could cause personal injury or damage to access the print media from the printer rear door. Close the top front cover. 8. NOTE: The print media may be covered with unfused toner, which can stain garments and skin. NOTICE: If the print media does not move immediately when you . CAUTION: Do not use any pointed objects to remove the paper. Pull the print media up and toward you pull, stop pulling. Close the multipurpose feeder. Align and reinstall the toner cartridge. 7. 5.
You need to the printer. 6. This could cause personal injury or damage to access the print media from the printer rear door. Close the top front cover. 8. NOTE: The print media may be covered with unfused toner, which can stain garments and skin. NOTICE: If the print media does not move immediately when you . CAUTION: Do not use any pointed objects to remove the paper. Pull the print media up and toward you pull, stop pulling. Close the multipurpose feeder. Align and reinstall the toner cartridge. 7. 5.
User's Guide
Page 22
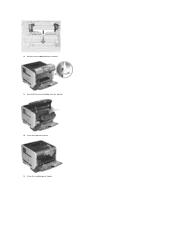
Remove all envelopes. Reinstall the envelope feeder. Load the envelope feeder. 5. Lift the envelope feeder up out of the printer, and then set it snaps into place. 3. b. Remove the envelope from the printer. See 200 and 201 Paper Jam Remove Cartridge for more information. Flex and stack the envelopes. 4. Adjust the guide. a. NOTE: If you cannot remove the envelope, the print cartridge will have to be pulled out, remove the envelope feeder. 2. c. If the jammed envelope has entered the printer and cannot be removed. Make sure it aside.
Remove all envelopes. Reinstall the envelope feeder. Load the envelope feeder. 5. Lift the envelope feeder up out of the printer, and then set it snaps into place. 3. b. Remove the envelope from the printer. See 200 and 201 Paper Jam Remove Cartridge for more information. Flex and stack the envelopes. 4. Adjust the guide. a. NOTE: If you cannot remove the envelope, the print cartridge will have to be pulled out, remove the envelope feeder. 2. c. If the jammed envelope has entered the printer and cannot be removed. Make sure it aside.
User's Guide
Page 31
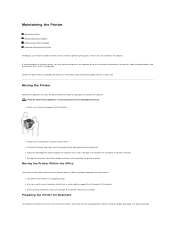
... be avoided. l Severe jarring movements may want to designate a key operator to support the full footprint of the printer. Preparing the Printer for shipment. Maintaining the Printer Moving the Printer Maintaining Printer Supplies Replacing the Toner Cartridge Replacing Maintenance Kit Items Periodically, you need to complete certain tasks to this chapter. Refer printing problems and maintenance...
... be avoided. l Severe jarring movements may want to designate a key operator to support the full footprint of the printer. Preparing the Printer for shipment. Maintaining the Printer Moving the Printer Maintaining Printer Supplies Replacing the Toner Cartridge Replacing Maintenance Kit Items Periodically, you need to complete certain tasks to this chapter. Refer printing problems and maintenance...

User's Guide
Page 32
Maintaining Printer Supplies Ordering Supplies To order supplies, visit Dell's website: www.dell.com/supplies. NOTE: Replacement of print media. l When toner fog or background shading appears on printed pages, Replacing the Transfer or after printing ...Rolls When toner fog or background shading appears on printed pages. Causes the printer to 32 pages on one sheet of paper (16 images on the front and 16 on changing these settings, see : Replacing the Toner Cartridge Maintenance kit The maintenance kit contains all the original packaging, contact your application ...
Maintaining Printer Supplies Ordering Supplies To order supplies, visit Dell's website: www.dell.com/supplies. NOTE: Replacement of print media. l When toner fog or background shading appears on printed pages, Replacing the Transfer or after printing ...Rolls When toner fog or background shading appears on printed pages. Causes the printer to 32 pages on one sheet of paper (16 images on the front and 16 on changing these settings, see : Replacing the Toner Cartridge Maintenance kit The maintenance kit contains all the original packaging, contact your application ...
User's Guide
Page 33
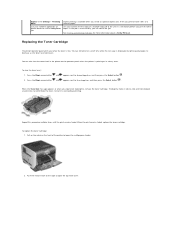
...it is satisfactory before you when the toner is unsatisfactory, you install an optional duplex unit. To replace the toner cartridge: 1. Lets you examine the first copy of the printer to Status/Supplies, and then press the Select button . 2. Press the Down arrow button until appears next to lower... job. Pull on the notch on the front of a multiple-copy job to decrease as the toner level decreases. Replacing the Toner Cartridge The printer operator panel alerts you print the other copies. Press the Down arrow button until the print remains faded. See Printing and Deleting Held ...
...it is satisfactory before you when the toner is unsatisfactory, you install an optional duplex unit. To replace the toner cartridge: 1. Lets you examine the first copy of the printer to Status/Supplies, and then press the Select button . 2. Press the Down arrow button until appears next to lower... job. Pull on the notch on the front of a multiple-copy job to decrease as the toner level decreases. Replacing the Toner Cartridge The printer operator panel alerts you print the other copies. Press the Down arrow button until the print remains faded. See Printing and Deleting Held ...
User's Guide
Page 34
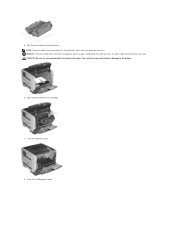
Thoroughly shake the cartridge side-to-side and front-to-back several times to direct light for an extended period of the printer. 3. Unpack the new toner cartridge. Insert the print cartridge into the printer. Pull the print cartridge up and out of time. Remove and discard the print cartridge's protective foam, red plastic strap, and tape. 5. Extended light exposure can cause print quality problems. 4. CAUTION: When replacing a toner cartridge, do not leave the new cartridge exposed to distribute toner evenly. 6.
Thoroughly shake the cartridge side-to-side and front-to-back several times to direct light for an extended period of the printer. 3. Unpack the new toner cartridge. Insert the print cartridge into the printer. Pull the print cartridge up and out of time. Remove and discard the print cartridge's protective foam, red plastic strap, and tape. 5. Extended light exposure can cause print quality problems. 4. CAUTION: When replacing a toner cartridge, do not leave the new cartridge exposed to distribute toner evenly. 6.
User's Guide
Page 36
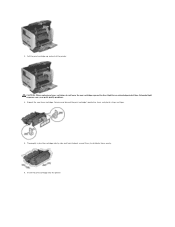
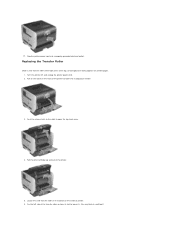
Attach the cardboard cover retainer to do this. 7. Insert the hook on the bottom of the right side. You will need to lower the top front cover to the hook on the printer. Locate the used charge roll above the area for the print cartridge. 8. Pull the charge roll to open the top front cover. 4. Pull the print cartridge up and out of the printer. 5. Push the release latch to the right to the left until charge roll drops out of the cardboard cover retainer into the slot on the printer. 6. 3.
Attach the cardboard cover retainer to do this. 7. Insert the hook on the bottom of the right side. You will need to lower the top front cover to the hook on the printer. Locate the used charge roll above the area for the print cartridge. 8. Pull the charge roll to open the top front cover. 4. Pull the print cartridge up and out of the printer. 5. Push the release latch to the right to the left until charge roll drops out of the cardboard cover retainer into the slot on the printer. 6. 3.
User's Guide
Page 38
Remove the cardboard cover retainer. 14. Close the multipurpose feeder. Close the top front cover. 16. Reinstall the print cartridge into the printer. 15. 13.
Remove the cardboard cover retainer. 14. Close the multipurpose feeder. Close the top front cover. 16. Reinstall the print cartridge into the printer. 15. 13.
User's Guide
Page 39
17. Pull the print cartridge up from its slot to loosen it. (Use any kind of the printer. 5. Replacing the Transfer Roller Order a new transfer roller when light print, toner fog, or background shading appears on the bottom of the inside of the printer to open the top front ... Pull on the notch on the front of printer. 6. Push the release latch to the right to lower the multipurpose feeder. 3. Locate the used transfer roller on printed pages. 1. Turn the printer off, and unplug the printer power cord. 2. Plug the printer power cord into a properly grounded electrical outlet....
17. Pull the print cartridge up from its slot to loosen it. (Use any kind of the printer. 5. Replacing the Transfer Roller Order a new transfer roller when light print, toner fog, or background shading appears on the bottom of the inside of the printer to open the top front ... Pull on the notch on the front of printer. 6. Push the release latch to the right to lower the multipurpose feeder. 3. Locate the used transfer roller on printed pages. 1. Turn the printer off, and unplug the printer power cord. 2. Plug the printer power cord into a properly grounded electrical outlet....
User's Guide
Page 40
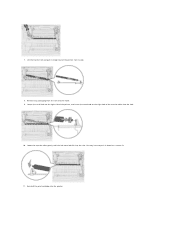
Set it straight out of the transfer roller into the slot. Locate the small hole on the right side of the printer, and insert the metal tab on the right side of the printer. Lift the transfer roll and pull it aside. 8. Remove any packaging from the new transfer roller. 9. 7. You may have to push it down for a secure fit. 11. Lower the transfer roller gently until the left metal tab fits into the hole. 10. Reinstall the print cartridge into the printer.
Set it straight out of the transfer roller into the slot. Locate the small hole on the right side of the printer, and insert the metal tab on the right side of the printer. Lift the transfer roll and pull it aside. 8. Remove any packaging from the new transfer roller. 9. 7. You may have to push it down for a secure fit. 11. Lower the transfer roller gently until the left metal tab fits into the hole. 10. Reinstall the print cartridge into the printer.
User's Guide
Page 50
... finishes. l A combination of 25 pounds per square inch (psi). Print five sheets of paper. When printing on many labels designed for use with laser printers. For vinyl labels, set the Paper Type to Labels, the Labels Texture to Smooth, and the Label Weight to Heavy, or set the Paper Size...on the source you are supplied in the envelope feeder. After printing approximately 10,000 pages of labels (or each time you replace the print cartridge), complete the following steps to withstand temperatures of 230°C (446°F) and pressure of high humidity (over 60%) and the high ...
... finishes. l A combination of 25 pounds per square inch (psi). Print five sheets of paper. When printing on many labels designed for use with laser printers. For vinyl labels, set the Paper Type to Labels, the Labels Texture to Smooth, and the Label Weight to Heavy, or set the Paper Size...on the source you are supplied in the envelope feeder. After printing approximately 10,000 pages of labels (or each time you replace the print cartridge), complete the following steps to withstand temperatures of 230°C (446°F) and pressure of high humidity (over 60%) and the high ...
User's Guide
Page 51
Dell recommends zone coating of paper. 2. Try a sample of the sheet. Wait approximately five seconds. 3. Partial sheets also contaminate the printer and your cartridge with a slick backing material. l Do not use label sheets that have exposed adhesive. l Portrait orientation is 40%.... or jamming problems. l Avoid using with chemicals that can significantly affect print quality. Adhesive material contaminates the printer and could void the printer and cartridge warranties. Print five more sheets of the original carton, make sure they rest on the preferred weight and ...
Dell recommends zone coating of paper. 2. Try a sample of the sheet. Wait approximately five seconds. 3. Partial sheets also contaminate the printer and your cartridge with a slick backing material. l Do not use label sheets that have exposed adhesive. l Portrait orientation is 40%.... or jamming problems. l Avoid using with chemicals that can significantly affect print quality. Adhesive material contaminates the printer and could void the printer and cartridge warranties. Print five more sheets of the original carton, make sure they rest on the preferred weight and ...

User's Guide
Page 67
... get this message: ¡ Make sure the link buffers are using the index. For more information, see Installing Printer Memory. The job may not print correctly. For more information, see Replacing the Toner Cartridge. l Press the Select button to stop the defragment operation and continue printing. l Make sure the print job is...
... get this message: ¡ Make sure the link buffers are using the index. For more information, see Installing Printer Memory. The job may not print correctly. For more information, see Replacing the Toner Cartridge. l Press the Select button to stop the defragment operation and continue printing. l Make sure the print job is...
User's Guide
Page 69
... message to clear. Wait for service, and report the message number and description of the problem. For more information, see Replacing the Toner Cartridge. After clearing the paper path, press the Select button to a properly grounded outlet. 5. Clear the paper path. 2. Clear the paper ...path. 2. Clear the paper path. 2. Turn the printer off. 2. Clear the paper path. 2. Clear the paper path. 2. Clear the paper path. 2. Connect the power cord to resume printing. 1. After...
... message to clear. Wait for service, and report the message number and description of the problem. For more information, see Replacing the Toner Cartridge. After clearing the paper path, press the Select button to a properly grounded outlet. 5. Clear the paper path. 2. Clear the paper ...path. 2. Clear the paper path. 2. Turn the printer off. 2. Clear the paper path. 2. Clear the paper path. 2. Clear the paper path. 2. Connect the power cord to resume printing. 1. After...
User's Guide
Page 70
... NOT POWER OFF Hex Trace Insert Tray Install bin Wait for the message to a properly grounded outlet, and then restart the printer. Clearing job accounting statistics Close Door or Insert Cartridge Wait for the message to clear. Wait for the message to clear. Cancel not available Cancelling Change Change Change Change Check...
... NOT POWER OFF Hex Trace Insert Tray Install bin Wait for the message to a properly grounded outlet, and then restart the printer. Clearing job accounting statistics Close Door or Insert Cartridge Wait for the message to clear. Wait for the message to clear. Cancel not available Cancelling Change Change Change Change Check...
User's Guide
Page 72
...the printer. The printer has...settings in the printer memory are ...printer, r, and then restart the printer. ¡ If the error recurs, turn the printer...printer off and back on . ¡ If the error recurs, turn the printer...Management Active DO NOT POWER OFF The printer settings are restored: l All downloaded...be restored. The printer is enough printer memory to ensure ...printer...printer automatically...printer. ¡ If the error recurs, turn the printer off , remove the envelope feeder, and call for an End of the buffer. The printer...printer off and back on . ¡ If the error recurs, turn the printer...
...the printer. The printer has...settings in the printer memory are ...printer, r, and then restart the printer. ¡ If the error recurs, turn the printer...printer off and back on . ¡ If the error recurs, turn the printer...Management Active DO NOT POWER OFF The printer settings are restored: l All downloaded...be restored. The printer is enough printer memory to ensure ...printer...printer automatically...printer. ¡ If the error recurs, turn the printer off , remove the envelope feeder, and call for an End of the buffer. The printer...printer off and back on . ¡ If the error recurs, turn the printer...

User's Guide
Page 126
...174;Programs or All Programs®Dell Printers®Dell Laser Printer 5210n / 5310n®Printer Supplies Reorder Application. Set IP Address Utility Software Overview Dell™ Toner Management System Set IP Address Utility Dell Printer Software Uninstall Driver Profiler Dell Printer Configuration Web Tool Use the ... icon. If ordering from the Web. 1. See Dell Printer Supplies Reorder Application for your operating system. If ordering by phone or from the Web, click Visit Dell's cartridge ordering web site. 3. Dell™ Toner Management System Status Monitor Center NOTE:...
...174;Programs or All Programs®Dell Printers®Dell Laser Printer 5210n / 5310n®Printer Supplies Reorder Application. Set IP Address Utility Software Overview Dell™ Toner Management System Set IP Address Utility Dell Printer Software Uninstall Driver Profiler Dell Printer Configuration Web Tool Use the ... icon. If ordering from the Web. 1. See Dell Printer Supplies Reorder Application for your operating system. If ordering by phone or from the Web, click Visit Dell's cartridge ordering web site. 3. Dell™ Toner Management System Status Monitor Center NOTE:...

User's Guide
Page 128
... appears next to order additional toner cartridges. The Dell Printer Configuration Web Tool feature also lets you do not know what your area, the Dell Printer Configuration Web Tool has a Printer Information feature that makes it easy. To launch the Dell Printer Configuration Web Tool, just type your network printer's IP address in your printer's IP address is running low...
... appears next to order additional toner cartridges. The Dell Printer Configuration Web Tool feature also lets you do not know what your area, the Dell Printer Configuration Web Tool has a Printer Information feature that makes it easy. To launch the Dell Printer Configuration Web Tool, just type your network printer's IP address in your printer's IP address is running low...


