Owner's Manual
Page 6
www.dell.com/supplies | support.dell.com 5 Using Your Printer 33 Changing Printer Settings 34 Initializing NVRAM ...35 Setting of Panel Lock 35 Adjusting the Language 36 Printing a Job ...36 Canceling a Job From the Printer Operator Panel 36 Canceling the Job From a Computer 36 Canceling a Job From the Taskbar ... Transfer Roller 47 Removing the Used Transfer Roller 47 Installing the New Transfer Roller 48 Replacing the Fuser and Separator Roller 50 Removing the Used Fuser 50 Installing the New Fuser 52 Removing the Used Separator Roller 53 Installing the New Separator Roller 54 6
www.dell.com/supplies | support.dell.com 5 Using Your Printer 33 Changing Printer Settings 34 Initializing NVRAM ...35 Setting of Panel Lock 35 Adjusting the Language 36 Printing a Job ...36 Canceling a Job From the Printer Operator Panel 36 Canceling the Job From a Computer 36 Canceling a Job From the Taskbar ... Transfer Roller 47 Removing the Used Transfer Roller 47 Installing the New Transfer Roller 48 Replacing the Fuser and Separator Roller 50 Removing the Used Fuser 50 Installing the New Fuser 52 Removing the Used Separator Roller 53 Installing the New Separator Roller 54 6

Owner's Manual
Page 39
Section 6 Maintenance Replacing the Imaging Drum Replacing the Toner Cartridge Replacing the Transfer Roller Replacing the Fuser and Separator Roller Cleaning the Automatic Density Control (ADC) Sensor 6 Maintenance
Section 6 Maintenance Replacing the Imaging Drum Replacing the Toner Cartridge Replacing the Transfer Roller Replacing the Fuser and Separator Roller Cleaning the Automatic Density Control (ADC) Sensor 6 Maintenance
Owner's Manual
Page 50
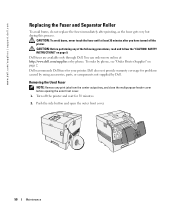
Dell fuser are available only through Dell. Dell recommends Dell fuser for 30 minutes. 2. Turn off the printer. Removing the Used Fuser NOTE: Remove any of the following procedures, read and follow the "CAUTION: SAFETY INSTRUCTIONS" on page 2. www.dell.com/supplies | support.dell.com Replacing the Fuser and Separator Roller To avoid burns, do not replace the fuser immediately after you have...
Dell fuser are available only through Dell. Dell recommends Dell fuser for 30 minutes. 2. Turn off the printer. Removing the Used Fuser NOTE: Remove any of the following procedures, read and follow the "CAUTION: SAFETY INSTRUCTIONS" on page 2. www.dell.com/supplies | support.dell.com Replacing the Fuser and Separator Roller To avoid burns, do not replace the fuser immediately after you have...

Owner's Manual
Page 51
Maintenance 51 Lift up the levers next to both ends of the printer. 3. Grip the knobs and gently lift the fuser out of the fuser. 4.
Maintenance 51 Lift up the levers next to both ends of the printer. 3. Grip the knobs and gently lift the fuser out of the fuser. 4.

Owner's Manual
Page 52
Completely push down the fuser by the knobs, align it with the slots in the printer, and slowly push it in. 2. www.dell.com/supplies | support.dell.com Installing the New Fuser 1. Unpack a new fuser, grip the fuser by holding the knobs at both ends of the fuser until the levers next to both ends of the fuser return to their original position. 3. Close the outer front cover. 52 Maintenance
Completely push down the fuser by the knobs, align it with the slots in the printer, and slowly push it in. 2. www.dell.com/supplies | support.dell.com Installing the New Fuser 1. Unpack a new fuser, grip the fuser by holding the knobs at both ends of the fuser until the levers next to both ends of the fuser return to their original position. 3. Close the outer front cover. 52 Maintenance


