
OwnersManual.book
Page 2
You can order Printer Supplies online at www.dell.com/supplies or by phone. Contact your distributor. Contact your distributor. US Algeria Argentina Australia Austria Belgium Canada Caribbean Islands Chile Colombia... 877-INK-2-YOU Contact your distributor. Contact your distributor. Contact your distributor. 0870 907 4574 Contact your distributor. Order Printer Supplies Dell™ Printer Supplies are available only through Dell. Contact your distributor. 02.713 1590 Malaysia Mexico Netherlands Norway Oman Paraguay Peru Poland PRC Puerto Rico Qatar Russia Saudi ...
You can order Printer Supplies online at www.dell.com/supplies or by phone. Contact your distributor. Contact your distributor. US Algeria Argentina Australia Austria Belgium Canada Caribbean Islands Chile Colombia... 877-INK-2-YOU Contact your distributor. Contact your distributor. Contact your distributor. 0870 907 4574 Contact your distributor. Order Printer Supplies Dell™ Printer Supplies are available only through Dell. Contact your distributor. 02.713 1590 Malaysia Mexico Netherlands Norway Oman Paraguay Peru Poland PRC Puerto Rico Qatar Russia Saudi ...

OwnersManual.book
Page 4
www.dell.com/supplies | support.dell.com Notes, Notices, and Cautions NOTE: A NOTE indicates important information that helps you how to avoid the problem. Information in this document is subject to change without the written permission of their products. UNIX is US registered trademark of Dell Inc.; PCL ...data and tells you make better use of your printer NOTICE: A NOTICE indicates either the entities claiming the marks and names of Dell Inc. Refer to hardware or loss of The Open Group in applicable FAR provisions: Dell Inc., One Dell Way, Round Rock, Texas, 78682, USA. ...
www.dell.com/supplies | support.dell.com Notes, Notices, and Cautions NOTE: A NOTE indicates important information that helps you how to avoid the problem. Information in this document is subject to change without the written permission of their products. UNIX is US registered trademark of Dell Inc.; PCL ...data and tells you make better use of your printer NOTICE: A NOTICE indicates either the entities claiming the marks and names of Dell Inc. Refer to hardware or loss of The Open Group in applicable FAR provisions: Dell Inc., One Dell Way, Round Rock, Texas, 78682, USA. ...

OwnersManual.book
Page 6
www.dell.com/supplies | support.dell.com 5 Using Your Printer 33 Changing Printer Settings 34 Initializing NVRAM ...35 Setting of Panel Lock 35 Adjusting the Language 36 Printing a Job ...36 Canceling a Job From the Printer Operator Panel 36 Canceling the Job From a Computer 36 Canceling a Job From the Taskbar 36 Canceling a Job From the Desktop 37 Software...
www.dell.com/supplies | support.dell.com 5 Using Your Printer 33 Changing Printer Settings 34 Initializing NVRAM ...35 Setting of Panel Lock 35 Adjusting the Language 36 Printing a Job ...36 Canceling a Job From the Printer Operator Panel 36 Canceling the Job From a Computer 36 Canceling a Job From the Taskbar 36 Canceling a Job From the Desktop 37 Software...

OwnersManual.book
Page 12
The width guides should be fully extended. NOTE: For A4 paper, push the lever to the edge of the tray. Slide the width guides to the A4 position. 12 Loading Paper www.dell.com/supplies | support.dell.com Loading the Standard Tray Load the print media used for the majority of the printer until it from the printer. 2. Pull the tray out of your print jobs in the standard 500-sheet tray. 1. Hold the tray with both hands, lift the front slightly, and remove it stops.
The width guides should be fully extended. NOTE: For A4 paper, push the lever to the edge of the tray. Slide the width guides to the A4 position. 12 Loading Paper www.dell.com/supplies | support.dell.com Loading the Standard Tray Load the print media used for the majority of the printer until it from the printer. 2. Pull the tray out of your print jobs in the standard 500-sheet tray. 1. Hold the tray with both hands, lift the front slightly, and remove it stops.

OwnersManual.book
Page 14
If you load any print media into the printer, and push until they rest lightly against the edge of the print media stack. 7. Insert the tray into the tray, configure the Paper Type settings for that tray according to the message on the operator panel. 14 Loading Paper www.dell.com/supplies | support.dell.com 6. Slide the width guides and length guide until it stops. 8.
If you load any print media into the printer, and push until they rest lightly against the edge of the print media stack. 7. Insert the tray into the tray, configure the Paper Type settings for that tray according to the message on the operator panel. 14 Loading Paper www.dell.com/supplies | support.dell.com 6. Slide the width guides and length guide until it stops. 8.

OwnersManual.book
Page 16
www.dell.com/supplies | support.dell.com 3. NOTE: Be careful not to the correct value for the multipurpose feeder are set to bend the print media. 5. For tips on the printer operator panel. Select print media source, size, and type in your software program and select the print media size and type on recommended print...
www.dell.com/supplies | support.dell.com 3. NOTE: Be careful not to the correct value for the multipurpose feeder are set to bend the print media. 5. For tips on the printer operator panel. Select print media source, size, and type in your software program and select the print media size and type on recommended print...

OwnersManual.book
Page 20
..., the Adobe License Agreement appears, click to accept the agreement and then click Install. 10. When using a USB or parallel cable. www.dell.com/supplies | support.dell.com A local printer is not connected to your computer when you begin. If your printer is attached to a network and not your computer. 2. When the Congratulations! Connect your...
..., the Adobe License Agreement appears, click to accept the agreement and then click Install. 10. When using a USB or parallel cable. www.dell.com/supplies | support.dell.com A local printer is not connected to your computer when you begin. If your printer is attached to a network and not your computer. 2. When the Congratulations! Connect your...

OwnersManual.book
Page 24
... then click the green arrow. 3. c. Under the TCP/IP heading, verify the IP address. www.dell.com/supplies | support.dell.com Network Set-Up NOTE: To use this situation, disable the Windows XP firewall before you install the Dell printer software. NOTE: When using a CD drive in the LCD, press Menu. Print and Check the...
... then click the green arrow. 3. c. Under the TCP/IP heading, verify the IP address. www.dell.com/supplies | support.dell.com Network Set-Up NOTE: To use this situation, disable the Windows XP firewall before you install the Dell printer software. NOTE: When using a CD drive in the LCD, press Menu. Print and Check the...
OwnersManual.book
Page 26
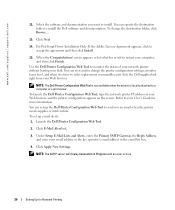
... server. Refer to restart your User's Guide for Network Printing Click Next. 14. Launch the Dell Printer Configuration Web Tool. 2. Click E-Mail Alert link. 3. www.dell.com/supplies | support.dell.com 12. To launch the Dell Printer Configuration Web Tool, type the network printer IP address in the email list box. 4. Click Apply New Settings. screen appears, select...
... server. Refer to restart your User's Guide for Network Printing Click Next. 14. Launch the Dell Printer Configuration Web Tool. 2. Click E-Mail Alert link. 3. www.dell.com/supplies | support.dell.com 12. To launch the Dell Printer Configuration Web Tool, type the network printer IP address in the email list box. 4. Click Apply New Settings. screen appears, select...

OwnersManual.book
Page 28
Double click Dell 5100cn Installer icon. 6. Click Install. When the installation of the Chooser, and then click Create. Installation is complete, click Quit. 12. Setting the Printer Driver (for AppleTalk Connection) When you have no objections to it, click Accept. 10. Make ... and if you finish installing the AdobePS printer driver, set the PostScript Printer Description (PPD) file for the printer and sets the PPD file. The program automatically searches for this printer. 1. www.dell.com/supplies | support.dell.com Installing the AdobePS Printer Driver (Mac OS 9.x) There are two...
Double click Dell 5100cn Installer icon. 6. Click Install. When the installation of the Chooser, and then click Create. Installation is complete, click Quit. 12. Setting the Printer Driver (for AppleTalk Connection) When you have no objections to it, click Accept. 10. Make ... and if you finish installing the AdobePS printer driver, set the PostScript Printer Description (PPD) file for the printer and sets the PPD file. The program automatically searches for this printer. 1. www.dell.com/supplies | support.dell.com Installing the AdobePS Printer Driver (Mac OS 9.x) There are two...

OwnersManual.book
Page 30
... in Installable Options, and then click OK. 30 Installing the Printer Driver or PPD File on the printer. 2. www.dell.com/supplies | support.dell.com Setting the Printer Driver (for the printer being used in Printer Address, and then click OK. 6. Turn on Macintosh Computers Specify the desktop printer name and target location, then click Save. To use the...
... in Installable Options, and then click OK. 30 Installing the Printer Driver or PPD File on the printer. 2. www.dell.com/supplies | support.dell.com Setting the Printer Driver (for the printer being used in Printer Address, and then click OK. 6. Turn on Macintosh Computers Specify the desktop printer name and target location, then click Save. To use the...

OwnersManual.book
Page 32
... Using IP Printing 1. Mac OS 10.2.8 1. Start Printer Setup Utility. www.dell.com/supplies | support.dell.com When Using AppleTalk 1. Select Auto Select from the list. 3. The Printer List screen appears. 2. Click Printers on the Print Center menu bar, and select Show Info. 4. Select AppleTalk from Printer Model, and confirm Dell Laser Printer 5100cn is not selected, select it is selected...
... Using IP Printing 1. Mac OS 10.2.8 1. Start Printer Setup Utility. www.dell.com/supplies | support.dell.com When Using AppleTalk 1. Select Auto Select from the list. 3. The Printer List screen appears. 2. Click Printers on the Print Center menu bar, and select Show Info. 4. Select AppleTalk from Printer Model, and confirm Dell Laser Printer 5100cn is not selected, select it is selected...

OwnersManual.book
Page 34
...also change or override the user default menu settings you select a new setting from the operator panel. www.dell.com/supplies | support.dell.com Changing Printer Settings NOTE: For detailed explanations of values for different countries.) When you select from the operator panel. 34 ...Using Your Printer To select a new value as the current user default menu setting. This asterisk indicates the factory ...
...also change or override the user default menu settings you select a new setting from the operator panel. www.dell.com/supplies | support.dell.com Changing Printer Settings NOTE: For detailed explanations of values for different countries.) When you select from the operator panel. 34 ...Using Your Printer To select a new value as the current user default menu setting. This asterisk indicates the factory ...

OwnersManual.book
Page 36
... language appears, and then press . Select the job you send a job to print or the number of the taskbar. 1. www.dell.com/supplies | support.dell.com Adjusting the Language To display a different language on the keyboard. 36 Using Your Printer Press or . 4. Press until Panel Language appears, and then press or . 5. Double-click the...
... language appears, and then press . Select the job you send a job to print or the number of the taskbar. 1. www.dell.com/supplies | support.dell.com Adjusting the Language To display a different language on the keyboard. 36 Using Your Printer Press or . 4. Press until Panel Language appears, and then press or . 5. Double-click the...

OwnersManual.book
Page 38
... Update The firmware and/or driver updates can be used to multiple computers running the same operating system. Click Start →All Programs →Dell Printers →Dell Laser Printer 5100cn →Dell Supplies Management System. If ordering from the Status Window when a toner error occurs. If ordering by phone, call the number that you have created will...
... Update The firmware and/or driver updates can be used to multiple computers running the same operating system. Click Start →All Programs →Dell Printers →Dell Laser Printer 5100cn →Dell Supplies Management System. If ordering from the Status Window when a toner error occurs. If ordering by phone, call the number that you have created will...

OwnersManual.book
Page 40
...and injuries. You can order more online at http://www.dell.com/supplies or by Dell. Removing the Used Imaging Drum NOTE: Remove any of the following illustration and open the front cover. 2. To order by phone, see "Order Printer Supplies" on page 9. Push the front latch up and ...fully open the imaging drum cover. 40 Maintenance www.dell.com/supplies | support.dell.com Replacing the Imaging Drum CAUTION: Before performing any print jobs from the ...
...and injuries. You can order more online at http://www.dell.com/supplies or by Dell. Removing the Used Imaging Drum NOTE: Remove any of the following illustration and open the front cover. 2. To order by phone, see "Order Printer Supplies" on page 9. Push the front latch up and ...fully open the imaging drum cover. 40 Maintenance www.dell.com/supplies | support.dell.com Replacing the Imaging Drum CAUTION: Before performing any print jobs from the ...

OwnersManual.book
Page 42
... on the imaging drum straight up to come into the printer without correctly aligning the rollers with anything. 3. NOTICE: Do not touch the transfer roller (black-colored roller). Close the front cover. 42 Maintenance Close the imaging drum cover. 5. www.dell.com/supplies | support.dell.com NOTICE: Lowering the imaging drum into contact with the...
... on the imaging drum straight up to come into the printer without correctly aligning the rollers with anything. 3. NOTICE: Do not touch the transfer roller (black-colored roller). Close the front cover. 42 Maintenance Close the imaging drum cover. 5. www.dell.com/supplies | support.dell.com NOTICE: Lowering the imaging drum into contact with the...
OwnersManual.book
Page 43
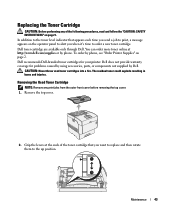
... performing any print jobs from the outer front cover before removing the top cover. 1. Remove the top cover. 2. Dell does not provide warranty coverage for your printer. To order by phone, see "Order Printer Supplies" on page 9. You can order more toner online at the ends of the following procedures, read and follow the...
... performing any print jobs from the outer front cover before removing the top cover. 1. Remove the top cover. 2. Dell does not provide warranty coverage for your printer. To order by phone, see "Order Printer Supplies" on page 9. You can order more toner online at the ends of the following procedures, read and follow the...
OwnersManual.book
Page 44
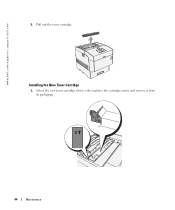
Installing the New Toner Cartridge 1. Select the new toner cartridge whose color matches the cartridge carrier and remove it from its packaging. 44 Maintenance www.dell.com/supplies | support.dell.com 3. Pull out the toner cartridge.
Installing the New Toner Cartridge 1. Select the new toner cartridge whose color matches the cartridge carrier and remove it from its packaging. 44 Maintenance www.dell.com/supplies | support.dell.com 3. Pull out the toner cartridge.

OwnersManual.book
Page 46
In this case, perform step 4 again, or turn the printer off once and then on again. 6. Pulling the toner seal diagonally may appear. NOTE: If it . Replace the top cover by inserting its front side into the printer first. 46 Maintenance NOTE: Pull the toner seal straight up to remove it takes more than five seconds to remove the toner seal after inserting the toner cartridge in the printer, an error message may tear the seal. www.dell.com/supplies | support.dell.com 5. Pull the toner seal straight up .
In this case, perform step 4 again, or turn the printer off once and then on again. 6. Pulling the toner seal diagonally may appear. NOTE: If it . Replace the top cover by inserting its front side into the printer first. 46 Maintenance NOTE: Pull the toner seal straight up to remove it takes more than five seconds to remove the toner seal after inserting the toner cartridge in the printer, an error message may tear the seal. www.dell.com/supplies | support.dell.com 5. Pull the toner seal straight up .


