
User Guide
Page 33
... by the Universal Setup menu. The Feed Direction menu will enter the printer first. 1 From the Universal Setup menu, press the down arrow button until Feed Direction appears, and then press . 2 Press the down arrow button until Short Edge or Long Edge appears, and...press . Specify the paper height and width Defining a specific height and width measurement for the Universal paper size (in the portrait orientation) allows the printer to support the size, including support for Universal paper settings. Submitting selection appears, followed by the Universal Setup menu. 5 Press and release...
... by the Universal Setup menu. The Feed Direction menu will enter the printer first. 1 From the Universal Setup menu, press the down arrow button until Feed Direction appears, and then press . 2 Press the down arrow button until Short Edge or Long Edge appears, and...press . Specify the paper height and width Defining a specific height and width measurement for the Universal paper size (in the portrait orientation) allows the printer to support the size, including support for Universal paper settings. Submitting selection appears, followed by the Universal Setup menu. 5 Press and release...

User Guide
Page 59
... a confidential job, also enter a four-digit PIN. 5 Click OK or Print, and then go to the printer to release the job. 6 From the printer control panel, press the down arrow button until Held jobs appears, and then press . 7 Press the down arrow button until you can print additional copies later. You can print additional copies as...
... a confidential job, also enter a four-digit PIN. 5 Click OK or Print, and then go to the printer to release the job. 6 From the printer control panel, press the down arrow button until Held jobs appears, and then press . 7 Press the down arrow button until you can print additional copies later. You can print additional copies as...

User Guide
Page 60
... a four-digit PIN. 4 Click Print, and then go to the printer to release the job. 5 From the printer control panel, press the down arrow button until Held jobs appears, and then press . 6 Press the down arrow button until appears next to your user name, and then press . 7 Press the down arrow button until appears next to your job...
... a four-digit PIN. 4 Click Print, and then go to the printer to release the job. 5 From the printer control panel, press the down arrow button until Held jobs appears, and then press . 6 Press the down arrow button until appears next to your user name, and then press . 7 Press the down arrow button until appears next to your job...

User Guide
Page 61
... Cancel appears. Canceling a print job from the printer control panel If the job is sent, to easily cancel a job, press . Printing 61 Note: Once a print job is formatting or already printing, and Cancel a job appears on . 3 Release the buttons when the clock appears, and wait ...for CONFIG MENU to cancel, and then press . The Stopped screen appears. The printer folder opens. 4 Double-click the printer icon. Resetting the Printer appears briefly, followed by a clock, and then Ready ...
... Cancel appears. Canceling a print job from the printer control panel If the job is sent, to easily cancel a job, press . Printing 61 Note: Once a print job is formatting or already printing, and Cancel a job appears on . 3 Release the buttons when the clock appears, and wait ...for CONFIG MENU to cancel, and then press . The Stopped screen appears. The printer folder opens. 4 Double-click the printer icon. Resetting the Printer appears briefly, followed by a clock, and then Ready ...
User Guide
Page 70
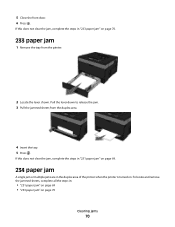
Pull the lever down to release the jam. 3 Pull the jammed sheets from the printer. 2 Locate the lever shown. 5 Close the front door. 6 Press . To locate and remove the jammed sheets, complete all the steps in: • "231 paper jam" on page 69 • "233 paper jam" on page ...70. 233 paper jam 1 Remove the tray from the duplex area. 4 Insert the tray. 5 Press . If...
Pull the lever down to release the jam. 3 Pull the jammed sheets from the printer. 2 Locate the lever shown. 5 Close the front door. 6 Press . To locate and remove the jammed sheets, complete all the steps in: • "231 paper jam" on page 69 • "233 paper jam" on page ...70. 233 paper jam 1 Remove the tray from the duplex area. 4 Insert the tray. 5 Press . If...
User Guide
Page 143
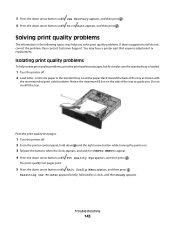
...Config Menu appears, and then press . Print the print quality test pages: 1 Turn the printer off . 2 Load letter- Troubleshooting 143 5 Press the down arrow button until Jam Recovery appears, and then press . 6 Press the down arrow button until Prt Quality Pgs appears, and then press . or A4-size paper... arrow button until On or Auto appears, and then press . Resetting the Printer appears briefly, followed by a clock, and then Ready appears. Isolating print quality problems To help you . Notice the maximum fill line on . 3 Release the buttons when the clock appears, and wait for ...
...Config Menu appears, and then press . Print the print quality test pages: 1 Turn the printer off . 2 Load letter- Troubleshooting 143 5 Press the down arrow button until Jam Recovery appears, and then press . 6 Press the down arrow button until Prt Quality Pgs appears, and then press . or A4-size paper... arrow button until On or Auto appears, and then press . Resetting the Printer appears briefly, followed by a clock, and then Ready appears. Isolating print quality problems To help you . Notice the maximum fill line on . 3 Release the buttons when the clock appears, and wait for ...


