
User's Guide
Page 5
... of supplies from a network computer 126 Ordering supplies...126 Printer attached to a network ...126 Printer attached locally to a computer ...127 Replacing supplies...127 Replacing the toner cartridge ...127 Replacing the photoconductor kit ...129 Moving the printer...132 Moving the printer to another location...132 Administrative support 133 Using the Embedded Web Server...
... of supplies from a network computer 126 Ordering supplies...126 Printer attached to a network ...126 Printer attached locally to a computer ...127 Replacing supplies...127 Replacing the toner cartridge ...127 Replacing the photoconductor kit ...129 Moving the printer...132 Moving the printer to another location...132 Administrative support 133 Using the Embedded Web Server...

User's Guide
Page 53
An exception is added to the Windows® Firewall to allow this communication. Dell Printer Supplies Reorder Application The Order Supplies dialog box can : • Monitor the toner level for . 4 Follow the instructions on the screen. • If ordering from the Web, click ...when you are ordering the supplies for your printer. • Click Order Supplies to order replacement toner cartridges. You can communicate. c Click Dell 3330dn Laser Printer. Dell Toner Management System Printing Status Window Note: For the Printing Status Window to work properly, bidirectional communication ...
An exception is added to the Windows® Firewall to allow this communication. Dell Printer Supplies Reorder Application The Order Supplies dialog box can : • Monitor the toner level for . 4 Follow the instructions on the screen. • If ordering from the Web, click ...when you are ordering the supplies for your printer. • Click Order Supplies to order replacement toner cartridges. You can communicate. c Click Dell 3330dn Laser Printer. Dell Toner Management System Printing Status Window Note: For the Printing Status Window to work properly, bidirectional communication ...
User's Guide
Page 64
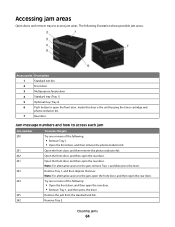
... then open the rear door. Clearing jams 64 Note: For alternative access to open the front door. Inside this door is the unit housing the toner cartridge and photoconductor kit. 7 Rear door Jam message numbers and how to access each jam Jam number 200 201 202 231 233 234 235 242 To...
... then open the rear door. Clearing jams 64 Note: For alternative access to open the front door. Inside this door is the unit housing the toner cartridge and photoconductor kit. 7 Rear door Jam message numbers and how to access each jam Jam number 200 201 202 231 233 234 235 242 To...
User's Guide
Page 65
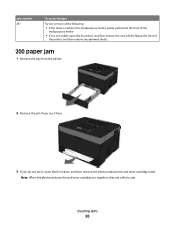
... of the following: • If the sheet is not visible, open the front door, and then remove the photoconductor kit and toner cartridge (unit). Note: When the photoconductor kit and toner cartridge are together, they are called a unit. Jam number 251 To access the jam Try one or more of the multipurpose feeder. •...
... of the following: • If the sheet is not visible, open the front door, and then remove the photoconductor kit and toner cartridge (unit). Note: When the photoconductor kit and toner cartridge are together, they are called a unit. Jam number 251 To access the jam Try one or more of the multipurpose feeder. •...
User's Guide
Page 111
... Wait for the message to clear. Press to clear the message and continue printing. Try one or more of the following : • Remove the toner cartridge, shake it, and then reinstall it. Press to clear the message and continue printing. List of the following : • Remove the... Try one of status and error messages Activating Menu Changes Wait for the message to clear the message and continue printing. • Remove the toner cartridge, and then install a new one . Cancel not available Wait for the message to clear the message and continue printing. • Remove the...
... Wait for the message to clear. Press to clear the message and continue printing. Try one or more of the following : • Remove the toner cartridge, shake it, and then reinstall it. Press to clear the message and continue printing. List of the following : • Remove the... Try one of status and error messages Activating Menu Changes Wait for the message to clear the message and continue printing. • Remove the toner cartridge, and then install a new one . Cancel not available Wait for the message to clear the message and continue printing. • Remove the...
User's Guide
Page 112
.... • Cancel the current print job. • For more information, select Show Me. Disabling Menus Wait for the message to clear. Cartridge Life Exceeded The toner cartridge is exhausted. 1 Remove the used toner cartridge, and then install a new one. 2 Press to print on the display. Deletion complete Wait for the message to clear. Change to...
.... • Cancel the current print job. • For more information, select Show Me. Disabling Menus Wait for the message to clear. Cartridge Life Exceeded The toner cartridge is exhausted. 1 Remove the used toner cartridge, and then install a new one. 2 Press to print on the display. Deletion complete Wait for the message to clear. Change to...

User's Guide
Page 116
...The printer is changed from the Supply Notifications Web page (located on the Embedded Web Server). If the setting is exhausted. 1 Remove the used toner cartridge, and then install a new one. 2 Press to clear. Resetting the printer Wait for the message to clear the message and continue printing. Warning... on the display. Remove paper from standard output bin Remove the stack of paper from the standard exit bin to clear. Replace Cartridge The toner cartridge is On, then the printer stops printing. Wait for the photoconductor kit. When the PC Kit Life Warning appears, order a new ...
...The printer is changed from the Supply Notifications Web page (located on the Embedded Web Server). If the setting is exhausted. 1 Remove the used toner cartridge, and then install a new one. 2 Press to clear. Resetting the printer Wait for the message to clear the message and continue printing. Warning... on the display. Remove paper from standard output bin Remove the stack of paper from the standard exit bin to clear. Replace Cartridge The toner cartridge is On, then the printer stops printing. Wait for the photoconductor kit. When the PC Kit Life Warning appears, order a new ...
User's Guide
Page 118
...it . • Remove the toner cartridge, and then install a new one. 32.yy Cartridge part number unsupported by device Remove the toner cartridge, and then install a supported one. 34 Short paper Try one . 31.yy Replace defective or missing cartridge The toner cartridge is correctly set. Understanding printer ... Properties settings to disable Resource Save and continue printing. Wait for the message to clear. Waiting, too many events ... Remove the toner cartridge, and then install a new one or more of the following: • Load the appropriate paper in the tray. • Press...
...it . • Remove the toner cartridge, and then install a new one. 32.yy Cartridge part number unsupported by device Remove the toner cartridge, and then install a supported one. 34 Short paper Try one . 31.yy Replace defective or missing cartridge The toner cartridge is correctly set. Understanding printer ... Properties settings to disable Resource Save and continue printing. Wait for the message to clear. Waiting, too many events ... Remove the toner cartridge, and then install a new one or more of the following: • Load the appropriate paper in the tray. • Press...
User's Guide
Page 119
...rest of the printer. to stop the defragment operation 37 Insufficient memory to clear the message and continue 42.xy Cartridge region mismatch Install a toner cartridge that matches the region number of the print job. • Cancel the current print job. x indicates the value of ...the cartridge region. y indicates the value of the printer region. to process current jobs. Continue appears, and then press to clear the ...
...rest of the printer. to stop the defragment operation 37 Insufficient memory to clear the message and continue 42.xy Cartridge region mismatch Install a toner cartridge that matches the region number of the print job. • Cancel the current print job. x indicates the value of ...the cartridge region. y indicates the value of the printer region. to process current jobs. Continue appears, and then press to clear the ...
User's Guide
Page 121
...printer discards any data received through the USB port. Understanding printer messages 121 Replace the toner cartridge, and then press to clear the message and continue printing. 88.yy Replace cartridge The toner cartridge is near exhaustion. 56 Standard USB port disabled Try one or more of the ... is exhausted. 1 Replace the toner cartridge. 2 Press to clear the message. Install a new photoconductor kit. 88.yy Cartridge is low Replace the toner cartridge, and then press to clear the message and continue printing. 88.yy Cartridge nearly low The toner is not set to clear the...
...printer discards any data received through the USB port. Understanding printer messages 121 Replace the toner cartridge, and then press to clear the message and continue printing. 88.yy Replace cartridge The toner cartridge is near exhaustion. 56 Standard USB port disabled Try one or more of the ... is exhausted. 1 Replace the toner cartridge. 2 Press to clear the message. Install a new photoconductor kit. 88.yy Cartridge is low Replace the toner cartridge, and then press to clear the message and continue printing. 88.yy Cartridge nearly low The toner is not set to clear the...

User's Guide
Page 122
...the following: • Remove Tray 1. • Open the front door, and then remove the photoconductor kit and toner cartridge unit. 2 Remove the jam. 3 Replace the photoconductor kit and toner cartridge unit if you removed it. 4 Close any open doors or trays. 5 Press to continue printing. 201.yy ...jammed or the number of pages jammed. 1 Open the front door, and then remove the photoconductor kit and toner cartridge unit. 2 Remove the jam. 3 Replace the photoconductor kit and toner cartridge unit. 4 Close the front door. 5 Press to continue printing. 202.yy Paper jam The message indicates either...
...the following: • Remove Tray 1. • Open the front door, and then remove the photoconductor kit and toner cartridge unit. 2 Remove the jam. 3 Replace the photoconductor kit and toner cartridge unit if you removed it. 4 Close any open doors or trays. 5 Press to continue printing. 201.yy ...jammed or the number of pages jammed. 1 Open the front door, and then remove the photoconductor kit and toner cartridge unit. 2 Remove the jam. 3 Replace the photoconductor kit and toner cartridge unit. 4 Close the front door. 5 Press to continue printing. 202.yy Paper jam The message indicates either...

User's Guide
Page 123
... jam, try one or more of the following: • Remove Tray 1. • Open the front door, and then remove the photoconductor kit and toner cartridge unit. • Remove Tray 2. 2 Remove the jam. 3 Replace the photoconductor kit and toner cartridge unit if you removed it. 4 Close any open doors or trays. 5 Press to continue printing.
... jam, try one or more of the following: • Remove Tray 1. • Open the front door, and then remove the photoconductor kit and toner cartridge unit. • Remove Tray 2. 2 Remove the jam. 3 Replace the photoconductor kit and toner cartridge unit if you removed it. 4 Close any open doors or trays. 5 Press to continue printing.

User's Guide
Page 127
...In Windows VistaTM and later: a Click Programs. b Click Dell Printers. The Order Toner Cartridges window opens. 3 Choose your printer model from the list. 4 Enter your printer. 5 Click Visit Dell's cartridge ordering website. Maintaining the printer 127 In Windows® XP and ... Dell printer Service Tag number. When shaking the cartridge no longer improves the print quality, replace the toner cartridge. c Click Dell 3330dn Laser Printer. Replacing supplies Replacing the toner cartridge When 88 Cartridge low appears, or when you experience faded print, remove the toner cartridge...
...In Windows VistaTM and later: a Click Programs. b Click Dell Printers. The Order Toner Cartridges window opens. 3 Choose your printer model from the list. 4 Enter your printer. 5 Click Visit Dell's cartridge ordering website. Maintaining the printer 127 In Windows® XP and ... Dell printer Service Tag number. When shaking the cartridge no longer improves the print quality, replace the toner cartridge. c Click Dell 3330dn Laser Printer. Replacing supplies Replacing the toner cartridge When 88 Cartridge low appears, or when you experience faded print, remove the toner cartridge...

User's Guide
Page 128
Maintaining the printer 128 Extended light exposure can cause print quality problems. 4 Rotate the cartridge in all directions to direct light for an extended period of the photoconductor kit, and then pull the toner cartridge out using the handle. 3 Unpack the new toner cartridge. Warning-Potential Damage: When replacing a toner cartridge, do not leave the photoconductor kit exposed to distribute the toner. 2 Press the button on the base of time.
Maintaining the printer 128 Extended light exposure can cause print quality problems. 4 Rotate the cartridge in all directions to direct light for an extended period of the photoconductor kit, and then pull the toner cartridge out using the handle. 3 Unpack the new toner cartridge. Warning-Potential Damage: When replacing a toner cartridge, do not leave the photoconductor kit exposed to distribute the toner. 2 Press the button on the base of time.
User's Guide
Page 129
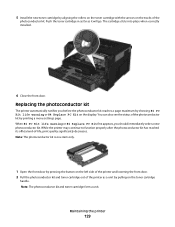
...Replace PC Kit first appears, you before the photoconductor kit reaches a page maximum by printing a menu settings page. Note: The photoconductor kit and toner cartridge form a unit. Maintaining the printer 129 Replacing the photoconductor kit The printer automatically notifies you should immediately order a new photoconductor kit. While the... Replace PC Kit on the left side of the printer and lowering the front door. 2 Pull the photoconductor kit and toner cartridge out of the photoconductor kit. You can also see the status of -life, print quality significantly decreases. Push the...
...Replace PC Kit first appears, you before the photoconductor kit reaches a page maximum by printing a menu settings page. Note: The photoconductor kit and toner cartridge form a unit. Maintaining the printer 129 Replacing the photoconductor kit The printer automatically notifies you should immediately order a new photoconductor kit. While the... Replace PC Kit on the left side of the printer and lowering the front door. 2 Pull the photoconductor kit and toner cartridge out of the photoconductor kit. You can also see the status of -life, print quality significantly decreases. Push the...
User's Guide
Page 130
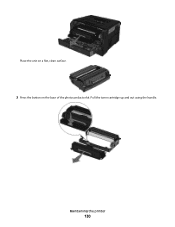
Pull the toner cartridge up and out using the handle. Maintaining the printer 130 Place the unit on a flat, clean surface. 3 Press the button on the base of the photoconductor kit.
Pull the toner cartridge up and out using the handle. Maintaining the printer 130 Place the unit on a flat, clean surface. 3 Press the button on the base of the photoconductor kit.

User's Guide
Page 131
... guides of the unit with the arrows in the printer. To reset the counter, see the instruction sheet that came with the tracks. Push the toner cartridge until it will go. 7 After you replace the photoconductor kit, reset the photoconductor counter. Warning-Potential Damage: Resetting the photoconductor counter without replacing the photoconductor... printer 131 Push the unit as far as it clicks into place. 6 Install the unit into the photoconductor kit by aligning the arrows on the toner cartridge with the new photoconductor kit. 4 Unpack the new photoconductor kit.
... guides of the unit with the arrows in the printer. To reset the counter, see the instruction sheet that came with the tracks. Push the toner cartridge until it will go. 7 After you replace the photoconductor kit, reset the photoconductor counter. Warning-Potential Damage: Resetting the photoconductor counter without replacing the photoconductor... printer 131 Push the unit as far as it clicks into place. 6 Install the unit into the photoconductor kit by aligning the arrows on the toner cartridge with the new photoconductor kit. 4 Unpack the new photoconductor kit.
User's Guide
Page 144
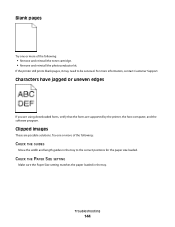
... pages, it may need to the correct positions for the paper size loaded. Try one or more of the following : • Remove and reinstall the toner cartridge. • Remove and reinstall the photoconductor kit. Clipped images These are supported by the printer, the host computer, and the software program. Blank pages Try...
... pages, it may need to the correct positions for the paper size loaded. Try one or more of the following : • Remove and reinstall the toner cartridge. • Remove and reinstall the photoconductor kit. Clipped images These are supported by the printer, the host computer, and the software program. Blank pages Try...

User's Guide
Page 147
...setting is too dark, the Brightness setting is too dark, or the Contrast setting is too dark These are possible solutions. THE TONER CARTRIDGE MAY BE DEFECTIVE Replace the toner cartridge. CHECK THE PAPER Avoid textured paper with rough finishes. THE PAPER HAS ABSORBED MOISTURE DUE TO HIGH HUMIDITY • Load paper ...File > Print. 2 Locate the drop-down box under the Orientation pictures, and then click the down button. 3 Click Printer Features. 4 Change the settings for Toner Darkness, Brightness, and Contrast. • From the printer control panel Quality menu, change these settings.
...setting is too dark, the Brightness setting is too dark, or the Contrast setting is too dark These are possible solutions. THE TONER CARTRIDGE MAY BE DEFECTIVE Replace the toner cartridge. CHECK THE PAPER Avoid textured paper with rough finishes. THE PAPER HAS ABSORBED MOISTURE DUE TO HIGH HUMIDITY • Load paper ...File > Print. 2 Locate the drop-down box under the Orientation pictures, and then click the down button. 3 Click Printer Features. 4 Change the settings for Toner Darkness, Brightness, and Contrast. • From the printer control panel Quality menu, change these settings.

User's Guide
Page 149
Toner rubs off These are possible solutions. CHECK THE PAPER TEXTURE SETTING Make sure the Paper Texture setting matches the paper loaded in the tray to ... or background shading appears on the page These are possible solutions. Try one or more of the following : THE TONER CARTRIDGE MAY BE DEFECTIVE Replace the toner cartridge. THERE IS TONER IN THE PAPER PATH Contact Customer Support. Skewed print CHECK THE PAPER GUIDES Move the guides in the tray. CHECK THE PAPER Make sure...
Toner rubs off These are possible solutions. CHECK THE PAPER TEXTURE SETTING Make sure the Paper Texture setting matches the paper loaded in the tray to ... or background shading appears on the page These are possible solutions. Try one or more of the following : THE TONER CARTRIDGE MAY BE DEFECTIVE Replace the toner cartridge. THERE IS TONER IN THE PAPER PATH Contact Customer Support. Skewed print CHECK THE PAPER GUIDES Move the guides in the tray. CHECK THE PAPER Make sure...


