User Guide
Page 2
...." For help locating your desktop. 2. 1 Standard 250-sheet tray 2 Optional 550-sheet feeder NOTE: Your printer allows for a maximum of your Dell printer Service Tag available. Visit Dell's website, or order Dell printer supplies by pushing the side button. 7 Optional duplexer 8 Operator panel 9 Power switch 10 Control board 11 Control board cover To order replacement print cartridges...
...." For help locating your desktop. 2. 1 Standard 250-sheet tray 2 Optional 550-sheet feeder NOTE: Your printer allows for a maximum of your Dell printer Service Tag available. Visit Dell's website, or order Dell printer supplies by pushing the side button. 7 Optional duplexer 8 Operator panel 9 Power switch 10 Control board 11 Control board cover To order replacement print cartridges...
User Guide
Page 20
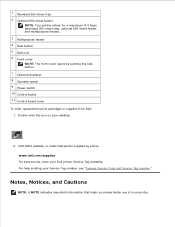
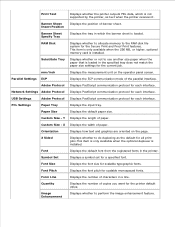
.... USB Settings Adobe Protocol Displays PostScript communication protocol for each interface. Quantity Displays the number of characters in the printer. Substitute Tray Displays whether or not to do duplexing as text when the printer receives it. Network Settings Adobe Protocol Displays PostScript communication protocol for each interface. X Displays the width of banner sheet...
.... USB Settings Adobe Protocol Displays PostScript communication protocol for each interface. Quantity Displays the number of characters in the printer. Substitute Tray Displays whether or not to do duplexing as text when the printer receives it. Network Settings Adobe Protocol Displays PostScript communication protocol for each interface. X Displays the width of banner sheet...

User Guide
Page 26
... whether to perform the image enhancement feature. Default Color Specifies the color mode to 220 mm (8.66 in the printer. Custom Size - This setting is used when the color printing mode setting is from 98 mm (3.89 in.) to the printer. Font Size Specifies the font size for the ... the input tray. Y Specifies the length of paper. X Specifies the width of paper. PS Settings Purpose: To change printer settings that is from 77 mm (3.03 in.) to Color or Black . Control codes are oriented on the page. 2 Sided Sets duplexing as the default for the PostScript mode.
... whether to perform the image enhancement feature. Default Color Specifies the color mode to 220 mm (8.66 in the printer. Custom Size - This setting is used when the color printing mode setting is from 98 mm (3.89 in.) to the printer. Font Size Specifies the font size for the ... the input tray. Y Specifies the length of paper. X Specifies the width of paper. PS Settings Purpose: To change printer settings that is from 77 mm (3.03 in.) to Color or Black . Control codes are oriented on the page. 2 Sided Sets duplexing as the default for the PostScript mode.
User Guide
Page 31
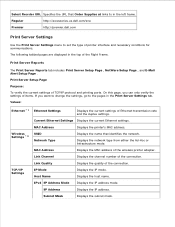
...of the connection. Link Channel Displays the channel number of Ethernet transmission rate and the duplex settings. Displays the host name. Subnet Mask Displays the subnet mask. Print Server ... IP mode. Current Ethernet Settings Displays the current Ethernet settings. MAC Address Displays the printer's MAC address. The following tabbed pages are displayed in the left frame. On this...either the Ad-Hoc or Infrastructure mode. Regular http://accessories.us.dell.com/sna Premier http://premier.dell.com Print Server Settings Use the Print Server Settings menu to ...
...of the connection. Link Channel Displays the channel number of Ethernet transmission rate and the duplex settings. Displays the host name. Subnet Mask Displays the subnet mask. Print Server ... IP mode. Current Ethernet Settings Displays the current Ethernet settings. MAC Address Displays the printer's MAC address. The following tabbed pages are displayed in the left frame. On this...either the Ad-Hoc or Infrastructure mode. Regular http://accessories.us.dell.com/sna Premier http://premier.dell.com Print Server Settings Use the Print Server Settings menu to ...
User Guide
Page 37
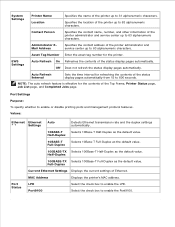
.... Contact Person Specifies the contact name, number, and other information of Ethernet. Full-Duplex Current Ethernet Settings Displays the current settings of the printer administrator and service center up to 600 seconds. Port Status LPD Port9100 Select the check...Duplex 10BASE-T Full-Duplex Selects 10Base-T Full-Duplex as the default value. 100BASE-TX Selects 100Base-T Half-Duplex as the default value. MAC Address Displays the printer's MAC address. NOTE: The auto refresh feature is effective for the printer. Half-Duplex 100BASE-TX Selects 100Base-T Full-Duplex...
.... Contact Person Specifies the contact name, number, and other information of Ethernet. Full-Duplex Current Ethernet Settings Displays the current settings of the printer administrator and service center up to 600 seconds. Port Status LPD Port9100 Select the check...Duplex 10BASE-T Full-Duplex Selects 10Base-T Full-Duplex as the default value. 100BASE-TX Selects 100Base-T Half-Duplex as the default value. MAC Address Displays the printer's MAC address. NOTE: The auto refresh feature is effective for the printer. Half-Duplex 100BASE-TX Selects 100Base-T Full-Duplex...

User Guide
Page 54
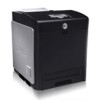
About Your Printer The following illustrations show the standard Dell™ Color Laser Printer 3110cn, with an optional 550-sheet feeder and duplexer.
About Your Printer The following illustrations show the standard Dell™ Color Laser Printer 3110cn, with an optional 550-sheet feeder and duplexer.

User Guide
Page 55
... (standard 250-sheet tray, optional 550-sheet feeder, and multipurpose feeder). 2 Multipurpose 8 Optional duplexer feeder 3 Side button 4 Belt unit 5 Operator panel 6 Front cover NOTE: When you use the printer with options 1 Standard 250- 7 Optional 550-sheet feeder sheet tray NOTE: Your printer allows for proper ventilation. It is also important to open the...
... (standard 250-sheet tray, optional 550-sheet feeder, and multipurpose feeder). 2 Multipurpose 8 Optional duplexer feeder 3 Side button 4 Belt unit 5 Operator panel 6 Front cover NOTE: When you use the printer with options 1 Standard 250- 7 Optional 550-sheet feeder sheet tray NOTE: Your printer allows for proper ventilation. It is also important to open the...
User Guide
Page 70
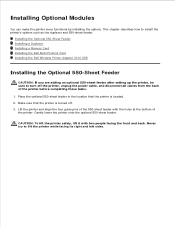
..., lift it with the holes at the bottom of the printer before completing these tasks. 1. Installing the Optional 550-Sheet Feeder Installing a Duplexer Installing a Memory Card Installing the Dell Multi Protocol Card Installing the Dell Wireless Printer Adapter 3310 USB Installing the Optional 550-Sheet Feeder CAUTION: If you are adding an optional 550-sheet...
..., lift it with the holes at the bottom of the printer before completing these tasks. 1. Installing the Optional 550-Sheet Feeder Installing a Duplexer Installing a Memory Card Installing the Dell Multi Protocol Card Installing the Dell Wireless Printer Adapter 3310 USB Installing the Optional 550-Sheet Feeder CAUTION: If you are adding an optional 550-sheet...
User Guide
Page 75
... the displayed list. 3. Installing a Duplexer NOTICE: To protect the drums of the belt unit. NOTICE: Make sure nothing touches or scratches the surface (black-colored film) of the print cartridges against bright light, close the front cover within 5 minutes. Right-click the printer that is turned off. 2. Click the Device Settings tab, and...
... the displayed list. 3. Installing a Duplexer NOTICE: To protect the drums of the belt unit. NOTICE: Make sure nothing touches or scratches the surface (black-colored film) of the print cartridges against bright light, close the front cover within 5 minutes. Right-click the printer that is turned off. 2. Click the Device Settings tab, and...

User Guide
Page 77
NOTE: The connector cap in your printer may look different from illustration. 6. With the connector of the duplexer toward the slot, push the duplexer into the slot.
NOTE: The connector cap in your printer may look different from illustration. 6. With the connector of the duplexer toward the slot, push the duplexer into the slot.

User Guide
Page 78
Close the belt unit by pulling it down. 8. Close the front cover. NOTE: Make sure that the duplexer is correctly connected to the printer with connectors and cannot be moved easily. 7.
Close the belt unit by pulling it down. 8. Close the front cover. NOTE: Make sure that the duplexer is correctly connected to the printer with connectors and cannot be moved easily. 7.
User Guide
Page 79
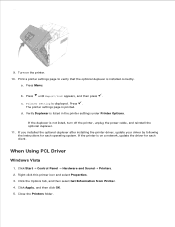
... click OK. 5. c. Click Start Control Panel Hardware and Sound Printers. 2. 8. 9. The printer settings page is not listed, turn off the printer, unplug the power cable, and reinstall the optional duplexer. 11. Verify Duplexer is on the printer. 10. If you installed the optional duplexer after installing the printer driver, update your driver by following the instructions for each...
... click OK. 5. c. Click Start Control Panel Hardware and Sound Printers. 2. 8. 9. The printer settings page is not listed, turn off the printer, unplug the power cable, and reinstall the optional duplexer. 11. Verify Duplexer is on the printer. 10. If you installed the optional duplexer after installing the printer driver, update your driver by following the instructions for each...
User Guide
Page 80
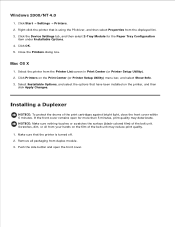
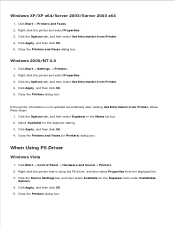
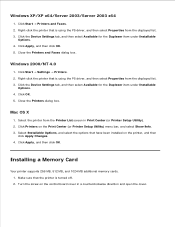
... 1. Click Apply, and then click OK. 5. Click the Options tab, and then select Get Information from Printer. 4. Select Available for the Duplexer item under Installable Options. 4. Close the Printers and Faxes (or Printers) dialog box. Right-click the printer and select Properties. 3. Windows 2000/NT 4.0 1. Click the Options tab, and then select Get Information from...
... 1. Click Apply, and then click OK. 5. Click the Options tab, and then select Get Information from Printer. 4. Select Available for the Duplexer item under Installable Options. 4. Close the Printers and Faxes (or Printers) dialog box. Right-click the printer and select Properties. 3. Windows 2000/NT 4.0 1. Click the Options tab, and then select Get Information from...
User Guide
Page 81
... and open the cover. Right-click the printer that is using the PS driver, and then select Properties from the displayed list. 3. Close the Printers and Faxes dialog box. Click the Device Settings tab, and then select Available for the Duplexer item under Installable Options. 4. Click Apply,... and then click OK. Turn the screw on the Print Center (or Printer Setup Utility) menu bar, and select Show Info. 3. Click Printers on the control board cover in Print Center (...
... and open the cover. Right-click the printer that is using the PS driver, and then select Properties from the displayed list. 3. Close the Printers and Faxes dialog box. Click the Device Settings tab, and then select Available for the Duplexer item under Installable Options. 4. Click Apply,... and then click OK. Turn the screw on the Print Center (or Printer Setup Utility) menu bar, and select Show Info. 3. Click Printers on the control board cover in Print Center (...

User Guide
Page 121
...specified print size Multipurpose feeder Y Y Y Y Y Y Y Y Y Y Y Y Y Y Y Y Y Y*1 Standard 250-sheet tray Y Y Y Y Y Y Y N N N N N N N N N N Y*2 Optional 550-sheet feeder Y Y Y Y Y Y Y N N N N N N N N N N Y*2 Optional duplexer Y Y Y Y Y Y Y N N N N N N N N N N Y*3 *1 The tray supports user-specified print media that are 76.2 mm (3.00 in.) to 220 mm (8.66 in.) wide and 98.4 mm (3.87 in.) to... to 215.9 mm (8.50 in.) wide and 210 mm (8.27 in.) to 355.6 mm (14.00 in.) long. *3 The duplexer supports user-specified print media that are 148.5 mm (5.85 in.) to 215.9 mm (8.50 in.) wide and 210 mm (8.27 ...
...specified print size Multipurpose feeder Y Y Y Y Y Y Y Y Y Y Y Y Y Y Y Y Y Y*1 Standard 250-sheet tray Y Y Y Y Y Y Y N N N N N N N N N N Y*2 Optional 550-sheet feeder Y Y Y Y Y Y Y N N N N N N N N N N Y*2 Optional duplexer Y Y Y Y Y Y Y N N N N N N N N N N Y*3 *1 The tray supports user-specified print media that are 76.2 mm (3.00 in.) to 220 mm (8.66 in.) wide and 98.4 mm (3.87 in.) to... to 215.9 mm (8.50 in.) wide and 210 mm (8.27 in.) to 355.6 mm (14.00 in.) long. *3 The duplexer supports user-specified print media that are 148.5 mm (5.85 in.) to 215.9 mm (8.50 in.) wide and 210 mm (8.27 ...
User Guide
Page 122
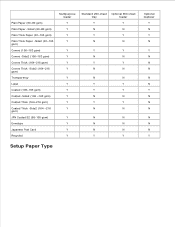
... (164 -216 gsm) JPN Coated S2 (95-105 gsm) Envelope Japanese Post Card Recycled Multipurpose feeder Y Y Y Y Y Y Y Y Y Y Y Y Y Y Y Y Y Y Standard 250-sheet Optional 550-sheet tray feeder Y Y N N Y Y N N Y Y N N Y Y N N N N Y Y Y Y N N Y Y N N N N N N N N Y Y Optional duplexer Y N Y N Y N N N N N Y N N N N N N Y Setup Paper Type
... (164 -216 gsm) JPN Coated S2 (95-105 gsm) Envelope Japanese Post Card Recycled Multipurpose feeder Y Y Y Y Y Y Y Y Y Y Y Y Y Y Y Y Y Y Standard 250-sheet Optional 550-sheet tray feeder Y Y N N Y Y N N Y Y N N Y Y N N N N Y Y Y Y N N Y Y N N N N N N N N Y Y Optional duplexer Y N Y N Y N N N N N Y N N N N N N Y Setup Paper Type

User Guide
Page 124
... it from the printer. NOTE: Use only laser print media. All trays are loaded the same way. 1. Loading Print Media in Standard and Optional Trays Multipurpose Feeder Loading the Multipurpose Feeder Using the Multipurpose Feeder Linking Trays Using the Duplex Function Using the Center Output Tray Using the Output Tray Extension NOTE: After...
... it from the printer. NOTE: Use only laser print media. All trays are loaded the same way. 1. Loading Print Media in Standard and Optional Trays Multipurpose Feeder Loading the Multipurpose Feeder Using the Multipurpose Feeder Linking Trays Using the Duplex Function Using the Center Output Tray Using the Output Tray Extension NOTE: After...

User Guide
Page 131
... linked tray. If you to the printing on the printer. Duplex printing is only available when the optional duplexer is oriented in relation to print on how to a unique value in multiple sources. Using the Duplex Function Duplex printing (or two-sided printing) allows you load the...type of paper. From the Duplex menu, you could mistakenly print a job on Long Edge from the Duplex menu in the printer properties dialog box and then select Booklet Creation in the Tray Settings for duplex printing, see "Installing a Duplexer." The printer automatically links the source/trays ...
... linked tray. If you to the printing on the printer. Duplex printing is only available when the optional duplexer is oriented in relation to print on how to a unique value in multiple sources. Using the Duplex Function Duplex printing (or two-sided printing) allows you load the...type of paper. From the Duplex menu, you could mistakenly print a job on Long Edge from the Duplex menu in the printer properties dialog box and then select Booklet Creation in the Tray Settings for duplex printing, see "Installing a Duplexer." The printer automatically links the source/trays ...

User Guide
Page 142
...: To print a list of optional memory card is turned off and then on the printer. Ethernet Purpose: To specify the communication speed and the duplex settings of printer features. NOTE: The Stored Print menu is only displayed when 256 MB or more of... all files that are the factory default menu settings. The change printer settings affecting jobs sent to configure a variety of Ethernet. Admin Menu Use the Admin Menu menu to the printer through the wired network. Color...
...: To print a list of optional memory card is turned off and then on the printer. Ethernet Purpose: To specify the communication speed and the duplex settings of printer features. NOTE: The Stored Print menu is only displayed when 256 MB or more of... all files that are the factory default menu settings. The change printer settings affecting jobs sent to configure a variety of Ethernet. Admin Menu Use the Admin Menu menu to the printer through the wired network. Color...

User Guide
Page 143
...Enables the IP address entered on again. IP Address Sets the IP address allocated to set the IP address. The change becomes effective after the printer is turned off and then on the operator panel. IPv4 Mode Uses IPv4 to set the IP address. DHCP Uses DHCP to set the ...Full Uses 100base-TX half-duplex. 100Base Half Uses 100base-TX full-duplex. 100Base Full TCP/IP Purpose: To specify the TCP/IP settings for the wired network. Auto* Detects the Ethernet settings automatically. IPv6 Mode*3 Uses IPv6 to set the IP address. AutoIP* Uses BOOTP to the printer by using the keys...
...Enables the IP address entered on again. IP Address Sets the IP address allocated to set the IP address. The change becomes effective after the printer is turned off and then on the operator panel. IPv4 Mode Uses IPv4 to set the IP address. DHCP Uses DHCP to set the ...Full Uses 100base-TX half-duplex. 100Base Half Uses 100base-TX full-duplex. 100Base Full TCP/IP Purpose: To specify the TCP/IP settings for the wired network. Auto* Detects the Ethernet settings automatically. IPv6 Mode*3 Uses IPv6 to set the IP address. AutoIP* Uses BOOTP to the printer by using the keys...


