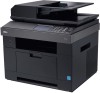
User Guide
Page 5
... technical support. Enter the Express Service Code to technical service The Dell Support Website provides several online tools, including: and support questions • Solutions - The Express Service Code is not available in the requested details to access help tools and information. 4 Troubleshooting hints and tips, articles from • Documentation for components, such...
... technical support. Enter the Express Service Code to technical service The Dell Support Website provides several online tools, including: and support questions • Solutions - The Express Service Code is not available in the requested details to access help tools and information. 4 Troubleshooting hints and tips, articles from • Documentation for components, such...
User Guide
Page 15
... Cartridge 252 Storing the Toner Cartridge 252 Redistributing Toner 252 Replacing the Toner Cartridge 254 Cleaning the Drum 256 Replacement Parts 256 Ordering Supplies 257 Troubleshooting Clearing Jams in the DADF 260 Clearing Jams in the Paper Tray 264 Paper Feed Jam (tray 1 265 Paper Feed Jam (optional tray 2 266 MPF...
... Cartridge 252 Storing the Toner Cartridge 252 Redistributing Toner 252 Replacing the Toner Cartridge 254 Cleaning the Drum 256 Replacement Parts 256 Ordering Supplies 257 Troubleshooting Clearing Jams in the DADF 260 Clearing Jams in the Paper Tray 264 Paper Feed Jam (tray 1 265 Paper Feed Jam (optional tray 2 266 MPF...
User Guide
Page 16
Fax Problems 290 Copying Problems 292 Scanning Problems 293 Global address problems 294 Common Windows Problems 294 Common Linux Problems 295 Common Macintosh Problems 297 Troubleshooting PostScript (PS) Errors 298 Installing Accessories Precautions When Installing Printer Accessories 300 Installing Printer Memory 300 Installing an Optional Tray 2 302 Installing Wireless Network interface ...
Fax Problems 290 Copying Problems 292 Scanning Problems 293 Global address problems 294 Common Windows Problems 294 Common Linux Problems 295 Common Macintosh Problems 297 Troubleshooting PostScript (PS) Errors 298 Installing Accessories Precautions When Installing Printer Accessories 300 Installing Printer Memory 300 Installing an Optional Tray 2 302 Installing Wireless Network interface ...

User Guide
Page 23
Job status shows the jobs currently running and in the edit area. Gives detailed information about machine's info., reports, troubleshooting guide, and quick reference guide. Operator Panel Button Functions Status LED Fax keys Function keys Common keys Common Keys Press: To: Stop an operation at ...
Job status shows the jobs currently running and in the edit area. Gives detailed information about machine's info., reports, troubleshooting guide, and quick reference guide. Operator Panel Button Functions Status LED Fax keys Function keys Common keys Common Keys Press: To: Stop an operation at ...
User Guide
Page 41
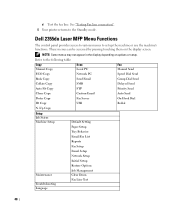
d Test the fax line. Dell 2355dn Laser MFP Menu Functions The control panel provides access to various menus to the following table: Copy Manual Copy Scan Local PC Fax Manual Send ... Clone Copy Custom Email Auto Send Poster Copy Fax Server On Hook Dial ID Copy USB Redial N -Up Copy Setup Job Status Machine Setup Maintenance Troubleshooting Language Default Setting Paper Setup Tray Behavior Email/Fax List Reports Fax Setup Email Setup Network Setup Initial Setup Restore Options Job Management Clear Drum...
d Test the fax line. Dell 2355dn Laser MFP Menu Functions The control panel provides access to various menus to the following table: Copy Manual Copy Scan Local PC Fax Manual Send ... Clone Copy Custom Email Auto Send Poster Copy Fax Server On Hook Dial ID Copy USB Redial N -Up Copy Setup Job Status Machine Setup Maintenance Troubleshooting Language Default Setting Paper Setup Tray Behavior Email/Fax List Reports Fax Setup Email Setup Network Setup Initial Setup Restore Options Job Management Clear Drum...
User Guide
Page 56
Set Password Dell Printer Configuration Web Tool (Embedded Web Service) can be locked by typing each printer's IP address. NOTE: You must be a network administrator to the Wireless Quick Reference Guide for printer troubleshooting. When any of the printer settings are changed using Embedded Web Service and locks... menu appears only when you install the wireless network interface card to visit the Dell website for more information about the All-In-One Main page, View Saved Images page, or the Maintain/Troubleshoot page, click the Help link located in the upper right corner of jobs being...
Set Password Dell Printer Configuration Web Tool (Embedded Web Service) can be locked by typing each printer's IP address. NOTE: You must be a network administrator to the Wireless Quick Reference Guide for printer troubleshooting. When any of the printer settings are changed using Embedded Web Service and locks... menu appears only when you install the wireless network interface card to visit the Dell website for more information about the All-In-One Main page, View Saved Images page, or the Maintain/Troubleshoot page, click the Help link located in the upper right corner of jobs being...
User Guide
Page 67
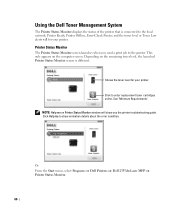
... on Printer Status Monitor window will for your printer. Printer Status Monitor The Printer Status Monitor screen launches when you the printer troubleshooting guide. Dell Printers Dell 2355dn Laser MFP 66 Using the Dell Toner Management System The Printer Status Monitor displays the status of the printer that is different. Click to the local network.
... on Printer Status Monitor window will for your printer. Printer Status Monitor The Printer Status Monitor screen launches when you the printer troubleshooting guide. Dell Printers Dell 2355dn Laser MFP 66 Using the Dell Toner Management System The Printer Status Monitor displays the status of the printer that is different. Click to the local network.

User Guide
Page 188
... sized paper and discarding does not occur. If you can set the printer to recognize the ring patterns to use a single telephone line to the troubleshooting section for a received fax printing job. Option Discard Size Receive Code DRPD Mode Tray Print Duplex Description When receiving a document as long as or longer...
... sized paper and discarding does not occur. If you can set the printer to recognize the ring patterns to use a single telephone line to the troubleshooting section for a received fax printing job. Option Discard Size Receive Code DRPD Mode Tray Print Duplex Description When receiving a document as long as or longer...

User Guide
Page 260
Troubleshooting Clearing Jams in the DADF Clearing Jams in the Paper Tray Clearing LCD Error Messages Solving Problems
Troubleshooting Clearing Jams in the DADF Clearing Jams in the Paper Tray Clearing LCD Error Messages Solving Problems

User Guide
Page 299
... prints. Reduce the complexity of the page or try adjusting the print quality settings. Print job may be sent to the PostScript errors section. installed. Troubleshooting PostScript (PS) Errors NOTE: To receive a printed or screen displayed message when PS errors occur, open the Print Options window and click the desired selection...
... prints. Reduce the complexity of the page or try adjusting the print quality settings. Print job may be sent to the PostScript errors section. installed. Troubleshooting PostScript (PS) Errors NOTE: To receive a printed or screen displayed message when PS errors occur, open the Print Options window and click the desired selection...

Service Manual
Page 4
... 4-1 4.1.2 Clearing Paper Jams 4-2 4.1.3 Diagnostic Mode 4-17 4.1.4 Consumables and Replacement Parts 4-33 4.2 Troubleshooting 4-34 4.2.1 Procedure of Checking the Symptoms 4-34 4.2.2 Abnormal Image Printing and Defective Roller 4-35 4.2.3 Solution 4-39 chapter 5 System Diagram 5.1 Block Diagram 5-1 5.2 Connection Diagram 5-2 chapter 6 Reference Information 6.1 Tool for Troubleshooting 6-1 6.2 Acronyms and Abbreviations 6-2 6.3 A4 ISO 19752 Standard Pattern 6-3 attached Parts Catalog
... 4-1 4.1.2 Clearing Paper Jams 4-2 4.1.3 Diagnostic Mode 4-17 4.1.4 Consumables and Replacement Parts 4-33 4.2 Troubleshooting 4-34 4.2.1 Procedure of Checking the Symptoms 4-34 4.2.2 Abnormal Image Printing and Defective Roller 4-35 4.2.3 Solution 4-39 chapter 5 System Diagram 5.1 Block Diagram 5-1 5.2 Connection Diagram 5-2 chapter 6 Reference Information 6.1 Tool for Troubleshooting 6-1 6.2 Acronyms and Abbreviations 6-2 6.3 A4 ISO 19752 Standard Pattern 6-3 attached Parts Catalog

Service Manual
Page 41
Alignment and Troubleshooting 4.1 Alignment and Adjustments This chapter describes the main functions for service, such as the product maintenance method, the test output related to maintenance and repair, DCU using method, Jam removing method, and so on. Alignment and Troubleshooting 4. It includes the contents of manual. 4.1.1 Paper path Scanner Part PAPER EMPTY SENSOR FEED SENSOR SCAN SENSOR Engine Part Roller-REGI Roller-MP OPC Roller-Transfer Roller-Feed Roller-Pickup Roller-Exit Roller-Heat Roller-Pressure Duplex 4-1 Service Manual
Alignment and Troubleshooting 4.1 Alignment and Adjustments This chapter describes the main functions for service, such as the product maintenance method, the test output related to maintenance and repair, DCU using method, Jam removing method, and so on. Alignment and Troubleshooting 4. It includes the contents of manual. 4.1.1 Paper path Scanner Part PAPER EMPTY SENSOR FEED SENSOR SCAN SENSOR Engine Part Roller-REGI Roller-MP OPC Roller-Transfer Roller-Feed Roller-Pickup Roller-Exit Roller-Heat Roller-Pressure Duplex 4-1 Service Manual

Service Manual
Page 42
If a paper jam occurs, LCD window will show it's speeds. Alignment and Troubleshooting 4.1.2 Clearing Paper Jams Occasionally, paper can be removed which can be jammed during a print job. • Paper was used that does not meet paper speci&#...
If a paper jam occurs, LCD window will show it's speeds. Alignment and Troubleshooting 4.1.2 Clearing Paper Jams Occasionally, paper can be removed which can be jammed during a print job. • Paper was used that does not meet paper speci&#...

Service Manual
Page 43
... touching registration 3. Remove jammed paper Jam 2 1. Pull down jam lever on fuser leave Exit Sensor within a 2. Pull out duplex unit 2. Open rear cover 2. Alignment and Troubleshooting ■ Description of ENGINE JAM type (Simplex) Type Case Jam Removal Jam 0 Leading edge of media does not arrive at registration within a certain time after...
... touching registration 3. Remove jammed paper Jam 2 1. Pull down jam lever on fuser leave Exit Sensor within a 2. Pull out duplex unit 2. Open rear cover 2. Alignment and Troubleshooting ■ Description of ENGINE JAM type (Simplex) Type Case Jam Removal Jam 0 Leading edge of media does not arrive at registration within a certain time after...

Service Manual
Page 44
Remove jammed paper 4-4 Service Manual Open DADF open cover 2. Remove jammed paper OR 1. Alignment and Troubleshooting ■ Description of DADF JAM type PAPER EMPTY SENSOR FEED SENSOR SCAN SENSOR Type Case Document Jam All case of DADF Jam Jam Removal 1. Open DADF open cover and Lift up DADF middle cover 2.
Remove jammed paper 4-4 Service Manual Open DADF open cover 2. Remove jammed paper OR 1. Alignment and Troubleshooting ■ Description of DADF JAM type PAPER EMPTY SENSOR FEED SENSOR SCAN SENSOR Type Case Document Jam All case of DADF Jam Jam Removal 1. Open DADF open cover and Lift up DADF middle cover 2.

Service Manual
Page 45
Open the DADF cover. If the document is jammed in the DADF When a document jams while it out. 4-5 Service Manual NOTE: To prevent document jams, use the document glass for thick, thin or mixed documents. 1. b. c. Then reload the document into the DADF. Close the DADF cover. Remove the remaining documents from the DADF. Remove the document by gently pulling it passes through the DADF, a warning message appears on the display. Alignment and Troubleshooting 4.1.2.1 Clearing Jams in the paper feed area: a.
Open the DADF cover. If the document is jammed in the DADF When a document jams while it out. 4-5 Service Manual NOTE: To prevent document jams, use the document glass for thick, thin or mixed documents. 1. b. c. Then reload the document into the DADF. Close the DADF cover. Remove the remaining documents from the DADF. Remove the document by gently pulling it passes through the DADF, a warning message appears on the display. Alignment and Troubleshooting 4.1.2.1 Clearing Jams in the paper feed area: a.

Service Manual
Page 46
Alignment and Troubleshooting If the document is jammed in the paper exit area: a. Open the document input tray upwards and pull the document gently out of the DADF. Remove the document by gently pulling it out. d. b. c. Then load the documents back into the DADF. 4-6 Service Manual Open the DADF cover. Close the DADF cover and the document input tray.
Alignment and Troubleshooting If the document is jammed in the paper exit area: a. Open the document input tray upwards and pull the document gently out of the DADF. Remove the document by gently pulling it out. d. b. c. Then load the documents back into the DADF. 4-6 Service Manual Open the DADF cover. Close the DADF cover and the document input tray.

Service Manual
Page 47
c. Remove the document by gently pulling it out. Then load the documents back into the DADF. 4-7 Service Manual b. Open the DADF inner cover. Close the DADF inner cover and the DADF cover. Open the DADF cover. d. Alignment and Troubleshooting If the document is jammed in the duplex path: a.
c. Remove the document by gently pulling it out. Then load the documents back into the DADF. 4-7 Service Manual b. Open the DADF inner cover. Close the DADF inner cover and the DADF cover. Open the DADF cover. d. Alignment and Troubleshooting If the document is jammed in the duplex path: a.

Service Manual
Page 48
... paper out, open the document cover. 3. Follow the steps below to "Paper Feed Jam (tray 1)" or "Paper Feed Jam (optional tray 2)". "Duplex Jam 1". Alignment and Troubleshooting 2. Refer to the table below to the right. 4.
... paper out, open the document cover. 3. Follow the steps below to "Paper Feed Jam (tray 1)" or "Paper Feed Jam (optional tray 2)". "Duplex Jam 1". Alignment and Troubleshooting 2. Refer to the table below to the right. 4.

Service Manual
Page 49
Open and close the front cover. If you cannot see "Fuser Area Jam". 4. Printing automatically resumes. 4-9 Service Manual Alignment and Troubleshooting Paper Feed Jam (tray 1) 1. If the paper does not exit, go to the next step. 2. For more information, see the paper or the paper does not move when pulled, check the fuser area. Insert the paper tray into the printer until it straight out. The jammed paper automatically exits the printer. 3. Pull the paper tray open. Remove the paper by gently pulling it snaps into place.
Open and close the front cover. If you cannot see "Fuser Area Jam". 4. Printing automatically resumes. 4-9 Service Manual Alignment and Troubleshooting Paper Feed Jam (tray 1) 1. If the paper does not exit, go to the next step. 2. For more information, see the paper or the paper does not move when pulled, check the fuser area. Insert the paper tray into the printer until it straight out. The jammed paper automatically exits the printer. 3. Pull the paper tray open. Remove the paper by gently pulling it snaps into place.


