User Guide
Page 4
...10. : Start a job. 5. Job Status button: Shows the jobs. 4. M/C Setup button: Leads you can use my printer Quick Reference Guide Dell 2355dn MFP Quick Reference Guide Quick Reference Guide Quick Reference Guide Front 2 1 Front 3 Front 4 5 11 12 Front 13 6 7 8 1. Cancel ...: Cancel displayed operation. Touch Screen Touch Screen Touch Screen 1.Copy: Enters the copy menu. 2. Fax: Enters the fax menu. 3. Scan: Enters the scan menu. 4. Setup: Enters the advanced settings. 8. : Return to the machine setup and advanced settings. 5 Start button: Initiate operation....
...10. : Start a job. 5. Job Status button: Shows the jobs. 4. M/C Setup button: Leads you can use my printer Quick Reference Guide Dell 2355dn MFP Quick Reference Guide Quick Reference Guide Quick Reference Guide Front 2 1 Front 3 Front 4 5 11 12 Front 13 6 7 8 1. Cancel ...: Cancel displayed operation. Touch Screen Touch Screen Touch Screen 1.Copy: Enters the copy menu. 2. Fax: Enters the fax menu. 3. Scan: Enters the scan menu. 4. Setup: Enters the advanced settings. 8. : Return to the machine setup and advanced settings. 5 Start button: Initiate operation....

User Guide
Page 10
... Poster Copying 137 ID Copying 138 2-up or 4-up copying (N-up 139 Printing Copies on Both Sides of Paper 139 Changing the Default Settings 140 Scanning Scanning Overview 142 9
... Poster Copying 137 ID Copying 138 2-up or 4-up copying (N-up 139 Printing Copies on Both Sides of Paper 139 Changing the Default Settings 140 Scanning Scanning Overview 142 9

User Guide
Page 11
... 142 Using SmarThru Office 143 Scanning Using Dell Scan Manager 146 About Dell Scan Manager 146 Setting scan information in Dell Scan Manager 146 Scanning to a PC Application 148 Scanning and Sending an Email 149 Scanning and Sending to SMB Server 150 Scanning and Sending to FTP Server 151 Scanning and Sending Custom Email 152 Scan to Fax Server 153 Scanning Using the Windows Image...
... 142 Using SmarThru Office 143 Scanning Using Dell Scan Manager 146 About Dell Scan Manager 146 Setting scan information in Dell Scan Manager 146 Scanning to a PC Application 148 Scanning and Sending an Email 149 Scanning and Sending to SMB Server 150 Scanning and Sending to FTP Server 151 Scanning and Sending Custom Email 152 Scan to Fax Server 153 Scanning Using the Windows Image...
User Guide
Page 14
Macintosh Installing Software for Macintosh 214 Install the printer driver 214 UnInstall the printer driver 215 Install the Scan driver 215 UnInstall the scan driver 215 Setting Up the Printer 216 For a Network-connected Macintosh 216 For a USB-connected Macintosh 217 Printing 218 ...Printing a Document 218 Changing Printer Settings 218 Printing Multiple Pages on One Sheet of Paper 219 Duplex Printing 220 Scanning 222 Linux Getting Started 224 Installing the MFP Driver 224 System Requirements 224 Installing the MFP Driver 225 Uninstalling the MFP Driver 231...
Macintosh Installing Software for Macintosh 214 Install the printer driver 214 UnInstall the printer driver 215 Install the Scan driver 215 UnInstall the scan driver 215 Setting Up the Printer 216 For a Network-connected Macintosh 216 For a USB-connected Macintosh 217 Printing 218 ...Printing a Document 218 Changing Printer Settings 218 Printing Multiple Pages on One Sheet of Paper 219 Duplex Printing 220 Scanning 222 Linux Getting Started 224 Installing the MFP Driver 224 System Requirements 224 Installing the MFP Driver 225 Uninstalling the MFP Driver 231...
User Guide
Page 16
Fax Problems 290 Copying Problems 292 Scanning Problems 293 Global address problems 294 Common Windows Problems 294 Common Linux Problems 295 Common Macintosh Problems 297 Troubleshooting PostScript (PS) Errors 298 Installing Accessories ...
Fax Problems 290 Copying Problems 292 Scanning Problems 293 Global address problems 294 Common Windows Problems 294 Common Linux Problems 295 Common Macintosh Problems 297 Troubleshooting PostScript (PS) Errors 298 Installing Accessories ...
User Guide
Page 18
... operation. 6. Fax: Enters the fax menu. 3. None: You can set the option which is a missing item, contact Dell: Toner cartridge Dell 2355dn MFP Quick Reference Guide Quick Reference Guide Quick Reference Guide Front 2 1 Front 3 Front 4 5 11 12 Front 13 6...Output tray (face down) 7. Document glass 14. Optional tray 2 cable connector 5. Extension telephone socket (EXT) 7. Rear door 8. Scan: Enters the scan menu. 4. Scan: Enters the scan menu. 4. Setup: Enters the advanced settings. 8. : Return to the upper menu. 9. : Scroll through available options. 10. ...
... operation. 6. Fax: Enters the fax menu. 3. None: You can set the option which is a missing item, contact Dell: Toner cartridge Dell 2355dn MFP Quick Reference Guide Quick Reference Guide Quick Reference Guide Front 2 1 Front 3 Front 4 5 11 12 Front 13 6...Output tray (face down) 7. Document glass 14. Optional tray 2 cable connector 5. Extension telephone socket (EXT) 7. Rear door 8. Scan: Enters the scan menu. 4. Scan: Enters the scan menu. 4. Setup: Enters the advanced settings. 8. : Return to the upper menu. 9. : Scroll through available options. 10. ...

User Guide
Page 19
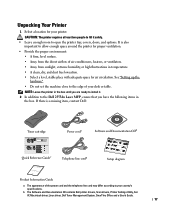
NOTE: Use the telephone line cord supplied with your product depending on your printer. The scan unlock switch should move forward to be plugged into a grounded power socket. 3 Save the carton and packing material in length. c Quick Reference Guide may not ...
NOTE: Use the telephone line cord supplied with your product depending on your printer. The scan unlock switch should move forward to be plugged into a grounded power socket. 3 Save the carton and packing material in length. c Quick Reference Guide may not ...

User Guide
Page 20
NOTE: To confirm the scanner is unlocked, open the scanner cover and ensure that the blue latch is locked, you are moving the printer or do not intend to use it forward. NOTE: When you cannot copy or scan. To scan or copy a document, the switch must be unlocked. 19 If the scan switch is in the unlocked position, reach under the operator panel and pull it for a long period of time, move the switch BACKWARD to the lock position, as shown. If the latch is not in the unlocked ( ) position.
NOTE: To confirm the scanner is unlocked, open the scanner cover and ensure that the blue latch is locked, you are moving the printer or do not intend to use it forward. NOTE: When you cannot copy or scan. To scan or copy a document, the switch must be unlocked. 19 If the scan switch is in the unlocked position, reach under the operator panel and pull it for a long period of time, move the switch BACKWARD to the lock position, as shown. If the latch is not in the unlocked ( ) position.

User Guide
Page 25
... port on your machine. • Language: Changes the display language on the screen, it shows the home screen. • Copy: Enters the copy menu. • Scan: Enters the scan menu. • Fax: Enters the fax menu. • Setup: You can set the option which is frequently used on home screen.
... port on your machine. • Language: Changes the display language on the screen, it shows the home screen. • Copy: Enters the copy menu. • Scan: Enters the scan menu. • Fax: Enters the fax menu. • Setup: You can set the option which is frequently used on home screen.
User Guide
Page 41
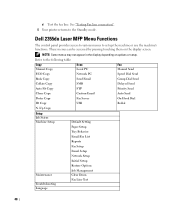
... or setup. See "Testing Fax line connection". 5 Your printer returns to set up the machine or use the machine's functions. d Test the fax line. Dell 2355dn Laser MFP Menu Functions The control panel provides access to various menus to the Standby mode. Refer to the following table: Copy Manual Copy... Scan Local PC Fax Manual Send ECO Copy Network PC Speed Dial Send Book Copy Send Email Group Dial Send Collate Copy SMB Delayed Send ...
... or setup. See "Testing Fax line connection". 5 Your printer returns to set up the machine or use the machine's functions. d Test the fax line. Dell 2355dn Laser MFP Menu Functions The control panel provides access to various menus to the Standby mode. Refer to the following table: Copy Manual Copy... Scan Local PC Fax Manual Send ECO Copy Network PC Speed Dial Send Book Copy Send Email Group Dial Send Collate Copy SMB Delayed Send ...
User Guide
Page 46
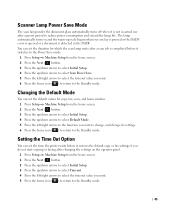
... want to change, and change its settings. 6 Press the home icon ( ) to return to the Standby mode. You can set the duration for copy, fax, scan, and home window. 1 Press Setup Machine Setup from the home screen. 2 Press the Next ( ) button. 3 Press the up/down arrows to select Initial Setup. 4 ...Setup from the home screen. 2 Press the Next ( ) button. 3 Press the up/down arrows to select Initial Setup. 4 Press the up/down arrows to select Scan Power Save. 5 Press the left/right arrows to select the timeout value you want . 5 Press the home icon ( ) to return to the Standby mode. 45
... want to change, and change its settings. 6 Press the home icon ( ) to return to the Standby mode. You can set the duration for copy, fax, scan, and home window. 1 Press Setup Machine Setup from the home screen. 2 Press the Next ( ) button. 3 Press the up/down arrows to select Initial Setup. 4 ...Setup from the home screen. 2 Press the Next ( ) button. 3 Press the up/down arrows to select Initial Setup. 4 Press the up/down arrows to select Scan Power Save. 5 Press the left/right arrows to select the timeout value you want . 5 Press the home icon ( ) to return to the Standby mode. 45
User Guide
Page 49
...; Macintosh printer driver- You can be used via SSL. use your printer as a printer in Windows, you to print documents. • Dell Scan Manager- This program allows you to set your printer. enables you must install the drivers and utilities from your computer desktop. •...; Dell Toner Management System- enables you to scan a document on your printer and save it to your computer, you to monitor the printer's status and alerts you purchased...
...; Macintosh printer driver- You can be used via SSL. use your printer as a printer in Windows, you to print documents. • Dell Scan Manager- This program allows you to set your printer. enables you must install the drivers and utilities from your computer desktop. •...; Dell Toner Management System- enables you to scan a document on your printer and save it to your computer, you to monitor the printer's status and alerts you purchased...
User Guide
Page 52
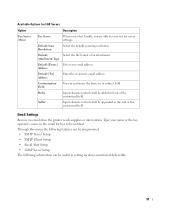
... you select Enable, you are able to be notified. Address Default [To:] Address Enter the recipient's email address. Type your email address. Default Scan Resolution Select the default scanning resolution. Attachment Type Default [From:] Enter your name or the key operator's name in setting up above-mentioned deliverable: 51 Email Settings Receive...
... you select Enable, you are able to be notified. Address Default [To:] Address Enter the recipient's email address. Type your email address. Default Scan Resolution Select the default scanning resolution. Attachment Type Default [From:] Enter your name or the key operator's name in setting up above-mentioned deliverable: 51 Email Settings Receive...
User Guide
Page 129
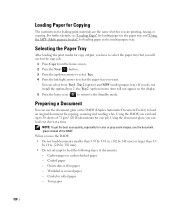
Loading Paper for Copying The instructions for copying, scanning and sending a fax. NOTE: To get the best scan quality, especially for color or gray scale images, use the DADF: • Do not load documents smaller than 5.59 by 5.83 in. (142 by 148 ...
Loading Paper for Copying The instructions for copying, scanning and sending a fax. NOTE: To get the best scan quality, especially for color or gray scale images, use the DADF: • Do not load documents smaller than 5.59 by 5.83 in. (142 by 148 ...

User Guide
Page 130
... Paper". NOTE: Ensure that any document is in the DADF: 1 Place the document(s) face up to load an original document. NOTE: To get the best scan quality, especially for color or gray scale images, use the DADF (Duplex Automatic Document Feeder) or the document glass to 50 sheets of paper. •...
... Paper". NOTE: Ensure that any document is in the DADF: 1 Place the document(s) face up to load an original document. NOTE: To get the best scan quality, especially for color or gray scale images, use the DADF (Duplex Automatic Document Feeder) or the document glass to 50 sheets of paper. •...

User Guide
Page 138
... select Clone Copy. 4 If necessary, customize the copy settings including number of copies, contrast, original type, and original size by pressing Options. If a document is scanned and printed one by pressing Options. Press , and the copying will stop . If a document is divided into 9 portions. Press , and the copying will stop . NOTE...
... select Clone Copy. 4 If necessary, customize the copy settings including number of copies, contrast, original type, and original size by pressing Options. If a document is scanned and printed one by pressing Options. Press , and the copying will stop . If a document is divided into 9 portions. Press , and the copying will stop . NOTE...
User Guide
Page 141
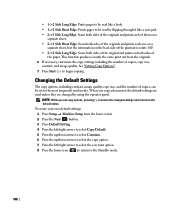
..., and the number of copies, can be read like a note pad. • 2->1 Side Long Edge: Scans both sides of the originals and prints each of them on a separate sheet. • 2->1 Side Short Edge: Scans both sides of the originals and prints each one on a separate sheet, but the information on the... back side of the printout is rotate 180°. • 2->2 Side Long Edge: Scans both sides of the original and prints on both sides of copies, copy size, contrast, and image quality. When you copy a document, the default settings...
..., and the number of copies, can be read like a note pad. • 2->1 Side Long Edge: Scans both sides of the originals and prints each of them on a separate sheet. • 2->1 Side Short Edge: Scans both sides of the originals and prints each one on a separate sheet, but the information on the... back side of the printout is rotate 180°. • 2->2 Side Long Edge: Scans both sides of the original and prints on both sides of copies, copy size, contrast, and image quality. When you copy a document, the default settings...
User Guide
Page 142
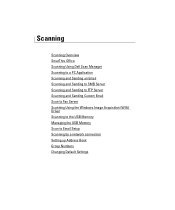
Scanning Scanning Overview SmarThru Office Scanning Using Dell Scan Manager Scanning to a PC Application Scanning and Sending an Email Scanning and Sending to SMB Server Scanning and Sending to FTP Server Scanning and Sending Custom Email Scan to Fax Server Scanning Using the Windows Image Acquisition (WIA) Driver Scanning to the USB Memory Managing the USB Memory Scan to Email Setup Scanning by a network connection Setting up Address Book Group Numbers Changing Default Settings
Scanning Scanning Overview SmarThru Office Scanning Using Dell Scan Manager Scanning to a PC Application Scanning and Sending an Email Scanning and Sending to SMB Server Scanning and Sending to FTP Server Scanning and Sending Custom Email Scan to Fax Server Scanning Using the Windows Image Acquisition (WIA) Driver Scanning to the USB Memory Managing the USB Memory Scan to Email Setup Scanning by a network connection Setting up Address Book Group Numbers Changing Default Settings

User Guide
Page 143
.... Scanning Overview Scanning with your machine lets you turn pictures and text into editable images on your computer. Then you can fax or email the files, upload them to start SmarThru Office: 1 Make sure that you double-click the SmarThru Office icon, the Quick Start Guide window pops up. Use your Dell 2355dn Laser... MFP to "Scanning Using Dell Scan Manager".
.... Scanning Overview Scanning with your machine lets you turn pictures and text into editable images on your computer. Then you can fax or email the files, upload them to start SmarThru Office: 1 Make sure that you double-click the SmarThru Office icon, the Quick Start Guide window pops up. Use your Dell 2355dn Laser... MFP to "Scanning Using Dell Scan Manager".

User Guide
Page 144
... on screen help supplied on your selection, read the statement and click OK. in the tray area of the windows taskbar to activate 2 Click the scanning icon to uninstall SmarThru Office. 4 The SmarThru Office appears. Using SmarThru Office 1 Click the SmarThru Office icon the SmarThru Office launcher. The SmarThru Office help... help SmarThru Office help window appears; in the tray area of the Windows taskbar to activate the NOTE: Follow the steps below to open the scanning window. 143
... on screen help supplied on your selection, read the statement and click OK. in the tray area of the windows taskbar to activate 2 Click the scanning icon to uninstall SmarThru Office. 4 The SmarThru Office appears. Using SmarThru Office 1 Click the SmarThru Office icon the SmarThru Office launcher. The SmarThru Office help... help SmarThru Office help window appears; in the tray area of the Windows taskbar to activate the NOTE: Follow the steps below to open the scanning window. 143


