
User's Guide (HTML)
Page 3
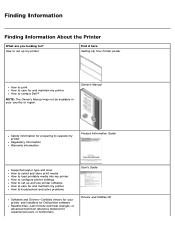
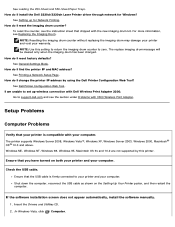
... media How to load printable media into my printer How to configure printer settings How to set up and use printer software How to care for and maintain my printer How to contact Dell™ NOTE: The Owner's Manual may not be available in your printer and installers for Dell printer software Readme files-Last minute technical changes, or...
... media How to load printable media into my printer How to configure printer settings How to set up and use printer software How to care for and maintain my printer How to contact Dell™ NOTE: The Owner's Manual may not be available in your printer and installers for Dell printer software Readme files-Last minute technical changes, or...
User's Guide (HTML)
Page 11
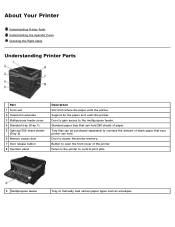
... amount of the printer. Button to manually load various paper types such as it exits the printer. Support for the paper as envelopes. Door to gain access to access the printer memory. Door to the multipurpose feeder. Panel on the printer to control print jobs...of blank paper that can hold 250 sheets of paper. Standard paper tray that your printer can hold . About Your Printer Understanding Printer Parts Understanding the Operator Panel Choosing the Right Cable Understanding Printer Parts Part 1 Front exit 2 Output bin extender 3 Multipurpose feeder cover 4 Standard...
... amount of the printer. Button to manually load various paper types such as it exits the printer. Support for the paper as envelopes. Door to gain access to access the printer memory. Door to the multipurpose feeder. Panel on the printer to control print jobs...of blank paper that can hold 250 sheets of paper. Standard paper tray that your printer can hold . About Your Printer Understanding Printer Parts Understanding the Operator Panel Choosing the Right Cable Understanding Printer Parts Part 1 Front exit 2 Output bin extender 3 Multipurpose feeder cover 4 Standard...

User's Guide (HTML)
Page 24
...Manual Env NOTE: The items on the default source varies depending on the device type and the attachments and/or supplies installed on the display, press the Select button to save the setting. If a print job requests a size or type that is only loaded in the multipurpose feeder, the printer... Arrow buttons to scroll through the available menu items. 5. Cassette*-Treats the multipurpose feeder like any other tray. Configure Determine when the printer selects paper from the multipurpose feeder for all print jobs. Press the Right Arrow button . Rough/Cotton Recycled Custom Type (where x ...
...Manual Env NOTE: The items on the default source varies depending on the device type and the attachments and/or supplies installed on the display, press the Select button to save the setting. If a print job requests a size or type that is only loaded in the multipurpose feeder, the printer... Arrow buttons to scroll through the available menu items. 5. Cassette*-Treats the multipurpose feeder like any other tray. Configure Determine when the printer selects paper from the multipurpose feeder for all print jobs. Press the Right Arrow button . Rough/Cotton Recycled Custom Type (where x ...
User's Guide (HTML)
Page 42
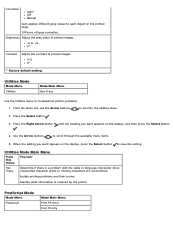
...language interpreter when unexpected character prints or missing characters are encountered Isolate printing problems and their source Identify what information is received by the printer PostScript Mode Mode Menu PostScript Mode Main Menu Print PS Error Font Priority From the menu list, use the Arrow buttons to scroll ...the display, and then press the Select button 4. Use the Arrow buttons to scroll through the available menu items. 5. Correction Auto* Off Manual Auto applies different gray values to each object on the display, press the Select button to save the setting.
...language interpreter when unexpected character prints or missing characters are encountered Isolate printing problems and their source Identify what information is received by the printer PostScript Mode Mode Menu PostScript Mode Main Menu Print PS Error Font Priority From the menu list, use the Arrow buttons to scroll ...the display, and then press the Select button 4. Use the Arrow buttons to scroll through the available menu items. 5. Correction Auto* Off Manual Auto applies different gray values to each object on the display, press the Select button to save the setting.
User's Guide (HTML)
Page 44
... performs a carriage return (CR) after a carriage return (CR) control command. On Off* Tray Renumber Assign MP Feeder Assign Tray Assign Manual Paper Assign Man Env Configure the printer to work with printer software or programs that print on each font name. Return all tray, drawer, and feeder assignments to print on the page... increments of 0.01 10.00* Orientation Specify the orientation of lines that use different source assignments for each page. 1-255 60* A4 Width Set the printer to the factory default settings. On Off* Auto LF after CR Specify whether the...
... performs a carriage return (CR) after a carriage return (CR) control command. On Off* Tray Renumber Assign MP Feeder Assign Tray Assign Manual Paper Assign Man Env Configure the printer to work with printer software or programs that print on each font name. Return all tray, drawer, and feeder assignments to print on the page... increments of 0.01 10.00* Orientation Specify the orientation of lines that use different source assignments for each page. 1-255 60* A4 Width Set the printer to the factory default settings. On Off* Auto LF after CR Specify whether the...
User's Guide (HTML)
Page 52
... with 3300 Wireless Print Adapter. How do I install the Dell 2330d/2330dn Laser Printer driver through network for Network Printing. I change the printer IP address by this setting to return the imaging drum counter to your printer and your computer. Insert the Drivers and Utilities CD. 2....Macintosh OS 9x and 10.2 are not supported by using the Dell Printer Configuration Web Tool? If the software installation screen does not appear automatically, install the software manually. 1. How do I am unable to support.dell.com and see Replacing the Imaging Drum. How do I reset...
... with 3300 Wireless Print Adapter. How do I install the Dell 2330d/2330dn Laser Printer driver through network for Network Printing. I change the printer IP address by this setting to return the imaging drum counter to your printer and your computer. Insert the Drivers and Utilities CD. 2....Macintosh OS 9x and 10.2 are not supported by using the Dell Printer Configuration Web Tool? If the software installation screen does not appear automatically, install the software manually. 1. How do I am unable to support.dell.com and see Replacing the Imaging Drum. How do I reset...
User's Guide (HTML)
Page 87
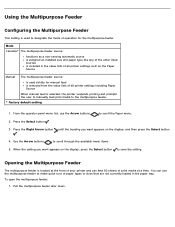
...open the multipurpose feeder: 1. Press the Right Arrow button . Opening the Multipurpose Feeder The multipurpose feeder is selected, the printer suspends printing and prompts the user to manually load print media to save the setting. Press the Select button . 3. Mode Cassette* The multipurpose feeder source: functions ... paper types or sizes that are not currently loaded in the value lists of all printer settings including Paper Source When manual feed is located at the front of your printer and can use the Arrow buttons to scroll through the available menu items. 5. When...
...open the multipurpose feeder: 1. Press the Right Arrow button . Opening the Multipurpose Feeder The multipurpose feeder is selected, the printer suspends printing and prompts the user to manually load print media to save the setting. Press the Select button . 3. Mode Cassette* The multipurpose feeder source: functions ... paper types or sizes that are not currently loaded in the value lists of all printer settings including Paper Source When manual feed is located at the front of your printer and can use the Arrow buttons to scroll through the available menu items. 5. When...
User's Guide (HTML)
Page 111
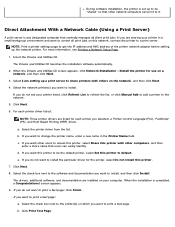
... be the default printer, select Set this printer. 7. When the installation is completed, a Congratulations! If you want this printer to be "shared" so that other network computers can easily identify. Select the network printer(s) you are sharing your printer listed, click Refresh List to refresh the list, or click Manual Add to add a printer to the network...
... be the default printer, select Set this printer. 7. When the installation is completed, a Congratulations! If you want this printer to be "shared" so that other network computers can easily identify. Select the network printer(s) you are sharing your printer listed, click Refresh List to refresh the list, or click Manual Add to add a printer to the network...
User's Guide (HTML)
Page 112
... do not see your computer. If you want to the printer(s) on the printer(s). d. Select the check box next to use on your printer listed, click Refresh List to refresh the list, or click Manual Add to add a printer to print a test page: a. Select the printer driver from the list. Click Finish. c. Verify the test page...
... do not see your computer. If you want to the printer(s) on the printer(s). d. Select the check box next to use on your printer listed, click Refresh List to refresh the list, or click Manual Add to add a printer to print a test page: a. Select the printer driver from the list. Click Finish. c. Verify the test page...

User's Guide (HTML)
Page 127
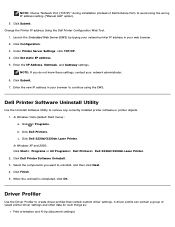
... IP Address Utility lets you must be in place so the printer and computer can communicate. Click on . To set the IP address manually: 1. Software Overview Status Monitor Center Set IP Address Utility Dell Printer Software Uninstall Utility Driver Profiler Dell Printer Configuration Web Tool Dell Printer Alert Utility Removing and Reinstalling Software Installing the Optional XPS Driver...
... IP Address Utility lets you must be in place so the printer and computer can communicate. Click on . To set the IP address manually: 1. Software Overview Status Monitor Center Set IP Address Utility Dell Printer Software Uninstall Utility Driver Profiler Dell Printer Configuration Web Tool Dell Printer Alert Utility Removing and Reinstalling Software Installing the Optional XPS Driver...
User's Guide (HTML)
Page 128
... Port) to continue using the wrong IP address setting ("Manual Add" option). 5. Under Printer Server Settings, click TCP/IP. 4. Click Dell 2330d/2330dn Laser Printer. Click Set static IP address. 5. Click ® Programs. b. In Windows XP and 2000: Click Start® Programs or All Programs® Dell Printers® Dell 2330d/2330dn Laser Printer. 2. Click Configuration. 3. In Windows Vista (default Start menu...
... Port) to continue using the wrong IP address setting ("Manual Add" option). 5. Under Printer Server Settings, click TCP/IP. 4. Click Dell 2330d/2330dn Laser Printer. Click Set static IP address. 5. Click ® Programs. b. In Windows XP and 2000: Click Start® Programs or All Programs® Dell Printers® Dell 2330d/2330dn Laser Printer. 2. Click Configuration. 3. In Windows Vista (default Start menu...
Service Manual
Page 4
sensor test 3-11 Printer setup 3-12 EP setup 3-13 Event log 3-14 Exit Diagnostics 3-15 Printhead assembly electronic adjustment...Lower front cover removal 4-25 LVPS/HVPS removal 4-27 Main motor gear drive removal 4-30 Manual feed clutch removal 4-32 Manual feed solenoid removal 4-34 Media ACM ASM feeder removal 4-37 Media feed clutch with cable removal 4-40 ...Media manual input sensor 4-42 Multipurpose feeder (MPF) removal 4-45 Multipurpose feeder (MPF) feed clutch removal 4-48 ...
sensor test 3-11 Printer setup 3-12 EP setup 3-13 Event log 3-14 Exit Diagnostics 3-15 Printhead assembly electronic adjustment...Lower front cover removal 4-25 LVPS/HVPS removal 4-27 Main motor gear drive removal 4-30 Manual feed clutch removal 4-32 Manual feed solenoid removal 4-34 Media ACM ASM feeder removal 4-37 Media feed clutch with cable removal 4-40 ...Media manual input sensor 4-42 Multipurpose feeder (MPF) removal 4-45 Multipurpose feeder (MPF) feed clutch removal 4-48 ...

Service Manual
Page 16
... additional information. Unplug the product before you are discussed. 2. xvi General information contains a general description of the printer and the maintenance approach used to locate or repeat symptoms of caution indicates a hot surface. Diagnostic aids contains tests...prevent problems. 7. Connector locations uses illustrations to isolate failing field replaceable units (FRUs). 3. Preface This manual contains maintenance procedures for making printer adjustments and removing and installing FRUs. 5. Diagnostic information contains an error indicator table, symptom tables, and...
... additional information. Unplug the product before you are discussed. 2. xvi General information contains a general description of the printer and the maintenance approach used to locate or repeat symptoms of caution indicates a hot surface. Diagnostic aids contains tests...prevent problems. 7. Connector locations uses illustrations to isolate failing field replaceable units (FRUs). 3. Preface This manual contains maintenance procedures for making printer adjustments and removing and installing FRUs. 5. Diagnostic information contains an error indicator table, symptom tables, and...
Service Manual
Page 17
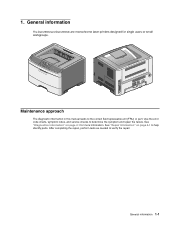
... tests as needed to the correct field replaceable unit (FRU) or part. Maintenance approach The diagnostic information in this manual leads to verify the repair. General information The Dell 2330d and Dell 2330dn are monochrome laser printers designed for more information. Use the error code charts, symptom index, and service checks to help identify parts. See...
... tests as needed to the correct field replaceable unit (FRU) or part. Maintenance approach The diagnostic information in this manual leads to verify the repair. General information The Dell 2330d and Dell 2330dn are monochrome laser printers designed for more information. Use the error code charts, symptom index, and service checks to help identify parts. See...
Service Manual
Page 24
Note: Make sure the media stack is below the maximum media fill indicators on the Dell Web site at a time through the manual feeder. • Do not mix print media sizes, weights, or types in the same print media source. • Push all trays in the sources. •... media. • Flex, fan, and straighten print media before loading the paper or specialty media. • Do not remove trays while a job is in the printer. Contain windows, holes, perforations, cutouts, or embossments - Most paper jams can help prevent paper jams: • Use only the recommended print media. • Do...
Note: Make sure the media stack is below the maximum media fill indicators on the Dell Web site at a time through the manual feeder. • Do not mix print media sizes, weights, or types in the same print media source. • Push all trays in the sources. •... media. • Flex, fan, and straighten print media before loading the paper or specialty media. • Do not remove trays while a job is in the printer. Contain windows, holes, perforations, cutouts, or embossments - Most paper jams can help prevent paper jams: • Use only the recommended print media. • Do...

Service Manual
Page 33
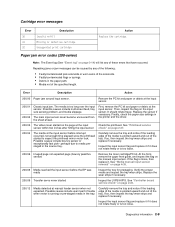
...type and size media. • Cancel the current job. User attendance messages (Continued) Message Action Load manual feeder with Load manual feeder with Load manual feeder with Load manual feeder with Load with Load with Load Load Maintenance Menus Disabled Network Network Card Busy Not Ready Parallel ...Test Pages • Load the specified media in the manual feed tray or multipurpose feeder. • To ignore the manual feed request and print on whatever media is processing or printing the menu settings page. If the printer cannot find a tray with the correct media type and...
...type and size media. • Cancel the current job. User attendance messages (Continued) Message Action Load manual feeder with Load manual feeder with Load manual feeder with Load manual feeder with Load with Load with Load Load Maintenance Menus Disabled Network Network Card Busy Not Ready Parallel ...Test Pages • Load the specified media in the manual feed tray or multipurpose feeder. • To ignore the manual feed request and print on whatever media is processing or printing the menu settings page. If the printer cannot find a tray with the correct media type and...
Service Manual
Page 35
.... Diagnostics information 2-9 Repeating jams or jam messages can be caused by any of media when motor is running or pre-staged media in the printer and the driver. 200.03 The video never started on page 2-37. 200.04 The media at the input sensor. See "Printhead service ... 200.08 Media reached the input sensor before interrupt occurred-not enough time elapsed since the printhead started Inspect the LVPS/HVPS. See "Media manual input sensor removal" on the input sensor. Replace the wear strips if necessary. 200.09 Transfer servo never started to media prestaged in the ...
.... Diagnostics information 2-9 Repeating jams or jam messages can be caused by any of media when motor is running or pre-staged media in the printer and the driver. 200.03 The video never started on page 2-37. 200.04 The media at the input sensor. See "Printhead service ... 200.08 Media reached the input sensor before interrupt occurred-not enough time elapsed since the printhead started Inspect the LVPS/HVPS. See "Media manual input sensor removal" on the input sensor. Replace the wear strips if necessary. 200.09 Transfer servo never started to media prestaged in the ...

Service Manual
Page 39
... the media. Duplex jam while picking from Tray 2 Remove Tray 2 and inspect for obstructions. If there are worn or clogged with Tray 2. (Lift the printer and re-set it if necessary. 233.02 Feed error picking from tray 1. Duplex supports A4, letter, legal, oficio, and folio media sizes. 241.00... the manual feed sensor. 234.01 Duplex sensor covered during warm-up dc feed motor 242.08 Received lots of dc feed interrupts before losing them Check the connection with dust. See "ACM pick tire roller removal" on a wireless unit), and inspect the flag of the cables, tilt the printer onto...
... the media. Duplex jam while picking from Tray 2 Remove Tray 2 and inspect for obstructions. If there are worn or clogged with Tray 2. (Lift the printer and re-set it if necessary. 233.02 Feed error picking from tray 1. Duplex supports A4, letter, legal, oficio, and folio media sizes. 241.00... the manual feed sensor. 234.01 Duplex sensor covered during warm-up dc feed motor 242.08 Received lots of dc feed interrupts before losing them Check the connection with dust. See "ACM pick tire roller removal" on a wireless unit), and inspect the flag of the cables, tilt the printer onto...

Service Manual
Page 40
...has been pushed in too far. Inspect the pick roller on the MPF or the rollers on the manual feed. For a printer with a manual feed only (no MPF), clean the roller. 251.12 Second pick from manual feeder, tray 1, or feeder failed when media was in the source, other sheets were committed to... feed from manual feeder. Pages in the paper path have been flushed to the output bin. Replace if necessary. ...
...has been pushed in too far. Inspect the pick roller on the MPF or the rollers on the manual feed. For a printer with a manual feed only (no MPF), clean the roller. 251.12 Second pick from manual feeder, tray 1, or feeder failed when media was in the source, other sheets were committed to... feed from manual feeder. Pages in the paper path have been flushed to the output bin. Replace if necessary. ...

Service Manual
Page 48
...board. The operator panel See "Operator panel service check" on positions 6, 17, and 19 of the cable connector (LVPS/HVPS). Turn the printer off . Controller board service check Controller board service check FRU Action Controller board assembly Warning: Do not replace the operator panel and controller board...side are new and replaced at the same time. Verify +24 V dc input from the controller board at the end of the manual which involve measuring voltages on the LVPS/HVPS (low voltage power supply/ high voltage power supply board) should complete POST in each ...
...board. The operator panel See "Operator panel service check" on positions 6, 17, and 19 of the cable connector (LVPS/HVPS). Turn the printer off . Controller board service check Controller board service check FRU Action Controller board assembly Warning: Do not replace the operator panel and controller board...side are new and replaced at the same time. Verify +24 V dc input from the controller board at the end of the manual which involve measuring voltages on the LVPS/HVPS (low voltage power supply/ high voltage power supply board) should complete POST in each ...


