
User Guide
Page 2
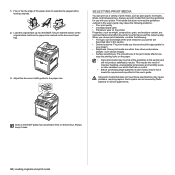
...heavy paper. See Software section. Print in various sizes. See Software section. • Your printer prints A4-sized paper at up to 20 ppm and letter-sized paper at the same time. The multi-purpose tray holds up to multiple destinations using cyan, magenta, yellow, and black. • You can...your new laser printer Copy originals in use the precise compressions of up to 100 sheets of paper and can print with Windows 2000 and Windows XP/2003/ 2008/Vista as well as "Confidential". Scan the originals and send it right away • Scan in a full range of colors using ...
...heavy paper. See Software section. Print in various sizes. See Software section. • Your printer prints A4-sized paper at up to 20 ppm and letter-sized paper at the same time. The multi-purpose tray holds up to multiple destinations using cyan, magenta, yellow, and black. • You can...your new laser printer Copy originals in use the precise compressions of up to 100 sheets of paper and can print with Windows 2000 and Windows XP/2003/ 2008/Vista as well as "Confidential". Scan the originals and send it right away • Scan in a full range of colors using ...
User Guide
Page 7
... of your new laser printer 5 Safety information INTRODUCTION 12 Printer overview 12 12 12 Front view Rear view 13 Control panel overview 14 Understanding the Status LED 14 Acknowledging the status of the toner cartridge 15 Menu overview 16 Supplied software 16 Printer driver features 16 Printer driver 16 PostScript driver...for special print media 27 Changing the size of the paper in the paper tray 27 Loading paper 27 Loading paper in the tray 1 or optional tray 28 Loading paper in the multi-purpose tray 29 Adjusting the output support 29 For Letter-sized paper 29 For A4- or...
... of your new laser printer 5 Safety information INTRODUCTION 12 Printer overview 12 12 12 Front view Rear view 13 Control panel overview 14 Understanding the Status LED 14 Acknowledging the status of the toner cartridge 15 Menu overview 16 Supplied software 16 Printer driver features 16 Printer driver 16 PostScript driver...for special print media 27 Changing the size of the paper in the paper tray 27 Loading paper 27 Loading paper in the tray 1 or optional tray 28 Loading paper in the multi-purpose tray 29 Adjusting the output support 29 For Letter-sized paper 29 For A4- or...

User Guide
Page 8
contents 8 | Contents COPYING 31 Selecting the paper tray 31 31 Copying 31 Changing the settings for each copy 31 Darkness 31 Original type 31 Reduced or enlarged copy 32 Changing the scan size ... on both sides of paper 35 Setting copy timeout SCANNING 36 Scanning basics 36 36 Scanning from the control panel 36 Setting scan information in Dell Scan Manager. 36 Scanning to application programs 37 Scanning by a network connection 37 Preparing for network scanning 38 Scanning to Email 39 Scanning to an...
contents 8 | Contents COPYING 31 Selecting the paper tray 31 31 Copying 31 Changing the settings for each copy 31 Darkness 31 Original type 31 Reduced or enlarged copy 32 Changing the scan size ... on both sides of paper 35 Setting copy timeout SCANNING 36 Scanning basics 36 36 Scanning from the control panel 36 Setting scan information in Dell Scan Manager. 36 Scanning to application programs 37 Scanning by a network connection 37 Preparing for network scanning 38 Scanning to Email 39 Scanning to an...
User Guide
Page 9
contents 44 Sending faxes on both sides of paper 44 Receiving a fax 44 Selecting the paper tray 44 Changing receiving modes 45 Receiving automatically in Fax mode 45 Receiving manually in Tel mode 45 Receiving manually using an extension telephone 45 Receiving ... memory device 54 Viewing the USB memory status MAINTENANCE 55 Printing reports 55 55 Printing a report 55 Adjusting the color contrast 56 Using toner low alert 56 Clearing memory 56 Cleaning your printer 56 Cleaning the outside 56 Cleaning the inside 58 Cleaning the scan unit 58 Maintaining the cartridge 58 Toner...
contents 44 Sending faxes on both sides of paper 44 Receiving a fax 44 Selecting the paper tray 44 Changing receiving modes 45 Receiving automatically in Fax mode 45 Receiving manually in Tel mode 45 Receiving manually using an extension telephone 45 Receiving ... memory device 54 Viewing the USB memory status MAINTENANCE 55 Printing reports 55 55 Printing a report 55 Adjusting the color contrast 56 Using toner low alert 56 Clearing memory 56 Cleaning your printer 56 Cleaning the outside 56 Cleaning the inside 58 Cleaning the scan unit 58 Maintaining the cartridge 58 Toner...

User Guide
Page 10
... 68 In the paper exit area 69 In the optional tray 70 Understanding display messages 73 Solving other problems 73 Paper feeding 74 Printing problems 75 Printing quality problems 77 Copying problems 78 Scanning problems 78 Dell Scan Manager problems 78 Fax problems 79 Common PostScript problems ...Supplies 83 83 Accessories 83 How to purchase INSTALLING ACCESSORIES 84 Precautions to take when installing accessories 84 84 Activating the added accessories in printer properties 84 Upgrading a memory module 84 Installing a memory module 85 Using the hard disk 85 Installing the hard disk 86 Printing ...
... 68 In the paper exit area 69 In the optional tray 70 Understanding display messages 73 Solving other problems 73 Paper feeding 74 Printing problems 75 Printing quality problems 77 Copying problems 78 Scanning problems 78 Dell Scan Manager problems 78 Fax problems 79 Common PostScript problems ...Supplies 83 83 Accessories 83 How to purchase INSTALLING ACCESSORIES 84 Precautions to take when installing accessories 84 84 Activating the added accessories in printer properties 84 Upgrading a memory module 84 Installing a memory module 85 Using the hard disk 85 Installing the hard disk 86 Printing ...

User Guide
Page 12
... the status of the toner cartridge PRINTER OVERVIEW Front view • Menu overview • Supplied software • Printer driver features Rear view 1 Document width guides 2 DADF 3 Control panel 4 Output support 5 Front cover 6 Front cover handle 7 Multi-purpose tray handle 8 Multi-purpose tray 9 Tray 1 10 Document input tray 11 Document output tray 12 | Introduction 12 USB connector 13...
... the status of the toner cartridge PRINTER OVERVIEW Front view • Menu overview • Supplied software • Printer driver features Rear view 1 Document width guides 2 DADF 3 Control panel 4 Output support 5 Front cover 6 Front cover handle 7 Multi-purpose tray handle 8 Multi-purpose tray 9 Tray 1 10 Document input tray 11 Document output tray 12 | Introduction 12 USB connector 13...
User Guide
Page 13
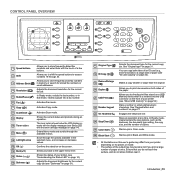
... mode, clears/cancels the copy options, such as the darkness, the document type setting, the copy size, and the number of copies. 25 Color Start ( ) Starts a job in Color mode. 26 Black Start ( ) Starts a job in memory or search for stored fax numbers or email addresses. 4 Resolution ( ) Adjusts the ... into the USB connector on the front of pages at any time. Allows you to print documents on both sides of the output tray may differ from your printer (see "About USB memory" on page 21 Engages the telephone line. Ensure that you back to a single side of paper (see ...
... mode, clears/cancels the copy options, such as the darkness, the document type setting, the copy size, and the number of copies. 25 Color Start ( ) Starts a job in Color mode. 26 Black Start ( ) Starts a job in memory or search for stored fax numbers or email addresses. 4 Resolution ( ) Adjusts the ... into the USB connector on the front of pages at any time. Allows you to print documents on both sides of the output tray may differ from your printer (see "About USB memory" on page 21 Engages the telephone line. Ensure that you back to a single side of paper (see ...

User Guide
Page 14
...page 59). Green Blinking • • When the green LED blinks slowly, the printer is open or no paper in the tray, so that the printer cannot continue the job. On • The printer is and how to solve the problem. See "Understanding display messages" on the display ..."Understanding display messages" on page 59). However the arrow mark shows which color toner is of toner cartridges is empty, or needs to operate the printer properly. Red Blinking • A minor error has occurred and the printer is low. Order a new toner cartridge, see "Ordering supplies and accessories...
...page 59). Green Blinking • • When the green LED blinks slowly, the printer is open or no paper in the tray, so that the printer cannot continue the job. On • The printer is and how to solve the problem. See "Understanding display messages" on the display ..."Understanding display messages" on page 59). However the arrow mark shows which color toner is of toner cartridges is empty, or needs to operate the printer properly. Red Blinking • A minor error has occurred and the printer is low. Order a new toner cartridge, see "Ordering supplies and accessories...

User Guide
Page 17
...8226; Printing a demo page • Setting up the network • System requirements • Installing the software • Printer's basic settings SETTING UP THE HARDWARE This section shows the steps to the edge of heat, cold, and humidity. When you move... quality. This program does not support Linux. 2. Select a stable location. Allow extra space to set up the printer. Select a flat, stable surface that all the enclosed items. Getting started This chapter gives you step-by toner,... is suitable for more information. SETTING UP THE NETWORK You need to open covers and trays.
...8226; Printing a demo page • Setting up the network • System requirements • Installing the software • Printer's basic settings SETTING UP THE HARDWARE This section shows the steps to the edge of heat, cold, and humidity. When you move... quality. This program does not support Linux. 2. Select a stable location. Allow extra space to set up the printer. Select a flat, stable surface that all the enclosed items. Getting started This chapter gives you step-by toner,... is suitable for more information. SETTING UP THE NETWORK You need to open covers and trays.

User Guide
Page 22
... the specified time and then cancels printing if data flow does not resume. 1. Click Start → All Programs → DELL → DELL Printers → Dell 2145cn Color Laser MFP → Printer Setting Utility. 22 | Getting started You can set the amount of the display and press OK. 2. Click Emulation. 5. Following...turns off the scan lamp. Press the left /right arrow until System Setup appears on the control panel, when the paper size mismatches the tray paper size. 5. Press the left /right arrow until you want appears and press OK. 5. Press OK when Machine Setup appears. 3....
... the specified time and then cancels printing if data flow does not resume. 1. Click Start → All Programs → DELL → DELL Printers → Dell 2145cn Color Laser MFP → Printer Setting Utility. 22 | Getting started You can set the amount of the display and press OK. 2. Click Emulation. 5. Following...turns off the scan lamp. Press the left /right arrow until System Setup appears on the control panel, when the paper size mismatches the tray paper size. 5. Press the left /right arrow until you want appears and press OK. 5. Press OK when Machine Setup appears. 3....

User Guide
Page 23
Dell 2145cn has the DADF function which can let you scan on the scanner glass. If an original is detected in the DADF, the printer gives it priority over the original on both sides... the paper tray • Loading paper • Adjusting the output support • Setting the paper size and type LOADING ORIGINALS You can load up to load originals and print media into your printer. Lift and...any glue, ink, or correction fluid on the printout. To get the best scan quality, especially for colored or gray-scaled images, use the scanner glass or DADF to load the following types of paper: ...
Dell 2145cn has the DADF function which can let you scan on the scanner glass. If an original is detected in the DADF, the printer gives it priority over the original on both sides... the paper tray • Loading paper • Adjusting the output support • Setting the paper size and type LOADING ORIGINALS You can load up to load originals and print media into your printer. Lift and...any glue, ink, or correction fluid on the printout. To get the best scan quality, especially for colored or gray-scaled images, use the scanner glass or DADF to load the following types of paper: ...
User Guide
Page 24
...loading originals. 2. When you choose should be the result of improper handling, unacceptable temperature and humidity levels, or other variables over which Dell has no control. • Before purchasing large quantities of the original stack matches the paper size marked on the printout. Dust on... appropriate for use print media that meet these specifications may cause black lines on the document input tray. 3. Such repairs are important factors that does not meet the guidelines for your printer. Load the original face up into the DADF. Using print media that affect the...
...loading originals. 2. When you choose should be the result of improper handling, unacceptable temperature and humidity levels, or other variables over which Dell has no control. • Before purchasing large quantities of the original stack matches the paper size marked on the printout. Dust on... appropriate for use print media that meet these specifications may cause black lines on the document input tray. 3. Such repairs are important factors that does not meet the guidelines for your printer. Load the original face up into the DADF. Using print media that affect the...

User Guide
Page 25
...127 mm (3 x 5 inches) 216 x 356 mm (8.5 x 14 inches) 60 to 163 g/m2 (16 to43 lb bond) a. Specifications on media weight, thickness, and environmental conditions. purpose tray Envelope Envelope Monarch Envelope 6 3/4 98 x 191 mm (3.87 x 7.5 inches) 92 x 165 mm (3.62 x 6.5 inches) 75 to 105 g/m2 (20 to 28 lb bond) 10 ...sheets of 75 g/m2 (20 lb bond) in the multi-purpose tray Envelope No. 10 105 x 241 mm (4.12 x 9.5 inches) Envelope No. 9 98 x 225 mm (3.87 x 8.87 inches) Envelope DL 110 x 220 mm (4.33 x 8.66 ...
...127 mm (3 x 5 inches) 216 x 356 mm (8.5 x 14 inches) 60 to 163 g/m2 (16 to43 lb bond) a. Specifications on media weight, thickness, and environmental conditions. purpose tray Envelope Envelope Monarch Envelope 6 3/4 98 x 191 mm (3.87 x 7.5 inches) 92 x 165 mm (3.62 x 6.5 inches) 75 to 105 g/m2 (20 to 28 lb bond) 10 ...sheets of 75 g/m2 (20 lb bond) in the multi-purpose tray Envelope No. 10 105 x 241 mm (4.12 x 9.5 inches) Envelope No. 9 98 x 225 mm (3.87 x 8.87 inches) Envelope DL 110 x 220 mm (4.33 x 8.66 ...

User Guide
Page 26
...8226; Do not use labels that are wrinkled, bubbled, or otherwise damaged. Curl: Prior to printing, labels must use in laser printers. - Temperature: You should use envelopes that are separating from the edges of the envelope paper should not contain air. -..., Legal, • tray 1 Oficio, US Folio, • optional tray 2 Executive, JIS B5, A5, • multi-purpose tray A6 Print mode All sizes supported by the printer • tray 1 • optional tray 2 • multi-purpose tray Fax mode Letter, A4, Legal • tray 1 • optional tray 2 Duplex printinga Letter,...
...8226; Do not use labels that are wrinkled, bubbled, or otherwise damaged. Curl: Prior to printing, labels must use in laser printers. - Temperature: You should use envelopes that are separating from the edges of the envelope paper should not contain air. -..., Legal, • tray 1 Oficio, US Folio, • optional tray 2 Executive, JIS B5, A5, • multi-purpose tray A6 Print mode All sizes supported by the printer • tray 1 • optional tray 2 • multi-purpose tray Fax mode Letter, A4, Legal • tray 1 • optional tray 2 Duplex printinga Letter,...

User Guide
Page 27
...-proof wrapping to Letter or A4 size depending on the back of the paper; When you are not covered by Dell's warranty or service agreements. Place the tray into the tray. 5. side of paper, such as shown, move it toward the stack of paper until it may cause paper jams... LOADING PAPER Loading paper in the tray 1 or optional tray Load the print media you use legal-sized paper, you need to the printer's fusing temperature for the majority of the tray. 3. Load the paper into the printer. 6. Set the paper size from your printer's specification to view the fusing temperature...
...-proof wrapping to Letter or A4 size depending on the back of the paper; When you are not covered by Dell's warranty or service agreements. Place the tray into the tray. 5. side of paper, such as shown, move it toward the stack of paper until it may cause paper jams... LOADING PAPER Loading paper in the tray 1 or optional tray Load the print media you use legal-sized paper, you need to the printer's fusing temperature for the majority of the tray. 3. Load the paper into the printer. 6. Set the paper size from your printer's specification to view the fusing temperature...

User Guide
Page 28
See Software section for single page printing on postcards, envelopes, and labels before loading. Loading paper in the multi-purpose tray The multi-purpose tray can load previously printed paper. This also applies to other types of print media. • Print media should be placed in the ... the paper stack to avoid paper jams and print quality problems (see "Selecting print media" on page 24). • Flatten any curl on letterhead or colored paper. 1. Load the paper. 28 | Loading originals and print media • If you want to open. 2. Tips on using paper, flex or...
See Software section for single page printing on postcards, envelopes, and labels before loading. Loading paper in the multi-purpose tray The multi-purpose tray can load previously printed paper. This also applies to other types of print media. • Print media should be placed in the ... the paper stack to avoid paper jams and print quality problems (see "Selecting print media" on page 24). • Flatten any curl on letterhead or colored paper. 1. Load the paper. 28 | Loading originals and print media • If you want to open. 2. Tips on using paper, flex or...

User Guide
Page 29
...; Card stock: Print side up with the top edge toward the printer. 4. For the output support to correctly align the pages, you are using, keep out of the output tray may be bent, which will result in the software application. For Letter-sized paper Pull out the output support to...source and type in a paper jam or skew. When you continuously print many pages, the surface of children's reach. After printing, close the multi-purpose tray. 1 Output support 2 Extension • If the output support is incorrectly adjusted, printed pages may become hot. Do not force too much, or the ...
...; Card stock: Print side up with the top edge toward the printer. 4. For the output support to correctly align the pages, you are using, keep out of the output tray may be bent, which will result in the software application. For Letter-sized paper Pull out the output support to...source and type in a paper jam or skew. When you continuously print many pages, the surface of children's reach. After printing, close the multi-purpose tray. 1 Output support 2 Extension • If the output support is incorrectly adjusted, printed pages may become hot. Do not force too much, or the ...
User Guide
Page 30
Press the left /right arrow until Paper Setup appears and press OK. 3. Press the left /right arrow until the paper tray you want to use special sized paper such as a billing paper, select Custom in the Paper tab in the application program you use on the ... you are using appears and press OK. 9. SETTING THE PAPER SIZE AND TYPE After loading paper in the paper tray, you need to select the paper size and type in the printer propeties. Press the left/right arrow until System Setup appears on your computer, you need to set the paper size...
Press the left /right arrow until Paper Setup appears and press OK. 3. Press the left /right arrow until the paper tray you want to use special sized paper such as a billing paper, select Custom in the Paper tab in the application program you use on the ... you are using appears and press OK. 9. SETTING THE PAPER SIZE AND TYPE After loading paper in the paper tray, you need to select the paper size and type in the printer propeties. Press the left/right arrow until System Setup appears on your computer, you need to set the paper size...
User Guide
Page 31
...press Original Type ( h ). Each time you press the button, the following modes are magazines. Press Reduce/Enlarge ( ). 2. Press OK when Copy Tray appears. 5. Enter the number of copies using the Reduce/Enlarge ( ) button, you can adjust the brightness to make a copy that you want to ... during an operation. See the next section. Press Stop/Clear ( ), and the copying will automatically return to begin color copying. CHANGING THE SETTINGS FOR EACH COPY Your printer provides default settings for copy jobs. 1. If you press Stop/Clear ( ) while setting the copy options, all of...
...press Original Type ( h ). Each time you press the button, the following modes are magazines. Press Reduce/Enlarge ( ). 2. Press OK when Copy Tray appears. 5. Enter the number of copies using the Reduce/Enlarge ( ) button, you can adjust the brightness to make a copy that you want to ... during an operation. See the next section. Press Stop/Clear ( ), and the copying will automatically return to begin color copying. CHANGING THE SETTINGS FOR EACH COPY Your printer provides default settings for copy jobs. 1. If you press Stop/Clear ( ) while setting the copy options, all of...

User Guide
Page 44
... the resolution and the darkness to print a confirmation report automatically each one on a separate sheet, but the information on page 49.. 6. Press Color Start ( ) or Black Start ( ) . 6. If an original is loaded in Normal mode. • 2 Side: Send faxes on both sides of the original. &#...1. Redialing the last number To redial the number you want appears. • Off: Send faxes in the DADF, the printer automatically begins to select the paper tray you will use speed buttons, speed dial numbers, or group dial numbers. Press the left /right arrow until Paper Source appears...
... the resolution and the darkness to print a confirmation report automatically each one on a separate sheet, but the information on page 49.. 6. Press Color Start ( ) or Black Start ( ) . 6. If an original is loaded in Normal mode. • 2 Side: Send faxes on both sides of the original. &#...1. Redialing the last number To redial the number you want appears. • Off: Send faxes in the DADF, the printer automatically begins to select the paper tray you will use speed buttons, speed dial numbers, or group dial numbers. Press the left /right arrow until Paper Source appears...


