
User Guide
Page 7
... to install option, 1 How to remove option, 1 How to replace retard roller, 1 How to set up, 1 HTTP, 1, 2 I ID, 1, 2 Identifying print media, 1 Identifying print paper, 1 Image Compression, 1, 2 Impression Number, 1 Init Print Meter, 1 Initialize NIC NVM and restart printer, 1 Initialize PrintMeter, 1 Installing Printer drivers, 1 Installing retard roller in tray, 1 Installing the optional memory card, 1 Installing toner cartridge, 1
... to install option, 1 How to remove option, 1 How to replace retard roller, 1 How to set up, 1 HTTP, 1, 2 I ID, 1, 2 Identifying print media, 1 Identifying print paper, 1 Image Compression, 1, 2 Impression Number, 1 Init Print Meter, 1 Initialize NIC NVM and restart printer, 1 Initialize PrintMeter, 1 Installing Printer drivers, 1 Installing retard roller in tray, 1 Installing the optional memory card, 1 Installing toner cartridge, 1

User Guide
Page 13
Removing toner cartridge, 1 Replacing retard roller, 1 Reports, 1 Resend Delay, 1, 2, 3 RESET button, 1 Reset Defaults, 1 Reset Print Server, 1 Resetting Defaults, 1, 2 Resident font, 1 Resident scalable fonts, 1 Resolution, 1, 2, 3, 4, ... Print, 1 Del after Print, 1, 2 Delete, 1, 2 Print and Save, 1, 2 Secure print, 1 Secure Receive, 1 Secure Receive Set, 1, 2 Secure Settings, 1, 2, 3, 4 Select Reorder URL, 1 Select Tray, 1, 2, 3 Selecting letterhead, 1 Selecting paper, 1 Selecting preprinted form, 1 Selecting pre-punched paper, 1 Sending print job, 1 Sent Fax Forward, 1, 2 Sent Fax Fwd, 1
Removing toner cartridge, 1 Replacing retard roller, 1 Reports, 1 Resend Delay, 1, 2, 3 RESET button, 1 Reset Defaults, 1 Reset Print Server, 1 Resetting Defaults, 1, 2 Resident font, 1 Resident scalable fonts, 1 Resolution, 1, 2, 3, 4, ... Print, 1 Del after Print, 1, 2 Delete, 1, 2 Print and Save, 1, 2 Secure print, 1 Secure Receive, 1 Secure Receive Set, 1, 2 Secure Settings, 1, 2, 3, 4 Select Reorder URL, 1 Select Tray, 1, 2, 3 Selecting letterhead, 1 Selecting paper, 1 Selecting preprinted form, 1 Selecting pre-punched paper, 1 Sending print job, 1 Sent Fax Forward, 1, 2 Sent Fax Fwd, 1

User Guide
Page 141
... Time-Out on the operator panel, the Tool Box, or Dell Printer Configuration Web Tool. Do not mix print media types. Load a print media source only when it may be replaced. Wipe the retard rollers in the tray 1. Page breaks in the output bin. Increase the value for more information.... media sources are using the operator panel or Dell Printer Configuration Web Tool. Launch the Tool Box, and click Non-Dell Toner on the Paper/Output tab in each toner cartridge. On the Advanced tab, ensure that use the operator panel and Dell Configuration Web Tool, see if feeding improves. ...
... Time-Out on the operator panel, the Tool Box, or Dell Printer Configuration Web Tool. Do not mix print media types. Load a print media source only when it may be replaced. Wipe the retard rollers in the tray 1. Page breaks in the output bin. Increase the value for more information.... media sources are using the operator panel or Dell Printer Configuration Web Tool. Launch the Tool Box, and click Non-Dell Toner on the Paper/Output tab in each toner cartridge. On the Advanced tab, ensure that use the operator panel and Dell Configuration Web Tool, see if feeding improves. ...

User Guide
Page 150
...envelope. 4b Is the problem resolved? Go to action 3c. Yes No Contact Dell. Replace the PHD unit if you have a spare unit. Your printer is considered normal. Go to 4b. The task is complete. Load the envelope in the tray 1 with the noise from the drop-down list box, and click the ... list box, and click the Start button. 2 2. If not, use the print media recommended for the printer. 1 The task is complete. If the envelope is COM-10. Launch the Tool Box, and click Paper Wrinkle Check Mode on an envelope, go to check the motor sound. Go to action 4b. The...
...envelope. 4b Is the problem resolved? Go to action 3c. Yes No Contact Dell. Replace the PHD unit if you have a spare unit. Your printer is considered normal. Go to 4b. The task is complete. Load the envelope in the tray 1 with the noise from the drop-down list box, and click the ... list box, and click the Start button. 2 2. If not, use the print media recommended for the printer. 1 The task is complete. If the envelope is COM-10. Launch the Tool Box, and click Paper Wrinkle Check Mode on an envelope, go to check the motor sound. Go to action 4b. The...
User Guide
Page 152
.... The task is complete. The task is complete. Contact Dell. Click the Color Regi Chart button to action 3d. Use Thick paper that the tray 1 is not damp. 4a Is the problem resolved? Use Thin paper that the print media is 216 gsm or less. 2b Is...manually correct the color registration. 1. The task is properly loaded in the tray 1 or single sheet feeder as instructed in Color Registration Adjustment 1 (Lateral) and Color Registration Adjustment 2 (Process). Go to action 3a. 2 Do you have a spare unit. 4b Is the problem resolved? See "Replacing the Print Head ...
.... The task is complete. The task is complete. Contact Dell. Click the Color Regi Chart button to action 3d. Use Thick paper that the tray 1 is not damp. 4a Is the problem resolved? Use Thin paper that the print media is 216 gsm or less. 2b Is...manually correct the color registration. 1. The task is properly loaded in the tray 1 or single sheet feeder as instructed in Color Registration Adjustment 1 (Lateral) and Color Registration Adjustment 2 (Process). Go to action 3a. 2 Do you have a spare unit. 4b Is the problem resolved? See "Replacing the Print Head ...
User Guide
Page 153
... is complete. Go to install the fuser, see the fuser replacement guide, Replacing the Fuser. 1 Is the problem resolved? Wipe the retard roller in the tray 1 with a cloth moistened with water. 5 The task is complete. Contact Dell. Action Yes No Clear the jam. See "Clearing Paper Jams From the ADF". 1 The task is complete. For...
... is complete. Go to install the fuser, see the fuser replacement guide, Replacing the Fuser. 1 Is the problem resolved? Wipe the retard roller in the tray 1 with a cloth moistened with water. 5 The task is complete. Contact Dell. Action Yes No Clear the jam. See "Clearing Paper Jams From the ADF". 1 The task is complete. For...
User Guide
Page 154
...Admin Menu ® Fax Settings ® Modem Speed. and the buttons are not received automatically. The document does not feed into the printer. Ensure that the scanner is configured correctly. An error often occurs during a fax transmission or reception. Try lowering the scan resolution rate. ... fax has blank spaces or is received in the paper tray. Replace the toner cartridge, referring to see if the display shows Memory Full. Check your fax. See "Cleaning the Scanner". There may not be empty. The printer will not send or receive faxes. Try the Prescan...
...Admin Menu ® Fax Settings ® Modem Speed. and the buttons are not received automatically. The document does not feed into the printer. Ensure that the scanner is configured correctly. An error often occurs during a fax transmission or reception. Try lowering the scan resolution rate. ... fax has blank spaces or is received in the paper tray. Replace the toner cartridge, referring to see if the display shows Memory Full. Check your fax. See "Cleaning the Scanner". There may not be empty. The printer will not send or receive faxes. Try the Prescan...
User Guide
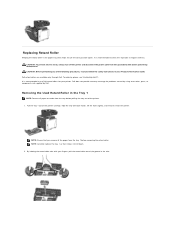
Page 175
... not fall down. 2. Pull the tray 1 out of the printer carefully. NOTE: Carefully replace the tray 1 so that you remove all paper or media from the tray before pulling the tray out of the printer. 1. CAUTION: Before performing any of the following procedures, read and follow the safety instructions in the axle. Dell does not provide warranty coverage for...
... not fall down. 2. Pull the tray 1 out of the printer carefully. NOTE: Carefully replace the tray 1 so that you remove all paper or media from the tray before pulling the tray out of the printer. 1. CAUTION: Before performing any of the following procedures, read and follow the safety instructions in the axle. Dell does not provide warranty coverage for...


