
User Guide
Page 10
Other Features, 1 Other problems, 1 Out of Paper Tone, 1, 2 Output Result, 1 Output Tray, 1 Owner, 1, 2 Owner's Manual, 1 P Page display format, 1 Page orientation, 1, 2 Panel, 1 Panel Alert Tone, 1, 2 Panel Language, 1, 2, 3 Panel lock, 1 Panel Lock Set, 1, 2 Panel Select Tone, 1, 2 Panel Settings, 1, 2 Panel settings page, 1, 2 Paper, 1, 2 ...
Other Features, 1 Other problems, 1 Out of Paper Tone, 1, 2 Output Result, 1 Output Tray, 1 Owner, 1, 2 Owner's Manual, 1 P Page display format, 1 Page orientation, 1, 2 Panel, 1 Panel Alert Tone, 1, 2 Panel Language, 1, 2, 3 Panel lock, 1 Panel Lock Set, 1, 2 Panel Select Tone, 1, 2 Panel Settings, 1, 2 Panel settings page, 1, 2 Paper, 1, 2 ...

User Guide
Page 28
... gateway address. It is set as the subnet mask. Manually sets the IP address allocated to apply the changes. After you complete the settings, press the Apply New Settings button to the printer. Press the Restart printer to apply new settings button to apply new settings Automatically ...Specifies the size of paper loaded in the tray 1. Values: AutoIP* IP Address Mode DHCP BOOTP RARP Manually Set IP Address Subnet Mask Gateway Address Apply New Settings Restart printer to apply the changes. Sets the IP address using DHCP. Values: Paper Type Paper Size Plain* Plain...
... gateway address. It is set as the subnet mask. Manually sets the IP address allocated to apply the changes. After you complete the settings, press the Apply New Settings button to the printer. Press the Restart printer to apply new settings button to apply new settings Automatically ...Specifies the size of paper loaded in the tray 1. Values: AutoIP* IP Address Mode DHCP BOOTP RARP Manually Set IP Address Subnet Mask Gateway Address Apply New Settings Restart printer to apply the changes. Sets the IP address using DHCP. Values: Paper Type Paper Size Plain* Plain...

User Guide
Page 32
... Mid) -3-3 0* Color Balance (Cyan High) -3-3 0* Color Balance (Black Low) -3-3 0* Color Balance (Black Mid) -3-3 0* Color Balance (Black High) -3-3 0* Off* Multiple-Up Auto ID Copy Manual Collated Uncollated* Collated Margin Top/Bottom 0.0-2.0 inch (0-50 mm) 0.2 inch* (4 mm) Margin Left/Right 0.0-2.0 inch (0-50 mm) 0.2 inch* (4 mm) Margin Middle 0.0-2.0 inch (0-50 mm) 0.0 inch* (0 mm) Apply New Settings Restart printer to...
... Mid) -3-3 0* Color Balance (Cyan High) -3-3 0* Color Balance (Black Low) -3-3 0* Color Balance (Black Mid) -3-3 0* Color Balance (Black High) -3-3 0* Off* Multiple-Up Auto ID Copy Manual Collated Uncollated* Collated Margin Top/Bottom 0.0-2.0 inch (0-50 mm) 0.2 inch* (4 mm) Margin Left/Right 0.0-2.0 inch (0-50 mm) 0.2 inch* (4 mm) Margin Middle 0.0-2.0 inch (0-50 mm) 0.0 inch* (0 mm) Apply New Settings Restart printer to...

User Guide
Page 40
... original pages to enhance text. Values: Uncollated* Does not sort the copy job. Multiple-Up Purpose: To print two original pages to lighten the color of the copy. ID Copy Prints the original pages onto one sheet of paper in the size specified in increments of 0.1 inch (1 mm). 0.0-2.0... inch (0-50 mm) Margin Left/Right Purpose: To specify the left and right margins of the copy. Collated Sorts the copy job. Manual Prints the original pages onto the one sheet of paper in increments of the original to enhance text on the copy. Values: 0.2 inch* (4 mm*) ...
... original pages to enhance text. Values: Uncollated* Does not sort the copy job. Multiple-Up Purpose: To print two original pages to lighten the color of the copy. ID Copy Prints the original pages onto one sheet of paper in the size specified in increments of 0.1 inch (1 mm). 0.0-2.0... inch (0-50 mm) Margin Left/Right Purpose: To specify the left and right margins of the copy. Collated Sorts the copy job. Manual Prints the original pages onto the one sheet of paper in increments of the original to enhance text on the copy. Values: 0.2 inch* (4 mm*) ...

User Guide
Page 46
.... Lighter/Darker Purpose: To adjust the density to improve the output quality. Lighter1 OnHook Purpose: To send or receive faxes manually. The Super Fine mode is enabled only if the remote machine also supports the Super Super Fine Fine mode. Values: Off... for documents containing small characters or thin lines or documents printed using a dot-matrix printer. Darker1 Darker2 Works well with normal sized characters. On Sends or receives faxes manually. Values: Standard* Suitable for documents containing photographic images. Darker3 Lighter3 Lighter2 Works well with...
.... Lighter/Darker Purpose: To adjust the density to improve the output quality. Lighter1 OnHook Purpose: To send or receive faxes manually. The Super Fine mode is enabled only if the remote machine also supports the Super Super Fine Fine mode. Values: Off... for documents containing small characters or thin lines or documents printed using a dot-matrix printer. Darker1 Darker2 Works well with normal sized characters. On Sends or receives faxes manually. Values: Standard* Suitable for documents containing photographic images. Darker3 Lighter3 Lighter2 Works well with...

User Guide
Page 56
...LPD port. After executing this option when you want to their default values. Panel Use this function and rebooting the printer, all wired network settings are reset to set manually, the IP is only available for Filter n. You can set as 255.255.0.0. Values: No. Off* Disable ...the IP Filter feature for LPD or Port9100. NOTE: This item is allocated to Dell Printer Configuration Web Tool embedded in use DHCP/...
...LPD port. After executing this option when you want to their default values. Panel Use this function and rebooting the printer, all wired network settings are reset to set manually, the IP is only available for Filter n. You can set as 255.255.0.0. Values: No. Off* Disable ...the IP Filter feature for LPD or Port9100. NOTE: This item is allocated to Dell Printer Configuration Web Tool embedded in use DHCP/...

User Guide
Page 67
...: To clean the surface of yellow, magenta, and cyan lines. Off Does not automatically perform color registration adjustment. Manual Color Registration Adjustments are next to Off. On the chart, find the values on the right side that... lateral (perpendicular to automatically perform color registration adjustment. C NOTE: Ensure that are required when the printer is initially installed and after the printer is set to the straightest lines for each toner cartridge. Color Reg Chart Prints a color registration chart. The color registration chart prints a lattice pattern...
...: To clean the surface of yellow, magenta, and cyan lines. Off Does not automatically perform color registration adjustment. Manual Color Registration Adjustments are next to Off. On the chart, find the values on the right side that... lateral (perpendicular to automatically perform color registration adjustment. C NOTE: Ensure that are required when the printer is initially installed and after the printer is set to the straightest lines for each toner cartridge. Color Reg Chart Prints a color registration chart. The color registration chart prints a lattice pattern...

User Guide
Page 87
.... Press to select Yes or No, and then press . 7. For example, if you select Yes, press to load another page. Press until Multiple-Up appears. 4. Manual Prints the original pages onto the one sheet of paper in first into the ADF. For the document loaded on the document glass. If necessary...
.... Press to select Yes or No, and then press . 7. For example, if you select Yes, press to load another page. Press until Multiple-Up appears. 4. Manual Prints the original pages onto the one sheet of paper in first into the ADF. For the document loaded on the document glass. If necessary...

User Guide
Page 111
...appears, and then press . 5. Press to the standby mode, press . To return to save the selection. 7. l Telephone/Fax: When the printer receives an incoming fax, the external telephone rings for that the call . If the phone communication is using the Distinctive Ring Pattern Detection (DRPD) ... fax setup to the previous screen. 8. l Fax: (automatic receive mode) l Telephone (manual receive mode): Automatic fax reception is 0 second. Auto Rec Ans/Fax Sets the interval at which the printer goes into the fax receive mode after the external telephone receives an incoming call . Press until...
...appears, and then press . 5. Press to the standby mode, press . To return to save the selection. 7. l Telephone/Fax: When the printer receives an incoming fax, the external telephone rings for that the call . If the phone communication is using the Distinctive Ring Pattern Detection (DRPD) ... fax setup to the previous screen. 8. l Fax: (automatic receive mode) l Telephone (manual receive mode): Automatic fax reception is 0 second. Auto Rec Ans/Fax Sets the interval at which the printer goes into the fax receive mode after the external telephone receives an incoming call . Press until...

User Guide
Page 116
... loaded on the document glass, the display asks if you send a fax, the printer will not automatically redial a number that was busy when the number was manually entered. The number is dialed and then the printer begins sending the fax when the remote fax machine is not loaded on the display.... Sending a Fax Manually 1. l If the document is no answer when you want to the ...
... loaded on the document glass, the display asks if you send a fax, the printer will not automatically redial a number that was busy when the number was manually entered. The number is dialed and then the printer begins sending the fax when the remote fax machine is not loaded on the display.... Sending a Fax Manually 1. l If the document is no answer when you want to the ...
User Guide
Page 120
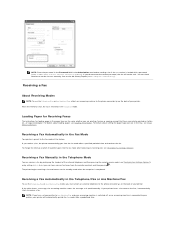
...in the Telephone/Fax or Ans Machine/Fax To use the Telephone/Fax or Ans Machine/Fax, attach an answering machine to your printer, your printer. Loading Paper for Receiving Faxes The instructions for loading paper in the tray, see "Loading Print Media". For details about loading paper..., see "Print Media Guidelines". Receiving a Fax Manually in the Fax Mode Your printer is completed. If your answering machine is switched off, or no answering machine is locked with a password (SETUP ® Admin ...
...in the Telephone/Fax or Ans Machine/Fax To use the Telephone/Fax or Ans Machine/Fax, attach an answering machine to your printer, your printer. Loading Paper for Receiving Faxes The instructions for loading paper in the tray, see "Loading Print Media". For details about loading paper..., see "Print Media Guidelines". Receiving a Fax Manually in the Fax Mode Your printer is completed. If your answering machine is switched off, or no answering machine is locked with a password (SETUP ® Admin ...

User Guide
Page 121
... and then press . 2. When you receive a call you on is identified by the telephone company. NOTE: Set the dialing system of your printer stores incoming faxes in the DRPD, you need to select to use a single telephone line to Off and then press . Receiving Faxes in sequence... how to the printer. Press to select the desired setting, and then press . 6. NOTE: For information on the external telephone without having to go to enter the fax number of the remote machine, see "Sending a Fax Manually" or "Sending a Fax Automatically". 5. Receiving a Fax Manually Using an External ...
... and then press . 2. When you receive a call you on is identified by the telephone company. NOTE: Set the dialing system of your printer stores incoming faxes in the DRPD, you need to select to use a single telephone line to Off and then press . Receiving Faxes in sequence... how to the printer. Press to select the desired setting, and then press . 6. NOTE: For information on the external telephone without having to go to enter the fax number of the remote machine, see "Sending a Fax Manually" or "Sending a Fax Automatically". 5. Receiving a Fax Manually Using an External ...

User Guide
Page 141
... Make sure that the print media is securely inserted. the tray is complete. For information on how to see "Understanding the Menus" and "Dell Printer Configuration Web Tool". Is the problem resolved? Ensure that the tray 1 is not curled. The task is curled. Do not mix reams of... media is empty. The task is too light. Do not mix print media types. Wipe the retard rollers in the tray. Cannot perform manual duplex printing. Print Quality Problems NOTE: Some of a ream before loading it may skew or buckle. Confirm the amount of print media....
... Make sure that the print media is securely inserted. the tray is complete. For information on how to see "Understanding the Menus" and "Dell Printer Configuration Web Tool". Is the problem resolved? Ensure that the tray 1 is not curled. The task is curled. Do not mix reams of... media is empty. The task is too light. Do not mix print media types. Wipe the retard rollers in the tray. Cannot perform manual duplex printing. Print Quality Problems NOTE: Some of a ream before loading it may skew or buckle. Confirm the amount of print media....
User Guide
Page 152
... Go to action 3a. On the Registration Adjustment page, click the Color Regi Chart button. 3a The Color Regi Configuration Chart is complete. Print the Color Regi Configuration Chart and manually correct the color registration. 1. The Color Regi Configuration Chart is deformed, correct it or use another envelope. ... button to action 3a. 3b. Is the problem resolved? Go to action Go to print the Color Regi Configuration Chart again. Contact Dell. The task is complete. Contact Dell. Use Thick paper that is 216 gsm or less. 2b Is the problem resolved? Load Coated paper...
... Go to action 3a. On the Registration Adjustment page, click the Color Regi Chart button. 3a The Color Regi Configuration Chart is complete. Print the Color Regi Configuration Chart and manually correct the color registration. 1. The Color Regi Configuration Chart is deformed, correct it or use another envelope. ... button to action 3a. 3b. Is the problem resolved? Go to action Go to print the Color Regi Configuration Chart again. Contact Dell. The task is complete. Contact Dell. Use Thick paper that is 216 gsm or less. 2b Is the problem resolved? Load Coated paper...
User Guide
Page 159
...the drive letter of your CD), and then click OK. 2. To prevent this point. Click the start ® All Programs® Dell Printers® Additional Color Laser Software® Quick Launch Utility. In the list, click Turn Windows Firewall on or off and then follow the instructions on a server ...the Search box, type firewall and then press Enter. NOTICE: It is recommended that you want to the list manually. Select Local Installation, and then click Next. 5. Select the printer you enable your computer to a network and the Windows XP, Windows Vista, or Windows Server 2008 firewall is...
...the drive letter of your CD), and then click OK. 2. To prevent this point. Click the start ® All Programs® Dell Printers® Additional Color Laser Software® Quick Launch Utility. In the list, click Turn Windows Firewall on or off and then follow the instructions on a server ...the Search box, type firewall and then press Enter. NOTICE: It is recommended that you want to the list manually. Select Local Installation, and then click Next. 5. Select the printer you enable your computer to a network and the Windows XP, Windows Vista, or Windows Server 2008 firewall is...

User Guide
Page 163
... into your desk. NOTE: When using AutoIP, 0.0.0.0 is selected for local accounts and select Properties. 11. Enter the password when Color-Password Enabled is displayed in which to the list manually. Use the Dell Printer Configuration Web Tool to install, and then click Next. 3. Select Folder Options. 4. From the View tab, clear the Use...
... into your desk. NOTE: When using AutoIP, 0.0.0.0 is selected for local accounts and select Properties. 11. Enter the password when Color-Password Enabled is displayed in which to the list manually. Use the Dell Printer Configuration Web Tool to install, and then click Next. 3. Select Folder Options. 4. From the View tab, clear the Use...

User Guide
Page 194
...MB) What are you need to contact Dell The Drivers and Utilities CD contains documentation and drivers for your printer. Find it here Drivers and Utilities CD l Drivers for my printer l My User's Guide l How to load print media into my printer l How to print, scan, and...send and receive faxes l How to care for and maintain my printer l How to buy separately. Owner's Manual NOTE: The Owner's Manual may be available in your Product Information Guide prior to set up and operating your printer. Product Information Guide l Safety information l Warranty information CAUTION: Read...
...MB) What are you need to contact Dell The Drivers and Utilities CD contains documentation and drivers for your printer. Find it here Drivers and Utilities CD l Drivers for my printer l My User's Guide l How to load print media into my printer l How to print, scan, and...send and receive faxes l How to care for and maintain my printer l How to buy separately. Owner's Manual NOTE: The Owner's Manual may be available in your Product Information Guide prior to set up and operating your printer. Product Information Guide l Safety information l Warranty information CAUTION: Read...

User Guide
Page 195
Drivers ¡ Manuals- l How to use the operator panel menus of my printer l How to use the Dell Printer Configuration Web Tool and Tool Box l How to print, scan, and copy l How to send and receive faxes l Print media guidelines l How to use the software for my printer l How to ... side door of your region on the support page, and fill in the requested details to Contents Page See the Dell Support website at support.dell.com. Select your printer. Contact information, order status, warranty, and repair information ¡ Downloads - Troubleshooting hints and tips, articles from ...
Drivers ¡ Manuals- l How to use the operator panel menus of my printer l How to use the Dell Printer Configuration Web Tool and Tool Box l How to print, scan, and copy l How to send and receive faxes l Print media guidelines l How to use the software for my printer l How to ... side door of your region on the support page, and fill in the requested details to Contents Page See the Dell Support website at support.dell.com. Select your printer. Contact information, order status, warranty, and repair information ¡ Downloads - Troubleshooting hints and tips, articles from ...
User Guide
Page 201
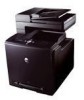
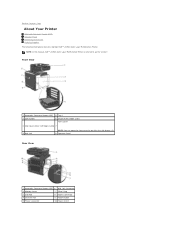
... Connector 2 Memory Cover 7 "Blue" Plug 3 USB Port 8 Power Connector 4 Ethernet Port 9 RESET Button 5 Phone Connector 10 Power Switch Back to as the "printer". NOTE: In this manual, Dell™ 2135cn Color Laser Multifunction Printer is referred to Contents Page About Your Printer Automatic Document Feeder (ADF) Operator Panel Protecting Your Printer Ordering Supplies The following illustrations show the standard Dell™ 2135cn Color Laser Multifunction Printer.
... Connector 2 Memory Cover 7 "Blue" Plug 3 USB Port 8 Power Connector 4 Ethernet Port 9 RESET Button 5 Phone Connector 10 Power Switch Back to as the "printer". NOTE: In this manual, Dell™ 2135cn Color Laser Multifunction Printer is referred to Contents Page About Your Printer Automatic Document Feeder (ADF) Operator Panel Protecting Your Printer Ordering Supplies The following illustrations show the standard Dell™ 2135cn Color Laser Multifunction Printer.

User Guide
Page 218
...following menus are linked to the menu that you click on the Print Server Settings page. Dell 2135cn MFP IPv4 Location Contact Person Machine image Displays the product name of the printer. The location can be changed in the left frame are displayed in the Basic Information section...section on the left frame. 1. Select Options from the Tools menu. 2. l Select the Manual proxy configuration check box, and then enter the printer's IP address in the top frame. When the Dell Printer Configuration Web Tool is located on the Print Server Settings page. Order Supplies at the top...
...following menus are linked to the menu that you click on the Print Server Settings page. Dell 2135cn MFP IPv4 Location Contact Person Machine image Displays the product name of the printer. The location can be changed in the left frame are displayed in the Basic Information section...section on the left frame. 1. Select Options from the Tools menu. 2. l Select the Manual proxy configuration check box, and then enter the printer's IP address in the top frame. When the Dell Printer Configuration Web Tool is located on the Print Server Settings page. Order Supplies at the top...


