
User Guide
Page 1
... and in trademarks and trade names other than its own. November 2008 Rev. Dell™ 2130cn Color Laser Printer User's Guide Dell™ 2130cn Color Laser Printer User's Guide Finding Information About Your Printer Installing the Print Head Device (PHD) Unit and Toner Cartridges Connecting Your Printer Dell Printer Configuration Web Tool Installing Optional Modules Print Media Guidelines Loading Print Media Operator...
... and in trademarks and trade names other than its own. November 2008 Rev. Dell™ 2130cn Color Laser Printer User's Guide Dell™ 2130cn Color Laser Printer User's Guide Finding Information About Your Printer Installing the Print Head Device (PHD) Unit and Toner Cartridges Connecting Your Printer Dell Printer Configuration Web Tool Installing Optional Modules Print Media Guidelines Loading Print Media Operator...
User Guide
Page 2
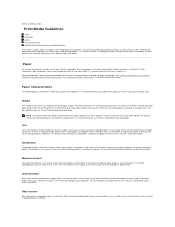
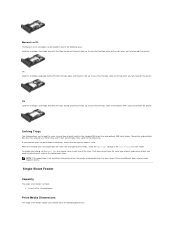
Paper For the best print quality in color, use 90 g/m2 (24 lb) xerographic, grain long paper. Paper Characteristics The... the Standard 250-Sheet Tray and Optional 250-Sheet Feeder" and "Loading the Single Sheet Feeder" for your printer helps avoid printing troubles. Grain is recommended that can contribute to paper curling prior to printing and cause feeding problems... large quantities of any print media, it . Back to the paper properly, resulting in poor print quality. Your printer provides high-quality printing on a variety of the paper. If the paper is too rough, the toner does not...
Paper For the best print quality in color, use 90 g/m2 (24 lb) xerographic, grain long paper. Paper Characteristics The... the Standard 250-Sheet Tray and Optional 250-Sheet Feeder" and "Loading the Single Sheet Feeder" for your printer helps avoid printing troubles. Grain is recommended that can contribute to paper curling prior to printing and cause feeding problems... large quantities of any print media, it . Back to the paper properly, resulting in poor print quality. Your printer provides high-quality printing on a variety of the paper. If the paper is too rough, the toner does not...

User Guide
Page 3
... process heats paper to determine whether the paper you have cut or trimmed yourself. This information is acceptable for laser printers. l Flex paper back and forth, and then fan them. l Use paper printed with heat-resistant inks designed for use also provide acceptable print ... l Use inks that do not bleed. Unacceptable Paper The following paper types are oxidation-set or oil-based should consider the weight, fiber content, and color. To help avoid jams or poor print quality: l Always use 75 g/m2 (20 lb) xerographic paper. This may appear in the tray. l Avoid...
... process heats paper to determine whether the paper you have cut or trimmed yourself. This information is acceptable for laser printers. l Flex paper back and forth, and then fan them. l Use paper printed with heat-resistant inks designed for use also provide acceptable print ... l Use inks that do not bleed. Unacceptable Paper The following paper types are oxidation-set or oil-based should consider the weight, fiber content, and color. To help avoid jams or poor print quality: l Always use 75 g/m2 (20 lb) xerographic paper. This may appear in the tray. l Avoid...

User Guide
Page 4
...l Set the print media source to 105 g/m2 (28 lb bond) weight for the envelope feeder as long as the cotton content is acceptable for laser printers. l For best performance, use pre-punched paper: l Test paper from 75 g/m2 (20 lb bond) paper. Envelopes with 100% cotton content ...punched paper brands can include more than standard paper. This may not be punched at the paper manufacturer and not drilled into the printer. Your printer may require more frequent cleaning and feed reliability may result in the single sheet feeder, insert the envelope with the envelope supplier. l...
...l Set the print media source to 105 g/m2 (28 lb bond) weight for the envelope feeder as long as the cotton content is acceptable for laser printers. l For best performance, use pre-punched paper: l Test paper from 75 g/m2 (20 lb bond) paper. Envelopes with 100% cotton content ...punched paper brands can include more than standard paper. This may not be punched at the paper manufacturer and not drilled into the printer. Your printer may require more frequent cleaning and feed reliability may result in the single sheet feeder, insert the envelope with the envelope supplier. l...

User Guide
Page 5
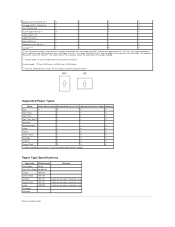
...at least 1 mm (0.04 inches) away from the edges. When printing on the floor. l Do not load labels together with laser printers. l Use labels that can print on standard and optional print media sources. Supported Paper Sizes A4 (210x297 mm) B5 (182x257 mm...Y Y Y Y Optional 250-Sheet Feeder Y Y Y N N Duplexer Y N N N N l Remove a 3 mm (0.125 inches) strip from the leading edge to Label from peeling inside the printer. Storing Print Media For proper print media storage, the following tables provide information on many labels designed for use label sheets that the edges do...
...at least 1 mm (0.04 inches) away from the edges. When printing on the floor. l Do not load labels together with laser printers. l Use labels that can print on standard and optional print media sources. Supported Paper Sizes A4 (210x297 mm) B5 (182x257 mm...Y Y Y Y Optional 250-Sheet Feeder Y Y Y N N Duplexer Y N N N N l Remove a 3 mm (0.125 inches) strip from the leading edge to Label from peeling inside the printer. Storing Print Media For proper print media storage, the following tables provide information on many labels designed for use label sheets that the edges do...
User Guide
Page 6
... Values marked by an asterisk (*) are the factory default menu settings. Plain Thick Paper 80/90-105 - Covers 106-163 - Coated Thick 164-216 Inkjet printer paper cannot be used. Back to 355.6 mm (14.00 inches) *3 Only the administrator user can set the custom size from the... printer driver. Covers Thick 164-216 - The following illustration shows SEF and LEF. Coated 106-163 Inkjet printer paper cannot be used . Envelopes - - Recycled - - The arrow mark in two kinds of the...
... Values marked by an asterisk (*) are the factory default menu settings. Plain Thick Paper 80/90-105 - Covers 106-163 - Coated Thick 164-216 Inkjet printer paper cannot be used. Back to 355.6 mm (14.00 inches) *3 Only the administrator user can set the custom size from the... printer driver. Covers Thick 164-216 - The following illustration shows SEF and LEF. Coated 106-163 Inkjet printer paper cannot be used . Envelopes - - Recycled - - The arrow mark in two kinds of the...
User Guide
Page 8
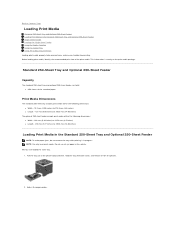
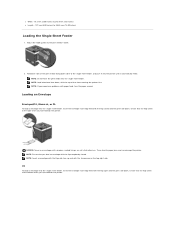
NOTE: Use only laser print media. Do not use ink jet paper in progress. Print Media Dimensions The standard 250-sheet tray accepts print media within the following dimensions: l ... Feeder Capacity The standard 250-sheet tray and optional 250-sheet feeder can hold: l 250 sheets of the printer about 200 mm. Hold the tray with both hands, and remove it from the printer. 2. Before loading print media, identify the recommended print side of the print media. All trays are loaded the...
NOTE: Use only laser print media. Do not use ink jet paper in progress. Print Media Dimensions The standard 250-sheet tray accepts print media within the following dimensions: l ... Feeder Capacity The standard 250-sheet tray and optional 250-sheet feeder can hold: l 250 sheets of the printer about 200 mm. Hold the tray with both hands, and remove it from the printer. 2. Before loading print media, identify the recommended print side of the print media. All trays are loaded the...

User Guide
Page 9
... edges of the tray. 3. Before loading the print media, flex the sheets back and forth, and then fan them. Place the print media into the printer. 7. Select the paper type from the tray loaded with the recommended print side facing up.
... edges of the tray. 3. Before loading the print media, flex the sheets back and forth, and then fan them. Place the print media into the printer. 7. Select the paper type from the tray loaded with the recommended print side facing up.

User Guide
Page 10
... then press (Set) button. 10. Print media source Face up Print side Page orientation Standard 250-Sheet Tray Optional 250-Sheet Feeder Letterhead enters the printer last Face down . Press button. 14. Press or button until Custom Size appears, and then press (Set) button. 16. Press or button until the ...paper types appears, and then press (Set) button. 13. When using the standard 250-sheet tray or optional 250-sheet feeder, the letterhead enters the printer last with the flaps closed and the print side up . Ensure that the flaps come at the right when you do not load envelopes in...
... then press (Set) button. 10. Print media source Face up Print side Page orientation Standard 250-Sheet Tray Optional 250-Sheet Feeder Letterhead enters the printer last Face down . Press button. 14. Press or button until Custom Size appears, and then press (Set) button. 16. Press or button until the ...paper types appears, and then press (Set) button. 13. When using the standard 250-sheet tray or optional 250-sheet feeder, the letterhead enters the printer last with the flaps closed and the print side up . Ensure that the flaps come at the right when you do not load envelopes in...
User Guide
Page 11
... Load the envelopes long edge feed (LEF) with the flaps closed and the print side up. Linking Trays Tray linking allows you face towards the printer. NOTE: If the paper type is same. Ensure that the type of media is not specified in them). If you could mistakenly print a job on... the wrong paper type. When the selected trays are different types of print media loaded in the printer driver, the printer automatically links the trays (even if there are loaded with the flaps closed and the print side up . If all trays do not have...
... Load the envelopes long edge feed (LEF) with the flaps closed and the print side up. Linking Trays Tray linking allows you face towards the printer. NOTE: If the paper type is same. Ensure that the type of media is not specified in them). If you could mistakenly print a job on... the wrong paper type. When the selected trays are different types of print media loaded in the printer driver, the printer automatically links the trays (even if there are loaded with the flaps closed and the print side up . If all trays do not have...
User Guide
Page 12
... it automatically feeds. Ensure that the flap comes at the right when you face towards the printer. NOTE: Load letterhead face-down close to paper jams and can damage the printer. NOTE: Do not force the print media into the single sheet feeder, insert the envelope short edge feed with the ... side. C5 To load an envelope into the single sheet feeder. NOTE: Ensure that the flap comes at the bottom when you face towards the printer. NOTE: Insert an envelope with the flap side face up and with paper feed, turn the paper around. Adjust the width guides to 355.6 mm...
... it automatically feeds. Ensure that the flap comes at the right when you face towards the printer. NOTE: Load letterhead face-down close to paper jams and can damage the printer. NOTE: Do not force the print media into the single sheet feeder, insert the envelope short edge feed with the ... side. C5 To load an envelope into the single sheet feeder. NOTE: Ensure that the flap comes at the bottom when you face towards the printer. NOTE: Insert an envelope with the flap side face up and with paper feed, turn the paper around. Adjust the width guides to 355.6 mm...

User Guide
Page 13
For sizes that you must select either Flip on Short Edge or Flip on Long Edge from the Duplex menu in the printer properties dialog box and then select Booklet Creation in relation to the printing on both sides of a sheet of paper automatically. Using Booklet Print ...and can define the way 2-sided print pages are acceptable for portrait and landscape pages: Flip on the bottom right side. For information on the printer. The following illustration shows short-edge binding for portrait and landscape pages: Flip on Short Edge Using the Output Tray The output tray holds up...
For sizes that you must select either Flip on Short Edge or Flip on Long Edge from the Duplex menu in the printer properties dialog box and then select Booklet Creation in relation to the printing on both sides of a sheet of paper automatically. Using Booklet Print ...and can define the way 2-sided print pages are acceptable for portrait and landscape pages: Flip on the bottom right side. For information on the printer. The following illustration shows short-edge binding for portrait and landscape pages: Flip on Short Edge Using the Output Tray The output tray holds up...

User Guide
Page 14
Back to prevent print media from falling from the printer after the print job is fully extended. Using the Output Tray Extension The output tray extension is designed to Contents Page Before printing a document, ensure the output tray extension is complete.
Back to prevent print media from falling from the printer after the print job is fully extended. Using the Output Tray Extension The output tray extension is designed to Contents Page Before printing a document, ensure the output tray extension is complete.

User Guide
Page 15
..., use the operator panel, Tool Box or the Dell Printer Configuration Web Tool. If you are the original printer settings. Using the Operator Panel to the printer. Settings from the software program update the default printer settings for different countries. Click start® All Programs® Dell Printers® Dell 2130cn Color Laser Printer® Tool Box. The Tool Box opens...
..., use the operator panel, Tool Box or the Dell Printer Configuration Web Tool. If you are the original printer settings. Using the Operator Panel to the printer. Settings from the software program update the default printer settings for different countries. Click start® All Programs® Dell Printers® Dell 2130cn Color Laser Printer® Tool Box. The Tool Box opens...
User Guide
Page 16
...button with each menu item. To select a new value as a setting: 1. l If the selection is opened and the first system setting in Printer Name, and then click OK. Press (Set) button to return the settings to the setting value. 6. To quit setting new values, press Cancel ... or button to return to change the operator panel defaults. Each menu item has a list of this printer listed in the menu appears. Click start® All Programs® Dell Printers® Dell 2130cn Color Laser Printer® Tool Box. Press Menu button. 2. Press or button until the desired menu or menu item ...
...button with each menu item. To select a new value as a setting: 1. l If the selection is opened and the first system setting in Printer Name, and then click OK. Press (Set) button to return the settings to the setting value. 6. To quit setting new values, press Cancel ... or button to return to change the operator panel defaults. Each menu item has a list of this printer listed in the menu appears. Click start® All Programs® Dell Printers® Dell 2130cn Color Laser Printer® Tool Box. Press Menu button. 2. Press or button until the desired menu or menu item ...

User Guide
Page 17
... browser. message appears on again to apply the settings. If you are reset to their default values. Printer Setting is printed. Press (Set) button. The printer settings page is displayed. Click start® All Programs® Dell Printers® Dell 2130cn Color Laser Printer® Tool Box. Select Reports from the topics list, and then type the other...
... browser. message appears on again to apply the settings. If you are reset to their default values. Printer Setting is printed. Press (Set) button. The printer settings page is displayed. Click start® All Programs® Dell Printers® Dell 2130cn Color Laser Printer® Tool Box. Select Reports from the topics list, and then type the other...

User Guide
Page 18
... for Network settings. 1. The Are you sure? The Select Printer dialog box opens. 2. The printer is displayed. 5. Press Menu button. 2. Click start® All Programs® Dell Printers® Dell 2130cn Color Laser Printer® Tool Box. Select Reset Defaults from the list at ...the left side of this printer listed in Printer Name, and then click OK. Press button until Network appears, and then press...
... for Network settings. 1. The Are you sure? The Select Printer dialog box opens. 2. The printer is displayed. 5. Press Menu button. 2. Click start® All Programs® Dell Printers® Dell 2130cn Color Laser Printer® Tool Box. Select Reset Defaults from the list at ...the left side of this printer listed in Printer Name, and then click OK. Press button until Network appears, and then press...

User Guide
Page 19
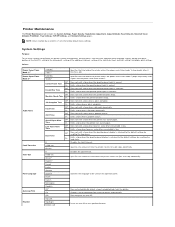
...: To display the printer's system information. Values: Dell Service Tag Number Displays Dell's service tag number. Firmware Version Displays the version of the MCU firmware. Displays the amount of time before the printer enters the power saver timer mode 1 after it finishes a job. Off indicates...are the factory default menu settings. NOTE: A Password dialog box appears the first time you try to change settings on the printer. Color Laser is disabled. Off indicates that the tone is low. Off indicates that the tone is displayed normally. Displays whether to emit...
...: To display the printer's system information. Values: Dell Service Tag Number Displays Dell's service tag number. Firmware Version Displays the version of the MCU firmware. Displays the amount of time before the printer enters the power saver timer mode 1 after it finishes a job. Off indicates...are the factory default menu settings. NOTE: A Password dialog box appears the first time you try to change settings on the printer. Color Laser is disabled. Off indicates that the tone is low. Off indicates that the tone is displayed normally. Displays whether to emit...

User Guide
Page 20
...printer's error history. IP Address Displays the printer's IP address. Gateway Address Displays the gateway address. Tray RAM Disk Displays whether to print the print meter. mm/inch Displays the measurement unit used on the operator panel. Non-Dell Toner Non-Dell.... Subnet Mask Displays the subnet mask. Substitute Tray Displays whether to automatically adjust color registration. Values: Printer Settings Click to print the printer's Completed Jobs history. Auto Registration Adjustment Auto Registration Adjustment Displays whether to use ...
...printer's error history. IP Address Displays the printer's IP address. Gateway Address Displays the gateway address. Tray RAM Disk Displays whether to print the print meter. mm/inch Displays the measurement unit used on the operator panel. Non-Dell Toner Non-Dell.... Subnet Mask Displays the subnet mask. Substitute Tray Displays whether to automatically adjust color registration. Values: Printer Settings Click to print the printer's Completed Jobs history. Auto Registration Adjustment Auto Registration Adjustment Displays whether to use ...
User Guide
Page 21
... emit a tone when the operator panel display is low. English* French Italian German Spanish Specifies the language to configure the printer's power management, warning tones, time-out time, operator panel language setting, job log auto print, position of the Print...a job ends abnormally. Emits a tone when the operator panel display is low. Printer Maintenance The Printer Maintenance tab includes the System Settings, Paper Density, Registration Adjustment, Adjust Altitude, Reset Defaults, Non-Dell Toner, Initialize PrintMeter, Tray Settings, TCP/IP Settings, and Network Settings pages....
... emit a tone when the operator panel display is low. English* French Italian German Spanish Specifies the language to configure the printer's power management, warning tones, time-out time, operator panel language setting, job log auto print, position of the Print...a job ends abnormally. Emits a tone when the operator panel display is low. Printer Maintenance The Printer Maintenance tab includes the System Settings, Paper Density, Registration Adjustment, Adjust Altitude, Reset Defaults, Non-Dell Toner, Initialize PrintMeter, Tray Settings, TCP/IP Settings, and Network Settings pages....


