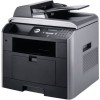
Owners Manual
Page 9
4 Using Your Multi-Function Printer Printing 51 Printing in Windows 51 Printing in Macintosh 51 Printing in Linux 51 Printing from the USB Memory Key 52 Copying 52 Knowing the ... Copies on Both Sides of Paper 55 Changing the Default Settings 56 Scanning 57 Knowing the Scan Menu 58 Scanning to an Application 58 Scanning Using Network Scan 59 Scanning to the USB Memory Key 60 Scanning Using the Windows Image Acquisition (WIA) Driver 63 Scanning and Sending an Email 64 Faxing 65 Knowing the Fax Menu 65...
4 Using Your Multi-Function Printer Printing 51 Printing in Windows 51 Printing in Macintosh 51 Printing in Linux 51 Printing from the USB Memory Key 52 Copying 52 Knowing the ... Copies on Both Sides of Paper 55 Changing the Default Settings 56 Scanning 57 Knowing the Scan Menu 58 Scanning to an Application 58 Scanning Using Network Scan 59 Scanning to the USB Memory Key 60 Scanning Using the Windows Image Acquisition (WIA) Driver 63 Scanning and Sending an Email 64 Faxing 65 Knowing the Fax Menu 65...
Owners Manual
Page 15
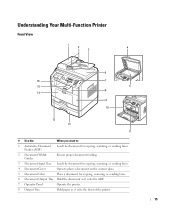
Understanding Your Multi-Function Printer Front View 1 2 3 4 6 16 7 15 5 8 14 9 10 13 12 11 # Use the: When you want to place a document on the scanner glass. 5 Document Glass Place a document for copying, scanning, or sending faxes. Feeder (ADF) 2 Document Width Guides Ensure ... the document for copying, scanning, or sending faxes. 4 Document Cover Open to : 1 Automatic Document Load the document for copying, scanning, or sending faxes. 6 Document Output Tray Hold the document as it exits the ADF. 7 Operator Panel Operate the printer. 8 Output Tray Hold paper...
Understanding Your Multi-Function Printer Front View 1 2 3 4 6 16 7 15 5 8 14 9 10 13 12 11 # Use the: When you want to place a document on the scanner glass. 5 Document Glass Place a document for copying, scanning, or sending faxes. Feeder (ADF) 2 Document Width Guides Ensure ... the document for copying, scanning, or sending faxes. 4 Document Cover Open to : 1 Automatic Document Load the document for copying, scanning, or sending faxes. 6 Document Output Tray Hold the document as it exits the ADF. 7 Operator Panel Operate the printer. 8 Output Tray Hold paper...

Owners Manual
Page 19
To scan or copy a document, the switch must be unlocked. Preparing Your Multi-Function Printer 19 1 Preparing Your Multi-Function Printer Unlocking the Scanner 1 Remove the label completely from the scanner module by gently pulling it for a long period of time, move the switch BACKWARD to.... NOTE: To confirm the scanner is unlocked, open the scanner cover and make sure the blue latch is not in the unlocked ( ) position. The scan unlock switch automatically moves FORWARD to use it . If the latch is in the unlocked position, reach under the operator panel and pull it forward.
To scan or copy a document, the switch must be unlocked. Preparing Your Multi-Function Printer 19 1 Preparing Your Multi-Function Printer Unlocking the Scanner 1 Remove the label completely from the scanner module by gently pulling it for a long period of time, move the switch BACKWARD to.... NOTE: To confirm the scanner is unlocked, open the scanner cover and make sure the blue latch is not in the unlocked ( ) position. The scan unlock switch automatically moves FORWARD to use it . If the latch is in the unlocked position, reach under the operator panel and pull it forward.

Owners Manual
Page 20
Store frequently used fax numbers in edit mode. 20 Preparing Your Multi-Function Printer Use the printer operator panel to the upper menu. Confirm the selection on the Setup Diagram (poster) to complete the hardware installation. It also allows.... Common keys Key pad Common Keys Press: ➊ ➎ ➍ ➎ Key Pad ➊ ➋ ➌ Press: ➊ ➋ ➌ To: Return to scan, copy, and fax. Scroll through available options. Stop an operation at any time, or return to main menu. To: Dial/Enter number or enter alphanumeric...
Store frequently used fax numbers in edit mode. 20 Preparing Your Multi-Function Printer Use the printer operator panel to the upper menu. Confirm the selection on the Setup Diagram (poster) to complete the hardware installation. It also allows.... Common keys Key pad Common Keys Press: ➊ ➎ ➍ ➎ Key Pad ➊ ➋ ➌ Press: ➊ ➋ ➌ To: Return to scan, copy, and fax. Scroll through available options. Stop an operation at any time, or return to main menu. To: Dial/Enter number or enter alphanumeric...
Owners Manual
Page 21
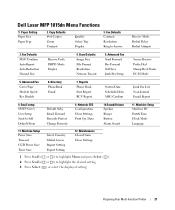
...Save Select Country Global Access Import Setting Export Setting 12. Machine Setup Machine ID Date&Time Clock Mode Language Preparing Your Multi-Function Printer 21 Dell Laser MFP 1815dn Menu Functions 1. Scan Defaults Image Size File Format Resolution Netscan Tm-out 5. Advanced Fax Send Forward Rcv Forward Toll Save Junk Fax Setup 5. Fax... Scheduled Jobs MSG Confirm 8. Receive Mode Redial Delay Redial Attmpts Secure Receive Prefix Dial Stamp Rcvd Name ECM Mode Junk Fax List Scan Journal Email Report 11. Copy Defaults # of Copies Zoom Contrast Quality Select Tray Duplex 3.
...Save Select Country Global Access Import Setting Export Setting 12. Machine Setup Machine ID Date&Time Clock Mode Language Preparing Your Multi-Function Printer 21 Dell Laser MFP 1815dn Menu Functions 1. Scan Defaults Image Size File Format Resolution Netscan Tm-out 5. Advanced Fax Send Forward Rcv Forward Toll Save Junk Fax Setup 5. Fax... Scheduled Jobs MSG Confirm 8. Receive Mode Redial Delay Redial Attmpts Secure Receive Prefix Dial Stamp Rcvd Name ECM Mode Junk Fax List Scan Journal Email Report 11. Copy Defaults # of Copies Zoom Contrast Quality Select Tray Duplex 3.

Owners Manual
Page 31
... utilities CD contains the following: • Dell Printer Drivers- enables you to print documents. • Network Scan- You can use your computer desktop. enables you to print and scan in Windows, see the Network Printer User's Guide on all image types. If you to scan a document on page 32. • Dell Printer Configuration Web Tool- For information about...
... utilities CD contains the following: • Dell Printer Drivers- enables you to print documents. • Network Scan- You can use your computer desktop. enables you to print and scan in Windows, see the Network Printer User's Guide on all image types. If you to scan a document on page 32. • Dell Printer Configuration Web Tool- For information about...
Owners Manual
Page 32
... scanner driver is automatically loaded first from D:\1815\Printer\GDI\WinXP\delr1.inf, where "D" is complete, print a test page. The printer driver is automatically loaded from D:\1815\Scan\WINXP2K\p3scan.inf, where "D" is not connected to your computer when you install the Dell software, the No Printer Found screen appears. You can change the destination...
... scanner driver is automatically loaded first from D:\1815\Printer\GDI\WinXP\delr1.inf, where "D" is complete, print a test page. The printer driver is automatically loaded from D:\1815\Scan\WINXP2K\p3scan.inf, where "D" is not connected to your computer when you install the Dell software, the No Printer Found screen appears. You can change the destination...

Owners Manual
Page 33
...), click Next, select CD-ROM Drives, and then click Next through the wizard screens. 3 The scanner driver is automatically loaded first from D:\1815\Scan\WINXP2K\p3scan.inf, where "D" is your CD drive. 4 Click Next. 5 Click Finish, and a second hardware wizard appears. The driver installs.... Click Next two times. Search for the best driver for your CD drive. 6 Click Next, and then click Finish. Understanding the Printer Software 33 The printer driver is automatically loaded from the Windows taskbar. 9 Click Next. The driver installs. 7 Click Finish, and a second wizard appears....
...), click Next, select CD-ROM Drives, and then click Next through the wizard screens. 3 The scanner driver is automatically loaded first from D:\1815\Scan\WINXP2K\p3scan.inf, where "D" is your CD drive. 4 Click Next. 5 Click Finish, and a second hardware wizard appears. The driver installs.... Click Next two times. Search for the best driver for your CD drive. 6 Click Next, and then click Finish. Understanding the Printer Software 33 The printer driver is automatically loaded from the Windows taskbar. 9 Click Next. The driver installs. 7 Click Finish, and a second wizard appears....

Owners Manual
Page 48
For best results, clean the scanner glass before use the scanner glass instead of the ADF. 1 Lift and open the document cover. 2 Place the document face down on the scanner glass and align it with the registration guide on the printout. Placing Documents on the Scanner Glass NOTE: Contaminants on the scanner glass may cause black spots on the top left corner of the glass. 3 Close the document cover. 48 Loading Print Media NOTE: To get the best scan quality, especially for color or gray scale images, use . See page 81.
For best results, clean the scanner glass before use the scanner glass instead of the ADF. 1 Lift and open the document cover. 2 Place the document face down on the scanner glass and align it with the registration guide on the printout. Placing Documents on the Scanner Glass NOTE: Contaminants on the scanner glass may cause black spots on the top left corner of the glass. 3 Close the document cover. 48 Loading Print Media NOTE: To get the best scan quality, especially for color or gray scale images, use . See page 81.

Owners Manual
Page 49
Loading Print Media 49 The ADF is recommended for scanning, copying, and faxing. The ADF output tray should be damaged. Make sure that the bottom of the document stack matches the document size marked on the ADF with page one on top) into the ADF for loading multiple page documents. 1 Place the document...
Loading Print Media 49 The ADF is recommended for scanning, copying, and faxing. The ADF output tray should be damaged. Make sure that the bottom of the document stack matches the document size marked on the ADF with page one on top) into the ADF for loading multiple page documents. 1 Place the document...

Owners Manual
Page 55
...ADF. 2 Press Scroll ( or ) to highlight Copy and press Select ( ). 3 Press Scroll ( or ) to Standby mode. NOTE: The copy job is scanned and printed one by 3). NOTE: Leaving the cover open while copying may cause black spots on the display. 4 Press Select ( ) to save the selection. 5 Press Cancel (... Tray2(option) and Bypass. NOTE: Contaminants on the scanner glass may affect the copy quality and toner consumption. Using Your Multi-Function Printer 55 For best results, clean the scanner glass before use for 30 seconds. ID Copying (available via scanner glass only): Prints an ...
...ADF. 2 Press Scroll ( or ) to highlight Copy and press Select ( ). 3 Press Scroll ( or ) to Standby mode. NOTE: The copy job is scanned and printed one by 3). NOTE: Leaving the cover open while copying may cause black spots on the display. 4 Press Select ( ) to save the selection. 5 Press Cancel (... Tray2(option) and Bypass. NOTE: Contaminants on the scanner glass may affect the copy quality and toner consumption. Using Your Multi-Function Printer 55 For best results, clean the scanner glass before use for 30 seconds. ID Copying (available via scanner glass only): Prints an ...
Owners Manual
Page 57
... these recommended resolutions may exceed the capabilities of available applications. Using Your Multi-Function Printer 57 NOTE: The first time you use PaperPort's built-in to your printer. Please refer to "Printer Settings Utility" on your computer. Scanning Use your Dell Laser MFP 1815 to convert pictures and text into editable images on the User's Guide...
... these recommended resolutions may exceed the capabilities of available applications. Using Your Multi-Function Printer 57 NOTE: The first time you use PaperPort's built-in to your printer. Please refer to "Printer Settings Utility" on your computer. Scanning Use your Dell Laser MFP 1815 to convert pictures and text into editable images on the User's Guide...

Owners Manual
Page 58
... ( or ) to select an application to which you to scan items and send them directly to PaperPort or other programs on your default email program on the Dell ScanCenter bar represent the programs that enables you want to PaperPort. 58 Using Your Multi-Function Printer Dell ScanCenter is complete. Icons on the computer. A new...
... ( or ) to select an application to which you to scan items and send them directly to PaperPort or other programs on your default email program on the Dell ScanCenter bar represent the programs that enables you want to PaperPort. 58 Using Your Multi-Function Printer Dell ScanCenter is complete. Icons on the computer. A new...

Owners Manual
Page 59
... PDF and save it to this scanner. Using Your Multi-Function Printer 59 NOTE: The operator panel's application list supports up with top edge in English. The first character must be 4 digits. To use the Dell Network Scan Manager window. 1 In the Dell Network Scan Manager window, click the Add Device button, or double-click...
... PDF and save it to this scanner. Using Your Multi-Function Printer 59 NOTE: The operator panel's application list supports up with top edge in English. The first character must be 4 digits. To use the Dell Network Scan Manager window. 1 In the Dell Network Scan Manager window, click the Add Device button, or double-click...

Owners Manual
Page 60
...See the User's Guide. 60 Using Your Multi-Function Printer Select Yes using the default settings, or you will be automatically selected. • Resolution: Select resolution 100 dpi, 200 dpi or 300 dpi. 9 Press Scroll ( or ) to computer where Network Scan is TIFF or PDF, the display asks if you...to the USB memory key. There are scanned, then select No. 11 After scanning, you can scan to the USB memory key using Scroll ( or ) and press Select ( ). If you press Select ( ) when the display shows Logout, your file type is running. If your printer returns to the upper menu level. 10...
...See the User's Guide. 60 Using Your Multi-Function Printer Select Yes using the default settings, or you will be automatically selected. • Resolution: Select resolution 100 dpi, 200 dpi or 300 dpi. 9 Press Scroll ( or ) to computer where Network Scan is TIFF or PDF, the display asks if you...to the USB memory key. There are scanned, then select No. 11 After scanning, you can scan to the USB memory key using Scroll ( or ) and press Select ( ). If you press Select ( ) when the display shows Logout, your file type is running. If your printer returns to the upper menu level. 10...
Owners Manual
Page 61
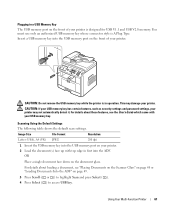
... such as security settings and password settings, your printer. OR Place a single document face down on page 49. 3 Press Scroll ( or ) to highlight Scan and press Select ( ). 4 Press Select ( ) to access USB key. This may damage your printer may not automatically detect it. For details about loading...1 Insert the USB memory key into the USB memory port on your printer. 2 Load the document(s) face up with your USB memory key. Scanning Using the Default Settings The following table shows the default scan settings. For details about these features, see "Placing Documents on the ...
... such as security settings and password settings, your printer. OR Place a single document face down on page 49. 3 Press Scroll ( or ) to highlight Scan and press Select ( ). 4 Press Select ( ) to access USB key. This may damage your printer may not automatically detect it. For details about loading...1 Insert the USB memory key into the USB memory port on your printer. 2 Load the document(s) face up with your USB memory key. Scanning Using the Default Settings The following table shows the default scan settings. For details about these features, see "Placing Documents on the ...

Owners Manual
Page 62
... document and save it to your printer. 2 Load the document(s) face up with top edge in the quick scan, follow the steps below. 1 Press Scroll ( or ) to highlight Scan and press Select ( ). 2 Press Select ( ) to access USB key. 3 Press Scroll ( or ) to highlight Default Change and press Select (... ). 4 Press Select ( ) to access Image Size. 62 Using Your Multi-Function Printer Changing the Default Settings To change the ...
... document and save it to your printer. 2 Load the document(s) face up with top edge in the quick scan, follow the steps below. 1 Press Scroll ( or ) to highlight Scan and press Select ( ). 2 Press Select ( ) to access USB key. 3 Press Scroll ( or ) to highlight Default Change and press Select (... ). 4 Press Select ( ) to access Image Size. 62 Using Your Multi-Function Printer Changing the Default Settings To change the ...

Owners Manual
Page 63
...-click the printer icon. The Scanners and Camera Wizard launches. 4 Choose your scanning preferences and click Preview to see "Placing Documents on the Scanner Glass" on page 48 or "Loading Documents Into the ADF" on -screen instructions to edit the picture after it is one of the ...). OR Place a single document face down on Windows XP. 1 Load the document(s) face up with digital cameras and scanners. Scanning Using the Windows Image Acquisition (WIA) Driver Your printer also supports the WIA driver for BMP, TIFF, or PDF, press Scroll ( or ) to highlight Resolution and press Select ...
...-click the printer icon. The Scanners and Camera Wizard launches. 4 Choose your scanning preferences and click Preview to see "Placing Documents on the Scanner Glass" on page 48 or "Loading Documents Into the ADF" on -screen instructions to edit the picture after it is one of the ...). OR Place a single document face down on Windows XP. 1 Load the document(s) face up with digital cameras and scanners. Scanning Using the Windows Image Acquisition (WIA) Driver Your printer also supports the WIA driver for BMP, TIFF, or PDF, press Scroll ( or ) to highlight Resolution and press Select ...

Owners Manual
Page 64
...press Select ( ). 12 Enter the email subject and press Select ( ). 13 Press Scroll ( or ) to select the file type to which the scanned image will be converted and press Select ( ). 14 Press Scroll ( or ) to select the resolution you want to review addresses. For details about loading... ). 8 Enter the recipient's email address and press Select ( ). To review addresses, press Select ( ) to Standby mode. 64 Using Your Multi-Function Printer The printer begins scanning and then sends the email. 16 If the display asks if you want and press Select ( ). 15 Press Start ( ) or Select ( ). To ...
...press Select ( ). 12 Enter the email subject and press Select ( ). 13 Press Scroll ( or ) to select the file type to which the scanned image will be converted and press Select ( ). 14 Press Scroll ( or ) to select the resolution you want to review addresses. For details about loading... ). 8 Enter the recipient's email address and press Select ( ). To review addresses, press Select ( ) to Standby mode. 64 Using Your Multi-Function Printer The printer begins scanning and then sends the email. 16 If the display asks if you want and press Select ( ). 15 Press Start ( ) or Select ( ). To ...

Owners Manual
Page 65
...Redials On Hook Dial Broadcast Fax Fax Features Refer to display the mode you want and press Select ( ). Using Your Multi-Function Printer 65 The printer will automatically switch to select the Contrast mode you want and press Select ( ). • Lighter works well with dark print.... with light print or faint pencil markings. Adjusting the Document Resolution Use the Resolution setting to improve the output quality of the original or to scan photographs. 1 Press Scroll ( or ) to highlight Fax and press Select ( ). 2 Press Scroll ( or ) to highlight Resolution and press Select ( ). 3 ...
...Redials On Hook Dial Broadcast Fax Fax Features Refer to display the mode you want and press Select ( ). Using Your Multi-Function Printer 65 The printer will automatically switch to select the Contrast mode you want and press Select ( ). • Lighter works well with dark print.... with light print or faint pencil markings. Adjusting the Document Resolution Use the Resolution setting to improve the output quality of the original or to scan photographs. 1 Press Scroll ( or ) to highlight Fax and press Select ( ). 2 Press Scroll ( or ) to highlight Resolution and press Select ( ). 3 ...


