Owners Manual
Page 1
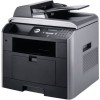
Dell™ Laser Multi-Function Printer 1815dn Owner's Manual Look Inside For: • Preparing Your Multi-Function Printer • Understanding the Printer Software • Loading Print Media • Using Your Multi-Function Printer • Maintenance • Troubleshooting • Installing Options • Contacting Dell Temporary www.dell.com | support.dell.com
Dell™ Laser Multi-Function Printer 1815dn Owner's Manual Look Inside For: • Preparing Your Multi-Function Printer • Understanding the Printer Software • Loading Print Media • Using Your Multi-Function Printer • Maintenance • Troubleshooting • Installing Options • Contacting Dell Temporary www.dell.com | support.dell.com
Owners Manual
Page 5
... loss of data and tells you make better use of Dell Inc. Microsoft and Windows are trademarks of Dell Inc.; Model Laser MFP 1815dn June 2006 NF 841 Rev. Dell Inc. Trademarks used in this document to refer to change without the written permission of your printer. CAUTION: A CAUTION indicates a potential for property damage, personal injury...
... loss of data and tells you make better use of Dell Inc. Microsoft and Windows are trademarks of Dell Inc.; Model Laser MFP 1815dn June 2006 NF 841 Rev. Dell Inc. Trademarks used in this document to refer to change without the written permission of your printer. CAUTION: A CAUTION indicates a potential for property damage, personal injury...

Owners Manual
Page 8
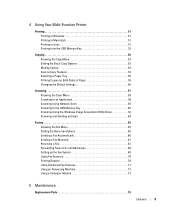
... 25 Preparing Networking 26 Attaching Cables 26 Printing the Network Configuration Page 27 Run the Installation Software 28 2 Understanding the Printer Software Software Overview 31 Installing Dell Software For Local Printing 32 Windows XP 32 Windows 2000 33 Windows 98 33 Windows Me 34 Assigning an IP Address ...34 Installing Dell Software For Network Printing 35 Uninstalling Software 36 3 Loading Print Media Print Media Guidelines 37 Loading Paper 40 Using the Paper Tray...
... 25 Preparing Networking 26 Attaching Cables 26 Printing the Network Configuration Page 27 Run the Installation Software 28 2 Understanding the Printer Software Software Overview 31 Installing Dell Software For Local Printing 32 Windows XP 32 Windows 2000 33 Windows 98 33 Windows Me 34 Assigning an IP Address ...34 Installing Dell Software For Network Printing 35 Uninstalling Software 36 3 Loading Print Media Print Media Guidelines 37 Loading Paper 40 Using the Paper Tray...
Owners Manual
Page 9
4 Using Your Multi-Function Printer Printing 51 Printing in Windows 51 Printing in Macintosh 51 Printing in Linux 51 Printing from the USB Memory Key 52 Copying 52 Knowing the ...
4 Using Your Multi-Function Printer Printing 51 Printing in Windows 51 Printing in Macintosh 51 Printing in Linux 51 Printing from the USB Memory Key 52 Copying 52 Knowing the ...
Owners Manual
Page 10
Replacing the ADF Rubber Pad 75 Ordering Supplies 77 Replacing the Toner Cartridge 78 Cleaning Your Multi-Function Printer 80 Cleaning the Exterior 80 Cleaning the Interior 80 Cleaning the Scanner 81 Cleaning the Drum 82 6 Troubleshooting... 94 7 Installing Options Precautions When Installing Printer Accessories 95 Expanding Printer Memory 95 Activating the Added Memory in the PS Printer Properties 97 Installing an Optional Tray 2 98 Activating the Installed Optional Tray 2 in the Printer Properties 100 8 Contacting Dell Technical Assistance 101 Automated Order-Status Service ...
Replacing the ADF Rubber Pad 75 Ordering Supplies 77 Replacing the Toner Cartridge 78 Cleaning Your Multi-Function Printer 80 Cleaning the Exterior 80 Cleaning the Interior 80 Cleaning the Scanner 81 Cleaning the Drum 82 6 Troubleshooting... 94 7 Installing Options Precautions When Installing Printer Accessories 95 Expanding Printer Memory 95 Activating the Added Memory in the PS Printer Properties 97 Installing an Optional Tray 2 98 Activating the Installed Optional Tray 2 in the Printer Properties 100 8 Contacting Dell Technical Assistance 101 Automated Order-Status Service ...

Owners Manual
Page 11
... 128 1-Year End-User Manufacturer Guarantee (Latin America and the Caribbean Only 129 Angreskjema For Norske Forbrukere 130 Dell™ Printer Consumables Limited Warranties 132 Consumables Limited Warranty (U.S. Only 121 Limited Warranty Terms for Dell-Branded Hardware Products (U.S. Terms and Conditions of Sale 119 Limited Warranties and Return Policy 121 Limited Warranty for...
... 128 1-Year End-User Manufacturer Guarantee (Latin America and the Caribbean Only 129 Angreskjema For Norske Forbrukere 130 Dell™ Printer Consumables Limited Warranties 132 Consumables Limited Warranty (U.S. Only 121 Limited Warranty Terms for Dell-Branded Hardware Products (U.S. Terms and Conditions of Sale 119 Limited Warranties and Return Policy 121 Limited Warranty for...
Owners Manual
Page 15
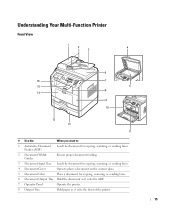
Understanding Your Multi-Function Printer Front View 1 2 3 4 6 16 7 15 5 8 14 9 10 13 12 11 # Use the: When you want to place a document on the scanner glass. 5 Document Glass Place a document ... Document Load the document for copying, scanning, or sending faxes. 6 Document Output Tray Hold the document as it exits the ADF. 7 Operator Panel Operate the printer. 8 Output Tray Hold paper as it exits the front of the...
Understanding Your Multi-Function Printer Front View 1 2 3 4 6 16 7 15 5 8 14 9 10 13 12 11 # Use the: When you want to place a document on the scanner glass. 5 Document Glass Place a document ... Document Load the document for copying, scanning, or sending faxes. 6 Document Output Tray Hold the document as it exits the ADF. 7 Operator Panel Operate the printer. 8 Output Tray Hold paper as it exits the front of the...
Owners Manual
Page 16
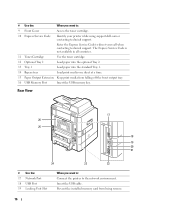
... Optional Tray 2 Load paper into the optional Tray 2. 13 Tray 1 Load paper into the standard Tray 1. 14 Bypass tray Load print media one sheet at a time. 15 Paper Output Extension Keep print media from being remove. 16 Prevent the installed memory card from falling off the front ...Use the: 17 Network Port 18 USB Port 19 Locking Unit Slot When you want to: Connect the printer to the network environment. Enter the Express Service Code to direct your printer while using support.dell.com or contacting technical support. Insert the USB cable. # Use the: When you want to: ...
... Optional Tray 2 Load paper into the optional Tray 2. 13 Tray 1 Load paper into the standard Tray 1. 14 Bypass tray Load print media one sheet at a time. 15 Paper Output Extension Keep print media from being remove. 16 Prevent the installed memory card from falling off the front ...Use the: 17 Network Port 18 USB Port 19 Locking Unit Slot When you want to: Connect the printer to the network environment. Enter the Express Service Code to direct your printer while using support.dell.com or contacting technical support. Insert the USB cable. # Use the: When you want to: ...
Owners Manual
Page 17
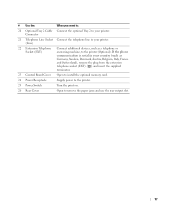
Connector 21 Telephone Line Socket Connect the telephone line to your printer. (Line) 22 Extension Telephone Socket (EXT) Connect additional devices, such as Germany, Sweden, Denmark, Austria, Belgium, Italy, France and Switzerland), remove the plug from the ... Open to install the optional memory card. 24 Power Receptacle Supply power to the printer. 25 Power Switch Turn the print on. 26 Rear Cover Open to the printer (Optional). If the phone communication is serial in your printer. # Use the: When you want to: 20 Optional Tray 2 Cable Connect the optional Tray...
Connector 21 Telephone Line Socket Connect the telephone line to your printer. (Line) 22 Extension Telephone Socket (EXT) Connect additional devices, such as Germany, Sweden, Denmark, Austria, Belgium, Italy, France and Switzerland), remove the plug from the ... Open to install the optional memory card. 24 Power Receptacle Supply power to the printer. 25 Power Switch Turn the print on. 26 Rear Cover Open to the printer (Optional). If the phone communication is serial in your printer. # Use the: When you want to: 20 Optional Tray 2 Cable Connect the optional Tray...

Owners Manual
Page 19
The scan unlock switch automatically moves FORWARD to the unlock position. NOTE: When you are moving the printer or do not intend to use it . To scan or copy a document, the switch must be unlocked. If the latch is in the unlocked position, ... is unlocked, open the scanner cover and make sure the blue latch is not in the unlocked ( ) position. Preparing Your Multi-Function Printer 19 1 Preparing Your Multi-Function Printer Unlocking the Scanner 1 Remove the label completely from the scanner module by gently pulling it for a long period of time, move the switch...
The scan unlock switch automatically moves FORWARD to the unlock position. NOTE: When you are moving the printer or do not intend to use it . To scan or copy a document, the switch must be unlocked. If the latch is in the unlocked position, ... is unlocked, open the scanner cover and make sure the blue latch is not in the unlocked ( ) position. Preparing Your Multi-Function Printer 19 1 Preparing Your Multi-Function Printer Unlocking the Scanner 1 Remove the label completely from the scanner module by gently pulling it for a long period of time, move the switch...

Owners Manual
Page 20
... return to scan, copy, and fax. It also allows you have not already done so, follow the steps on the display. Use the printer operator panel to main menu. Confirm the selection on the Setup Diagram (poster) to complete the hardware installation. Insert a pause into a fax...search for stored fax numbers or email addresses. Start a job. Store frequently used fax numbers in edit mode. 20 Preparing Your Multi-Function Printer Using the Operator Panel If you to print a Phonebook list. Scroll through available options. To: Dial/Enter number or enter alphanumeric characters....
... return to scan, copy, and fax. It also allows you have not already done so, follow the steps on the display. Use the printer operator panel to main menu. Confirm the selection on the Setup Diagram (poster) to complete the hardware installation. Insert a pause into a fax...search for stored fax numbers or email addresses. Start a job. Store frequently used fax numbers in edit mode. 20 Preparing Your Multi-Function Printer Using the Operator Panel If you to print a Phonebook list. Scroll through available options. To: Dial/Enter number or enter alphanumeric characters....
Owners Manual
Page 21
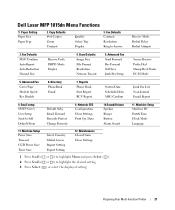
Dell Laser MFP 1815dn Menu Functions 1. Fax Defaults MSG Confirm Auto Report Auto Reduction Discard Size Receive Code DRPD Mode Duplex 4. Data 10.Sound/Volume Speaker Ringer Button Alarm ... Rcvd Name ECM Mode Junk Fax List Scan Journal Email Report 11. Machine Setup Machine ID Date&Time Clock Mode Language Preparing Your Multi-Function Printer 21 Fax Defaults Contrast Resolution Ring to Answer 3. Advanced Fax Send Forward Rcv Forward Toll Save Junk Fax Setup 5. Paper Setting Paper Size Paper Type...
Dell Laser MFP 1815dn Menu Functions 1. Fax Defaults MSG Confirm Auto Report Auto Reduction Discard Size Receive Code DRPD Mode Duplex 4. Data 10.Sound/Volume Speaker Ringer Button Alarm ... Rcvd Name ECM Mode Junk Fax List Scan Journal Email Report 11. Machine Setup Machine ID Date&Time Clock Mode Language Preparing Your Multi-Function Printer 21 Fax Defaults Contrast Resolution Ring to Answer 3. Advanced Fax Send Forward Rcv Forward Toll Save Junk Fax Setup 5. Paper Setting Paper Size Paper Type...

Owners Manual
Page 22
... ) when the number on the display is correct. The available languages are required by pressing the 1 button. Setting Up Faxing Setting the Printer ID In most countries, you want. For details on how to use the number keypad to enter alphanumeric characters, see "Using the Number ...Press Select ( ) when the name on the display is correct. 9 Press Cancel ( ) to return to Standby mode. 22 Preparing Your Multi-Function Printer Changing the Display Language To change the displayed language that the operator panel displays, follow these steps: 1 Press Scroll ( or ) to highlight Menu ...
... ) when the number on the display is correct. The available languages are required by pressing the 1 button. Setting Up Faxing Setting the Printer ID In most countries, you want. For details on how to use the number keypad to enter alphanumeric characters, see "Using the Number ...Press Select ( ) when the name on the display is correct. 9 Press Cancel ( ) to return to Standby mode. 22 Preparing Your Multi-Function Printer Changing the Display Language To change the displayed language that the operator panel displays, follow these steps: 1 Press Scroll ( or ) to highlight Menu ...
Owners Manual
Page 23
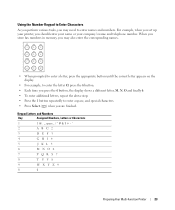
.... _ space 2 A B C 2 3 D E F 3 4 G H I 4 5 J K L 5 6 M N O 6 7 P Q R S 7 8 T U V 8 9 W X Y Z 9 0 0 Preparing Your Multi-Function Printer 23 Using the Number Keypad to Enter Characters As you perform various tasks, you may also enter the corresponding names. &@$ ABC DEF 1 2 3 GHI JKL MNO 4 5 6 ... display. • For example, to enter the letter O, press the 6 button. • Each time you should enter your name or your printer, you press the 6 button, the display shows a different letter, M, N, O and finally 6. • To enter additional letters, repeat the...
.... _ space 2 A B C 2 3 D E F 3 4 G H I 4 5 J K L 5 6 M N O 6 7 P Q R S 7 8 T U V 8 9 W X Y Z 9 0 0 Preparing Your Multi-Function Printer 23 Using the Number Keypad to Enter Characters As you perform various tasks, you may also enter the corresponding names. &@$ ABC DEF 1 2 3 GHI JKL MNO 4 5 6 ... display. • For example, to enter the letter O, press the 6 button. • Each time you should enter your name or your printer, you press the 6 button, the display shows a different letter, M, N, O and finally 6. • To enter additional letters, repeat the...

Owners Manual
Page 24
NOTE: The printer beeps and does not allow you to proceed to the next step if a wrong number is entered.... ~ 23 (24-hour mode) Minute= 00 ~ 59 You can change the correct time and date if loss of power to the printer occurs. Then enter the correct number or character. ) button to delete the Inserting a Pause For some telephone systems, it is not ...and Date The time and date are printed on the display to indicate when a pause is entered. 24 Preparing Your Multi-Function Printer Changing Numbers or Names If you want to correct and enter a new number. 5 To select AM or PM for 12-...
NOTE: The printer beeps and does not allow you to proceed to the next step if a wrong number is entered.... ~ 23 (24-hour mode) Minute= 00 ~ 59 You can change the correct time and date if loss of power to the printer occurs. Then enter the correct number or character. ) button to delete the Inserting a Pause For some telephone systems, it is not ...and Date The time and date are printed on the display to indicate when a pause is entered. 24 Preparing Your Multi-Function Printer Changing Numbers or Names If you want to correct and enter a new number. 5 To select AM or PM for 12-...

Owners Manual
Page 25
... press Select ( ). Setting Group Dial 1 Press Directory ( ) on the operator panel. OR Press Scroll ( or ) to highlight Fax and press Select ( ). Preparing Your Multi-Function Printer 25 OR Press Scroll ( or ) to highlight Menu and press Select ( ). To insert a pause between numbers, press Pause ( ) and a "-" appears on page 23. 5 Enter...
... press Select ( ). Setting Group Dial 1 Press Directory ( ) on the operator panel. OR Press Scroll ( or ) to highlight Fax and press Select ( ). Preparing Your Multi-Function Printer 25 OR Press Scroll ( or ) to highlight Menu and press Select ( ). To insert a pause between numbers, press Pause ( ) and a "-" appears on page 23. 5 Enter...

Owners Manual
Page 26
...network speed. 26 Preparing Your Multi-Function Printer Preparing Networking A print server is powered off and unplugged. 2 Connect one , two or three-digit speed dial number you want to assign to the group and press Select ( ). If you are sharing your printer in a small workgroup environment and want... into a LAN drop or hub, and the other speed dial numbers into the Ethernet network port on the network, follow these instructions to attach the printer to a print server. Or select the location by pressing Scroll ( or ) and then press Select ( ). 7 At the Add Another? prompt, press ...
...network speed. 26 Preparing Your Multi-Function Printer Preparing Networking A print server is powered off and unplugged. 2 Connect one , two or three-digit speed dial number you want to assign to the group and press Select ( ). If you are sharing your printer in a small workgroup environment and want... into a LAN drop or hub, and the other speed dial numbers into the Ethernet network port on the network, follow these instructions to attach the printer to a print server. Or select the location by pressing Scroll ( or ) and then press Select ( ). 7 At the Add Another? prompt, press ...

Owners Manual
Page 27
... sure the IP address, Subnet mask, and Gateway are what you may receive a reply. For example, at the back of the printer and the other end into a properly grounded outlet. 3 Connect one end of the printer power cord into the socket at a command prompt on a network computer, type ping followed by the new...
... sure the IP address, Subnet mask, and Gateway are what you may receive a reply. For example, at the back of the printer and the other end into a properly grounded outlet. 3 Connect one end of the printer power cord into the socket at a command prompt on a network computer, type ping followed by the new...
Owners Manual
Page 28
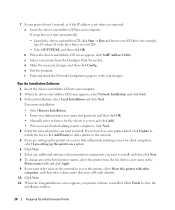
... Manually enter or browse for the clients or servers and click Add. • When you are setting up this printer on a server. 6 Click Next. 7 Select any of your printer from the list. b When the drivers and utilities CD screen appears, click SetIP Address Utility. d Make the necessary... select Network Installation and click Next. 3 For local installation, select Local Installation and click Next. Click Finish to access this printer, select Share this printer with other computers, and then enter a share name that will easily identify. 10 Click Next. 11 When the Congratulations! 7 ...
... Manually enter or browse for the clients or servers and click Add. • When you are setting up this printer on a server. 6 Click Next. 7 Select any of your printer from the list. b When the drivers and utilities CD screen appears, click SetIP Address Utility. d Make the necessary... select Network Installation and click Next. 3 For local installation, select Local Installation and click Next. Click Finish to access this printer, select Share this printer with other computers, and then enter a share name that will easily identify. 10 Click Next. 11 When the Congratulations! 7 ...

Owners Manual
Page 29
... is locally attached to a print server. To set up email alerts: 1 Launch the Dell Printer Configuration Web Tool. 2 Click Email Alert Setup. 3 Type your Web browser, and the printer configuration appears on the screen. Use the Dell Printer Configuration Web Tool, also known as the Printer Embedded Web Server, to monitor the status of your network...
... is locally attached to a print server. To set up email alerts: 1 Launch the Dell Printer Configuration Web Tool. 2 Click Email Alert Setup. 3 Type your Web browser, and the printer configuration appears on the screen. Use the Dell Printer Configuration Web Tool, also known as the Printer Embedded Web Server, to monitor the status of your network...


