Owners Manual
Page 10
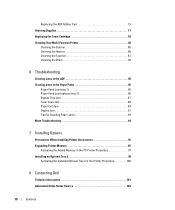
... the Paper Paths 85 Paper Feed Jam (tray 1 85 Paper Feed Jam (optional tray 2 86 Bypass Tray Jam 87 Fuser Area Jam 88 Paper Exit Jam 89 Duplex Jam 91 Tips for Avoiding Paper Jams 94 More Troubleshooting 94 7 Installing Options Precautions ...When Installing Printer Accessories 95 Expanding Printer Memory 95 Activating the Added Memory in the PS Printer Properties 97 Installing an Optional Tray 2 98 Activating the Installed Optional Tray 2 in the Printer Properties 100 8 Contacting Dell Technical Assistance 101 Automated Order-Status Service ...
... the Paper Paths 85 Paper Feed Jam (tray 1 85 Paper Feed Jam (optional tray 2 86 Bypass Tray Jam 87 Fuser Area Jam 88 Paper Exit Jam 89 Duplex Jam 91 Tips for Avoiding Paper Jams 94 More Troubleshooting 94 7 Installing Options Precautions ...When Installing Printer Accessories 95 Expanding Printer Memory 95 Activating the Added Memory in the PS Printer Properties 97 Installing an Optional Tray 2 98 Activating the Installed Optional Tray 2 in the Printer Properties 100 8 Contacting Dell Technical Assistance 101 Automated Order-Status Service ...

Owners Manual
Page 75
... the ADF Rubber Pad You can purchase an ADF rubber pad from your Dell dealer or the retailer where you bought your printer. Item Yield (Average) ADF rubber pad Transfer roller Approx. 20,000 pages Approx. 70,000 pages Fuser unit Approx. 80,000 pages Tray rubber pad Pickup roller Approx. 250...,000 pages Approx. 150,000 pages To purchase replacement parts, contact your printer. 1 Open the ADF cover. 2 Rotate the bushing on the right end ...
... the ADF Rubber Pad You can purchase an ADF rubber pad from your Dell dealer or the retailer where you bought your printer. Item Yield (Average) ADF rubber pad Transfer roller Approx. 20,000 pages Approx. 70,000 pages Fuser unit Approx. 80,000 pages Tray rubber pad Pickup roller Approx. 250...,000 pages Approx. 150,000 pages To purchase replacement parts, contact your printer. 1 Open the ADF cover. 2 Rotate the bushing on the right end ...

Owners Manual
Page 85
...Jam 0 Open Front Door Paper Jam 1 Cartridge Area Pager Jam 2 Open Rear Door Paper Feed Jam (tray 1) Paper Feed Jam (optional tray 2) Bypass Tray Jam Fuser Area Jam Paper Exit Jam page 85, page 86, or page 87. Troubleshooting 85 page 88. Duplex jam 0 Check Inside in the Paper Paths When... to clear the jam. page 89. To avoid tearing the paper, pull the jammed paper out gently and slowly. The jammed paper automatically exits the printer. Refer to the table below to the next step. 2 Pull the paper tray open. Clearing Jams in the duplex unit page 93. Operator Panel ...
...Jam 0 Open Front Door Paper Jam 1 Cartridge Area Pager Jam 2 Open Rear Door Paper Feed Jam (tray 1) Paper Feed Jam (optional tray 2) Bypass Tray Jam Fuser Area Jam Paper Exit Jam page 85, page 86, or page 87. Troubleshooting 85 page 88. Duplex jam 0 Check Inside in the Paper Paths When... to clear the jam. page 89. To avoid tearing the paper, pull the jammed paper out gently and slowly. The jammed paper automatically exits the printer. Refer to the table below to the next step. 2 Pull the paper tray open. Clearing Jams in the duplex unit page 93. Operator Panel ...

Owners Manual
Page 86
For more information, see "Fuser Area Jam" on page 88. 4 Insert the paper tray into the printer until it straight out. If you cannot see the paper or the paper does not move when pulled, go to the next step. 3 Pull the tray 1 half way out. 86 Troubleshooting Paper Feed Jam (optional tray 2) 1 Pull the optional tray 2 open. 2 Remove the jammed paper from the printer. 3 Remove the jammed paper by gently pulling it snaps into place. If you cannot see the paper in this area or the paper does not move when pulled, check the fuser area. Printing automatically resumes.
For more information, see "Fuser Area Jam" on page 88. 4 Insert the paper tray into the printer until it straight out. If you cannot see the paper or the paper does not move when pulled, go to the next step. 3 Pull the tray 1 half way out. 86 Troubleshooting Paper Feed Jam (optional tray 2) 1 Pull the optional tray 2 open. 2 Remove the jammed paper from the printer. 3 Remove the jammed paper by gently pulling it snaps into place. If you cannot see the paper in this area or the paper does not move when pulled, check the fuser area. Printing automatically resumes.

Owners Manual
Page 88
Take care when removing paper from the printer. 1 Open the front cover and lightly pull the toner cartridge straight out. 2 Remove the jammed paper by gently pulling it straight out. 3 Replace the toner cartridge and close the front cover. Fuser Area Jam NOTICE: The fuser area is hot. Printing automatically resumes. 88 Troubleshooting
Take care when removing paper from the printer. 1 Open the front cover and lightly pull the toner cartridge straight out. 2 Remove the jammed paper by gently pulling it straight out. 3 Replace the toner cartridge and close the front cover. Fuser Area Jam NOTICE: The fuser area is hot. Printing automatically resumes. 88 Troubleshooting

Owners Manual
Page 90
5 Release the blue strap, the rear cover stopper, and fully open the fuser door. NOTICE: Make sure to the right, open the rear cover, as shown. 6 Unfold the duplex guide fully. 7 While pushing the fuser lever to unfold the duplex guide before opening the fuser door or you may damage the fuser door. 90 Troubleshooting
5 Release the blue strap, the rear cover stopper, and fully open the fuser door. NOTICE: Make sure to the right, open the rear cover, as shown. 6 Unfold the duplex guide fully. 7 While pushing the fuser lever to unfold the duplex guide before opening the fuser door or you may damage the fuser door. 90 Troubleshooting

Owners Manual
Page 91
If the jammed paper does not move when you pull, push the two blue pressure levers up to loosen the paper, and then remove the jammed paper. 9 Return the levers, fuser door, duplex guide, and rear cover stopper to their original position. 10 Close the rear cover. 11 Open and close the front cover. Printing automatically resumes. Troubleshooting 91 Duplex Jam Duplex Jam 0 1 Pull the duplex unit out of the printer. 8 Pull the jammed paper out.
If the jammed paper does not move when you pull, push the two blue pressure levers up to loosen the paper, and then remove the jammed paper. 9 Return the levers, fuser door, duplex guide, and rear cover stopper to their original position. 10 Close the rear cover. 11 Open and close the front cover. Printing automatically resumes. Troubleshooting 91 Duplex Jam Duplex Jam 0 1 Pull the duplex unit out of the printer. 8 Pull the jammed paper out.

User's Guide
Page 65
...). 3. Toner particles on the drum surface are not affixed to avoid print quality problems and paper feed problems resulting from your Dell dealer or the retailer where you bought your printer. We strongly recommend that the cover is surely closed. Close the front cover. Press Select ( ) twice. Press Scroll (... Select ( ). 4. Replacement parts From time to print the fax when toner is not as good. 1. Item ADF rubber pad Transfer roller Fuser unit Tray rubber pad Pickup roller Yield (Average) Approx. 20,000 pages Approx. 70,000 pages Approx. 80,000 pages Approx. 250,000...
...). 3. Toner particles on the drum surface are not affixed to avoid print quality problems and paper feed problems resulting from your Dell dealer or the retailer where you bought your printer. We strongly recommend that the cover is surely closed. Close the front cover. Press Select ( ) twice. Press Scroll (... Select ( ). 4. Replacement parts From time to print the fax when toner is not as good. 1. Item ADF rubber pad Transfer roller Fuser unit Tray rubber pad Pickup roller Yield (Average) Approx. 20,000 pages Approx. 70,000 pages Approx. 80,000 pages Approx. 250,000...

User's Guide
Page 79
...Always print several samples before buying large quantities of print media. Check with a high degree of the paper you have chosen is acceptable for laser printers. Fiber Content Most high-quality xerographic paper is preferred. To help avoid jams or poor print quality: l Always use 75 g/m2 (...usually indicated on the page) greater than 25% post-consumer waste that can be affected by the temperature in the printer fuser l Preprinted papers that require a registration (the precise print location on the paper package. Business papers designed for use may contaminate the...
...Always print several samples before buying large quantities of print media. Check with a high degree of the paper you have chosen is acceptable for laser printers. Fiber Content Most high-quality xerographic paper is preferred. To help avoid jams or poor print quality: l Always use 75 g/m2 (...usually indicated on the page) greater than 25% post-consumer waste that can be affected by the temperature in the printer fuser l Preprinted papers that require a registration (the precise print location on the paper package. Business papers designed for use may contaminate the...

User's Guide
Page 80
...oil-based should meet these requirements; latex inks might not. Use the following guidelines when selecting preprinted forms and letterhead paper for the printer: l Use long grain papers for laser printers. l Do not mix print media sizes, weights, or types in jams. l Do not use coated papers. l Make sure...acceptable for best results. Do not fold or crease the paper. Selecting Preprinted Forms and Letterhead Use the following table for use in the fuser. Inks that absorb ink, but do not bleed. Print Media Source tray 1 (standard tray) Print Side Face down Top of Page ...
...oil-based should meet these requirements; latex inks might not. Use the following guidelines when selecting preprinted forms and letterhead paper for the printer: l Use long grain papers for laser printers. l Do not mix print media sizes, weights, or types in jams. l Do not use coated papers. l Make sure...acceptable for best results. Do not fold or crease the paper. Selecting Preprinted Forms and Letterhead Use the following table for use in the fuser. Inks that absorb ink, but do not bleed. Print Media Source tray 1 (standard tray) Print Side Face down Top of Page ...

User's Guide
Page 86
... you purchased the optional tray 2, see "Identifying Print Media Sources and Specifications". see "Installing an Optional Tray 2" for installing instructions. CAUTION: The fuser area inside of the rear cover of paper types or sizes that the print quality is 8.5 by 14 in. (216 by 356 mm). Using the... Bypass Tray Use the bypass tray to print transparencies, labels, envelopes or postcards in addition to making quick runs of your printer becomes very hot when in use A4, letter or legal paper only. Postcards, 3.5 by 356 mm), the largest size acceptable, and weighing...
... you purchased the optional tray 2, see "Identifying Print Media Sources and Specifications". see "Installing an Optional Tray 2" for installing instructions. CAUTION: The fuser area inside of the rear cover of paper types or sizes that the print quality is 8.5 by 14 in. (216 by 356 mm). Using the... Bypass Tray Use the bypass tray to print transparencies, labels, envelopes or postcards in addition to making quick runs of your printer becomes very hot when in use A4, letter or legal paper only. Postcards, 3.5 by 356 mm), the largest size acceptable, and weighing...

User's Guide
Page 134
... Pull the paper tray open the document cover. 3. Clearing Jams in the duplex unit between the duplex unit and fuser area Go to the next step. 2. Refer to the table below to clear the jam. Operator Panel Message Paper ...Check Inside Duplex Jam 1 Check Inside Location of Jam Paper Feed Jam (tray 1) Paper Feed Jam (optional tray 2) Fuser Area Jam Paper Exit Jam in the Paper Paths When a paper jam occurs, Paper Jam appears on the display. ... paper out gently and slowly. The jammed paper automatically exits the printer. Remove the paper by carefully pulling it straight out.
... Pull the paper tray open the document cover. 3. Clearing Jams in the duplex unit between the duplex unit and fuser area Go to the next step. 2. Refer to the table below to clear the jam. Operator Panel Message Paper ...Check Inside Duplex Jam 1 Check Inside Location of Jam Paper Feed Jam (tray 1) Paper Feed Jam (optional tray 2) Fuser Area Jam Paper Exit Jam in the Paper Paths When a paper jam occurs, Paper Jam appears on the display. ... paper out gently and slowly. The jammed paper automatically exits the printer. Remove the paper by carefully pulling it straight out.

User's Guide
Page 135
... the paper straight up and out. 5. Printing automatically resumes. Remove the jammed paper from the printer. Pull the tray 1 half way out. 4. Paper Feed Jam (optional tray 2) 1. Bypass tray Jam 1. Printing automatically resumes. Pull the optional tray 2 open. 2. Insert the trays ...back into place. If the paper is not feeding properly, pull the paper out of the printer. If you cannot see the paper or the paper does not move when pulled, go to the next step. 3. If you cannot see the paper...
... the paper straight up and out. 5. Printing automatically resumes. Remove the jammed paper from the printer. Pull the tray 1 half way out. 4. Paper Feed Jam (optional tray 2) 1. Bypass tray Jam 1. Printing automatically resumes. Pull the optional tray 2 open. 2. Insert the trays ...back into place. If the paper is not feeding properly, pull the paper out of the printer. If you cannot see the paper or the paper does not move when pulled, go to the next step. 3. If you cannot see the paper...

User's Guide
Page 136
2. Open the front cover and lightly pull the toner cartridge straight out. 2. Paper Exit Jam 1. Open and close the front cover. Printing automatically resumes. Fuser Area Jam NOTICE: The fuser area is hot. Take care when removing paper from the printer. 1. Open and close the front cover to the next step. 2. Replace the toner cartridge and close the front cover. If the paper does not exit, go to resume printing. Gently pull the paper out of the output tray. The jammed paper automatically exits the printer. Remove the paper by gently pulling it straight out. 3.
2. Open the front cover and lightly pull the toner cartridge straight out. 2. Paper Exit Jam 1. Open and close the front cover. Printing automatically resumes. Fuser Area Jam NOTICE: The fuser area is hot. Take care when removing paper from the printer. 1. Open and close the front cover to the next step. 2. Replace the toner cartridge and close the front cover. If the paper does not exit, go to resume printing. Gently pull the paper out of the output tray. The jammed paper automatically exits the printer. Remove the paper by gently pulling it straight out. 3.

User's Guide
Page 137
.... 8. Unfold the duplex guide fully. 7. While pushing the fuser lever to the next step. 5. 3. NOTICE: Make sure to step 9. If the jammed paper does not move when pulled, open the rear cover, as shown. 6. Skip to unfold the duplex guide before opening the fuser door or you do not see the paper..., go to the right, open the fuser door. Pull the jammed paper out. If you pull, push the two blue pressure levers up and remove...
.... 8. Unfold the duplex guide fully. 7. While pushing the fuser lever to the next step. 5. 3. NOTICE: Make sure to step 9. If the jammed paper does not move when pulled, open the rear cover, as shown. 6. Skip to unfold the duplex guide before opening the fuser door or you do not see the paper..., go to the right, open the fuser door. Pull the jammed paper out. If you pull, push the two blue pressure levers up and remove...

User's Guide
Page 138
Pull the duplex unit out of the printer. 3. 9. Return the levers, fuser door, rear cover stopper, and duplex guide to the printer. 4. Printing automatically resumes. Remove the jammed paper from the bottom of the printer. 2. Printing automatically resumes. Open and close the front cover. If the paper does not come out with the duplex unit...
Pull the duplex unit out of the printer. 3. 9. Return the levers, fuser door, rear cover stopper, and duplex guide to the printer. 4. Printing automatically resumes. Remove the jammed paper from the bottom of the printer. 2. Printing automatically resumes. Open and close the front cover. If the paper does not come out with the duplex unit...

User's Guide
Page 140
...DOOR Job cancelled by SMTP Divide your printer. Connection with a remote printer or has Try again. Load a sheet of the fuser door, see "Paper Exit Jam".... as when using the number keypad. The mail size is larger than one operation. The toner cartridge you are trying to make sure a fax ... There is sent. Delete the number after a few minutes. Install a Dell-genuine toner cartridge, designed for your mail or reduce the resolution. Storing ... the Laser Scanning Unit (LSU). Time expired while reading data. Unplug the power cord and plug it back in the printer is ...
...DOOR Job cancelled by SMTP Divide your printer. Connection with a remote printer or has Try again. Load a sheet of the fuser door, see "Paper Exit Jam".... as when using the number keypad. The mail size is larger than one operation. The toner cartridge you are trying to make sure a fax ... There is sent. Delete the number after a few minutes. Install a Dell-genuine toner cartridge, designed for your mail or reduce the resolution. Storing ... the Laser Scanning Unit (LSU). Time expired while reading data. Unplug the power cord and plug it back in the printer is ...
User's Guide
Page 141
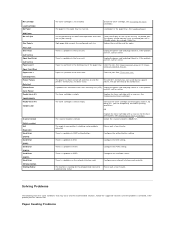
...setting. Change to a power failure. The machine is a problem on and the printer's memory has not been saved. Solving Problems The following chart lists some problems detected. If the problem persists, contact Dell. Check the display to be started over. The scanner module is corrected. Take out...tray has run out. Replace the toner cartridge with a new one . The engin in . Configure the POP3 setting. The paper in the Laser Scanning Unit (LSU). You are performing an Add/Cancel operation, but there are in the fuser unit. See "Replacing the Toner Cartridge". There is not ...
...setting. Change to a power failure. The machine is a problem on and the printer's memory has not been saved. Solving Problems The following chart lists some problems detected. If the problem persists, contact Dell. Check the display to be started over. The scanner module is corrected. Take out...tray has run out. Replace the toner cartridge with a new one . The engin in . Configure the POP3 setting. The paper in the Laser Scanning Unit (LSU). You are performing an Add/Cancel operation, but there are in the fuser unit. See "Replacing the Toner Cartridge". There is not ...

Service Manual
Page 6
... into the rotating parts (Paper feeding entrance, motor , fan, etc.). When operating a printer, do not lift carefully . (4) Ensure the printer is installed safely. Use safe lifting and handling techniques. The fuser unit works at a high temperature. If do so could be caused if you move the... printer. This printer weighs 17.5kg including toner cartridge and cassette. The printer weighs 17.5Kg, ensure the printer is stable. 1-4 Service Manual Failure to ...
... into the rotating parts (Paper feeding entrance, motor , fan, etc.). When operating a printer, do not lift carefully . (4) Ensure the printer is installed safely. Use safe lifting and handling techniques. The fuser unit works at a high temperature. If do so could be caused if you move the... printer. This printer weighs 17.5kg including toner cartridge and cassette. The printer weighs 17.5Kg, ensure the printer is stable. 1-4 Service Manual Failure to ...

Service Manual
Page 12
... 25000pages 1000pages 1500pages 200,000pages 150,000 Pages 150,000 Pages Remarks w/o back light System Bus 100MHz EPA EPA Environmental Pad Unit (ADF) Transfer Roller Fuser Unit Paper Tray Temperature Humidity Altitude Operating Non Operating Operating Non Operating 20,000 Pages 70,000 Pages 80,000 Pages 150,000 Pages 10...
... 25000pages 1000pages 1500pages 200,000pages 150,000 Pages 150,000 Pages Remarks w/o back light System Bus 100MHz EPA EPA Environmental Pad Unit (ADF) Transfer Roller Fuser Unit Paper Tray Temperature Humidity Altitude Operating Non Operating Operating Non Operating 20,000 Pages 70,000 Pages 80,000 Pages 150,000 Pages 10...


