Owners Manual
Page 9
4 Using Your Multi-Function Printer Printing 51 Printing in Windows 51 Printing in Macintosh 51 Printing in Linux 51 Printing from the USB Memory Key 52 Copying 52 Knowing the Copy Menu 52 Setting the Basic Copy Options 52 Making Copies 54 Special Copy Features 54 Selecting a Paper Tray ... the Default Settings 56 Scanning 57 Knowing the Scan Menu 58 Scanning to an Application 58 Scanning Using Network Scan 59 Scanning to the USB Memory Key 60 Scanning Using the Windows Image Acquisition (WIA) Driver 63 Scanning and Sending an Email 64 Faxing 65 Knowing the Fax Menu 65 ...
4 Using Your Multi-Function Printer Printing 51 Printing in Windows 51 Printing in Macintosh 51 Printing in Linux 51 Printing from the USB Memory Key 52 Copying 52 Knowing the Copy Menu 52 Setting the Basic Copy Options 52 Making Copies 54 Special Copy Features 54 Selecting a Paper Tray ... the Default Settings 56 Scanning 57 Knowing the Scan Menu 58 Scanning to an Application 58 Scanning Using Network Scan 59 Scanning to the USB Memory Key 60 Scanning Using the Windows Image Acquisition (WIA) Driver 63 Scanning and Sending an Email 64 Faxing 65 Knowing the Fax Menu 65 ...
Owners Manual
Page 10
Replacing the ADF Rubber Pad 75 Ordering Supplies 77 Replacing the Toner Cartridge 78 Cleaning Your Multi-Function Printer 80 Cleaning the Exterior 80 Cleaning the Interior 80 Cleaning the Scanner 81 Cleaning the Drum 82 6 ... Troubleshooting 94 7 Installing Options Precautions When Installing Printer Accessories 95 Expanding Printer Memory 95 Activating the Added Memory in the PS Printer Properties 97 Installing an Optional Tray 2 98 Activating the Installed Optional Tray 2 in the Printer Properties 100 8 Contacting Dell Technical Assistance 101 Automated Order-Status Service 102...
Replacing the ADF Rubber Pad 75 Ordering Supplies 77 Replacing the Toner Cartridge 78 Cleaning Your Multi-Function Printer 80 Cleaning the Exterior 80 Cleaning the Interior 80 Cleaning the Scanner 81 Cleaning the Drum 82 6 ... Troubleshooting 94 7 Installing Options Precautions When Installing Printer Accessories 95 Expanding Printer Memory 95 Activating the Added Memory in the PS Printer Properties 97 Installing an Optional Tray 2 98 Activating the Installed Optional Tray 2 in the Printer Properties 100 8 Contacting Dell Technical Assistance 101 Automated Order-Status Service 102...
Owners Manual
Page 16
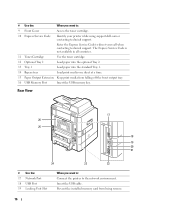
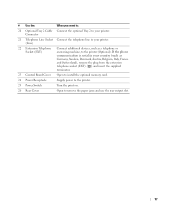
...environment. Prevent the installed memory card from falling off the front output tray. 16 USB Memory Port Insert the USB memory key. # Use ... When you want to: Connect the printer to direct your printer while using support.dell.com or contacting technical support. Insert the... USB cable. The Express Service Code is not available in all countries. 11 Toner Cartridge Use the toner cartridge. 12 Optional Tray 2 Load paper into the optional Tray 2. 13 Tray 1 Load paper into the standard Tray 1. 14 Bypass tray Load print media one...
...environment. Prevent the installed memory card from falling off the front output tray. 16 USB Memory Port Insert the USB memory key. # Use ... When you want to: Connect the printer to direct your printer while using support.dell.com or contacting technical support. Insert the... USB cable. The Express Service Code is not available in all countries. 11 Toner Cartridge Use the toner cartridge. 12 Optional Tray 2 Load paper into the optional Tray 2. 13 Tray 1 Load paper into the standard Tray 1. 14 Bypass tray Load print media one...
Owners Manual
Page 17
...) ( ) and insert the supplied terminator. 23 Control Board Cover Open to install the optional memory card. 24 Power Receptacle Supply power to the printer. 25 Power Switch Turn the print on. 26 Rear Cover Open to your printer. (Line) 22 Extension Telephone Socket (EXT) Connect additional devices, such as a telephone or answering... machine, to the printer (Optional). # Use the: When you want to: 20 Optional Tray 2 Cable Connect the optional Tray 2 to remove the paper jams and use the ...
...) ( ) and insert the supplied terminator. 23 Control Board Cover Open to install the optional memory card. 24 Power Receptacle Supply power to the printer. 25 Power Switch Turn the print on. 26 Rear Cover Open to your printer. (Line) 22 Extension Telephone Socket (EXT) Connect additional devices, such as a telephone or answering... machine, to the printer (Optional). # Use the: When you want to: 20 Optional Tray 2 Cable Connect the optional Tray 2 to remove the paper jams and use the ...

Owners Manual
Page 20
... frequently used fax numbers in edit mode. 20 Preparing Your Multi-Function Printer It also allows you have not already done so, follow the steps on the display. Insert a pause into a fax number in memory or search for stored fax numbers or email addresses. Start a job.... Confirm the selection on the Setup Diagram (poster) to complete the hardware installation. Use the printer operator panel to print a Phonebook list. Using the Operator Panel...
... frequently used fax numbers in edit mode. 20 Preparing Your Multi-Function Printer It also allows you have not already done so, follow the steps on the display. Insert a pause into a fax number in memory or search for stored fax numbers or email addresses. Start a job.... Confirm the selection on the Setup Diagram (poster) to complete the hardware installation. Use the printer operator panel to print a Phonebook list. Using the Operator Panel...
Owners Manual
Page 23
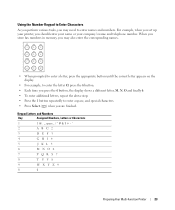
... repeatedly to enter names and numbers. For example, when you set up your printer, you are finished. Keypad Letters and Numbers Key Assigned Numbers, Letters or Characters 1 1 @ . _ space 2 A B C 2 3 D E F 3 4 G H I 4 5 J K L 5 6 M N O 6 7 P Q R S 7 8 T U V 8 9 W X Y Z 9 0 0 Preparing Your Multi-Function Printer 23 When you store fax numbers in memory, you may need to enter a space, and special characters. • Press Select...
... repeatedly to enter names and numbers. For example, when you set up your printer, you are finished. Keypad Letters and Numbers Key Assigned Numbers, Letters or Characters 1 1 @ . _ space 2 A B C 2 3 D E F 3 4 G H I 4 5 J K L 5 6 M N O 6 7 P Q R S 7 8 T U V 8 9 W X Y Z 9 0 0 Preparing Your Multi-Function Printer 23 When you store fax numbers in memory, you may need to enter a space, and special characters. • Press Select...

Owners Manual
Page 52
... options for copying. number of prints and press Select ( ). Setting the Basic Copy Options The Copy menus on your printer 2 Press Scroll ( or ) to highlight PRINT from the USB Memory Key You can print files stored in step 3, go to the next step. Printing from and press Select ( ). ...available. 1 Insert the USB memory key into the USB memory port on the operator panel let you want to print and press Select ( ). 5 Enter the number of copies, copy size, contrast and image quality. NOTE: Only English TXT files, PDF files generated by this printer, and TIFF 6.0 files are ...
... options for copying. number of prints and press Select ( ). Setting the Basic Copy Options The Copy menus on your printer 2 Press Scroll ( or ) to highlight PRINT from the USB Memory Key You can print files stored in step 3, go to the next step. Printing from and press Select ( ). ...available. 1 Insert the USB memory key into the USB memory port on the operator panel let you want to print and press Select ( ). 5 Enter the number of copies, copy size, contrast and image quality. NOTE: Only English TXT files, PDF files generated by this printer, and TIFF 6.0 files are ...

Owners Manual
Page 60
... ( ) when the display shows Logout, your file type is scanned and stored as the second page of doing this: you can scan to the USB memory key using Scroll ( or ) and press Select ( ). The next page is TIFF or PDF, the display asks if you will be logged off automatically. ...Scanning to display Start Scanning and press Select ( ). You can also format the USB memory key or check the available memory space. If your printer returns to the upper menu level. 10 The document will be scanned to computer where Network Scan is not required for...
... ( ) when the display shows Logout, your file type is scanned and stored as the second page of doing this: you can scan to the USB memory key using Scroll ( or ) and press Select ( ). The next page is TIFF or PDF, the display asks if you will be logged off automatically. ...Scanning to display Start Scanning and press Select ( ). You can also format the USB memory key or check the available memory space. If your printer returns to the upper menu level. 10 The document will be scanned to computer where Network Scan is not required for...
Owners Manual
Page 61
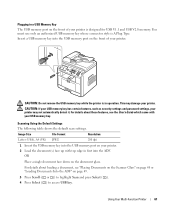
...) JPEG 200 dpi 1 Insert the USB memory key into the USB memory port on your printer. 2 Load the document(s) face up with your printer. CAUTION: Do not remove the USB memory key while the printer is in first into the USB memory port on the front of your printer. Insert a USB memory key into the ADF. CAUTION: If your...
...) JPEG 200 dpi 1 Insert the USB memory key into the USB memory port on your printer. 2 Load the document(s) face up with your printer. CAUTION: Do not remove the USB memory key while the printer is in first into the USB memory port on the front of your printer. Insert a USB memory key into the ADF. CAUTION: If your...

Owners Manual
Page 62
...Color Resolution Letter, A4, Legal, Folio, JPEG, BMP, TIFF, PDF Color, Gray, Mono Executive, A5, A6, B5 100, 200, 300 dpi 1 Insert the USB memory key into the ADF. Select Yes or No. If you want and press Select ( ). 7 Press Scroll ( or ) to access Image Size. 62 Using Your Multi...-Function Printer Select Yes or No. OR Place a single document face down on page 49. 3 Press Scroll ( or ) to highlight Scan and press Select ( ). 4 Press Select ( )...
...Color Resolution Letter, A4, Legal, Folio, JPEG, BMP, TIFF, PDF Color, Gray, Mono Executive, A5, A6, B5 100, 200, 300 dpi 1 Insert the USB memory key into the ADF. Select Yes or No. If you want and press Select ( ). 7 Press Scroll ( or ) to access Image Size. 62 Using Your Multi...-Function Printer Select Yes or No. OR Place a single document face down on page 49. 3 Press Scroll ( or ) to highlight Scan and press Select ( ). 4 Press Select ( )...
Owners Manual
Page 66
... is enabled only if the remote printer also supports the Super Fine resolution. NOTE: Faxes scanned in first into the memory. If you send the fax manually. Super Fine Documents containing extremely fine detail. You can also use, one, two or three-digit speed or group dial numbers. 5 Press Start (... ). 6 When the document is enabled only if the remote printer supports color fax reception ...
... is enabled only if the remote printer also supports the Super Fine resolution. NOTE: Faxes scanned in first into the memory. If you send the fax manually. Super Fine Documents containing extremely fine detail. You can also use, one, two or three-digit speed or group dial numbers. 5 Press Start (... ). 6 When the document is enabled only if the remote printer supports color fax reception ...
Owners Manual
Page 69
...one page. With this mode, the printer will monitor the fax signal and pick up the handset of the extension phone directly connected to the back of the printer and then pressing the remote receive code, or - Intervals from the remote mahine) and then pressing Start ( ) on two or more . If the user memory... is full, the printer is changed to Tel mode. • Tel mode (manual receive mode): Manual receive mode is enabled when automatic fax reception is not...
...one page. With this mode, the printer will monitor the fax signal and pick up the handset of the extension phone directly connected to the back of the printer and then pressing the remote receive code, or - Intervals from the remote mahine) and then pressing Start ( ) on two or more . If the user memory... is full, the printer is changed to Tel mode. • Tel mode (manual receive mode): Manual receive mode is enabled when automatic fax reception is not...
Owners Manual
Page 70
... both sides of reserved operations. • Cancel Job: Delete/cancel a scheduled fax job. • Ignore Toner: Set to print the incomming fax stored in memory when toner cartridge is preset to *9* at the factory. If you to initiate fax reception from an extension phone. In this menu, you can set... and press Select ( ). 3 Press Scroll ( or ) to display the report or list you set the printer to print on two sheets of the page. A second broadcast operation is not permitted until the first one is outside the margin you want to discard any excess at the bottom of paper at the...
... both sides of reserved operations. • Cancel Job: Delete/cancel a scheduled fax job. • Ignore Toner: Set to print the incomming fax stored in memory when toner cartridge is preset to *9* at the factory. If you to initiate fax reception from an extension phone. In this menu, you can set... and press Select ( ). 3 Press Scroll ( or ) to display the report or list you set the printer to print on two sheets of the page. A second broadcast operation is not permitted until the first one is outside the margin you want to discard any excess at the bottom of paper at the...

Owners Manual
Page 71
...received documents, access Secure Receive and select Print with your printer not to Fine. The resolution setting is available. NOTICE: The fax machine automatically stores faxes in the memory if faxes are sent error free even in memory and send at the pre-set time. • Junk... The following options are printed once the machine is automatically changed to receive incoming faxes. The selected information prints out. NOTICE: For memory transmission, the Super Fine resolution is sent manually and if the remote machine supports color fax reception. • Scheduled Jobs: Scheduled ...
...received documents, access Secure Receive and select Print with your printer not to Fine. The resolution setting is available. NOTICE: The fax machine automatically stores faxes in the memory if faxes are sent error free even in memory and send at the pre-set time. • Junk... The following options are printed once the machine is automatically changed to receive incoming faxes. The selected information prints out. NOTICE: For memory transmission, the Super Fine resolution is sent manually and if the remote machine supports color fax reception. • Scheduled Jobs: Scheduled ...
Owners Manual
Page 78
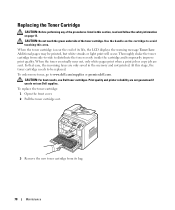
...not guaranteed if you do not use Dell toner cartridges. CAUTION: For best results, use Dell supplies. Print quality and printer reliability are only saved in this section, read and follow the safety information on the cartridge to www.dell.com/supplies or premier.dell.com. When the toner cartridge is ...pages may be replaced. Use the handle on page 13. Replacing the Toner Cartridge CAUTION: Before performing any of the procedures listed in the memory and not printed. When the toner eventually runs out, only white pages print when a print job or copy job are sent. CAUTION: Do...
...not guaranteed if you do not use Dell toner cartridges. CAUTION: For best results, use Dell supplies. Print quality and printer reliability are only saved in this section, read and follow the safety information on the cartridge to www.dell.com/supplies or premier.dell.com. When the toner cartridge is ...pages may be replaced. Use the handle on page 13. Replacing the Toner Cartridge CAUTION: Before performing any of the procedures listed in the memory and not printed. When the toner eventually runs out, only white pages print when a print job or copy job are sent. CAUTION: Do...
Owners Manual
Page 95
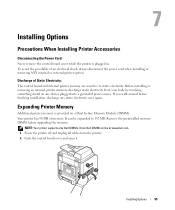
...control board and internal printer memory are sensitive to 192 MB. Remove the preinstalled memory DIMM before finishing installation, discharge any device plugged into a grounded power source. NOTE: Your printer supports only Dell DIMMs. Order Dell DIMMs online at www.dell.com. 1 Power the printer off and unplug all... cables from your body by touching something metal on a Dual In-line Memory Module (DIMM). To avoid the possibility of ...
...control board and internal printer memory are sensitive to 192 MB. Remove the preinstalled memory DIMM before finishing installation, discharge any device plugged into a grounded power source. NOTE: Your printer supports only Dell DIMMs. Order Dell DIMMs online at www.dell.com. 1 Power the printer off and unplug all... cables from your body by touching something metal on a Dual In-line Memory Module (DIMM). To avoid the possibility of ...

Owners Manual
Page 96
Make sure the latches fit over the notches located on the memory DIMM with the grooves at the top of the DIMM. 96 Installing Options 3 Completely open the latches on each side of the DIMM slot and remove the preinstalled memory DIMM. 4 Remove a new memory DIMM from its antistatic package. 5 Holding the memory DIMM by the edges, align the notches on either side of the memory DIMM slot. 6 Push the DIMM straight into the DIMM slot until it snaps into place.
Make sure the latches fit over the notches located on the memory DIMM with the grooves at the top of the DIMM. 96 Installing Options 3 Completely open the latches on each side of the DIMM slot and remove the preinstalled memory DIMM. 4 Remove a new memory DIMM from its antistatic package. 5 Holding the memory DIMM by the edges, align the notches on either side of the memory DIMM slot. 6 Push the DIMM straight into the DIMM slot until it snaps into place.

Owners Manual
Page 97
... XP, select Printers and Faxes. 4 Select the Dell Laser MFP 1815 PS printer. 5 Right-click the printer icon and: In Windows 98/Me, click Properties. Installing Options 97 For details about installing the PS printer driver, see "Installing Dell Software For Local Printing" on . For Windows NT 4.0/2000/XP, select Device Settings. 7 Select the memory DIMM you can...
... XP, select Printers and Faxes. 4 Select the Dell Laser MFP 1815 PS printer. 5 Right-click the printer icon and: In Windows 98/Me, click Properties. Installing Options 97 For details about installing the PS printer driver, see "Installing Dell Software For Local Printing" on . For Windows NT 4.0/2000/XP, select Device Settings. 7 Select the memory DIMM you can...

Owners Manual
Page 122
... lasts for the time period indicated on your packing slip or invoice, except for the following Dell-branded hardware: • Portable computer batteries carry a 1-year limited warranty. • Projector lamps carry a 90-day limited warranty. • Memory carries a lifetime limited warranty. • Monitors carry the longer of either a 1-year limited warranty for...
... lasts for the time period indicated on your packing slip or invoice, except for the following Dell-branded hardware: • Portable computer batteries carry a 1-year limited warranty. • Projector lamps carry a 90-day limited warranty. • Memory carries a lifetime limited warranty. • Monitors carry the longer of either a 1-year limited warranty for...
Owners Manual
Page 123
...not covered under this warranty, we will not charge you return the original part to us within 30 days, we will replace any Dell-branded hardware products returned to you freight collect. During the remaining years: For the remaining period of the limited warranty, we will ship...Resellers (VARs): Technical Support and Customer Service 1-800-822-8965 Government and Education Customers: Technical Support and Customer Service 1-800-234-1490 Dell-Branded Memory 1-888-363-5150 What will charge to be defective in the product(s). You must return the products to us , we will pay to...
...not covered under this warranty, we will not charge you return the original part to us within 30 days, we will replace any Dell-branded hardware products returned to you freight collect. During the remaining years: For the remaining period of the limited warranty, we will ship...Resellers (VARs): Technical Support and Customer Service 1-800-822-8965 Government and Education Customers: Technical Support and Customer Service 1-800-234-1490 Dell-Branded Memory 1-888-363-5150 What will charge to be defective in the product(s). You must return the products to us , we will pay to...


