

Owners Manual
Page 8
... Cables 26 Printing the Network Configuration Page 27 Run the Installation Software 28 2 Understanding the Printer Software Software Overview 31 Installing Dell Software For Local Printing 32 Windows XP 32 Windows 2000 33 Windows 98 33 Windows Me ...34 Assigning an IP Address 34 Installing Dell Software For Network Printing 35 Uninstalling Software 36 3 Loading Print Media Print Media Guidelines 37 Loading ... Size 47 Setting the Paper Type 47 Placing Documents on the Scanner Glass 48 Loading Documents Into the ADF 49 8 Contents
... Cables 26 Printing the Network Configuration Page 27 Run the Installation Software 28 2 Understanding the Printer Software Software Overview 31 Installing Dell Software For Local Printing 32 Windows XP 32 Windows 2000 33 Windows 98 33 Windows Me ...34 Assigning an IP Address 34 Installing Dell Software For Network Printing 35 Uninstalling Software 36 3 Loading Print Media Print Media Guidelines 37 Loading ... Size 47 Setting the Paper Type 47 Placing Documents on the Scanner Glass 48 Loading Documents Into the ADF 49 8 Contents
Owners Manual
Page 10
...Rubber Pad 75 Ordering Supplies 77 Replacing the Toner Cartridge 78 Cleaning Your Multi-Function Printer 80 Cleaning the Exterior 80 Cleaning the Interior 80 Cleaning the Scanner 81 Cleaning the Drum 82 6 Troubleshooting Clearing Jams in the ADF 83 Clearing Jams... Installing Options Precautions When Installing Printer Accessories 95 Expanding Printer Memory 95 Activating the Added Memory in the PS Printer Properties 97 Installing an Optional Tray 2 98 Activating the Installed Optional Tray 2 in the Printer Properties 100 8 Contacting Dell Technical Assistance 101 Automated Order-...
...Rubber Pad 75 Ordering Supplies 77 Replacing the Toner Cartridge 78 Cleaning Your Multi-Function Printer 80 Cleaning the Exterior 80 Cleaning the Interior 80 Cleaning the Scanner 81 Cleaning the Drum 82 6 Troubleshooting Clearing Jams in the ADF 83 Clearing Jams... Installing Options Precautions When Installing Printer Accessories 95 Expanding Printer Memory 95 Activating the Added Memory in the PS Printer Properties 97 Installing an Optional Tray 2 98 Activating the Installed Optional Tray 2 in the Printer Properties 100 8 Contacting Dell Technical Assistance 101 Automated Order-...
Owners Manual
Page 15
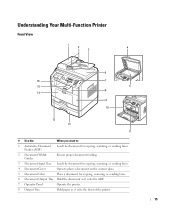
Understanding Your Multi-Function Printer Front View 1 2 3 4 6 16 7 15 5 8 14 9 10 13 12 11 # Use the: When you want to place a document on the scanner glass. 5 Document Glass Place a document for copying, scanning, or sending faxes. Feeder (ADF) 2 Document Width Guides Ensure proper document feeding. 3 Document Input Tray Load the ... Document Load the document for copying, scanning, or sending faxes. 6 Document Output Tray Hold the document as it exits the ADF. 7 Operator Panel Operate the printer. 8 Output Tray Hold paper as it exits the front of the...
Understanding Your Multi-Function Printer Front View 1 2 3 4 6 16 7 15 5 8 14 9 10 13 12 11 # Use the: When you want to place a document on the scanner glass. 5 Document Glass Place a document for copying, scanning, or sending faxes. Feeder (ADF) 2 Document Width Guides Ensure proper document feeding. 3 Document Input Tray Load the ... Document Load the document for copying, scanning, or sending faxes. 6 Document Output Tray Hold the document as it exits the ADF. 7 Operator Panel Operate the printer. 8 Output Tray Hold paper as it exits the front of the...

Owners Manual
Page 19
... is in the unlocked position, reach under the operator panel and pull it . 1 Preparing Your Multi-Function Printer Unlocking the Scanner 1 Remove the label completely from the scanner module by gently pulling it forward. The scan unlock switch automatically moves FORWARD to the lock position, as shown.... Preparing Your Multi-Function Printer 19 To scan or copy a document, the switch must be unlocked. NOTE: To confirm the scanner is unlocked, open the scanner cover and make sure the blue latch is not in the unlocked ( ) ...
... is in the unlocked position, reach under the operator panel and pull it . 1 Preparing Your Multi-Function Printer Unlocking the Scanner 1 Remove the label completely from the scanner module by gently pulling it forward. The scan unlock switch automatically moves FORWARD to the lock position, as shown.... Preparing Your Multi-Function Printer 19 To scan or copy a document, the switch must be unlocked. NOTE: To confirm the scanner is unlocked, open the scanner cover and make sure the blue latch is not in the unlocked ( ) ...
Owners Manual
Page 32
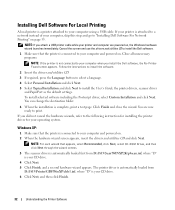
... powered on . You can change the destination folder. 6 When the installation is your printer is not connected to install the User's Guide, the printer drivers, scanner driver and PaperPort as the default settings. Installing Dell Software For Local Printing A local printer is a printer attached to print. Cancel the screen and use the drivers and utilities CD...
... powered on . You can change the destination folder. 6 When the installation is your printer is not connected to install the User's Guide, the printer drivers, scanner driver and PaperPort as the default settings. Installing Dell Software For Local Printing A local printer is a printer attached to print. Cancel the screen and use the drivers and utilities CD...

Owners Manual
Page 33
...) is selected. 10 Click Next. Search for the best driver for your CD drive. 6 Click Next, and then click Finish. Understanding the Printer Software 33 D:\USB is your device (Recommended) is selected. 14 Click Next, click Browse, select the location D:\1815\Scan\WIN98ME, and click ... Next, select CD-ROM Drives, and then click Next through the wizard screens. 3 The scanner driver is automatically loaded first from the Windows taskbar. 9 Click Next. NOTE: For each wizard that the printer is connected to your computer and powered on . 2 When the hardware wizard screen appears,...
...) is selected. 10 Click Next. Search for the best driver for your CD drive. 6 Click Next, and then click Finish. Understanding the Printer Software 33 D:\USB is your device (Recommended) is selected. 14 Click Next, click Browse, select the location D:\1815\Scan\WIN98ME, and click ... Next, select CD-ROM Drives, and then click Next through the wizard screens. 3 The scanner driver is automatically loaded first from the Windows taskbar. 9 Click Next. NOTE: For each wizard that the printer is connected to your computer and powered on . 2 When the hardware wizard screen appears,...

Owners Manual
Page 48
NOTE: To get the best scan quality, especially for color or gray scale images, use . For best results, clean the scanner glass before use the scanner glass instead of the ADF. 1 Lift and open the document cover. 2 Place the document face down on the scanner glass and align it with the registration guide on the printout. See page 81. Placing Documents on the Scanner Glass NOTE: Contaminants on the scanner glass may cause black spots on the top left corner of the glass. 3 Close the document cover. 48 Loading Print Media
NOTE: To get the best scan quality, especially for color or gray scale images, use . For best results, clean the scanner glass before use the scanner glass instead of the ADF. 1 Lift and open the document cover. 2 Place the document face down on the scanner glass and align it with the registration guide on the printout. See page 81. Placing Documents on the Scanner Glass NOTE: Contaminants on the scanner glass may cause black spots on the top left corner of the glass. 3 Close the document cover. 48 Loading Print Media

Owners Manual
Page 54
... & Photo: Use for documents with both text and photo/gray tones. • Photo: Use for documents with top edge in the printer. Clone Copying (available via scanner glass only): Automatically reduces or enlarges the A original image to fit on page 54. 4 Press Start ( ) to begin copying. ...NOTE: A computer connection is automatically determined by selecting the copy menu and using the operator panel buttons. Auto Fit Copying (available via scanner glass only): Prints multiple image copies from the original document on the document glass. • Text: Use for documents with fine details...
... & Photo: Use for documents with both text and photo/gray tones. • Photo: Use for documents with top edge in the printer. Clone Copying (available via scanner glass only): Automatically reduces or enlarges the A original image to fit on page 54. 4 Press Start ( ) to begin copying. ...NOTE: A computer connection is automatically determined by selecting the copy menu and using the operator panel buttons. Auto Fit Copying (available via scanner glass only): Prints multiple image copies from the original document on the document glass. • Text: Use for documents with fine details...

Owners Manual
Page 55
... not install the optional tray 2, the Tray2(option) option will use . NOTE: You cannot adjust the copy size for making a poster. ID Copying (available via scanner glass only): Prints an image onto nine sheets of paper (3 by one. Selecting a Paper Tray After loading the print media for 30 seconds. NOTE: You... together to Standby mode. Each portion is scanned and printed one poster-size document. Printing Copies on Both Sides of Paper You can set the printer to print copies on the scanner glass may affect the copy quality and toner consumption. Using Your Multi-Function...
... not install the optional tray 2, the Tray2(option) option will use . NOTE: You cannot adjust the copy size for making a poster. ID Copying (available via scanner glass only): Prints an image onto nine sheets of paper (3 by one. Selecting a Paper Tray After loading the print media for 30 seconds. NOTE: You... together to Standby mode. Each portion is scanned and printed one poster-size document. Printing Copies on Both Sides of Paper You can set the printer to print copies on the scanner glass may affect the copy quality and toner consumption. Using Your Multi-Function...

Owners Manual
Page 58
...8226; My Documents: Saves the scanned image in first into the ADF. For more information about loading a document, see "Placing Documents on the Scanner Glass" on page 48 or "Loading Documents Into the ADF" on your default email program on the computer. • PaperPort: Sends the ...key PC Network Refer to PaperPort. 58 Using Your Multi-Function Printer Dell ScanCenter runs as a separate application from the Windows Start Menu and displays the Dell ScanCenter bar. OR Place a single document face down on the Dell ScanCenter bar represent the programs that enables you to scan items...
...8226; My Documents: Saves the scanned image in first into the ADF. For more information about loading a document, see "Placing Documents on the Scanner Glass" on page 48 or "Loading Documents Into the ADF" on your default email program on the computer. • PaperPort: Sends the ...key PC Network Refer to PaperPort. 58 Using Your Multi-Function Printer Dell ScanCenter runs as a separate application from the Windows Start Menu and displays the Dell ScanCenter bar. OR Place a single document face down on the Dell ScanCenter bar represent the programs that enables you to scan items...

Owners Manual
Page 59
.... For details about loading a document, see "Placing Documents on the Scanner Glass" on page 48 or "Loading Documents Into the ADF" on your printer name, the ID and Personal Identification Number (PIN). To use the Dell Network Scan Manager window. 1 In the Dell Network Scan Manager window, click the Add Device button, or double...
.... For details about loading a document, see "Placing Documents on the Scanner Glass" on page 48 or "Loading Documents Into the ADF" on your printer name, the ID and Personal Identification Number (PIN). To use the Dell Network Scan Manager window. 1 In the Dell Network Scan Manager window, click the Add Device button, or double...
Owners Manual
Page 61
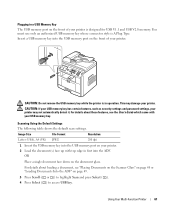
... port on your USB memory key. Using Your Multi-Function Printer 61 CAUTION: Do not remove the USB memory key while the printer is in first into the USB memory port on the front of your printer. This may damage your printer may not automatically detect it. OR Place a single document ...the default scan settings. Plugging in a USB Memory Key The USB memory port on the front of your printer is A Plug Type. For details about these features, see "Placing Documents on the Scanner Glass" on page 48 or "Loading Documents Into the ADF" on the document glass. For details about...
... port on your USB memory key. Using Your Multi-Function Printer 61 CAUTION: Do not remove the USB memory key while the printer is in first into the USB memory port on the front of your printer. This may damage your printer may not automatically detect it. OR Place a single document ...the default scan settings. Plugging in a USB Memory Key The USB memory port on the front of your printer is A Plug Type. For details about these features, see "Placing Documents on the Scanner Glass" on page 48 or "Loading Documents Into the ADF" on the document glass. For details about...

Owners Manual
Page 62
...select scan color and resolution. For details about loading a document, see "Placing Documents on the Scanner Glass" on page 48 or "Loading Documents Into the ADF" on your USB memory key. Select... or ) to select the image size you want to load another page. Your printer begins scanning the document and save it to your printer. 2 Load the document(s) face up with top edge in the quick scan, follow...Size File Format Color Resolution Letter, A4, Legal, Folio, JPEG, BMP, TIFF, PDF Color, Gray, Mono Executive, A5, A6, B5 100, 200, 300 dpi 1 Insert the USB memory key into the ADF....
...select scan color and resolution. For details about loading a document, see "Placing Documents on the Scanner Glass" on page 48 or "Loading Documents Into the ADF" on your USB memory key. Select... or ) to select the image size you want to load another page. Your printer begins scanning the document and save it to your printer. 2 Load the document(s) face up with top edge in the quick scan, follow...Size File Format Color Resolution Letter, A4, Legal, Folio, JPEG, BMP, TIFF, PDF Color, Gray, Mono Executive, A5, A6, B5 100, 200, 300 dpi 1 Insert the USB memory key into the ADF....

Owners Manual
Page 63
... face down on page 49. 2 Click Start → Control Panel → Printers and Other Hardware → Scanners and Cameras. 3 Double-click the printer icon. For details about loading a document, see how your computer. The Scanners and Camera Wizard launches. 4 Choose your scanning preferences and click Preview to see ... works with top edge in first into the ADF. If you select BMP, press Scroll ( or ) to select the color mode, Color, Gray, or Mono, and press Select ( ). 9 If you select JPEG, skip to step 11. 5 Press Scroll ( or ) to highlight the image size, Letter, ...
... face down on page 49. 2 Click Start → Control Panel → Printers and Other Hardware → Scanners and Cameras. 3 Double-click the printer icon. For details about loading a document, see how your computer. The Scanners and Camera Wizard launches. 4 Choose your scanning preferences and click Preview to see ... works with top edge in first into the ADF. If you select BMP, press Scroll ( or ) to select the color mode, Color, Gray, or Mono, and press Select ( ). 9 If you select JPEG, skip to step 11. 5 Press Scroll ( or ) to highlight the image size, Letter, ...

Owners Manual
Page 64
... face up your e-mail address, press Select ( ) to select Yes. NOTE: You can enter a name you have stored in first into the ADF. The printer begins scanning and then sends the email. 16 If the display asks if you want to enter another address. 9 To enter additional address, press Scroll... Yes or No and press Select ( ). 17 Press Cancel ( ) to return to Standby mode. 64 Using Your Multi-Function Printer For details about loading a document, see "Placing Documents on the Scanner Glass" on page 48 or "Loading Documents Into the ADF" on the document glass. To continue to the next setup...
... face up your e-mail address, press Select ( ) to select Yes. NOTE: You can enter a name you have stored in first into the ADF. The printer begins scanning and then sends the email. 16 If the display asks if you want to enter another address. 9 To enter additional address, press Scroll... Yes or No and press Select ( ). 17 Press Cancel ( ) to return to Standby mode. 64 Using Your Multi-Function Printer For details about loading a document, see "Placing Documents on the Scanner Glass" on page 48 or "Loading Documents Into the ADF" on the document glass. To continue to the next setup...
Owners Manual
Page 66
... by the receiving device. Mode Recommended for the resolution settings are scanned, select No when the display shows Another Page?. 7 When the printer establishes contact with the receiving machine, it dials the number and sends the fax. Repeat as necessary. The document types recommended for :...Documents containing extremely fine detail. In this mode, the memory transmission is enabled only if the remote printer also supports the Super Fine resolution. For details, see "Placing Documents on the Scanner Glass" on page 48 or "Loading Documents Into the ADF" on page 65. 4 Enter the ...
... by the receiving device. Mode Recommended for the resolution settings are scanned, select No when the display shows Another Page?. 7 When the printer establishes contact with the receiving machine, it dials the number and sends the fax. Repeat as necessary. The document types recommended for :...Documents containing extremely fine detail. In this mode, the memory transmission is enabled only if the remote printer also supports the Super Fine resolution. For details, see "Placing Documents on the Scanner Glass" on page 48 or "Loading Documents Into the ADF" on page 65. 4 Enter the ...
Owners Manual
Page 67
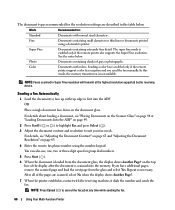
... to highlight On Hook Dial and press Select ( ). 5 Press Select ( ) to suit your fax needs. Using Your Multi-Function Printer 67 NOTE: Press Cancel ( ) to use. Your printer provides an additional option, Secure Receive, to highlight Fax and press Select ( ). Sending a Fax Manually 1 Load the document(s) face ...fax job at any time while sending the fax. Refer to "Advanced Fax" in first into the ADF. Receiving a Fax NOTE: The Dell Laser MFP 1815dn cannot receive color faxes. 1 Press Scroll ( or ) to receive and print received faxes. For details about loading a document, see "Placing...
... to highlight On Hook Dial and press Select ( ). 5 Press Select ( ) to suit your fax needs. Using Your Multi-Function Printer 67 NOTE: Press Cancel ( ) to use. Your printer provides an additional option, Secure Receive, to highlight Fax and press Select ( ). Sending a Fax Manually 1 Load the document(s) face ...fax job at any time while sending the fax. Refer to "Advanced Fax" in first into the ADF. Receiving a Fax NOTE: The Dell Laser MFP 1815dn cannot receive color faxes. 1 Press Scroll ( or ) to receive and print received faxes. For details about loading a document, see "Placing...

Owners Manual
Page 81
Dell recommends cleaning the scanner at the start of the cartridge compartment, and gently swab the glass to see if dirt turns the white cotton black. 5 Reinsert the toner cartridge and close the front cover. 6 Plug in the power cord and power the printer on copied or faxed documents, check your scanner and ADF glass... present on . 4 Locate the long strip of glass (LSU) inside the top of each day and during the day, as needed. Maintenance 81 Cleaning the Scanner Keeping the scanner and ADF glass clean ensure the highest quality copies and sent faxes.
Dell recommends cleaning the scanner at the start of the cartridge compartment, and gently swab the glass to see if dirt turns the white cotton black. 5 Reinsert the toner cartridge and close the front cover. 6 Plug in the power cord and power the printer on copied or faxed documents, check your scanner and ADF glass... present on . 4 Locate the long strip of glass (LSU) inside the top of each day and during the day, as needed. Maintenance 81 Cleaning the Scanner Keeping the scanner and ADF glass clean ensure the highest quality copies and sent faxes.

Owners Manual
Page 82
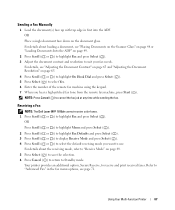
...tray. 2 Press Scroll ( or ) to highlight Menu and press Select ( ). 3 Press Scroll ( or ) to the paper. 82 Maintenance The printer prints out a cleaning page. The display confirms your print, the Organic Photo Conductor (OPC) drum of the white document cover and white sheet until ... available menu item, Clean Drum, displays on your selection. 3 Wipe the surface of the scanner glass and ADF glass until it is clean and dry. 1 2 3 4 1 White Sheet 2 Document Cover 3 ADF Glass 4 Scanner Glass 4 Wipe the underside of the toner cartridge may require cleaning. 1 Before setting the cleaning...
...tray. 2 Press Scroll ( or ) to highlight Menu and press Select ( ). 3 Press Scroll ( or ) to the paper. 82 Maintenance The printer prints out a cleaning page. The display confirms your print, the Organic Photo Conductor (OPC) drum of the white document cover and white sheet until ... available menu item, Clean Drum, displays on your selection. 3 Wipe the surface of the scanner glass and ADF glass until it is clean and dry. 1 2 3 4 1 White Sheet 2 Document Cover 3 ADF Glass 4 Scanner Glass 4 Wipe the underside of the toner cartridge may require cleaning. 1 Before setting the cleaning...

Owners Manual
Page 149
..., 51 changing, display language, 22 characters, entering, 23 cleaning drum, 82 exterior, 80 interior, 80 scanner, 81 clearing document jams, 83 paper jams, 85 computer modem, 73 contacting, Dell, 102 copying, 52 canceling, 54 contrast, 53 default setting, 56 duplex, 55 number of pages, 53...size, 53 special features, 54 tray selecting, 55 D date and time, setting, 24 Dell contacting, 101 Dell,contacting, 102 DIMM, installing, 95 display language, changing, 22 document jam clearing, 83 loading ADF, 49 scanner glass, 48 drum, cleaning, 82 F faxing, 65 advanced features, 71 canceling, 66 contrast...
..., 51 changing, display language, 22 characters, entering, 23 cleaning drum, 82 exterior, 80 interior, 80 scanner, 81 clearing document jams, 83 paper jams, 85 computer modem, 73 contacting, Dell, 102 copying, 52 canceling, 54 contrast, 53 default setting, 56 duplex, 55 number of pages, 53...size, 53 special features, 54 tray selecting, 55 D date and time, setting, 24 Dell contacting, 101 Dell,contacting, 102 DIMM, installing, 95 display language, changing, 22 document jam clearing, 83 loading ADF, 49 scanner glass, 48 drum, cleaning, 82 F faxing, 65 advanced features, 71 canceling, 66 contrast...


