
Owner's Manual
Page 2
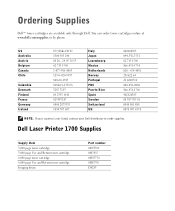
... country is not listed, contact your Dell distributor to order supplies. You can order toner cartridges online at www.dell.com/supplies or by phone. Dell Laser Printer 1700 Supplies Supply Item 3,000 page toner cartridge 3,000 page Use and Return toner cartridge 6,000 page toner cartridge 6,000 page Use and Return toner cartridge Imaging drum Part number 00N3769 00J3815...
... country is not listed, contact your Dell distributor to order supplies. You can order toner cartridges online at www.dell.com/supplies or by phone. Dell Laser Printer 1700 Supplies Supply Item 3,000 page toner cartridge 3,000 page Use and Return toner cartridge 6,000 page toner cartridge 6,000 page Use and Return toner cartridge Imaging drum Part number 00N3769 00J3815...
Owner's Manual
Page 6
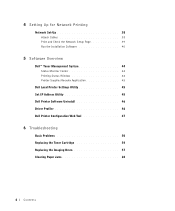
... System 44 Status Monitor Center 44 Printing Status Window 44 Printer Supplies Reorder Application 45 Dell Local Printer Settings Utility 45 Set IP Address Utility 45 Dell Printer Software Uninstall 46 Driver Profiler 46 Dell Printer Configuration Web Tool 47 6 Troubleshooting Basic Problems 50 Replacing the Toner Cartridge 54 Replacing the Imaging Drum 57 Clearing Paper Jams 60...
... System 44 Status Monitor Center 44 Printing Status Window 44 Printer Supplies Reorder Application 45 Dell Local Printer Settings Utility 45 Set IP Address Utility 45 Dell Printer Software Uninstall 46 Driver Profiler 46 Dell Printer Configuration Web Tool 47 6 Troubleshooting Basic Problems 50 Replacing the Toner Cartridge 54 Replacing the Imaging Drum 57 Clearing Paper Jams 60...
Owner's Manual
Page 7
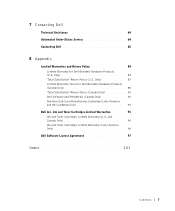
... Only 95 Ink and Toner Cartridges Limited Warranty (Latin America Only 96 Dell Software License Agreement 97 Index 101 Contents 7 Only 84 "Total Satisfaction" Return Policy (U.S. 7 Contacting Dell Technical Assistance 64 Automated Order-Status Service 64 Contacting Dell 65 8 Appendix Limited Warranties and Return Policy 84 Limited Warranty for Dell-Branded Hardware Products (Canada Only...
... Only 95 Ink and Toner Cartridges Limited Warranty (Latin America Only 96 Dell Software License Agreement 97 Index 101 Contents 7 Only 84 "Total Satisfaction" Return Policy (U.S. 7 Contacting Dell Technical Assistance 64 Automated Order-Status Service 64 Contacting Dell 65 8 Appendix Limited Warranties and Return Policy 84 Limited Warranty for Dell-Branded Hardware Products (Canada Only...

Owner's Manual
Page 39
...and a network setup page. 2 Under the Standard Network Card heading on the printer. Setting Up for Network Printing 39 After the printer completes its internal tests, the Ready/Data light comes on , make sure the toner cartridge is Connected. If Status is turned on . Make sure the Ethernet cable is... firmly plugged into the back of the printer and the other end into a properly grounded outlet. 4 Turn on the network setup ...
...and a network setup page. 2 Under the Standard Network Card heading on the printer. Setting Up for Network Printing 39 After the printer completes its internal tests, the Ready/Data light comes on , make sure the toner cartridge is Connected. If Status is turned on . Make sure the Ethernet cable is... firmly plugged into the back of the printer and the other end into a properly grounded outlet. 4 Turn on the network setup ...
Owner's Manual
Page 41
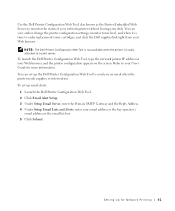
... when it is locally attached to a print server. NOTE: The Dell Printer Configuration Web Tool is not available when the printer is time to order replacement toner cartridges, just click the Dell supplies link right from your Web browser. To set up email alerts: 1 Launch the Dell Printer Configuration Web Tool. 2 Click Email Alert Setup. 3 Under Setup...
... when it is locally attached to a print server. NOTE: The Dell Printer Configuration Web Tool is not available when the printer is time to order replacement toner cartridges, just click the Dell supplies link right from your Web browser. To set up email alerts: 1 Launch the Dell Printer Configuration Web Tool. 2 Click Email Alert Setup. 3 Under Setup...
Owner's Manual
Page 44
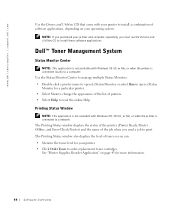
...level of toner so you can: • Monitor the toner level for a particular printer. • Select View to change the appearance of the list of printers. • Select Help to read the online Help. www.dell.com/supplies | support.dell.com Use the Drivers and Utilities CD that came with your... is not available with Windows NT, 98 SE, or Me, or when the printer is connected locally to order replacement toner cartridges. Use the Status Monitor Center to manage multiple Status Monitors. • Double-click a printer name to open its Status Monitor, or select Run to open a Status Monitor for...
...level of toner so you can: • Monitor the toner level for a particular printer. • Select View to change the appearance of the list of printers. • Select Help to read the online Help. www.dell.com/supplies | support.dell.com Use the Drivers and Utilities CD that came with your... is not available with Windows NT, 98 SE, or Me, or when the printer is connected locally to order replacement toner cartridges. Use the Status Monitor Center to manage multiple Status Monitors. • Double-click a printer name to open its Status Monitor, or select Run to open a Status Monitor for...
Owner's Manual
Page 45
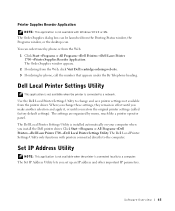
...from the Web, click Visit Dell's cartridge ordering web site. 3 If ordering by menu, much like a printer operator panel. The Dell Local Printer Settings Utility is installed automatically on your computer when you restore the original printer settings (called factory default ... or All Programs→Dell Printers→Dell Laser Printer 1700→Dell Local Printer Settings Utility. The Order Supplies window appears. 2 If ordering from the Web. 1 Click Start→Programs or All Programs→Dell Printers→Dell Laser Printer 1700→Printer Supplies Reorder Application. The...
...from the Web, click Visit Dell's cartridge ordering web site. 3 If ordering by menu, much like a printer operator panel. The Dell Local Printer Settings Utility is installed automatically on your computer when you restore the original printer settings (called factory default ... or All Programs→Dell Printers→Dell Laser Printer 1700→Dell Local Printer Settings Utility. The Order Supplies window appears. 2 If ordering from the Web. 1 Click Start→Programs or All Programs→Dell Printers→Dell Laser Printer 1700→Printer Supplies Reorder Application. The...
Owner's Manual
Page 47
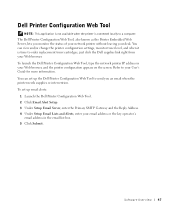
...Under Setup Email Lists and Alerts, enter your Web browser, and the printer configuration appears on the screen. Software Overview 47 To launch the Dell Printer Configuration Web Tool, type the network printer IP address in your email address or the key operator's email address in... and/or change the printer configuration settings, monitor toner level, and when it is connected locally to a computer. Dell Printer Configuration Web Tool NOTE: This application is not available when the printer is time to order replacement toner cartridges, just click the Dell supplies link right from your...
...Under Setup Email Lists and Alerts, enter your Web browser, and the printer configuration appears on the screen. Software Overview 47 To launch the Dell Printer Configuration Web Tool, type the network printer IP address in your email address or the key operator's email address in... and/or change the printer configuration settings, monitor toner level, and when it is connected locally to a computer. Dell Printer Configuration Web Tool NOTE: This application is not available when the printer is time to order replacement toner cartridges, just click the Dell supplies link right from your...
Owner's Manual
Page 49
SECTION 6 Tr o u b l e s h o o t i n g Basic Problems Replacing the Toner Cartridge Replacing the Imaging Drum Clearing Paper Jams 6
SECTION 6 Tr o u b l e s h o o t i n g Basic Problems Replacing the Toner Cartridge Replacing the Imaging Drum Clearing Paper Jams 6
Owner's Manual
Page 50
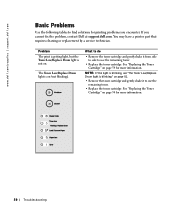
... the remaining toner. • Replace the toner cartridge. What to do • Remove the toner cartridge and gently shake it to use the remaining toner. • Replace the toner cartridge. You may have a printer part that requires cleaning or replacement by a service technician. www.dell.com/supplies | support.dell.com Basic Problems Use the following tables...
... the remaining toner. • Replace the toner cartridge. What to do • Remove the toner cartridge and gently shake it to use the remaining toner. • Replace the toner cartridge. You may have a printer part that requires cleaning or replacement by a service technician. www.dell.com/supplies | support.dell.com Basic Problems Use the following tables...
Owner's Manual
Page 51
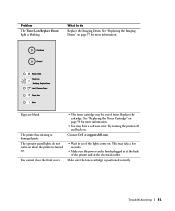
... Toner Cartridge" on . Contact Dell at support.dell.com. • Wait to do not come on page 54 for more information. • You may have a software error. Pages are blank. The operator panel lights do Replace the Imaging Drum. Replace the cartridge. This may be out of the printer and at... the back of toner. You cannot close the front cover. • The toner cartridge may take a few seconds. • Make sure the power cord is...
... Toner Cartridge" on . Contact Dell at support.dell.com. • Wait to do not come on page 54 for more information. • You may have a software error. Pages are blank. The operator panel lights do Replace the Imaging Drum. Replace the cartridge. This may be out of the printer and at... the back of toner. You cannot close the front cover. • The toner cartridge may take a few seconds. • Make sure the power cord is...
Owner's Manual
Page 52
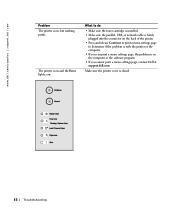
...dell.com/supplies | support.dell.com Problem The printer is on . The printer is on and the Error light is on , but nothing prints. What to do • Make sure the toner cartridge is installed. • Make sure the parallel, USB, or network cable is firmly plugged into the connector on the back of the printer... Continue to print a menu settings page to determine if the problem is with the printer or the computer. • If you cannot print a menu settings page, contact Dell at support.dell.com. Make sure the printer cover is in the computer or the software program. • If you can print...
...dell.com/supplies | support.dell.com Problem The printer is on . The printer is on and the Error light is on , but nothing prints. What to do • Make sure the toner cartridge is installed. • Make sure the parallel, USB, or network cable is firmly plugged into the connector on the back of the printer... Continue to print a menu settings page to determine if the problem is with the printer or the computer. • If you cannot print a menu settings page, contact Dell at support.dell.com. Make sure the printer cover is in the computer or the software program. • If you can print...

Owner's Manual
Page 54
Extended light exposure can cause print quality problems. 1 Open the front cover by pressing the button on the left side of the printer and lowering the cover. 2 Remove the toner cartridge: a Press the button on the base of time. www.dell.com/supplies | support.dell.com Replacing the Toner Cartridge CAUTION: When replacing a toner cartridge, do not leave the new cartridge exposed to direct light for an extended period of the toner cartridge assembly. 54 Troubleshooting
Extended light exposure can cause print quality problems. 1 Open the front cover by pressing the button on the left side of the printer and lowering the cover. 2 Remove the toner cartridge: a Press the button on the base of time. www.dell.com/supplies | support.dell.com Replacing the Toner Cartridge CAUTION: When replacing a toner cartridge, do not leave the new cartridge exposed to direct light for an extended period of the toner cartridge assembly. 54 Troubleshooting
Owner's Manual
Page 55
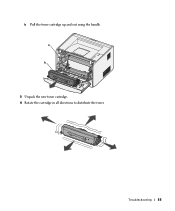
b Pull the toner cartridge up and out using the handle. Troubleshooting 55 a b 3 Unpack the new toner cartridge. 4 Rotate the cartridge in all directions to distribute the toner.
b Pull the toner cartridge up and out using the handle. Troubleshooting 55 a b 3 Unpack the new toner cartridge. 4 Rotate the cartridge in all directions to distribute the toner.
Owner's Manual
Page 56
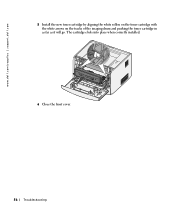
The cartridge clicks into place when correctly installed. 6 Close the front cover. 56 Troubleshooting www.dell.com/supplies | support.dell.com 5 Install the new toner cartridge by aligning the white rollers on the toner cartridge with the white arrows on the tracks of the imaging drum and pushing the toner cartridge in as far as it will go.
The cartridge clicks into place when correctly installed. 6 Close the front cover. 56 Troubleshooting www.dell.com/supplies | support.dell.com 5 Install the new toner cartridge by aligning the white rollers on the toner cartridge with the white arrows on the tracks of the imaging drum and pushing the toner cartridge in as far as it will go.

Owner's Manual
Page 57
Extended light exposure can cause print quality problems. 1 Open the front cover by pressing the button on the left side of the printer and lowering the cover. 2 Pull the toner cartridge assembly out of time. Troubleshooting 57 Replacing the Imaging Drum NOTICE: When replacing an imaging drum, do not leave the toner cartridge or the new imaging drum exposed to direct light for an extended period of the printer by pulling on the toner cartridge handle.
Extended light exposure can cause print quality problems. 1 Open the front cover by pressing the button on the left side of the printer and lowering the cover. 2 Pull the toner cartridge assembly out of time. Troubleshooting 57 Replacing the Imaging Drum NOTICE: When replacing an imaging drum, do not leave the toner cartridge or the new imaging drum exposed to direct light for an extended period of the printer by pulling on the toner cartridge handle.
Owner's Manual
Page 58
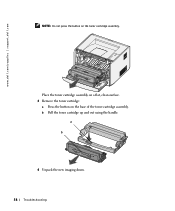
b Pull the toner cartridge up and out using the handle. a b 4 Unpack the new imaging drum. 58 Troubleshooting Place the toner cartridge assembly on a flat, clean surface. 3 Remove the toner cartridge: a Press the button on the toner cartridge assembly. www.dell.com/supplies | support.dell.com NOTE: Do not press the button on the base of the toner cartridge assembly.
b Pull the toner cartridge up and out using the handle. a b 4 Unpack the new imaging drum. 58 Troubleshooting Place the toner cartridge assembly on a flat, clean surface. 3 Remove the toner cartridge: a Press the button on the toner cartridge assembly. www.dell.com/supplies | support.dell.com NOTE: Do not press the button on the base of the toner cartridge assembly.
Owner's Manual
Page 59
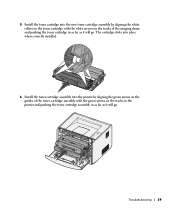
The cartridge clicks into place when correctly installed. 6 Install the toner cartridge assembly into the new toner cartridge assembly by aligning the green arrows on the guides of the imaging drum and pushing the toner cartridge in as far as it will go . Troubleshooting 59 5 Install the toner cartridge into the printer by aligning the white rollers on the toner cartridge with the green arrows on the tracks of the toner cartridge assembly with the white arrows on the tracks in the printer and pushing the toner cartridge assembly in as far as it will go .
The cartridge clicks into place when correctly installed. 6 Install the toner cartridge assembly into the new toner cartridge assembly by aligning the green arrows on the guides of the imaging drum and pushing the toner cartridge in as far as it will go . Troubleshooting 59 5 Install the toner cartridge into the printer by aligning the white rollers on the toner cartridge with the green arrows on the tracks of the toner cartridge assembly with the white arrows on the tracks in the printer and pushing the toner cartridge assembly in as far as it will go .
Owner's Manual
Page 61
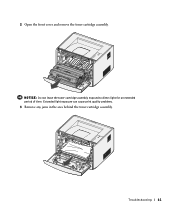
Troubleshooting 61 NOTICE: Do not leave the toner cartridge assembly exposed to direct light for an extended period of time. 2 Open the front cover and remove the toner cartridge assembly. Extended light exposure can cause print quality problems. 3 Remove any jams in the area behind the toner cartridge assembly.
Troubleshooting 61 NOTICE: Do not leave the toner cartridge assembly exposed to direct light for an extended period of time. 2 Open the front cover and remove the toner cartridge assembly. Extended light exposure can cause print quality problems. 3 Remove any jams in the area behind the toner cartridge assembly.
Owner's Manual
Page 62
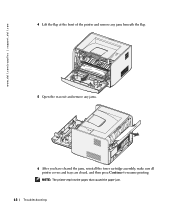
www.dell.com/supplies | support.dell.com 4 Lift the flap at the front of the printer and remove any jams beneath the flap. 5 Open the rear exit and remove any jams. 6 After you have cleared the jams, reinstall the toner cartridge assembly, make sure all printer covers and trays are closed, and then press Continue to resume printing. NOTE: The printer reprints the pages that caused the paper jam. 62 Troubleshooting
www.dell.com/supplies | support.dell.com 4 Lift the flap at the front of the printer and remove any jams beneath the flap. 5 Open the rear exit and remove any jams. 6 After you have cleared the jams, reinstall the toner cartridge assembly, make sure all printer covers and trays are closed, and then press Continue to resume printing. NOTE: The printer reprints the pages that caused the paper jam. 62 Troubleshooting


