
Owner's Manual
Page 2
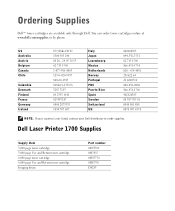
... your country is not listed, contact your Dell distributor to order supplies. Ordering Supplies Dell™ toner cartridges are available only through Dell. You can order toner cartridges online at www.dell.com/supplies or by phone. Dell Laser Printer 1700 Supplies Supply Item 3,000 page toner ...cartridge 3,000 page Use and Return toner cartridge 6,000 page toner cartridge 6,000 page Use and Return toner cartridge Imaging drum ...
... your country is not listed, contact your Dell distributor to order supplies. Ordering Supplies Dell™ toner cartridges are available only through Dell. You can order toner cartridges online at www.dell.com/supplies or by phone. Dell Laser Printer 1700 Supplies Supply Item 3,000 page toner ...cartridge 3,000 page Use and Return toner cartridge 6,000 page toner cartridge 6,000 page Use and Return toner cartridge Imaging drum ...
Owner's Manual
Page 6
... System 44 Status Monitor Center 44 Printing Status Window 44 Printer Supplies Reorder Application 45 Dell Local Printer Settings Utility 45 Set IP Address Utility 45 Dell Printer Software Uninstall 46 Driver Profiler 46 Dell Printer Configuration Web Tool 47 6 Troubleshooting Basic Problems 50 Replacing the Toner Cartridge 54 Replacing the Imaging Drum 57 Clearing Paper Jams 60 6 Contents
... System 44 Status Monitor Center 44 Printing Status Window 44 Printer Supplies Reorder Application 45 Dell Local Printer Settings Utility 45 Set IP Address Utility 45 Dell Printer Software Uninstall 46 Driver Profiler 46 Dell Printer Configuration Web Tool 47 6 Troubleshooting Basic Problems 50 Replacing the Toner Cartridge 54 Replacing the Imaging Drum 57 Clearing Paper Jams 60 6 Contents
Owner's Manual
Page 49
SECTION 6 Tr o u b l e s h o o t i n g Basic Problems Replacing the Toner Cartridge Replacing the Imaging Drum Clearing Paper Jams 6
SECTION 6 Tr o u b l e s h o o t i n g Basic Problems Replacing the Toner Cartridge Replacing the Imaging Drum Clearing Paper Jams 6
Owner's Manual
Page 51
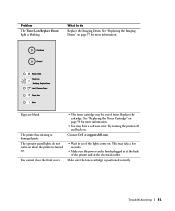
... 54 for more information. • You may be out of the printer and at support.dell.com. • Wait to do Replace the Imaging Drum. Contact Dell at the electrical outlet. Pages are blank. Replace the cartridge. The printer has missing or damaged parts. Troubleshooting 51 See "Replacing the Toner Cartridge... is turned on when the printer is firmly plugged in at the back of toner. What to see if the lights come on . Problem The Toner Low/Replace Drum light is positioned correctly. See "Replacing the Imaging Drum" on . Try turning the printer off and back on page...
... 54 for more information. • You may be out of the printer and at support.dell.com. • Wait to do Replace the Imaging Drum. Contact Dell at the electrical outlet. Pages are blank. Replace the cartridge. The printer has missing or damaged parts. Troubleshooting 51 See "Replacing the Toner Cartridge... is turned on when the printer is firmly plugged in at the back of toner. What to see if the lights come on . Problem The Toner Low/Replace Drum light is positioned correctly. See "Replacing the Imaging Drum" on . Try turning the printer off and back on page...
Owner's Manual
Page 56
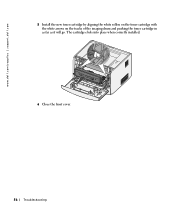
The cartridge clicks into place when correctly installed. 6 Close the front cover. 56 Troubleshooting www.dell.com/supplies | support.dell.com 5 Install the new toner cartridge by aligning the white rollers on the toner cartridge with the white arrows on the tracks of the imaging drum and pushing the toner cartridge in as far as it will go.
The cartridge clicks into place when correctly installed. 6 Close the front cover. 56 Troubleshooting www.dell.com/supplies | support.dell.com 5 Install the new toner cartridge by aligning the white rollers on the toner cartridge with the white arrows on the tracks of the imaging drum and pushing the toner cartridge in as far as it will go.

Owner's Manual
Page 57
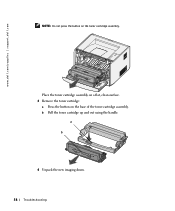
Troubleshooting 57 Replacing the Imaging Drum NOTICE: When replacing an imaging drum, do not leave the toner cartridge or the new imaging drum exposed to direct light for an extended period of the printer by pulling on the toner cartridge handle. Extended light exposure can cause print quality problems. 1 Open the front cover by pressing the button on the left side of the printer and lowering the cover. 2 Pull the toner cartridge assembly out of time.
Troubleshooting 57 Replacing the Imaging Drum NOTICE: When replacing an imaging drum, do not leave the toner cartridge or the new imaging drum exposed to direct light for an extended period of the printer by pulling on the toner cartridge handle. Extended light exposure can cause print quality problems. 1 Open the front cover by pressing the button on the left side of the printer and lowering the cover. 2 Pull the toner cartridge assembly out of time.
Owner's Manual
Page 58
Place the toner cartridge assembly on a flat, clean surface. 3 Remove the toner cartridge: a Press the button on the toner cartridge assembly. www.dell.com/supplies | support.dell.com NOTE: Do not press the button on the base of the toner cartridge assembly. a b 4 Unpack the new imaging drum. 58 Troubleshooting b Pull the toner cartridge up and out using the handle.
Place the toner cartridge assembly on a flat, clean surface. 3 Remove the toner cartridge: a Press the button on the toner cartridge assembly. www.dell.com/supplies | support.dell.com NOTE: Do not press the button on the base of the toner cartridge assembly. a b 4 Unpack the new imaging drum. 58 Troubleshooting b Pull the toner cartridge up and out using the handle.
Owner's Manual
Page 59
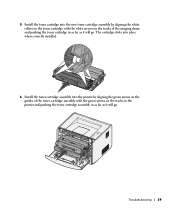
Troubleshooting 59 The cartridge clicks into place when correctly installed. 6 Install the toner cartridge assembly into the new toner cartridge assembly by aligning the green arrows on the guides of the imaging drum and pushing the toner cartridge in as far as it will go . 5 Install the toner cartridge into the printer by aligning the white rollers on the toner cartridge with the green arrows on the tracks of the toner cartridge assembly with the white arrows on the tracks in the printer and pushing the toner cartridge assembly in as far as it will go .
Troubleshooting 59 The cartridge clicks into place when correctly installed. 6 Install the toner cartridge assembly into the new toner cartridge assembly by aligning the green arrows on the guides of the imaging drum and pushing the toner cartridge in as far as it will go . 5 Install the toner cartridge into the printer by aligning the white rollers on the toner cartridge with the green arrows on the tracks of the toner cartridge assembly with the white arrows on the tracks in the printer and pushing the toner cartridge assembly in as far as it will go .
Owner's Manual
Page 60
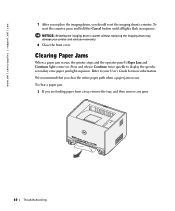
... your warranty. 8 Close the front cover. NOTICE: Resetting the imaging drum's counter without replacing the imaging drum may damage your printer and void your User's Guide for more information. We recommend that you should reset the imaging drum's counter. www.dell.com/supplies | support.dell.com 7 After you replace the imaging drum, you clear the entire paper path when a paper jam...
... your warranty. 8 Close the front cover. NOTICE: Resetting the imaging drum's counter without replacing the imaging drum may damage your printer and void your User's Guide for more information. We recommend that you should reset the imaging drum's counter. www.dell.com/supplies | support.dell.com 7 After you replace the imaging drum, you clear the entire paper path when a paper jam...

Owner's Manual
Page 101
... weights, 28 cards, installing, 17 clearing paper jams, 60 connect the printer Ethernet cable, 38 parallel cable, 30 USB cable, 30 D Dell contacting, 65 Dell Toner Management System, 44 driver profiler, using, 46 E envelopes sizes and weights, 28 Ethernet cable, connecting, 38 I imaging drum replacing, 57 installing optional cards, 17 optional drawer, 14 optional memory...
... weights, 28 cards, installing, 17 clearing paper jams, 60 connect the printer Ethernet cable, 38 parallel cable, 30 USB cable, 30 D Dell contacting, 65 Dell Toner Management System, 44 driver profiler, using, 46 E envelopes sizes and weights, 28 Ethernet cable, connecting, 38 I imaging drum replacing, 57 installing optional cards, 17 optional drawer, 14 optional memory...
Owner's Manual
Page 102
... network, 37 network setup page, 39 clearing paper jams, 60 replacing the imaging drum, 57 replacing the toner cartridge, 54 S set IP address utility, using, 45 software applications Dell Toner Management System, 44 driver profiler, 46 local printer settings utility, 45 printer supplies reorder application, 45 set IP address utility, 45 status monitor center, 44...
... network, 37 network setup page, 39 clearing paper jams, 60 replacing the imaging drum, 57 replacing the toner cartridge, 54 S set IP address utility, using, 45 software applications Dell Toner Management System, 44 driver profiler, 46 local printer settings utility, 45 printer supplies reorder application, 45 set IP address utility, 45 status monitor center, 44...


