User Guide
Page 4
Adjusting Projection Image Size 18 Using the Control Panel 20 Using the Remote Control 22 Installing the Remote Control Batteries 24 Operating Range With Remote Control 25 Using the On-Screen Display 26 Input Source 26 Auto Adjust 27 Brightness/Contrast 28 Video Mode 28 Volume 29 Advanced Settings 29 Language 43 Help 43 4 Troubleshooting Your Projector 44 Guiding Signals 48 Changing the Lamp 49 5 Specifications 51 6 Contacting Dell 57 7 Appendix: Glossary 58 4 Contents
Adjusting Projection Image Size 18 Using the Control Panel 20 Using the Remote Control 22 Installing the Remote Control Batteries 24 Operating Range With Remote Control 25 Using the On-Screen Display 26 Input Source 26 Auto Adjust 27 Brightness/Contrast 28 Video Mode 28 Volume 29 Advanced Settings 29 Language 43 Help 43 4 Troubleshooting Your Projector 44 Guiding Signals 48 Changing the Lamp 49 5 Specifications 51 6 Contacting Dell 57 7 Appendix: Glossary 58 4 Contents
User Guide
Page 15
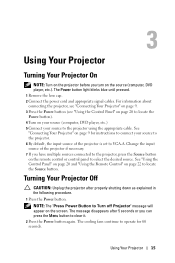
Using Your Projector 15 The Power button light blinks blue until pressed. 1 Remove the lens cap. 2 Connect the power cord and appropriate signal cables. See "Using the Control Panel" on page 20 and "Using the Remote Control" on page 22 to select the desired source. Turning Your Projector Off CAUTION: Unplug the projector after 5 seconds or you turn on the source (computer, DVD player, etc.). Change the input source of the projector is set to VGA-A. NOTE: The "Press Power Button to operate for instructions to connect your...
Using Your Projector 15 The Power button light blinks blue until pressed. 1 Remove the lens cap. 2 Connect the power cord and appropriate signal cables. See "Using the Control Panel" on page 20 and "Using the Remote Control" on page 22 to select the desired source. Turning Your Projector Off CAUTION: Unplug the projector after 5 seconds or you turn on the source (computer, DVD player, etc.). Change the input source of the projector is set to VGA-A. NOTE: The "Press Power Button to operate for instructions to connect your...
User Guide
Page 20
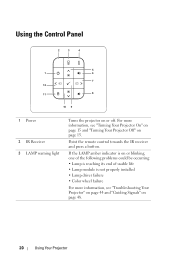
... indicator is on or blinking, one of the following problems could be occurring: • Lamp is reaching its end of usable life • Lamp module is not properly installed • Lamp driver failure • Color wheel failure For more information, see "Troubleshooting Your Projector" on page 44 and "Guiding Signals" on or off. Point the remote control towards the IR receiver and press a button. Using the Control Panel 2 3 4 5 1 6 7 12 11 8 10 9 1 Power 2 IR Receiver 3 LAMP warning light Turns...
... indicator is on or blinking, one of the following problems could be occurring: • Lamp is reaching its end of usable life • Lamp module is not properly installed • Lamp driver failure • Color wheel failure For more information, see "Troubleshooting Your Projector" on page 44 and "Guiding Signals" on or off. Point the remote control towards the IR receiver and press a button. Using the Control Panel 2 3 4 5 1 6 7 12 11 8 10 9 1 Power 2 IR Receiver 3 LAMP warning light Turns...
User Guide
Page 21
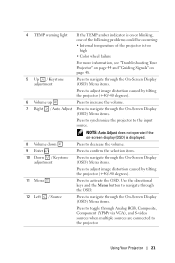
... via VGA), and S-video sources when multiple sources are connected to decrease the volume. 4 TEMP warning light If the TEMP amber indicator is on or blinking, one of the following problems could be occurring: • Internal temperature of the projector is too high • Color wheel failure For more information, see "Troubleshooting Your Projector" on page 44 and "Guiding Signals" on -screen display (OSD) is displayed. Using Your Projector 21 Use the directional keys and the Menu button to activate...
... via VGA), and S-video sources when multiple sources are connected to decrease the volume. 4 TEMP warning light If the TEMP amber indicator is on or blinking, one of the following problems could be occurring: • Internal temperature of the projector is too high • Color wheel failure For more information, see "Troubleshooting Your Projector" on page 44 and "Guiding Signals" on -screen display (OSD) is displayed. Using Your Projector 21 Use the directional keys and the Menu button to activate...

User Guide
Page 26
...1420X and 1430X models. Input Source The Input Source menu allows you press the Source button when the Auto Source mode is selected, the color changes to dark blue. • Use the or buttons on the control panel or remote control to adjust the settings. • To go back to select your projector's input source. Menu Input Source Auto Adjust Brightness/Contrast Video Mode Volume Advanced Settings Language Help Auto Source VGA-A VGA-B Composite S-Video Dell 1420X Resolution: 1400x1050 AUTO SOURCE-Select Off (the default) to auto detect the available input signals. Select On to lock...
...1420X and 1430X models. Input Source The Input Source menu allows you press the Source button when the Auto Source mode is selected, the color changes to dark blue. • Use the or buttons on the control panel or remote control to adjust the settings. • To go back to select your projector's input source. Menu Input Source Auto Adjust Brightness/Contrast Video Mode Volume Advanced Settings Language Help Auto Source VGA-A VGA-B Composite S-Video Dell 1420X Resolution: 1400x1050 AUTO SOURCE-Select Off (the default) to auto detect the available input signals. Select On to lock...
User Guide
Page 31
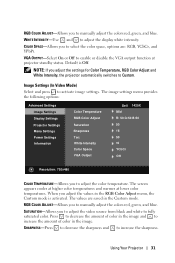
... manually adjust the colors red, green, and blue. Default is activated. The screen appears cooler at higher color temperatures and warmer at projector standby status. SATURATION-Allows you to adjust the video source from black and white to adjust the display white intensity. Using Your Projector 31 The image settings menu provides the following options: Advanced Settings Image Settings Display Settings Projector Settings Menu Settings Power Settings Information Color Temperature RGB Color Adjust Saturation Sharpness Tint White Intensity Color Space VGA Output Dell 1420X...
... manually adjust the colors red, green, and blue. Default is activated. The screen appears cooler at higher color temperatures and warmer at projector standby status. SATURATION-Allows you to adjust the video source from black and white to adjust the display white intensity. Using Your Projector 31 The image settings menu provides the following options: Advanced Settings Image Settings Display Settings Projector Settings Menu Settings Power Settings Information Color Temperature RGB Color Adjust Saturation Sharpness Tint White Intensity Color Space VGA Output Dell 1420X...

User Guide
Page 32
... Settings Image Settings Display Settings Projector Settings Menu Settings Power Settings Information VGA Output Dell 1420X Off Resolution: 1440x1050 VGA OUTPUT-Select On or Off to enable or disable the VGA output function at projector standby status. NOTE: If you to decrease the amount of green in the image and the amount of red in the image (available for Color Temperature, RGB Color Adjust, Saturation, Sharpness, Tint and White Intensity, the projector automatically switches to Custom. Default is Off. 32 Using Your Projector Default is...
... Settings Image Settings Display Settings Projector Settings Menu Settings Power Settings Information VGA Output Dell 1420X Off Resolution: 1440x1050 VGA OUTPUT-Select On or Off to enable or disable the VGA output function at projector standby status. NOTE: If you to decrease the amount of green in the image and the amount of red in the image (available for Color Temperature, RGB Color Adjust, Saturation, Sharpness, Tint and White Intensity, the projector automatically switches to Custom. Default is Off. 32 Using Your Projector Default is...

User Guide
Page 36
...the Source button when the projector is mounted. • Front - CLOSED CAPTION-Select On to activate Projector settings. If you can manually select the input signal. SPEAKER -Select On to lock the current input signal. You can project from behind a translucent screen. • Rear Ceiling - The Projector settings menu provides the following options: Advanced Settings Image Settings Display Settings Projector Settings Menu Settings Power Settings Information Auto Source Projector Mode Speaker Closed Caption Startup Screen High Altitude Mode Test Pattern 2 Factory Reset...
...the Source button when the projector is mounted. • Front - CLOSED CAPTION-Select On to activate Projector settings. If you can manually select the input signal. SPEAKER -Select On to lock the current input signal. You can project from behind a translucent screen. • Rear Ceiling - The Projector settings menu provides the following options: Advanced Settings Image Settings Display Settings Projector Settings Menu Settings Power Settings Information Auto Source Projector Mode Speaker Closed Caption Startup Screen High Altitude Mode Test Pattern 2 Factory Reset...
User Guide
Page 38
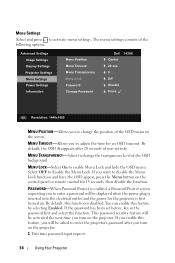
..., a Password Protect screen requesting you to change the transparency level of the following options: Advanced Settings Image Settings Display Settings Projector Settings Menu Settings Power Settings Information Menu Position Menu Timeout Menu Transparency Menu Lock Password Change Password Dell 1420X Center 20 sec. 0 Off Disable Press Resolution: 1440x1050 MENU POSITION-Allows you turn on the control panel or remote control for an OSD timeout. The menu settings consists of the OSD background. If you enable this feature, you will be activated the next time...
..., a Password Protect screen requesting you to change the transparency level of the following options: Advanced Settings Image Settings Display Settings Projector Settings Menu Settings Power Settings Information Menu Position Menu Timeout Menu Transparency Menu Lock Password Change Password Dell 1420X Center 20 sec. 0 Off Disable Press Resolution: 1440x1050 MENU POSITION-Allows you turn on the control panel or remote control for an OSD timeout. The menu settings consists of the OSD background. If you enable this feature, you will be activated the next time...
User Guide
Page 39
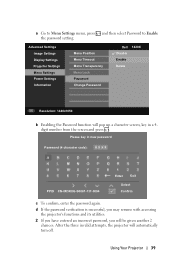
... key in a 4digit number from the screen and press . Advanced Settings Image Settings Display Settings Projector Settings Menu Settings Power Settings Information Menu Position Menu Timeout Menu Transparency Menu Lock Password Change Password Dell 1420X Disable Enable Delete Resolution: 1440x1050 b Enabling the Password function will pop up a character screen, key in new password Password (4 character code): PPID CN-0R3KXG-S0081-137-0004 Enter Exit Select Confirm c To confirm, enter the password again. Using Your Projector 39 d If the password verification is successful, you...
... key in a 4digit number from the screen and press . Advanced Settings Image Settings Display Settings Projector Settings Menu Settings Power Settings Information Menu Position Menu Timeout Menu Transparency Menu Lock Password Change Password Dell 1420X Disable Enable Delete Resolution: 1440x1050 b Enabling the Password function will pop up a character screen, key in new password Password (4 character code): PPID CN-0R3KXG-S0081-137-0004 Enter Exit Select Confirm c To confirm, enter the password again. Using Your Projector 39 d If the password verification is successful, you...

User Guide
Page 41
... the projector to enter power saving mode. Power saving can also set to stabilize. NOTE: Before you turn on immediately. Press any key buttons during countdown period to disable Power Saving mode. The power settings menu consists of the following options: Advanced Settings Image Settings Display Settings Projector Settings Menu Settings Power Settings Information Quick Shutdown Power Saving Lamp Mode Lamp Hour Reset Dell 1420X Off 10 Min Normal Press Resolution: 1440x1050 QUICK SHUTDOWN-Select On to stabilize the internal temperature. The projector will...
... the projector to enter power saving mode. Power saving can also set to stabilize. NOTE: Before you turn on immediately. Press any key buttons during countdown period to disable Power Saving mode. The power settings menu consists of the following options: Advanced Settings Image Settings Display Settings Projector Settings Menu Settings Power Settings Information Quick Shutdown Power Saving Lamp Mode Lamp Hour Reset Dell 1420X Off 10 Min Normal Press Resolution: 1440x1050 QUICK SHUTDOWN-Select On to stabilize the internal temperature. The projector will...

User Guide
Page 44
... broken. • Ensure that the colors of the computer. Ensure that the Input Source is set correctly in the Others menu. Problem No image appears on page 49). • Use Test Pattern in the OSD menu. • Ensure the external graphics port is set to Enable. 44 Troubleshooting Your Projector For other computers, see your projector, see "Changing the Lamp" on the screen F8 CRT/LCD Fn Missing Input Source.
... broken. • Ensure that the colors of the computer. Ensure that the Input Source is set correctly in the Others menu. Problem No image appears on page 49). • Use Test Pattern in the OSD menu. • Ensure the external graphics port is set to Enable. 44 Troubleshooting Your Projector For other computers, see your projector, see "Changing the Lamp" on the screen F8 CRT/LCD Fn Missing Input Source.
User Guide
Page 45
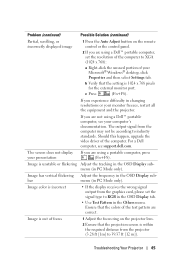
..., please set the resolution of your computer's documentation. Adjust the tracking in the OSD Display submenu (in the Others menu. Troubleshooting Your Projector 45 If you are using a Dell™ portable computer, set the signal type to industry standards. If you are not using a Dell™ portable computer, see support.dell.com. Should this happen, upgrade the video driver of focus Possible Solution (continued) 1 Press the Auto Adjust button on the projector lens. 2 Ensure...
..., please set the resolution of your computer's documentation. Adjust the tracking in the OSD Display submenu (in the Others menu. Troubleshooting Your Projector 45 If you are using a Dell™ portable computer, set the signal type to industry standards. If you are not using a Dell™ portable computer, see support.dell.com. Should this happen, upgrade the video driver of focus Possible Solution (continued) 1 Press the Auto Adjust button on the projector lens. 2 Ensure...
User Guide
Page 46
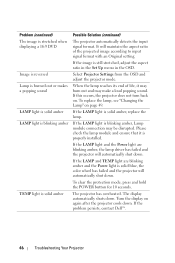
... the projected image according to input signal format with an Original setting. If the LAMP and TEMP light are blinking amber, the lamp driver has failed and the projector will automatically shut down . It will automatically shut down . If the image is solid blue, the color wheel has failed and the projector will maintain the aspect ratio of life, it is solid amber, replace the lamp. Select Projector Settings from the OSD and adjust the projector mode...
... the projected image according to input signal format with an Original setting. If the LAMP and TEMP light are blinking amber, the lamp driver has failed and the projector will automatically shut down . It will automatically shut down . If the image is solid blue, the color wheel has failed and the projector will maintain the aspect ratio of life, it is solid amber, replace the lamp. Select Projector Settings from the OSD and adjust the projector mode...
User Guide
Page 47
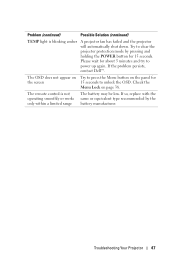
... clear the projector protection mode by the battery manufacturer. Try to press the Menu button on the screen The remote control is not operating smoothly or works only within a limited range Possible Solution (continued) A projector fan has failed and the projector will automatically shut down. Please wait for 15 seconds. Problem (continued) TEMP light is blinking amber The OSD does not appear on the panel for 15 seconds...
... clear the projector protection mode by the battery manufacturer. Try to press the Menu button on the screen The remote control is not operating smoothly or works only within a limited range Possible Solution (continued) A projector fan has failed and the projector will automatically shut down. Please wait for 15 seconds. Problem (continued) TEMP light is blinking amber The OSD does not appear on the panel for 15 seconds...
User Guide
Page 48
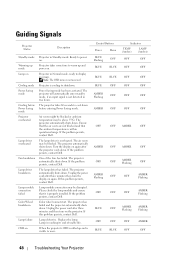
... entering Power Saving mode. Air vents might be blocked or ambient temperature may be blocked. The projector automatically shuts down before Power Saving mode Projector overheated Lamp driver overheated Fan breakdown Lamp driver breakdown Lamp module connection failed Color Wheel breakdown Lamp failure OSD on again. Lamp defective. Control Buttons Power Menu BLUE Flashing OFF BLUE BLUE BLUE BLUE AMBER Flashing BLUE OFF OFF AMBER OFF OFF OFF AMBER OFF ÒFF OFF AMBER Flashing OFF OFF OFF BLUE OFF OFF BLUE OFF BLUE Indicator TEMP (Amber) LAMP (Amber...
... entering Power Saving mode. Air vents might be blocked or ambient temperature may be blocked. The projector automatically shuts down before Power Saving mode Projector overheated Lamp driver overheated Fan breakdown Lamp driver breakdown Lamp module connection failed Color Wheel breakdown Lamp failure OSD on again. Lamp defective. Control Buttons Power Menu BLUE Flashing OFF BLUE BLUE BLUE BLUE AMBER Flashing BLUE OFF OFF AMBER OFF OFF OFF AMBER OFF ÒFF OFF AMBER Flashing OFF OFF OFF BLUE OFF OFF BLUE OFF BLUE Indicator TEMP (Amber) LAMP (Amber...
User Guide
Page 49
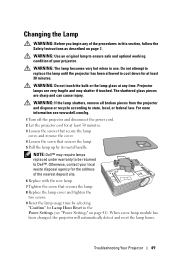
... lamp cover, and remove the cover. 4 Loosen the screw that secures the lamp. 5 Pull the lamp up by selecting "Confirm" for Lamp Hour Reset in the Power Settings (see www.dell.com/hg. 1 Turn off the projector and disconnect the power cord. 2 Let the projector cool for at any of the nearest deposit site. 6 Replace with the new lamp. 7 Tighten the screw that secures the lamp. 8 Replace the lamp cover and tighten the two screws. 9 Reset the lamp usage time...
... lamp cover, and remove the cover. 4 Loosen the screw that secures the lamp. 5 Pull the lamp up by selecting "Confirm" for Lamp Hour Reset in the Power Settings (see www.dell.com/hg. 1 Turn off the projector and disconnect the power cord. 2 Let the projector cool for at any of the nearest deposit site. 6 Replace with the new lamp. 7 Tighten the screw that secures the lamp. 8 Replace the lamp cover and tighten the two screws. 9 Reset the lamp usage time...
User Guide
Page 53
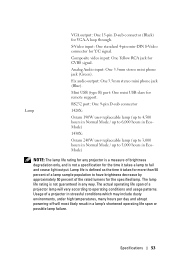
... hours in Normal Mode / up to operating conditions and usage patterns. Usage of a projector lamp will most likely result in a lamp's shortened operating life span or possible lamp failure. Specifications 53 Lamp VGA output: One 15-pin D-sub connector (Black) for remote support. Analog Audio input: One 3.5mm stereo mini phone jack (Green). The actual operating life span of a projector in stressful conditions which may include dusty environments, under high temperatures, many hours per...
... hours in Normal Mode / up to operating conditions and usage patterns. Usage of a projector lamp will most likely result in a lamp's shortened operating life span or possible lamp failure. Specifications 53 Lamp VGA output: One 15-pin D-sub connector (Black) for remote support. Analog Audio input: One 3.5mm stereo mini phone jack (Green). The actual operating life span of a projector in stressful conditions which may include dusty environments, under high temperatures, many hours per...
User Guide
Page 60
... - UXGA - XGA - Video Graphics Array - 640 x 480 pixels count. are backwards. typically used for each of sending color information. Service Set Identifiers - Extended Video Graphics Array - 1024 x 768 pixels count. S-Video - Zoom Lens Ratio - SVGA - For example, a 1.4:1 zoom lens ratio means that allows operator to move the view in a normal forward projection environment text, graphics, etc. used to identify the particular wireless LAN to which a user wants to connect. A French...
... - UXGA - XGA - Video Graphics Array - 640 x 480 pixels count. are backwards. typically used for each of sending color information. Service Set Identifiers - Extended Video Graphics Array - 1024 x 768 pixels count. S-Video - Zoom Lens Ratio - SVGA - For example, a 1.4:1 zoom lens ratio means that allows operator to move the view in a normal forward projection environment text, graphics, etc. used to identify the particular wireless LAN to which a user wants to connect. A French...

User Guide
Page 62
... Powering On the Projector 15 Q Quick Shutdown 41 R Remote Control 22 IR receiver 20 Reset, Factory 37 RS232 control port 9 S Security Settings 42 Specifications Audio 52 Brightness 51 Color Wheel Speed 51 Contrast Ratio 51 Dimensions 52 Displayable Color 51 Environmental 52 I/O Connectors 52 Light Valve 51 Noise Level 52 Power Consumption 52 Power Supply 51 Projection Distance 51 Projection Lens 51 Projection Screen Size 51 Uniformity 51 Video Compatibility 51 Weight 52 support contacting Dell 57 T telephone numbers 57 Troubleshooting...
... Powering On the Projector 15 Q Quick Shutdown 41 R Remote Control 22 IR receiver 20 Reset, Factory 37 RS232 control port 9 S Security Settings 42 Specifications Audio 52 Brightness 51 Color Wheel Speed 51 Contrast Ratio 51 Dimensions 52 Displayable Color 51 Environmental 52 I/O Connectors 52 Light Valve 51 Noise Level 52 Power Consumption 52 Power Supply 51 Projection Distance 51 Projection Lens 51 Projection Screen Size 51 Uniformity 51 Video Compatibility 51 Weight 52 support contacting Dell 57 T telephone numbers 57 Troubleshooting...


