Brochure
Page 4
...equipment 7 The Typical Energy Consumption value is assumed to A4 Simplex (single-sided) page using Dell's recycling program, details of which are included with each product. Dell 1135n multifunction laser printer Connectivity Standard interfaces Print languages and fonts Operating systems (OS) support Network ... For details on the Restriction of the use for this document to refer to Dell. Defective unit must be dispatched if necessary following phone-based troubleshooting. The midpoint of Dell Inc. Microsoft, Windows and Windows NT are registered trademarks or trademarks of the ...
...equipment 7 The Typical Energy Consumption value is assumed to A4 Simplex (single-sided) page using Dell's recycling program, details of which are included with each product. Dell 1135n multifunction laser printer Connectivity Standard interfaces Print languages and fonts Operating systems (OS) support Network ... For details on the Restriction of the use for this document to refer to Dell. Defective unit must be dispatched if necessary following phone-based troubleshooting. The midpoint of Dell Inc. Microsoft, Windows and Windows NT are registered trademarks or trademarks of the ...

Service Manual
Page 5
... 3.11 FAN 3-26 3.12 Transfer Roller 3-27 3.13 SMPS/HVPS board 3-28 3.14 Pick up roller 3-30 3.15 Cassette holder pad 3-30 chapter 4 Alignment and Troubleshooting 4.1 Alignment and Adjustments 4-1 4.1.1 Control Panel 4-1 4.1.2 Understanding the Status LED 4-4 4.1.3 JAM Removal 4-4 4.1.4 Paper Path 4-10
... 3.11 FAN 3-26 3.12 Transfer Roller 3-27 3.13 SMPS/HVPS board 3-28 3.14 Pick up roller 3-30 3.15 Cassette holder pad 3-30 chapter 4 Alignment and Troubleshooting 4.1 Alignment and Adjustments 4-1 4.1.1 Control Panel 4-1 4.1.2 Understanding the Status LED 4-4 4.1.3 JAM Removal 4-4 4.1.4 Paper Path 4-10

Service Manual
Page 6
...4-12 4.1.7 EDC Mode 4-19 4.1.8 Firmware Upgrade 4-22 4.1.9 Periodic Defective Image 4-23 4.1.10 Error Message 4-24 4.2 Troubleshooting 4-28 4.2.1 Procedure of Checking the Symptoms 4-28 4.2.2 The cause and solution of Bad image 4-29 4.2.3 The cause ... solutions 4-80 chapter 5 System Diagram 5.1 Block Diagram 5-1 5.2 Connection Diagram 5-2 chapter 6 Reference Information 6.1 Tool for Troubleshooting 6-1 6.2 Acronyms and Abbreviations 6-2 6.2.1 Acronyms 6-2 6.2.2 Service Parts 6-4 6.3 The Sample Pattern for the Test 6-8 6.3.1 A4 ISO 19752 Standard Pattern 6-8 6.4 Selecting ...
...4-12 4.1.7 EDC Mode 4-19 4.1.8 Firmware Upgrade 4-22 4.1.9 Periodic Defective Image 4-23 4.1.10 Error Message 4-24 4.2 Troubleshooting 4-28 4.2.1 Procedure of Checking the Symptoms 4-28 4.2.2 The cause and solution of Bad image 4-29 4.2.3 The cause ... solutions 4-80 chapter 5 System Diagram 5.1 Block Diagram 5-1 5.2 Connection Diagram 5-2 chapter 6 Reference Information 6.1 Tool for Troubleshooting 6-1 6.2 Acronyms and Abbreviations 6-2 6.2.1 Acronyms 6-2 6.2.2 Service Parts 6-4 6.3 The Sample Pattern for the Test 6-8 6.3.1 A4 ISO 19752 Standard Pattern 6-8 6.4 Selecting ...
Service Manual
Page 74
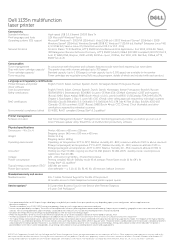
.... Shows the status of your machine depending on . 4.1.1 Control Panel ■ Dell 1135n This control panel may differ from your machine. Makes a copy smaller or larger than the original. Alignment and Troubleshooting 4.1 Alignment and Adjustments This chapter describes the main functions for servicing the equipment, ...driver's license to a single side of paper. Activates fax mode. Service Manual 4-1 Scroll through the available menus. Alignment and Troubleshooting 4. Enters Menu mode and scrolls through the options available in the selected menu, and increase or decrease values.
.... Shows the status of your machine depending on . 4.1.1 Control Panel ■ Dell 1135n This control panel may differ from your machine. Makes a copy smaller or larger than the original. Alignment and Troubleshooting 4.1 Alignment and Adjustments This chapter describes the main functions for servicing the equipment, ...driver's license to a single side of paper. Activates fax mode. Service Manual 4-1 Scroll through the available menus. Alignment and Troubleshooting 4. Enters Menu mode and scrolls through the options available in the selected menu, and increase or decrease values.

Service Manual
Page 75
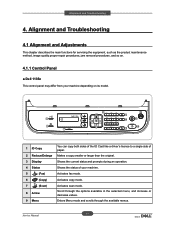
... to store frequently used fax numbers and email addresses or search for document copies or other options. Stops an operation at any time. Alignment and Troubleshooting 10 OK Confirms the selection on and off. Also in edit mode, inserts a pause into power saver mode. The pop-up window appears...
... to store frequently used fax numbers and email addresses or search for document copies or other options. Stops an operation at any time. Alignment and Troubleshooting 10 OK Confirms the selection on and off. Also in edit mode, inserts a pause into power saver mode. The pop-up window appears...
Service Manual
Page 76
... selection on its model. 1 Display 2 Status 3 Arrow 4 Menu 5 OK 6 Back 7 ID Copy 8 Scan to a single side of your machine depending on the screen. Alignment and Troubleshooting ■ Dell 1133 This control panel may differ from your machine. Makes a copy smaller or larger than the original.
... selection on its model. 1 Display 2 Status 3 Arrow 4 Menu 5 OK 6 Back 7 ID Copy 8 Scan to a single side of your machine depending on the screen. Alignment and Troubleshooting ■ Dell 1133 This control panel may differ from your machine. Makes a copy smaller or larger than the original.

Service Manual
Page 77
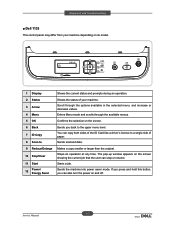
... Green Blinking On Red Blinking On DESCRIPTION • The machine is off-line. • The machine is no paper in power saver mode. Alignment and Troubleshooting 4.1.2 Understanding the Status LED The color of print-outs and is opened. You may also affect the number of life Replace new cart appears on...
... Green Blinking On Red Blinking On DESCRIPTION • The machine is off-line. • The machine is no paper in power saver mode. Alignment and Troubleshooting 4.1.2 Understanding the Status LED The color of print-outs and is opened. You may also affect the number of life Replace new cart appears on...

Service Manual
Page 78
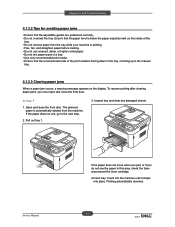
Alignment and Troubleshooting 4.1.3 JAM Removal 4.1.3.1 Clearing Original Document Jams When an original jams while passing through the document feeder, a warning message appears on the display screen. 1. Open the document feeder cover. 4. Close the document feeder cover. Open the scanner lid. * If you removed, if any remaining originals from the document feeder. 5. Reload the originals you see no paper in the document feeder. 3. Gently remove the jammed original from the document feeder. 2. Service Manual 4-5 Remove any , in this area, go to step 5.
Alignment and Troubleshooting 4.1.3 JAM Removal 4.1.3.1 Clearing Original Document Jams When an original jams while passing through the document feeder, a warning message appears on the display screen. 1. Open the document feeder cover. 4. Close the document feeder cover. Open the scanner lid. * If you removed, if any remaining originals from the document feeder. 5. Reload the originals you see no paper in the document feeder. 3. Gently remove the jammed original from the document feeder. 2. Service Manual 4-5 Remove any , in this area, go to step 5.

Service Manual
Page 79
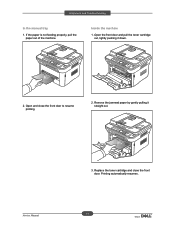
Note: Ensure the number of originals you place in the ADF does not exceed its tray capacity. 1 scanner lid Service Manual 4-6 Alignment and Troubleshooting 6. Load the removed pages back into the document feeder. Close the scanner lid. Gently remove the original from the feed area by carefully pulling it to the right using both hands. 7.
Note: Ensure the number of originals you place in the ADF does not exceed its tray capacity. 1 scanner lid Service Manual 4-6 Alignment and Troubleshooting 6. Load the removed pages back into the document feeder. Close the scanner lid. Gently remove the original from the feed area by carefully pulling it to the right using both hands. 7.
Service Manual
Page 80
... recommended side of the print media is automatically ejected from the machine. If the paper does not exit, go to the next step. 2. Alignment and Troubleshooting 4.1.3.2 Tips for avoiding paper jams • Ensure that the paper level is below the paper capacity mark on the display. Ensure that the adjustable guides...
... recommended side of the print media is automatically ejected from the machine. If the paper does not exit, go to the next step. 2. Alignment and Troubleshooting 4.1.3.2 Tips for avoiding paper jams • Ensure that the paper level is below the paper capacity mark on the display. Ensure that the adjustable guides...
Service Manual
Page 81
Inside the machine 1. Open and close the front door. Printing automatically resumes. 4-8 Open the front door and pull the toner cartridge out, lightly pushing it straight out. Service Manual 3. Replace the toner cartridge and close the front door to resume printing. 2. Remove the jammed paper by gently pulling it down. 2. Alignment and Troubleshooting In the manual tray 1. If the paper is not feeding properly, pull the paper out of the machine.
Inside the machine 1. Open and close the front door. Printing automatically resumes. 4-8 Open the front door and pull the toner cartridge out, lightly pushing it straight out. Service Manual 3. Replace the toner cartridge and close the front door to resume printing. 2. Remove the jammed paper by gently pulling it down. 2. Alignment and Troubleshooting In the manual tray 1. If the paper is not feeding properly, pull the paper out of the machine.

Service Manual
Page 82
... to their original position.. Open and close the front cover. If you do not see the jammed paper, go to their original position. 6. Alignment and Troubleshooting In exit area 1. Service Manual 4-9 Open and close front cover, printing automatically resumes. 1 Pressure lever If you do not see the jammed paper or if...
... to their original position.. Open and close the front cover. If you do not see the jammed paper, go to their original position. 6. Alignment and Troubleshooting In exit area 1. Service Manual 4-9 Open and close front cover, printing automatically resumes. 1 Pressure lever If you do not see the jammed paper or if...

Service Manual
Page 83
4.1.4 Paper Path Alignment and Troubleshooting Sc er P rt i e P rt Sc er P rt i e P rt Service Manual 4-10
4.1.4 Paper Path Alignment and Troubleshooting Sc er P rt i e P rt Sc er P rt i e P rt Service Manual 4-10
Service Manual
Page 84
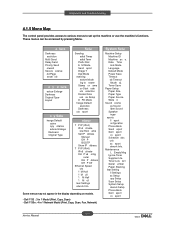
Dell 1133 : 3 in 1 Network Model (Print, Copy, Scan, Fax, Network) System Setu Machine Setup Machine ID Machine ax o. Maintenance L Empty Msg Ignore Toner Supplies Life Toner ... Book Sent eport cv eport Service Manual 4-11 Date Time lock Mode Language Default Mode Power Save Timeout ob Timeout ltitude dj. Dell 1135n : 4 in 1 Model (Print, Copy, Scan) - Alignment and Troubleshooting 4.1.5 Menu Map The control panel provides access to various menus to nswer Stamp cv ame cv Start ode uto eduction Discard...
Dell 1133 : 3 in 1 Network Model (Print, Copy, Scan, Fax, Network) System Setu Machine Setup Machine ID Machine ax o. Maintenance L Empty Msg Ignore Toner Supplies Life Toner ... Book Sent eport cv eport Service Manual 4-11 Date Time lock Mode Language Default Mode Power Save Timeout ob Timeout ltitude dj. Dell 1135n : 4 in 1 Model (Print, Copy, Scan) - Alignment and Troubleshooting 4.1.5 Menu Map The control panel provides access to various menus to nswer Stamp cv ame cv Start ode uto eduction Discard...

Service Manual
Page 85
... → Left → Right → Menu → Back" And the LCD briefly displays 'Tech Mode', the machine has entered service tech mode. Alignment and Troubleshooting 4.1.6 Tech Mode In service (tech) mode, the technician can check the machine and perform various test to isolate the cause of a malfunction.
... → Left → Right → Menu → Back" And the LCD briefly displays 'Tech Mode', the machine has entered service tech mode. Alignment and Troubleshooting 4.1.6 Tech Mode In service (tech) mode, the technician can check the machine and perform various test to isolate the cause of a malfunction.

Service Manual
Page 86
....8, 14.4, 12.0, 9.6, 4.8 5%, 10% Depth4 -12 Tone 33.6 10% [1-30]% : 10 Total Page Count Enter Password Off* On On* Off REDUCE_PANEL COMPLETE_PANEL Adjust Shading ? Alignment and Troubleshooting ■ Tech mode Menu Map Depth1 Data Setup Depth2 Send Level DTMF Level Pause Time Dial Mode Modem Speed Error Rate Clear All Mem.
....8, 14.4, 12.0, 9.6, 4.8 5%, 10% Depth4 -12 Tone 33.6 10% [1-30]% : 10 Total Page Count Enter Password Off* On On* Off REDUCE_PANEL COMPLETE_PANEL Adjust Shading ? Alignment and Troubleshooting ■ Tech mode Menu Map Depth1 Data Setup Depth2 Send Level DTMF Level Pause Time Dial Mode Modem Speed Error Rate Clear All Mem.
Service Manual
Page 87
... Time It shows the delay time when receving the pause input at auto dial. It is used to reset the system to low. Alignment and Troubleshooting Data Setup Send Level You can provide user convenience for replacing the toner cartridge. Dial Mode This function can choose dial method. *Default : Dial (Dial...
... Time It shows the delay time when receving the pause input at auto dial. It is used to reset the system to low. Alignment and Troubleshooting Data Setup Send Level You can provide user convenience for replacing the toner cartridge. Dial Mode This function can choose dial method. *Default : Dial (Dial...
Service Manual
Page 88
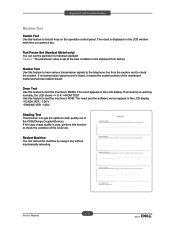
Alignment and Troubleshooting Machine Test Switch Test Use this feature to test all memory is working normally, the LCD shows >ROM TEST Use this feature to test the ...
Alignment and Troubleshooting Machine Test Switch Test Use this feature to test all memory is working normally, the LCD shows >ROM TEST Use this feature to test the ...
Service Manual
Page 89
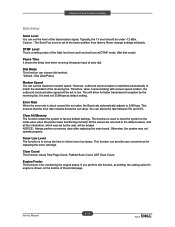
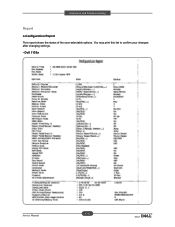
Alignment and Troubleshooting Report ■ Configuration Report This report shows the status of the user-selectable options. You may print this list to confirm your changes after changing settings. - Dell 1135n Service Manual 4-16
Alignment and Troubleshooting Report ■ Configuration Report This report shows the status of the user-selectable options. You may print this list to confirm your changes after changing settings. - Dell 1135n Service Manual 4-16

Service Manual
Page 90
Alignment and Troubleshooting Service Manual 4-17
Alignment and Troubleshooting Service Manual 4-17


