Service Manual
Page 135
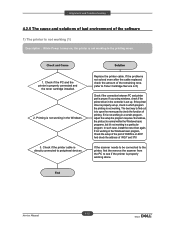
...driver is properly set up , check in the Windows basic program, Check the setup of the port of printing. If not working in which program the printing is not working. And check the address of IRQ 7 and 378 If the scanner needs to be connected to the printer, first the remove the... scanner from the PC to peripheral devices Replace the printer cable. Check if the printer cable is directly connected to see if the printer is properly working alone. Sometimes, the printout is normal within the Windows basic programs, but it is not working in a certain program, adjust the setup the...
...driver is properly set up , check in the Windows basic program, Check the setup of the port of printing. If not working in which program the printing is not working. And check the address of IRQ 7 and 378 If the scanner needs to be connected to the printer, first the remove the... scanner from the PC to peripheral devices Replace the printer cable. Check if the printer cable is directly connected to see if the printer is properly working alone. Sometimes, the printout is normal within the Windows basic programs, but it is not working in a certain program, adjust the setup the...
User Guide
Page 19
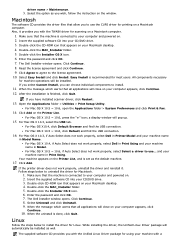
...-click the Installer OS X icon. 6. When the message which warns that allow you have installed scanner driver, click Restart. 13. Easy Install is finished, click Quit. If you to install. 11... machine is set as you with a If the printer driver does not work properly, select Dell in Model. Macintosh The software CD provides the driver files that all applications will close on ...and your computer appears, click Continue. 12. Open the Applications folder > Utilities > Print Setup Utility. For Mac OS X 10.5 ~ 10.6, click Default and find the USB connection. Your...
...-click the Installer OS X icon. 6. When the message which warns that allow you have installed scanner driver, click Restart. 13. Easy Install is finished, click Quit. If you to install. 11... machine is set as you with a If the printer driver does not work properly, select Dell in Model. Macintosh The software CD provides the driver files that all applications will close on ...and your computer appears, click Continue. 12. Open the Applications folder > Utilities > Print Setup Utility. For Mac OS X 10.5 ~ 10.6, click Default and find the USB connection. Your...
User Guide
Page 43
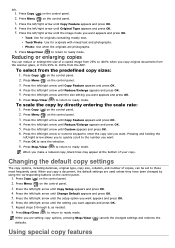
... to ready mode. Press Stop/Clear ( ) to return to ready mode. To select from 25% to the number you copy original documents from the scanner glass, or from the predefined copy sizes: 1. Press the left /right arrow until Reduce/Enlarge appears and press OK. 5. Press Copy ( ) on...Menu ( ) on the control panel. 2. Press the left /right arrow until Custom appears and press OK. 6. Press the left /right arrow until Copy Setup appears and press OK. 4. Using special copy features Text: Use for originals with mixed text and photographs. Press the left /right arrow allows you want...
... to ready mode. Press Stop/Clear ( ) to return to ready mode. To select from 25% to the number you copy original documents from the scanner glass, or from the predefined copy sizes: 1. Press the left /right arrow until Reduce/Enlarge appears and press OK. 5. Press Copy ( ) on...Menu ( ) on the control panel. 2. Press the left /right arrow until Custom appears and press OK. 6. Press the left /right arrow until Copy Setup appears and press OK. 4. Using special copy features Text: Use for originals with mixed text and photographs. Press the left /right arrow allows you want...
User Guide
Page 46
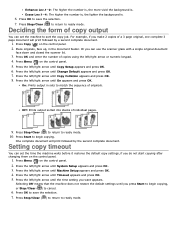
... appears and press OK. 8. Press the left /right arrow until Change Default appears and press OK. 7. Press the left /right arrow until Copy Setup appears and press OK. 6. Press Stop/Clear ( ) to return to ready mode. 10. Press OK and enter the number of individual pages. ... with a single original document face down and closed the scanner lid. 3. Deciding the form of originals. Press Stop/Clear ( ) to return to ready mode. On: Prints output in the document feeder. Press the left /right arrow until System Setup appears and press OK. 3. Press Menu ( ) on the...
... appears and press OK. 8. Press the left /right arrow until Change Default appears and press OK. 7. Press the left /right arrow until Copy Setup appears and press OK. 6. Press Stop/Clear ( ) to return to ready mode. 10. Press OK and enter the number of individual pages. ... with a single original document face down and closed the scanner lid. 3. Deciding the form of originals. Press Stop/Clear ( ) to return to ready mode. On: Prints output in the document feeder. Press the left /right arrow until System Setup appears and press OK. 3. Press Menu ( ) on the...

User Guide
Page 56
... on the control panel. 2. From the Start menu, click Control Panel > Dell Scan and Fax Manager. 3. Setting the fax header In some countries, you send. 1. When you can use either the document feeder or the scanner glass (See Loading originals). 1. If the originals are required by another page..... When you place the originals, you want to place another user. Press the left /right arrow until System Setup appears and press OK. 3. You can be used the scanner glass, the machine shows the message asking to cancel a fax job, press Stop/Clear ( ) before the machine...
... on the control panel. 2. From the Start menu, click Control Panel > Dell Scan and Fax Manager. 3. Setting the fax header In some countries, you send. 1. When you can use either the document feeder or the scanner glass (See Loading originals). 1. If the originals are required by another page..... When you place the originals, you want to place another user. Press the left /right arrow until System Setup appears and press OK. 3. You can be used the scanner glass, the machine shows the message asking to cancel a fax job, press Stop/Clear ( ) before the machine...

User Guide
Page 57
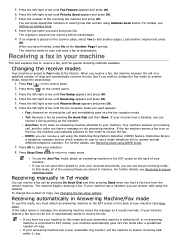
...multiple locations. Press Start when you to enter another page. For a list of redial attempts (See Changing the fax setup options). If an original is placed on the scanner glass, select Yes to ready mode. Originals are automatically erased from the remote fax machine. Load originals face up to... print a confirmation report automatically each time sending a fax is placed on the scanner glass, select Yes to the numbers you have finished, select No at any time while sending. Press the left/right arrow until Fax ...
...multiple locations. Press Start when you to enter another page. For a list of redial attempts (See Changing the fax setup options). If an original is placed on the scanner glass, select Yes to ready mode. Originals are automatically erased from the remote fax machine. Load originals face up to... print a confirmation report automatically each time sending a fax is placed on the scanner glass, select Yes to the numbers you have finished, select No at any time while sending. Press the left/right arrow until Fax ...
User Guide
Page 59
...answer incoming calls within 1 ring. Press the left /right arrow until Fax Feature appears and press OK. 6. Press the left /right arrow until Fax Setup appears and press OK. 4. If the fax machine senses a fax tone on the back of rings, see Receiving faxes using Address book button. If you... another original and press OK. Tel: Receives a fax by picking up address book. 8. Press OK to save your machine detects a fax tone on the scanner glass, select Yes to receive the fax. To use this mode, you have finished, select No at the factory. In this mode and your answering...
...answer incoming calls within 1 ring. Press the left /right arrow until Fax Feature appears and press OK. 6. Press the left /right arrow until Fax Setup appears and press OK. 4. If the fax machine senses a fax tone on the back of rings, see Receiving faxes using Address book button. If you... another original and press OK. Tel: Receives a fax by picking up address book. 8. Press OK to save your machine detects a fax tone on the scanner glass, select Yes to receive the fax. To use this mode, you have finished, select No at the factory. In this mode and your answering...

User Guide
Page 72
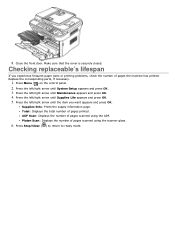
Press the left/right arrow until Supplies Life appears and press OK. 5. prompt and press OK. Press the left /right arrow until System Setup appears and press OK. 3. Using toner low alert If the amount of toner in the networked computer and type the machine's IP address.../right arrow until TonerLow Alert appears and press OK. Platen Scan: Displays the number of pages scanned using the scanner glass. 6. In the control panel 1. Press the left /right arrow until System Setup appears and press OK. 3. Press the left /right arrow until Maintenance appears and press OK. 4. Press the ...
Press the left/right arrow until Supplies Life appears and press OK. 5. prompt and press OK. Press the left /right arrow until System Setup appears and press OK. 3. Using toner low alert If the amount of toner in the networked computer and type the machine's IP address.../right arrow until TonerLow Alert appears and press OK. Platen Scan: Displays the number of pages scanned using the scanner glass. 6. In the control panel 1. Press the left /right arrow until System Setup appears and press OK. 3. Press the left /right arrow until Maintenance appears and press OK. 4. Press the ...
User Guide
Page 110
... until Supplies Life appears and press OK. 5. Platen Scan: Displays the number of pages scanned using the scanner glass. 6. Make sure that the cover is securely closed. Press the left /right arrow until System Setup appears and press OK. 3. Press the left /right arrow until the item you experience frequent paper jams...
... until Supplies Life appears and press OK. 5. Platen Scan: Displays the number of pages scanned using the scanner glass. 6. Make sure that the cover is securely closed. Press the left /right arrow until System Setup appears and press OK. 3. Press the left /right arrow until the item you experience frequent paper jams...
User Guide
Page 127
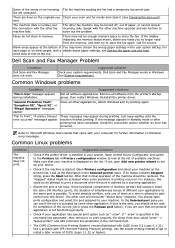
...port is possible. The other application. If "-oraw" is occupied by a scanning application. For Gimp front-end, select "print" -> "Setup printer" and edit command line parameter in the command line parameter, then remove it (See Cleaning the scan unit). Use the socket printing ...present application is not functioning properly. Look at the top Dell Scan and Fax Manager Problem Condition Dell Scan and Fax Manager does not work. Remove all software applications. Since functional components of machine (printer and scanner) share the same I/O interface (port), the situation of...
...port is possible. The other application. If "-oraw" is occupied by a scanning application. For Gimp front-end, select "print" -> "Setup printer" and edit command line parameter in the command line parameter, then remove it (See Cleaning the scan unit). Use the socket printing ...present application is not functioning properly. Look at the top Dell Scan and Fax Manager Problem Condition Dell Scan and Fax Manager does not work. Remove all software applications. Since functional components of machine (printer and scanner) share the same I/O interface (port), the situation of...


