Brochure
Page 3
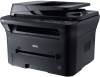
... 250 sheet via standard drawer and 1 sheet feeder Not available 251 sheets (250 sheet standard drawer and 1 sheet feeder) Manual duplex 80 sheet bin Automatic document feeder ADF type ADF input Media support Simplex Up to 40 sheets (based on 80 g/m2... 60 - 160 gsm Printable area Within 4 mm of all edges of the media Dell 1135n multifunction laser printer Product description Reliable and affordable multifunction (print, copy, scan, fax) monochrome laser printer Printer specifications Print speed1 First page out time Print resolutions User interface Data streams Processor speed ...
... 250 sheet via standard drawer and 1 sheet feeder Not available 251 sheets (250 sheet standard drawer and 1 sheet feeder) Manual duplex 80 sheet bin Automatic document feeder ADF type ADF input Media support Simplex Up to 40 sheets (based on 80 g/m2... 60 - 160 gsm Printable area Within 4 mm of all edges of the media Dell 1135n multifunction laser printer Product description Reliable and affordable multifunction (print, copy, scan, fax) monochrome laser printer Printer specifications Print speed1 First page out time Print resolutions User interface Data streams Processor speed ...
Service Manual
Page 3
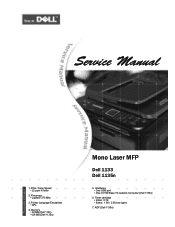
Print / Copy Speed • 22 ppm in letter 2. ADF (Dell 1135n) The keynote of Product Service Manual 1. Interfaces • One USB port • One 10/100 Base TX network connector (Dell 1135n) 6. Memory • 64 MB (Dell 1133) •128 MB (Dell 1135n) Mono Laser MFP Dell 1133 Dell 1135n 5. Toner cartridge • Initial : 0.7K • Sales : 1.5K / 2.5K two types 7. Processor • Jupiter5 375 Mhz 3. Printer Language Emulations • SPL 4.
Print / Copy Speed • 22 ppm in letter 2. ADF (Dell 1135n) The keynote of Product Service Manual 1. Interfaces • One USB port • One 10/100 Base TX network connector (Dell 1135n) 6. Memory • 64 MB (Dell 1133) •128 MB (Dell 1135n) Mono Laser MFP Dell 1133 Dell 1135n 5. Toner cartridge • Initial : 0.7K • Sales : 1.5K / 2.5K two types 7. Processor • Jupiter5 375 Mhz 3. Printer Language Emulations • SPL 4.

Service Manual
Page 8
...serviced by appropriately qualified service technician. Warning >> Never operate or service the printer with the protective cover removed from Laser/ Scanner assembly. Service Manual 1-1 The laser system and printer are not considered to the requirements of DHHS 21 CFR, chapter 1 Subchapter J for... only be hazardous. to conform to the requirements of IEC 825. Precautions 1. This printer should always be serviced by a qualified service technician. (2) Use only Dell replacement parts There are dangerous. The reflected beam, although invisible, can damage...
...serviced by appropriately qualified service technician. Warning >> Never operate or service the printer with the protective cover removed from Laser/ Scanner assembly. Service Manual 1-1 The laser system and printer are not considered to the requirements of DHHS 21 CFR, chapter 1 Subchapter J for... only be hazardous. to conform to the requirements of IEC 825. Precautions 1. This printer should always be serviced by a qualified service technician. (2) Use only Dell replacement parts There are dangerous. The reflected beam, although invisible, can damage...

Service Manual
Page 9
...the machine or the power cord if it is damaged it could make contact with the printer. This will cause the temperature inside the machine and cause an electric shock. Service Manual 1-2 The power connector must be repaired immediately. If the power cable is still connected ...moving the machine. (9) Use caution during thunder or lightening storms. Dell recommend that this can cause electric shock. If the liquid gets into the printer these weather conditions. (10) Avoid damp or dusty areas, install the printer in a clean well ventilated location. When removing the power connector ...
...the machine or the power cord if it is damaged it could make contact with the printer. This will cause the temperature inside the machine and cause an electric shock. Service Manual 1-2 The power connector must be repaired immediately. If the power cable is still connected ...moving the machine. (9) Use caution during thunder or lightening storms. Dell recommend that this can cause electric shock. If the liquid gets into the printer these weather conditions. (10) Avoid damp or dusty areas, install the printer in a clean well ventilated location. When removing the power connector ...

Service Manual
Page 10
... or network card is replaced. (2) Ensure that power is installed on the printer, These could cause the printer to the printer in print quality degradation. Take extra care when servicing the printer. Service Manual 1-3 Photoconductive properties and will be irreparably damaged if it in areas with the...the OPC Drum - Ensure that you do so could cause a fire. 1.2.4 Assembly / Disassembly Precautions Replace parts carefully, always use Dell parts. Take care to the OPC area and can damage the surface? Ensure all parts and cables are correct. (5) When removing or re...
... or network card is replaced. (2) Ensure that power is installed on the printer, These could cause the printer to the printer in print quality degradation. Take extra care when servicing the printer. Service Manual 1-3 Photoconductive properties and will be irreparably damaged if it in areas with the...the OPC Drum - Ensure that you do so could cause a fire. 1.2.4 Assembly / Disassembly Precautions Replace parts carefully, always use Dell parts. Take care to the OPC area and can damage the surface? Ensure all parts and cables are correct. (5) When removing or re...

Service Manual
Page 11
... installed safely. Use safe lifting and handling techniques. After installation, double check that the printer is installed on a sloping or unstable surface. Service Manual 1-4 The printer weighs 23.34 lbs (Dell 1133) / 25.44 lbs (Dell 1133n), ensure the printer is stable. Failure to do so could be caused if you do not put finger...
... installed safely. Use safe lifting and handling techniques. After installation, double check that the printer is installed on a sloping or unstable surface. Service Manual 1-4 The printer weighs 23.34 lbs (Dell 1133) / 25.44 lbs (Dell 1133n), ensure the printer is stable. Failure to do so could be caused if you do not put finger...
Service Manual
Page 13
... two types 7. ADF (Dell 1135n) 2-1 Service Manual Interfaces • One USB port • One 10/100 Base TX network connector (Dell 113 n) 6. Product specification and feature 2.1 Product Specifications 2.1.1 Product Overview Dell 1133 (3 in 1) Dell 1135n (4 in letter 2. Print / Copy Speed • 23 ppm in 1) 1. Product specification and feature 2. Printer Language Emulations •...
... two types 7. ADF (Dell 1135n) 2-1 Service Manual Interfaces • One USB port • One 10/100 Base TX network connector (Dell 113 n) 6. Product specification and feature 2.1 Product Specifications 2.1.1 Product Overview Dell 1133 (3 in 1) Dell 1135n (4 in letter 2. Print / Copy Speed • 23 ppm in 1) 1. Product specification and feature 2. Printer Language Emulations •...

Service Manual
Page 31
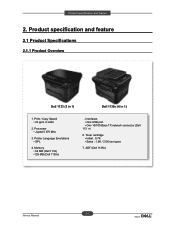
..., and fan driving. FFAAXX CCOONNEEXXAANNTT LSU SPEAKER CRUM OUT BIN FULL JJuuppiitteerr 55 HYPER DDDDRR22 SSDDRRAAMM SMPS Pick up Clutch BLDC & REGI CLUTCH 2-19 Service Manual CIS FUSER PLATEN MOTOR OPE ADF PPLLAATTEENN MMOOTTOORR IICC NETWORK NNeettwwoorrkk IICC USB UUSSBB 22..00 IICC EEEEPPRROOMM LINE EXT. The signals from the paper... are housed into one Main Board called Main PBA. Product specification and feature 2.2.4 Engine H/W Specifications 2.2.4.1 Main PBA The Engine and the Printer Controller function are directly inputted to the main board.
..., and fan driving. FFAAXX CCOONNEEXXAANNTT LSU SPEAKER CRUM OUT BIN FULL JJuuppiitteerr 55 HYPER DDDDRR22 SSDDRRAAMM SMPS Pick up Clutch BLDC & REGI CLUTCH 2-19 Service Manual CIS FUSER PLATEN MOTOR OPE ADF PPLLAATTEENN MMOOTTOORR IICC NETWORK NNeettwwoorrkk IICC USB UUSSBB 22..00 IICC EEEEPPRROOMM LINE EXT. The signals from the paper... are housed into one Main Board called Main PBA. Product specification and feature 2.2.4 Engine H/W Specifications 2.2.4.1 Main PBA The Engine and the Printer Controller function are directly inputted to the main board.

Service Manual
Page 41
...various printing application, PSU(Printer Settings Utility), Printer Status Monitor, Network Management.... Driver that translates the received document to a Printing Command Language which the printer can operate in a Windows and/or Web Environment. 2) The Firmware portion... a interpreter translate data received from Host to a printing language (PCL, PS, GDI(Dell 1130n), etc.) to be able to allow the user to user in Host. 2....specification and feature 2.2.6 S/W Descriptions 2.2.6.1 Overview The software of Dell 1133 system is constructed as follows: 1) The Host Software is an application ...
...various printing application, PSU(Printer Settings Utility), Printer Status Monitor, Network Management.... Driver that translates the received document to a Printing Command Language which the printer can operate in a Windows and/or Web Environment. 2) The Firmware portion... a interpreter translate data received from Host to a printing language (PCL, PS, GDI(Dell 1130n), etc.) to be able to allow the user to user in Host. 2....specification and feature 2.2.6 S/W Descriptions 2.2.6.1 Overview The software of Dell 1133 system is constructed as follows: 1) The Host Software is an application ...

Service Manual
Page 42
...is Windows application software translates printed data to one of additional functions for the printer; Stand-alone Application that manages the network communication between spooler and Network Interface...a similar Window software as same as above . Web-based Application offer a varity of printer languages and creates spooler file. 2. Port Monitor that is , at fi...them from spooler to monitoring the printer status by real time in Web, independent environment on OS. 3. Host Side is a detail explanation of printing job, printer administration, Status monitor to network ...
...is Windows application software translates printed data to one of additional functions for the printer; Stand-alone Application that manages the network communication between spooler and Network Interface...a similar Window software as same as above . Web-based Application offer a varity of printer languages and creates spooler file. 2. Port Monitor that is , at fi...them from spooler to monitoring the printer status by real time in Web, independent environment on OS. 3. Host Side is a detail explanation of printing job, printer administration, Status monitor to network ...

Service Manual
Page 43
...host spooler. - In Printing, the two procedures are realized in: (1) Web environment (2) Window environment In addition, Kernel informs the printing and printer status to required paper with engine & rendering job. 3. Engine print the received data to end-user making the printing job with the sequential... emulation job ends, Kernel sends the output bit-map data to required paper with the Status Monitor. 2-31 Service Manual Engine print the received data to the Engine using Printer Video Controller (by Kernel. After emulation job ends, Kernel sends the output bit-map data to the...
...host spooler. - In Printing, the two procedures are realized in: (1) Web environment (2) Window environment In addition, Kernel informs the printing and printer status to required paper with engine & rendering job. 3. Engine print the received data to end-user making the printing job with the sequential... emulation job ends, Kernel sends the output bit-map data to required paper with the Status Monitor. 2-31 Service Manual Engine print the received data to the Engine using Printer Video Controller (by Kernel. After emulation job ends, Kernel sends the output bit-map data to the...

Service Manual
Page 44
... other grounded areas of the chassis to discharge any unauthorized changes or additions to the printer, these could cause the printer to do so could result in aluminum foil. 2. Take care when fitting,...utio s whe re l ci rts 3.1.1 Prec utio s whe ssem li d dis ssem li Use only approved Dell spare parts. Do not make any static electrical charge on the body. 2. Do not disassemble the LSU unit. ...end of the parts are correct. Do not store a PB where it is latched. 3-1 Service Manual Use of the power cord, plug and socket. There are 19 different screws. elease carefully to...
... other grounded areas of the chassis to discharge any unauthorized changes or additions to the printer, these could cause the printer to do so could result in aluminum foil. 2. Take care when fitting,...utio s whe re l ci rts 3.1.1 Prec utio s whe ssem li d dis ssem li Use only approved Dell spare parts. Do not make any static electrical charge on the body. 2. Do not disassemble the LSU unit. ...end of the parts are correct. Do not store a PB where it is latched. 3-1 Service Manual Use of the power cord, plug and socket. There are 19 different screws. elease carefully to...
Service Manual
Page 45
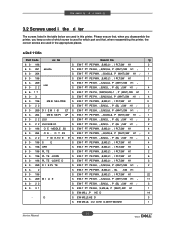
... D 3 S EW M3,L6, OU D HE D,WITH WOSHE 1 3-2 Service Manual Please ensure that, when you disassemble the printer, you keep a note of which screw is used for which part and that, when reassembling the printer, the correct screws are used in this printer. O T SS S EW-T PT PE PWH, ,-,B,M3,L6, P (WHT... 3- 264 O E - Dis ssem ly d e ssem ly 3.2 Screws used i the ri ter The screws listed in the table below are used in the appropriate places. ■ Dell 1135n Part Code oc tio Descri tio ty 6 3- 196 S EW-T PT PE PWH, ,B,M3,L1 , I PLT,SW H1 2 6 3- 261 assette S EW-T PT PE BH, ...
... D 3 S EW M3,L6, OU D HE D,WITH WOSHE 1 3-2 Service Manual Please ensure that, when you disassemble the printer, you keep a note of which screw is used for which part and that, when reassembling the printer, the correct screws are used in this printer. O T SS S EW-T PT PE PWH, ,-,B,M3,L6, P (WHT... 3- 264 O E - Dis ssem ly d e ssem ly 3.2 Screws used i the ri ter The screws listed in the table below are used in the appropriate places. ■ Dell 1135n Part Code oc tio Descri tio ty 6 3- 196 S EW-T PT PE PWH, ,B,M3,L1 , I PLT,SW H1 2 6 3- 261 assette S EW-T PT PE BH, ...

Service Manual
Page 47
Take off the cassette. emove screws on back side of printer. 2. emove the rear cover. 3-4 Service Manual 3.3 Cover 3.3.1 Front Cover 1. Take off the front cover by removing both hooks. 3.3.2 Rear Cover 1. Dis ssem ly d e ssem ly 2.
Take off the cassette. emove screws on back side of printer. 2. emove the rear cover. 3-4 Service Manual 3.3 Cover 3.3.1 Front Cover 1. Take off the front cover by removing both hooks. 3.3.2 Rear Cover 1. Dis ssem ly d e ssem ly 2.

Service Manual
Page 73
Take off the pick up roller 1. Take off the holder pad by unhooking both latches. 3-3 Service Manual Dis ssem ly d e ssem ly 3.14 Pick up roller after removing 1 screw. 3.15 Cassette holder pad 1. arefully turn the printer over. 3. Take out the assette unit. 2. Take out the assette unit. 2.
Take off the pick up roller 1. Take off the holder pad by unhooking both latches. 3-3 Service Manual Dis ssem ly d e ssem ly 3.14 Pick up roller after removing 1 screw. 3.15 Cassette holder pad 1. arefully turn the printer over. 3. Take out the assette unit. 2. Take out the assette unit. 2.

Service Manual
Page 77
... affected by your original. The estimated cartridge lifea is nearing its estimated cartridge lifea. Prepare a new cartridge for current information.) Service Manual 4-4 Estimated cartridge life means the expected or estimated toner cartridge life, which indicates the average capacity of print-outs and is designed ...• A minor error has occurred and the machine is waiting for the error to on the display and the printer stops printing. (See www.samsung.com/printer for replacement. When the problem is cleared, the machine resumes. • Small amount of life Replace new cart ...
... affected by your original. The estimated cartridge lifea is nearing its estimated cartridge lifea. Prepare a new cartridge for current information.) Service Manual 4-4 Estimated cartridge life means the expected or estimated toner cartridge life, which indicates the average capacity of print-outs and is designed ...• A minor error has occurred and the machine is waiting for the error to on the display and the printer stops printing. (See www.samsung.com/printer for replacement. When the problem is cleared, the machine resumes. • Small amount of life Replace new cart ...

Service Manual
Page 92
The message "COMPONENT TEST Press Menu Key" display on the LCD. 2. To get out of the EDC Mode, Press the "Stop" key Service Manual 4-19 Alignment and Troubleshooting 4.1.7 EDC Mode The EDC Mode is used to independently control and test each sensor and driver component, so as to more easily service the printer. ■ Method to enter 1. After turn on the system power, check the "Ready" message on the LCD. 4. "Menu → Stop → Left arrow → Back → OK → Right arrow" 3. To enter the EDC Mode, Push the buttons outlined below in the order outlined.
The message "COMPONENT TEST Press Menu Key" display on the LCD. 2. To get out of the EDC Mode, Press the "Stop" key Service Manual 4-19 Alignment and Troubleshooting 4.1.7 EDC Mode The EDC Mode is used to independently control and test each sensor and driver component, so as to more easily service the printer. ■ Method to enter 1. After turn on the system power, check the "Ready" message on the LCD. 4. "Menu → Stop → Left arrow → Back → OK → Right arrow" 3. To enter the EDC Mode, Push the buttons outlined below in the order outlined.
Service Manual
Page 98
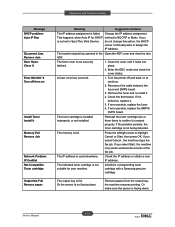
...press OK. ADF. Press the left/right arrow to assign the IP Address. Check the IP address or obtain a new IP address. Service Manual 4-25 Change the IP address assignment This happens, when Auto IP for your machine. If error persists, replace the fuser. 6. If error... is not facing down . The loaded original has jammed in SyncThru Web Service. The memory is installed improperly, or not installed. Turn the printer off then on to BOOTP or Static. The toner cartridge is full. A fuser error has occurred. 1. Check the thermostat. Install the corresponding...
...press OK. ADF. Press the left/right arrow to assign the IP Address. Check the IP address or obtain a new IP address. Service Manual 4-25 Change the IP address assignment This happens, when Auto IP for your machine. If error persists, replace the fuser. 6. If error... is not facing down . The loaded original has jammed in SyncThru Web Service. The memory is installed improperly, or not installed. Turn the printer off then on to BOOTP or Static. The toner cartridge is full. A fuser error has occurred. 1. Check the thermostat. Install the corresponding...
Service Manual
Page 100
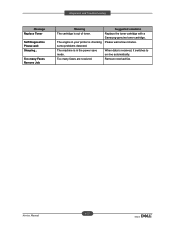
Too many Faxes Remove Job Meaning The cartridge is checking some problems detected. Suggested solutions Replace the toner cartridge with a Samsung-genuine toner cartridge. When data is in your printer is out of toner. Alignment and Troubleshooting Message Replace Toner Self Diagnostics Please wait Sleeping... Remove received fax. The machine is received, it switches to on-line automatically. Too many faxes are received. Please wait a few minutes. The engine in the power save mode. Service Manual 4-27
Too many Faxes Remove Job Meaning The cartridge is checking some problems detected. Suggested solutions Replace the toner cartridge with a Samsung-genuine toner cartridge. When data is in your printer is out of toner. Alignment and Troubleshooting Message Replace Toner Self Diagnostics Please wait Sleeping... Remove received fax. The machine is received, it switches to on-line automatically. Too many faxes are received. Please wait a few minutes. The engine in the power save mode. Service Manual 4-27

Service Manual
Page 101
Check the error message. ( Refer to 4.1.10 Error message) Refer to repair the printer first obtain a detailed description of Image Problem" Service Manual 4-28 END - Main PBA error - Ready or Power save Test Print printing Quality is Nomal? Power Module error - No Power - Panel PBA error Error LED ON? Power On Green LED on? Alignment and Troubleshooting 4.2 Troubleshooting 4.2.1 Procedure of Checking the Symptoms Before attempting to "Solution of the problem from the customer.
Check the error message. ( Refer to 4.1.10 Error message) Refer to repair the printer first obtain a detailed description of Image Problem" Service Manual 4-28 END - Main PBA error - Ready or Power save Test Print printing Quality is Nomal? Power Module error - No Power - Panel PBA error Error LED ON? Power On Green LED on? Alignment and Troubleshooting 4.2 Troubleshooting 4.2.1 Procedure of Checking the Symptoms Before attempting to "Solution of the problem from the customer.


