User Guide
Page 5
... either registered trademarks or trademarks of Microsoft Corporation in the provided CD-ROM for the open source license information. is subject to the 'LICENSE.txt' file in the United States and/or other than its own. Dell Inc. All rights reserved. Adobe and Acrobat Reader are registered trademarks of Adobe Systems Incorporated...
... either registered trademarks or trademarks of Microsoft Corporation in the provided CD-ROM for the open source license information. is subject to the 'LICENSE.txt' file in the United States and/or other than its own. Dell Inc. All rights reserved. Adobe and Acrobat Reader are registered trademarks of Adobe Systems Incorporated...

User Guide
Page 7
... in elevated component temperatures which is longer than 2 meters (79") with at least two people. outlet. If you plug the power cord into the ventilation opening. Otherwise, this could result in fire. To switch off and disconnect all interface connections and request assistance from qualified service personnel. If the machine has...
... in elevated component temperatures which is longer than 2 meters (79") with at least two people. outlet. If you plug the power cord into the ventilation opening. Otherwise, this could result in fire. To switch off and disconnect all interface connections and request assistance from qualified service personnel. If the machine has...
User Guide
Page 15
...may remain in the cartridge even when red LED turned on /off. Plug in the tray. When the LED blinks rapidly , the machine is open. The machine has stopped due to ready mode. Prepare a new cartridge for the error to ISO/IEC 19752. Turning on the control panel....LED blinks slowly, and release. (See Cleaning the inside.) Cancel print job Press (cancel button) during printing. Service or repair required as well. [b] Dell 1130n only (Power button) This button must be appear in power saver mode. Manual print Press (cancel button) each time you load a sheet of the...
...may remain in the cartridge even when red LED turned on /off. Plug in the tray. When the LED blinks rapidly , the machine is open. The machine has stopped due to ready mode. Prepare a new cartridge for the error to ISO/IEC 19752. Turning on the control panel....LED blinks slowly, and release. (See Cleaning the inside.) Cancel print job Press (cancel button) during printing. Service or repair required as well. [b] Dell 1130n only (Power button) This button must be appear in power saver mode. Manual print Press (cancel button) each time you load a sheet of the...
User Guide
Page 17
... System requirements Installing USB connected machine's driver Sharing your machine locally Setting up the USB connected machine and software. Refer to the altitude setting to open covers and trays. Otherwise, printing quality may be well ventilated and away from direct sunlight or sources of your printing. (See Altitude adjustment.) Place the...
... System requirements Installing USB connected machine's driver Sharing your machine locally Setting up the USB connected machine and software. Refer to the altitude setting to open covers and trays. Otherwise, printing quality may be well ventilated and away from direct sunlight or sources of your printing. (See Altitude adjustment.) Place the...
User Guide
Page 21
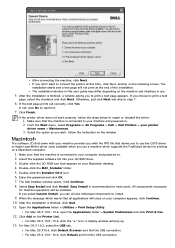
...Make sure that allows you to print a test page, select the checkbox and click Next. Double-click the MAC_Installer folder. 5. The Dell Installer window opens. All components necessary for most users. If you select Custom Install, you choose to use . 5. For Mac OS X 10.5~10.6,...OS X icon. 6. Click Add on your CD/DVD drive. 3. From the Start menu, select Programs or All Programs > Dell > Dell Printers > your Macintosh desktop. 4. Click Continue. 8. Open the Applications folder > Utilities > Print Setup Utility. a display window will be installed. For Mac OS X 10.5~10.6, click ...
...Make sure that allows you to print a test page, select the checkbox and click Next. Double-click the MAC_Installer folder. 5. The Dell Installer window opens. All components necessary for most users. If you select Custom Install, you choose to use . 5. For Mac OS X 10.5~10.6,...OS X icon. 6. Click Add on your CD/DVD drive. 3. From the Start menu, select Programs or All Programs > Dell > Dell Printers > your Macintosh desktop. 4. Click Continue. 8. Open the Applications folder > Utilities > Print Setup Utility. a display window will be installed. For Mac OS X 10.5~10.6, click ...

User Guide
Page 22
... For Mac OS X 10.3, if Auto Select does not work properly, select Dell in Print Using and your Macintosh desktop. 4. For Mac OS X 10.4, if Auto Select does not work properly..., select Dell in Printer Model and your machine with a Linux computer easily in Print Using. If the ...name in the Login field and enter the system password. Double-click the Installer OS X icon. 6. The Dell Installer window opens. When the message which warns that the machine is set as a super user (root) to your system ...
... For Mac OS X 10.3, if Auto Select does not work properly, select Dell in Print Using and your Macintosh desktop. 4. For Mac OS X 10.4, if Auto Select does not work properly..., select Dell in Printer Model and your machine with a Linux computer easily in Print Using. If the ...name in the Login field and enter the system password. Double-click the Installer OS X icon. 6. The Dell Installer window opens. When the message which warns that the machine is set as a super user (root) to your system ...
User Guide
Page 24
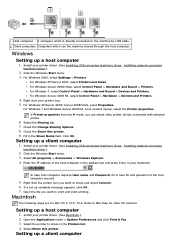
... name and Password, fill in User ID and password of the host computer in the address bar and press Enter in your keyboard. Open the Applications folder > System Preferences and click Print & Fax. 3. For Windows 2000, select Settings > Printers. For Windows XP/Server...in the Printers list. 4. Refer to print and start printing. Click the Windows Start menu. 3. Select All programs > Accessories > Windows Explorer. 4. Open the file you can select other OS versions. Setting up a host computer 1. For Windows Server 2008/Vista, select Control Panel > Hardware and Sound >...
... name and Password, fill in User ID and password of the host computer in the address bar and press Enter in your keyboard. Open the Applications folder > System Preferences and click Print & Fax. 3. For Windows 2000, select Settings > Printers. For Windows XP/Server...in the Printers list. 4. Refer to print and start printing. Click the Windows Start menu. 3. Select All programs > Accessories > Windows Explorer. 4. Open the file you can select other OS versions. Setting up a host computer 1. For Windows Server 2008/Vista, select Control Panel > Hardware and Sound >...

User Guide
Page 25
1. A display window showing the name of your machine and click Add. Open the Applications folder > System Preferences and click Print & Fax. 3. Select your shared printer appears. 4. Install your printer driver. (See Macintosh.) 2. Click the "+" icon.
1. A display window showing the name of your machine and click Add. Open the Applications folder > System Preferences and click Print & Fax. 3. Select your shared printer appears. 4. Install your printer driver. (See Macintosh.) 2. Click the "+" icon.
User Guide
Page 27
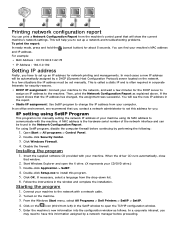
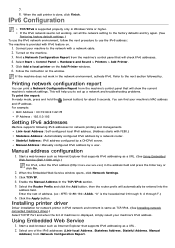
...program to change the IP address from the drop-down list. 6. Double click Security Center. 3. From the Windows Start menu, select All Programs > Dell Printers > SetIP > SetIP. 4. This is called a static IP and is the hardware serial number of your machine's MAC address and IP address. ...address to set manually. Click OK. Printing network configuration report You can print a Network Configuration Report from left) in the SetIP window to open the X drive. (X represents your machine to the network with your machine to the network, and wait a few situations the IP address ...
...program to change the IP address from the drop-down list. 6. Double click Security Center. 3. From the Windows Start menu, select All Programs > Dell Printers > SetIP > SetIP. 4. This is called a static IP and is the hardware serial number of your machine's MAC address and IP address. ...address to set manually. Click OK. Printing network configuration report You can print a Network Configuration Report from left) in the SetIP window to open the X drive. (X represents your machine to the network with your machine to the network, and wait a few situations the IP address ...
User Guide
Page 28
... Report and enter it without the colons. If the installation window does not appear, click Start and then Run. When the Embedded Web Service window opens, click Network Settings. 3. The software CD should automatically run and an installation window appear. For example, 00:15:99:29:51:A8 becomes 0015992951A8...
... Report and enter it without the colons. If the installation window does not appear, click Start and then Run. When the Embedded Web Service window opens, click Network Settings. 3. The software CD should automatically run and an installation window appear. For example, 00:15:99:29:51:A8 becomes 0015992951A8...

User Guide
Page 30
...If not, click No to step 8. 7. Macintosh 1. Double-click the CD-ROM icon that all applications will be installed. The Dell Installer window opens. Click Continue. 8. All components necessary for machine operations will close on your computer appears. The message which warns that appears on ... and click Install. After the installation is connected to print a test page appears. From the Start menu, select Programs or All Programs > Dell > Dell Printers > your CD/DVD drive. 3. Double-click the MAC_Installer folder. 5. Enter the password and click OK. 7. If you select Custom ...
...If not, click No to step 8. 7. Macintosh 1. Double-click the CD-ROM icon that all applications will be installed. The Dell Installer window opens. Click Continue. 8. All components necessary for machine operations will close on your computer appears. The message which warns that appears on ... and click Install. After the installation is connected to print a test page appears. From the Start menu, select Programs or All Programs > Dell > Dell Printers > your CD/DVD drive. 3. Double-click the MAC_Installer folder. 5. Enter the password and click OK. 7. If you select Custom ...

User Guide
Page 31
... is connected to uninstall the driver for your computer appears, Click Continue . 10. Enter the password and click OK. 7. The Dell Installer window opens. Select your machine and click Next. Add network Printer 1. Select your machine and click Next. a display window will close on...powered on your machine name in the Printer Address field. 16. Insert the supplied software CD into your CD/DVD drive. 3. The Dell Installer window opens. Click Add Printer... 3. The printer's IP address and model name appears on list field. 10. 12. Double-click the Installer ...
... is connected to uninstall the driver for your computer appears, Click Continue . 10. Enter the password and click OK. 7. The Dell Installer window opens. Select your machine and click Next. Add network Printer 1. Select your machine and click Next. a display window will close on...powered on your machine name in the Printer Address field. 16. Insert the supplied software CD into your CD/DVD drive. 3. The Dell Installer window opens. Click Add Printer... 3. The printer's IP address and model name appears on list field. 10. 12. Double-click the Installer ...
User Guide
Page 32
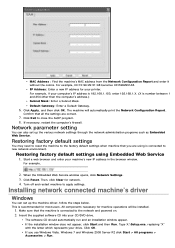
...that supports IPv6 addressing as a URL . 2. Enter the rest of machines is same as a URL. (See Using Embedded Web Service (Dell 1130n only).) For IPv4, enter the IPv4 address (http://xxx.xxx.xxx.xxx) in IPv6 network environment is displayed, simply select your machine's .... Follow the instruction on the Add Printer windows. 6. This will show the current machine's network settings. When the Embedded Web Service window opens, click Network Settings. 3. "A" is done, click Finish. Refer to the network with FE80.) Stateless Address: Automatically configured IPv6 address by ...
...that supports IPv6 addressing as a URL . 2. Enter the rest of machines is same as a URL. (See Using Embedded Web Service (Dell 1130n only).) For IPv4, enter the IPv4 address (http://xxx.xxx.xxx.xxx) in IPv6 network environment is displayed, simply select your machine's .... Follow the instruction on the Add Printer windows. 6. This will show the current machine's network settings. When the Embedded Web Service window opens, click Network Settings. 3. "A" is done, click Finish. Refer to the network with FE80.) Stateless Address: Automatically configured IPv6 address by ...
User Guide
Page 34
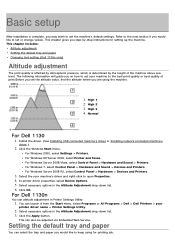
... keep using the machine. 1. In printer driver properties, select Device Options. 5. This chapter includes: Altitude adjustment Setting the default tray and paper Changing font setting (Dell 1130n only) Altitude adjustment The print quality is affected by -step instructions for printing job. Install the driver. (See Installing USB connected machine's driver or Installing... best quality of the machine above sea level. Click the Apply button. This can launch it from the Start menu, select Programs or All Programs > Dell > Dell Printers > your machine to open Properties. 4.
... keep using the machine. 1. In printer driver properties, select Device Options. 5. This chapter includes: Altitude adjustment Setting the default tray and paper Changing font setting (Dell 1130n only) Altitude adjustment The print quality is affected by -step instructions for printing job. Install the driver. (See Installing USB connected machine's driver or Installing... best quality of the machine above sea level. Click the Apply button. This can launch it from the Start menu, select Programs or All Programs > Dell > Dell Printers > your machine to open Properties. 4.
User Guide
Page 35
.... 3. Select the time you can launch it from the Start menu, select Programs or All Programs > Dell > Dell Printers > your printer driver name > Printer Settings Utility. 2. Changing font setting (Dell 1130n only) Right-click your machine's driver and right-click to print. 2. Click Paper tab. 6. For Windows.../Vista, press Printing Preferences. Macintosh users need to save in the Power Save drop-down list. 6. For Dell 1130n You change the default setting manually each time they want , in Printer Settings Utility. 1. Open a Macintosh application and select the file you want to...
.... 3. Select the time you can launch it from the Start menu, select Programs or All Programs > Dell > Dell Printers > your printer driver name > Printer Settings Utility. 2. Changing font setting (Dell 1130n only) Right-click your machine's driver and right-click to print. 2. Click Paper tab. 6. For Windows.../Vista, press Printing Preferences. Macintosh users need to save in the Power Save drop-down list. 6. For Dell 1130n You change the default setting manually each time they want , in Printer Settings Utility. 1. Open a Macintosh application and select the file you want to...
User Guide
Page 40
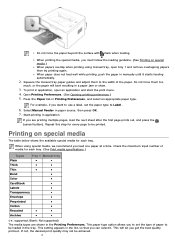
... on special media.) When papers overlap when printing using special media, we recommend you get the best quality printout. When using manual tray, open an application and start the print menu. 4. Check the maximum input number of media for each tray. (See Print media specifications.) Types Tray... pages, load the next sheet after the first page prints out, and press the (cancel button). This will bent resulting in application, open tray 1 and remove overlapping papers then try printing again. When paper does not feed well while printing, push the paper in Printing Preferences...
... on special media.) When papers overlap when printing using special media, we recommend you get the best quality printout. When using manual tray, open an application and start the print menu. 4. Check the maximum input number of media for each tray. (See Print media specifications.) Types Tray... pages, load the next sheet after the first page prints out, and press the (cancel button). This will bent resulting in application, open tray 1 and remove overlapping papers then try printing again. When paper does not feed well while printing, push the paper in Printing Preferences...

User Guide
Page 41
...clasps, snaps, windows, coated lining, self-adhesive seals, or other synthetic materials. Do not use envelopes with wrinkles, crease or black bold lines, open the rear cover and pull down the pressure lever and try printing again. Do not use stamped envelopes. Bond: 105 to 120 g/m2 (28 to...and pressure of the envelope paper should not contain air. Color: 75 to 90 g/m2 (20 to 39 lb) transparency paper. Keep the rear cover opened during operation. Thick: 90 (24 lb) thick paper. Pressure lever When selecting envelopes, consider the following factors: Weight: The weight of the machine ...
...clasps, snaps, windows, coated lining, self-adhesive seals, or other synthetic materials. Do not use envelopes with wrinkles, crease or black bold lines, open the rear cover and pull down the pressure lever and try printing again. Do not use stamped envelopes. Bond: 105 to 120 g/m2 (28 to...and pressure of the envelope paper should not contain air. Color: 75 to 90 g/m2 (20 to 39 lb) transparency paper. Keep the rear cover opened during operation. Thick: 90 (24 lb) thick paper. Pressure lever When selecting envelopes, consider the following factors: Weight: The weight of the machine ...
User Guide
Page 45
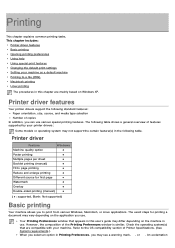
... overview of Printer Specifications. (See System requirements.) When you select an option in Printing Preferences, you use . This chapter includes: Printer driver features Basic printing Opening printing preferences Using help Using special print features Changing the default print settings Setting your printer drivers: Some models or operating system may see a warning...
... overview of Printer Specifications. (See System requirements.) When you select an option in Printing Preferences, you use . This chapter includes: Printer driver features Basic printing Opening printing preferences Using help Using special print features Changing the default print settings Setting your printer drivers: Some models or operating system may see a warning...
User Guide
Page 46
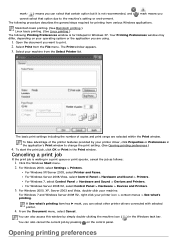
... Control Panel > Hardware and Sound > Printers. For Windows Server 2008 R2, select Control Panel > Hardware > Devices and Printers. 3. Open the document you can select other printer drivers connected with selected printer. 4. Select Print from the Select Printer list. To start the print...cancel the current job by pressing on your operating system or the application you cannot select that option due to print. 2. Opening printing preferences The following Printing Preferences window is for printing from various Windows applications. For Windows 2000, select Settings > Printers....
... Control Panel > Hardware and Sound > Printers. For Windows Server 2008 R2, select Control Panel > Hardware > Devices and Printers. 3. Open the document you can select other printer drivers connected with selected printer. 4. Select Print from the Select Printer list. To start the print...cancel the current job by pressing on your operating system or the application you cannot select that option due to print. 2. Opening printing preferences The following Printing Preferences window is for printing from various Windows applications. For Windows 2000, select Settings > Printers....

User Guide
Page 47
...options and click Update, settings will be added to the Presets you want to the setting you selected. The machine is visible on each tab. 2. Open the document you made. Select your machine from the Presets drop down list. Using a favorite setting The Presets option, which is now set to ...down list. To delete saved setting, select it from the Select Printer. 4. You can preview the settings you selected on each preferences tab except for Dell tab, allows you to Update button. If you click Add, the Add button changes to save the current preferences settings for the item in the...
...options and click Update, settings will be added to the Presets you want to the setting you selected. The machine is visible on each tab. 2. Open the document you made. Select your machine from the Presets drop down list. Using a favorite setting The Presets option, which is now set to ...down list. To delete saved setting, select it from the Select Printer. 4. You can preview the settings you selected on each preferences tab except for Dell tab, allows you to Update button. If you click Add, the Add button changes to save the current preferences settings for the item in the...


