Owner Manual
Page 4
... and maintenance 14 10.1 Cleaning the coffee maker 14 10.2 Cleaning the infuser 15 10.3 Descaling 16 10.4 Setting the water hardness 17 11 Meaning of coffee in the mill. 4 Coffee has been used to factory test the appliance and it is...of the appliance (see page 3 6 2 Safety warnings 7 3 Installation 7 4 Preparing the coffee maker 8 4.1 Filling the water tank 8 4.2 Filling the container with ground coffee (instead of beans 12 8 Producing Hot Water 12 9 Preparing cappuccinos (using coffee beans 9 6 Regulating the coffee mill 11 7 Preparing espresso/coffee with coffee beans 8 ...
... and maintenance 14 10.1 Cleaning the coffee maker 14 10.2 Cleaning the infuser 15 10.3 Descaling 16 10.4 Setting the water hardness 17 11 Meaning of coffee in the mill. 4 Coffee has been used to factory test the appliance and it is...of the appliance (see page 3 6 2 Safety warnings 7 3 Installation 7 4 Preparing the coffee maker 8 4.1 Filling the water tank 8 4.2 Filling the container with ground coffee (instead of beans 12 8 Producing Hot Water 12 9 Preparing cappuccinos (using coffee beans 9 6 Regulating the coffee mill 11 7 Preparing espresso/coffee with coffee beans 8 ...
Owner Manual
Page 6
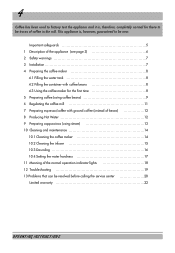
... M. Cup warmer tray B. Bean container lid L. Coffee bean container U. Ground coffee funnel W. Patented Cappuccino System Frother (Milk Frother) E. Water tank (removable) F. Service door I. Control panel K. Steam spout D. Removable Steam Nozzle Q. Grinding coarseness regulator T. Mobile drawer 1 23 45 ...temperature ready light 3) One cup button 4) 2 cup and coffee temperature ready light 5) Two cup button 6) Hot water or steam indicator light 7) Hot water selection button 8) Coffee quantity selector dial (short, normal or long) 9) Coffee flavor dial (for pre-ground ...
... M. Cup warmer tray B. Bean container lid L. Coffee bean container U. Ground coffee funnel W. Patented Cappuccino System Frother (Milk Frother) E. Water tank (removable) F. Service door I. Control panel K. Steam spout D. Removable Steam Nozzle Q. Grinding coarseness regulator T. Mobile drawer 1 23 45 ...temperature ready light 3) One cup button 4) 2 cup and coffee temperature ready light 5) Two cup button 6) Hot water or steam indicator light 7) Hot water selection button 8) Coffee quantity selector dial (short, normal or long) 9) Coffee flavor dial (for pre-ground ...
Owner Manual
Page 8
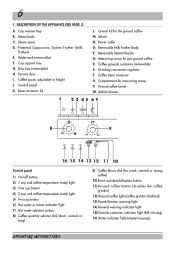
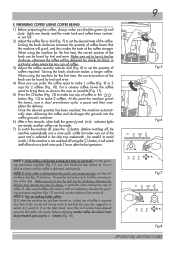
...BEANS • Open the lid on by -step instructions described in the following paragraphs. 4 PREPARING THE COFFEE MAKER 4.1 FILLING THE WATER TANK • Remove the water tank (Fig.1), rinse it and fill it is 1/3 full, turn the steam knob half a turn the steam knob counter-clockwise until...the cup with ground coffee, freeze-dried coffee or caramelized beans, or other objects that the water tank is full and the power cable is preheating. Move the milk frother towards the center of water.t. 5. IMMEDIATELY AFTER, WITHIN A MAXIMUM OF 30 SECONDS, turn clockwise (Fig.6) to make ...
...BEANS • Open the lid on by -step instructions described in the following paragraphs. 4 PREPARING THE COFFEE MAKER 4.1 FILLING THE WATER TANK • Remove the water tank (Fig.1), rinse it and fill it is 1/3 full, turn the steam knob half a turn the steam knob counter-clockwise until...the cup with ground coffee, freeze-dried coffee or caramelized beans, or other objects that the water tank is full and the power cable is preheating. Move the milk frother towards the center of water.t. 5. IMMEDIATELY AFTER, WITHIN A MAXIMUM OF 30 SECONDS, turn clockwise (Fig.6) to make ...
Owner Manual
Page 9
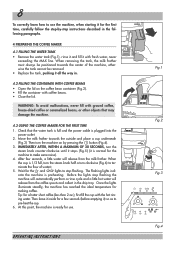
... machine for 2 coffees (Fig. 10). If the machine is not switched off , the machine automatically runs a rinse cycle: a little hot water runs out of the dial. Proceed by trial and error. 4) Place one click counter-clockwise (see section 6). pletes the delivery. Once the ...and discharges the grounds into the coffee grounds container. 6) After a few seconds, when both the green and indicator lights are steady and the water tank and coffee bean contain- be pre-heated, pressing the button (Fig. 14). Fig.7 Fig.8 OPERATING INSTRUCTIONS Turning the knob clockwise makes a ...
... machine for 2 coffees (Fig. 10). If the machine is not switched off , the machine automatically runs a rinse cycle: a little hot water runs out of the dial. Proceed by trial and error. 4) Place one click counter-clockwise (see section 6). pletes the delivery. Once the ...and discharges the grounds into the coffee grounds container. 6) After a few seconds, when both the green and indicator lights are steady and the water tank and coffee bean contain- be pre-heated, pressing the button (Fig. 14). Fig.7 Fig.8 OPERATING INSTRUCTIONS Turning the knob clockwise makes a ...

Owner Manual
Page 10
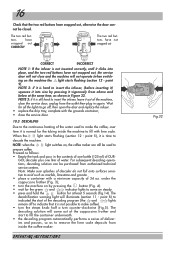
...NOTE 6: when the indicator light comes on steady (section 12 point 3), warning the user that the grounds container is delivering coffee, never remove the water tank. NOTE 9: if the machine is normal for there to pre-heat it is not completely full. To reset the machine, turn the steam knob ...(Fig. 12) or button (Fig. 13), as pre- Each 14 single cups (or 7 double cups), the light switches on (section 12, point 1), the water tank must be cleaned, as described in the coffee maker may fill over time and consequently the coffee will change taste as it . 2) Unless preheated, do...
...NOTE 6: when the indicator light comes on steady (section 12 point 3), warning the user that the grounds container is delivering coffee, never remove the water tank. NOTE 9: if the machine is normal for there to pre-heat it is not completely full. To reset the machine, turn the steam knob ...(Fig. 12) or button (Fig. 13), as pre- Each 14 single cups (or 7 double cups), the light switches on (section 12, point 1), the water tank must be cleaned, as described in the coffee maker may fill over time and consequently the coffee will change taste as it . 2) Unless preheated, do...
Owner Manual
Page 14
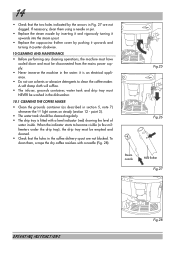
...26 Steam nozzle Milk frother Fig.27 OPERATING INSTRUCTIONS Fig.28 point 3). • The water tank should be cleaned regularly. • The drip tray is an electrical appliance. •...cooled down and must NEVER be disconnected from the mains power supply. • Never immerse the machine in the water: it is fitted with a needle (Fig. 28). To clean them using a needle or pin. •...clean the coffee maker. A soft damp cloth will suffice. • The infuser, grounds container, water tank and drip tray must be washed in the dishwasher. 10.1 CLEANING THE COFFEE MAKER • Clean ...
...26 Steam nozzle Milk frother Fig.27 OPERATING INSTRUCTIONS Fig.28 point 3). • The water tank should be cleaned regularly. • The drip tray is an electrical appliance. •...cooled down and must NEVER be disconnected from the mains power supply. • Never immerse the machine in the water: it is fitted with a needle (Fig. 28). To clean them using a needle or pin. •...clean the coffee maker. A soft damp cloth will suffice. • The infuser, grounds container, water tank and drip tray must be washed in the dishwasher. 10.1 CLEANING THE COFFEE MAKER • Clean ...
Owner Manual
Page 16
... of deliver- Proceed as marble, limestone and granite. • place a container with a minimum capacity of water. Note: Make sure splashes of DUR- NOTE 2: if it is hard to acid such as follows: • Empty the tank and pour in the contents of one liter of 34 oz. tive to insert the infuser... machine to make the coffee, over time it is normal for the green and indicator lights to insert the infuser, leave it out of the water used to descale the machine. NOTE 3: if it is still hard to come out of the cappuccino frother and start of the descaling program (the...
... of deliver- Proceed as marble, limestone and granite. • place a container with a minimum capacity of water. Note: Make sure splashes of DUR- NOTE 2: if it is hard to acid such as follows: • Empty the tank and pour in the contents of one liter of 34 oz. tive to insert the infuser... machine to make the coffee, over time it is normal for the green and indicator lights to insert the infuser, leave it out of the water used to descale the machine. NOTE 3: if it is still hard to come out of the cappuccino frother and start of the descaling program (the...
Owner Manual
Page 17
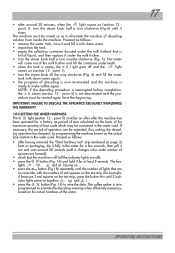
...a factory set period of descaling is now terminated and the machine is off (all the way clockwise (Fig. 6) and fill the water tank with clean water. • reposition the tank. • empty the collection container (located under the milk frother. • turn the steam knob half a turn the steam knob ...the basis of the maximum quantity of lime scale which may be started again form the beginning. Proceed as follows: • remove the water tank, rinse it and fill it changes color anda number of squares are formed); • check that the machine is ready to save the ...
...a factory set period of descaling is now terminated and the machine is off (all the way clockwise (Fig. 6) and fill the water tank with clean water. • reposition the tank. • empty the collection container (located under the milk frother. • turn the steam knob half a turn the steam knob ...the basis of the maximum quantity of lime scale which may be started again form the beginning. Proceed as follows: • remove the water tank, rinse it and fill it changes color anda number of squares are formed); • check that the machine is ready to save the ...
Owner Manual
Page 19
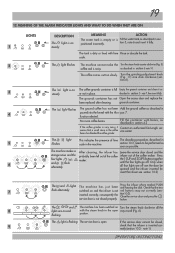
... INSTRUCTIONS 19 12 MEANING OF THE ALARM INDICATOR LIGHTS AND WHAT TO DO WHEN THEY ARE ON LIGHTS DESCRIPTION MEANING ACTION The water tank is empty or is Fill the water tank as possible. scale. 2 The light flashes The machine cannot make the Turn the steam knob counter-clockwise (Fig. 5) ... has blocked the coffee grinder. inserted correctly, consequently the tion10.2). tion 6). 3 The light is on and with lime Rinse or descale the tank. The , and The machine has been switched on Turn the steam knob clockwise all four lights are on The coffee grounds container is not closed...
... INSTRUCTIONS 19 12 MEANING OF THE ALARM INDICATOR LIGHTS AND WHAT TO DO WHEN THEY ARE ON LIGHTS DESCRIPTION MEANING ACTION The water tank is empty or is Fill the water tank as possible. scale. 2 The light flashes The machine cannot make the Turn the steam knob counter-clockwise (Fig. 5) ... has blocked the coffee grinder. inserted correctly, consequently the tion10.2). tion 6). 3 The light is on and with lime Rinse or descale the tank. The , and The machine has been switched on Turn the steam knob clockwise all four lights are on The coffee grounds container is not closed...


