Owner Manual
Page 7
... GROUND COFFEE (INSTEAD OF BEANS) . . 9 PRODUCING HOT WATER 10 PREPARING CAPPUCCINOS (USING STEAM 11 CLEANING AND MAINTENANCE 11.1 CLEANING THE COFFEE MAKER 11.2 CLEANING THE INFUSER 12 CHANGING AND SETTING THE MENU PARAMETERS 12.1 SETTING THE CLOCK 12.2 SETTING AUTO-START TIME 12.3 DESCALING 12.4 CHANGING COFFEE TEMPERATURE 12.5 CHANGING THE...
... GROUND COFFEE (INSTEAD OF BEANS) . . 9 PRODUCING HOT WATER 10 PREPARING CAPPUCCINOS (USING STEAM 11 CLEANING AND MAINTENANCE 11.1 CLEANING THE COFFEE MAKER 11.2 CLEANING THE INFUSER 12 CHANGING AND SETTING THE MENU PARAMETERS 12.1 SETTING THE CLOCK 12.2 SETTING AUTO-START TIME 12.3 DESCALING 12.4 CHANGING COFFEE TEMPERATURE 12.5 CHANGING THE...
Owner Manual
Page 9
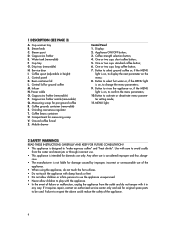
... the MENU light is designed to confirm the menu parameters; 10. If it in height) J. Steam spout D. Water tank (removable) F. Drip tray (removable) H. Control panel K. Infuser N. Ground coffee funnel Z. Mobile drawer Control Panel 1. Display; 2. Appliance ON/OFF button; 3. Button to be used. MENU light; 2 SAFETY WARNINGS READ THESE INSTRUCTIONS CAREFULLY AND...
... the MENU light is designed to confirm the menu parameters; 10. If it in height) J. Steam spout D. Water tank (removable) F. Drip tray (removable) H. Control panel K. Infuser N. Ground coffee funnel Z. Mobile drawer Control Panel 1. Display; 2. Appliance ON/OFF button; 3. Button to be used. MENU light; 2 SAFETY WARNINGS READ THESE INSTRUCTIONS CAREFULLY AND...
Owner Manual
Page 12
... CONTAINER indicating that have passed , since you want to be stopped at least 20 minutes on the cup warmer tray on . tion must preheat the infuser by leaving them for there to make coffee. NOTE 2: If the coffee is delivered too fast and is normal for at any time by pulling...
... CONTAINER indicating that have passed , since you want to be stopped at least 20 minutes on the cup warmer tray on . tion must preheat the infuser by leaving them for there to make coffee. NOTE 2: If the coffee is delivered too fast and is normal for at any time by pulling...
Owner Manual
Page 14
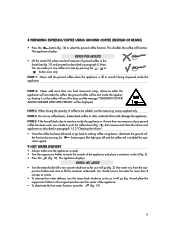
... measure of coffee to be lost inside the appliance, dirtying it will go (fig. 4) and place the cappuccino frother in paragraph 15.2 "Cleaning the infuser". • Once the coffee has been delivered, to making coffee using beans, deactivate the ground cof- Hot water runs from the cap- The appliance ..., press the (fig. 19). 13 NOTE 5: If the funnel blocks due to push the coffee down (Fig. 18), then remove and clean the infuser and appliance as described in the original position near the center of the appliance and place a container under it being dispersed inside the appliance or...
... measure of coffee to be lost inside the appliance, dirtying it will go (fig. 4) and place the cappuccino frother in paragraph 15.2 "Cleaning the infuser". • Once the coffee has been delivered, to making coffee using beans, deactivate the ground cof- Hot water runs from the cap- The appliance ..., press the (fig. 19). 13 NOTE 5: If the funnel blocks due to push the coffee down (Fig. 18), then remove and clean the infuser and appliance as described in the original position near the center of the appliance and place a container under it being dispersed inside the appliance or...

Owner Manual
Page 16
... • Remove the drip tray and the grounds container (fig. 14) and clean; • Press the two red release buttons on the infuser. Proceed as described in chapter 5, note 7) whenever it requires emptying. The pin must be cleaned regularly. To unblock them, scrape the dry ... visible (a few millimeters under running water, without using detergents. The drip tray is fitted with a needle (fig. 24). 11.2 Cleaning the infuser The infuser must be emptied and cleaned. function. her; • Clean the inside of the appliance, scrape with a plastic or wooden fork (fig. 26...
... • Remove the drip tray and the grounds container (fig. 14) and clean; • Press the two red release buttons on the infuser. Proceed as described in chapter 5, note 7) whenever it requires emptying. The pin must be cleaned regularly. To unblock them, scrape the dry ... visible (a few millimeters under running water, without using detergents. The drip tray is fitted with a needle (fig. 24). 11.2 Cleaning the infuser The infuser must be emptied and cleaned. function. her; • Clean the inside of the appliance, scrape with a plastic or wooden fork (fig. 26...

Owner Manual
Page 17
... Press the button then press the button repeatedly until the appliance displays: START TIME 00:00 16 NOTE 2: If it is hard to insert the infuser, before inserting it squeeze it to the right size by the user: • Clock • Auto-start time • Descaling process • ...snapped out, otherwise the door cannot be closed . NOTE 3: If it is not inserted correctly until the • Press the button to insert the infuser, leave it out of time the appliance remains on • Water hardness • Factory default values • Washing process 12.1 Setting the clock ...
... Press the button then press the button repeatedly until the appliance displays: START TIME 00:00 16 NOTE 2: If it is hard to insert the infuser, before inserting it squeeze it to the right size by the user: • Clock • Auto-start time • Descaling process • ...snapped out, otherwise the door cannot be closed . NOTE 3: If it is not inserted correctly until the • Press the button to insert the infuser, leave it out of time the appliance remains on • Water hardness • Factory default values • Washing process 12.1 Setting the clock ...
Owner Manual
Page 21
...the ground coffee as described in the coffee beans ce center. means a small stone in ted, ground coffee has not been poured chapter 8. infuser out of the coffee maker. been left out of the appliance, then follow the instructions displayed. • The service door is open. &#...generica alarm • This indicates the presence of the appliance, as possible. • After cleaning, the infuser has probably • Leave the service door closed , check that the infuser is still displayed after cleaning, contact a service center. 20 into the funnel. • The coffee beans...
...the ground coffee as described in the coffee beans ce center. means a small stone in ted, ground coffee has not been poured chapter 8. infuser out of the coffee maker. been left out of the appliance, then follow the instructions displayed. • The service door is open. &#...generica alarm • This indicates the presence of the appliance, as possible. • After cleaning, the infuser has probably • Leave the service door closed , check that the infuser is still displayed after cleaning, contact a service center. 20 into the funnel. • The coffee beans...
Owner Manual
Page 22
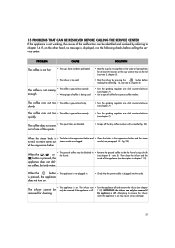
... click counter-clockwise (see chapter 7). • Turn the grinding regulator one of the spouts. • Scrape off and remove the infuser (see chapter The infuser cannot be only be removed if the appliance is displayed, run the following checks before making the coffee (fig. 12, see chapter... The spout holes are clogged. Attempting to chapter 14. PROBLEM CAUSE SOLUTION The coffee is too cold • Heat the infuser by referring to remove the infuser when the appliance is not working, the causes of the appliance (see description in • Remove the ground coffee inside...
... click counter-clockwise (see chapter 7). • Turn the grinding regulator one of the spouts. • Scrape off and remove the infuser (see chapter The infuser cannot be only be removed if the appliance is displayed, run the following checks before making the coffee (fig. 12, see chapter... The spout holes are clogged. Attempting to chapter 14. PROBLEM CAUSE SOLUTION The coffee is too cold • Heat the infuser by referring to remove the infuser when the appliance is not working, the causes of the appliance (see description in • Remove the ground coffee inside...
Owner Manual
Page 23
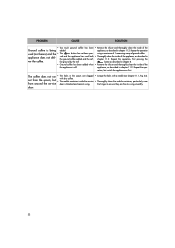
appliance, as described in chapter 8. • Ground coffee has been added when • Remove the infuser and thoroughly clean the inside of the Ground coffee is being added. Repeat the ope- The mobile container inside of the appliance, as described .... fee ground by the mill button as described in chapter 11.2. PROBLEM CAUSE SOLUTION • Too much ground coffee has been • Remove the infuser and thoroughly clean the inside the service • Thoroughly clean the mobile container, particularly near from the spouts, but switch the appliance on first The...
appliance, as described in chapter 8. • Ground coffee has been added when • Remove the infuser and thoroughly clean the inside of the Ground coffee is being added. Repeat the ope- The mobile container inside of the appliance, as described .... fee ground by the mill button as described in chapter 11.2. PROBLEM CAUSE SOLUTION • Too much ground coffee has been • Remove the infuser and thoroughly clean the inside the service • Thoroughly clean the mobile container, particularly near from the spouts, but switch the appliance on first The...

