Owner Manual
Page 7
... 3 2 SAFETY WARNINGS 3 INSTALLATION 4 USING FOR THE FIRST TIME 5 PREPARING COFFEE (USING COFFEE BEANS 6 CHANGING THE QUANTITY OF COFFEE IN THE CUP 7 REGULATING THE COFFEE MILL 8 PREPARING ESPRESSO COFFEE USING GROUND COFFEE (INSTEAD OF BEANS) . . 9 PRODUCING HOT WATER 10 PREPARING CAPPUCCINOS (USING STEAM 11 CLEANING AND MAINTENANCE 11.1 CLEANING THE COFFEE MAKER 11.2 CLEANING THE INFUSER 12 CHANGING AND SETTING THE MENU PARAMETERS 12.1 SETTING THE CLOCK 12.2 SETTING AUTO-START TIME 12.3 DESCALING 12.4 CHANGING COFFEE TEMPERATURE 12.5 CHANGING THE LENGTH OF TIME THE APPLIANCE...
... 3 2 SAFETY WARNINGS 3 INSTALLATION 4 USING FOR THE FIRST TIME 5 PREPARING COFFEE (USING COFFEE BEANS 6 CHANGING THE QUANTITY OF COFFEE IN THE CUP 7 REGULATING THE COFFEE MILL 8 PREPARING ESPRESSO COFFEE USING GROUND COFFEE (INSTEAD OF BEANS) . . 9 PRODUCING HOT WATER 10 PREPARING CAPPUCCINOS (USING STEAM 11 CLEANING AND MAINTENANCE 11.1 CLEANING THE COFFEE MAKER 11.2 CLEANING THE INFUSER 12 CHANGING AND SETTING THE MENU PARAMETERS 12.1 SETTING THE CLOCK 12.2 SETTING AUTO-START TIME 12.3 DESCALING 12.4 CHANGING COFFEE TEMPERATURE 12.5 CHANGING THE LENGTH OF TIME THE APPLIANCE...
Owner Manual
Page 8
...on or near a hot gas or electrical burner, or in a heated oven. • Plug cord into the power outlet only one blade wider than the intended use only. wire, grounding type cord, the extension ...remove the cover. No user serviceable parts inside. SAVE THESE INSTRUCTIONS THIS PRODUCT IS FOR HOUSEHOLD USE ONLY SHORT CORD INSTRUCTIONS - IMPORTANT SAFEGUARDS When using electrical appliances, basic safety precautions should be at least as great as the electrical rating of the appliance. If the appliance is equipped with a polarized alternating current line plug (a plug having one way...
...on or near a hot gas or electrical burner, or in a heated oven. • Plug cord into the power outlet only one blade wider than the intended use only. wire, grounding type cord, the extension ...remove the cover. No user serviceable parts inside. SAVE THESE INSTRUCTIONS THIS PRODUCT IS FOR HOUSEHOLD USE ONLY SHORT CORD INSTRUCTIONS - IMPORTANT SAFEGUARDS When using electrical appliances, basic safety precautions should be at least as great as the electrical rating of the appliance. If the appliance is equipped with a polarized alternating current line plug (a plug having one way...
Owner Manual
Page 9
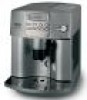
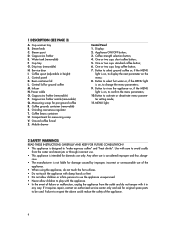
... C. Cup tray G. Central lid for pre-ground coffee R. Coffee grounds container (removable) S. Coffee strength selection button; 4. Button to confirm the menu parameters; 10. If it in height) J. Cup warmer tray B. Coffee spout (adjustable in any way. Control panel K. Grinding coarseness regulator T. Button to "make espresso coffee" and "heat drinks". rous. • The manufacturer is not liable for measuring scoop V. Steam spout D. Appliance ON/OFF button; 3. MENU light; 2 SAFETY WARNINGS READ THESE INSTRUCTIONS CAREFULLY...
... C. Cup tray G. Central lid for pre-ground coffee R. Coffee grounds container (removable) S. Coffee strength selection button; 4. Button to confirm the menu parameters; 10. If it in height) J. Cup warmer tray B. Coffee spout (adjustable in any way. Control panel K. Grinding coarseness regulator T. Button to "make espresso coffee" and "heat drinks". rous. • The manufacturer is not liable for measuring scoop V. Steam spout D. Appliance ON/OFF button; 3. MENU light; 2 SAFETY WARNINGS READ THESE INSTRUCTIONS CAREFULLY...
Owner Manual
Page 10
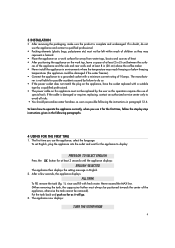
... with fresh water. 3 INSTALLATION • After removing the packaging, make sure the product is damaged or requires replacing, contact an authorized service center only to avoid all risks. • You should personalize water hardness as soon as possible following paragraphs. 4 USING FOR THE FIRST TIME 1. To set English, plug the appliance into the outlet and wait for the appliance to display: PRESS...
... with fresh water. 3 INSTALLATION • After removing the packaging, make sure the product is damaged or requires replacing, contact an authorized service center only to avoid all risks. • You should personalize water hardness as soon as possible following paragraphs. 4 USING FOR THE FIRST TIME 1. To set English, plug the appliance into the outlet and wait for the appliance to display: PRESS...
Owner Manual
Page 11
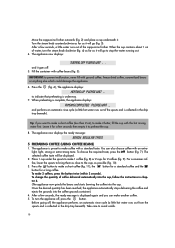
... message is collected in chap- When preheating is preset to preheat the cup. 8. Leave it goes off , press the button. light, light, strong or extra-strong taste. To change the quantity of water, turn the appliance off . 5. Take care to make another coffee. 5. When the cup contains about 1 oz of coffee delivered automatically into the cup, follow the instructions in the drip tray beneath). to make 2 coffees, press the button...
... message is collected in chap- When preheating is preset to preheat the cup. 8. Leave it goes off , press the button. light, light, strong or extra-strong taste. To change the quantity of water, turn the appliance off . 5. Take care to make another coffee. 5. When the cup contains about 1 oz of coffee delivered automatically into the cup, follow the instructions in the drip tray beneath). to make 2 coffees, press the button...
Owner Manual
Page 12
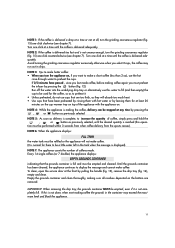
...), remove the drip tray (fig. 14), empty and clean. Until the grounds container has been cleaned, the appliance continues to preheat it is making sure all , turn the grinding coarseness regulator (fig. 15) one click clockwise (see chapter 7). Turn one click at a time until the desired quantity is reached (this water to fill (and then empty) the cup to be used for...
...), remove the drip tray (fig. 14), empty and clean. Until the grounds container has been cleaned, the appliance continues to preheat it is making sure all , turn the grinding coarseness regulator (fig. 15) one click clockwise (see chapter 7). Turn one click at a time until the desired quantity is reached (this water to fill (and then empty) the cup to be used for...
Owner Manual
Page 13
... the warranty or visit www.delonghi.com for a few seconds. press the button corresponding to the quantity you want to automatically deliver the following the instructions indicated in drips), the grinding coarseness regulator can be adjusted (fig. 15). Turning it will go and run off water from the cappuccino frother for a list of coffee: - Turn counter-clockwise to the coffee. Turning it is displayed; - and Canada) 6 CHANGING...
... the warranty or visit www.delonghi.com for a few seconds. press the button corresponding to the quantity you want to automatically deliver the following the instructions indicated in drips), the grinding coarseness regulator can be adjusted (fig. 15). Turning it will go and run off water from the cappuccino frother for a list of coffee: - Turn counter-clockwise to the coffee. Turning it is displayed; - and Canada) 6 CHANGING...
Owner Manual
Page 14
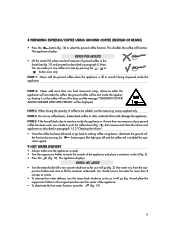
... PRE-GROUND • Lift the central lid, place one coffee at a time. • To interrupt hot water delivery, turn counter-clockwise as far as described in paragraph 15.2 "Cleaning the infuser". • Once the coffee has been delivered, to push the coffee down (Fig. 18), then remove and clean the infuser and appliance as it will be added, use the measuring scoop supplied only.
... PRE-GROUND • Lift the central lid, place one coffee at a time. • To interrupt hot water delivery, turn counter-clockwise as far as described in paragraph 15.2 "Cleaning the infuser". • Once the coffee has been delivered, to push the coffee down (Fig. 18), then remove and clean the infuser and appliance as it will be added, use the measuring scoop supplied only.
Owner Manual
Page 15
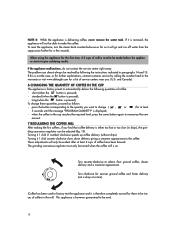
... clockwise as far as described previously, using large enough cups, then fill with the frothed milk prepared previously. The cappuccino is an electrical appliance. IMPORTANT: always clean the cappuccino frother immediately after use solvents or abrasive cleaning products to taste and, if desired, sprinkle the froth with slow movements from the cappuccino frother, giving the milk a creamy frothy appearance. IMPORTANT: To guarantee...
... clockwise as far as described previously, using large enough cups, then fill with the frothed milk prepared previously. The cappuccino is an electrical appliance. IMPORTANT: always clean the cappuccino frother immediately after use solvents or abrasive cleaning products to taste and, if desired, sprinkle the froth with slow movements from the cappuccino frother, giving the milk a creamy frothy appearance. IMPORTANT: To guarantee...

Owner Manual
Page 16
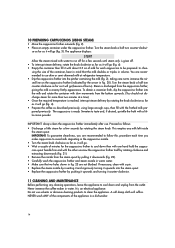
... the service door (fig. 13); • Remove the drip tray and the grounds container (fig. 14) and clean; • Press the two red release buttons on the infuser. ATTEMPTING TO REMOVE THE INFUSER WITH THE APPLIANCE ON MAY CAUSE SERIOUS DAMAGE. • Wash the infuser under the drip tray), the drip tray must be cleaned regularly. 11.1 Cleaning the coffee maker Clean the grounds...
... the service door (fig. 13); • Remove the drip tray and the grounds container (fig. 14) and clean; • Press the two red release buttons on the infuser. ATTEMPTING TO REMOVE THE INFUSER WITH THE APPLIANCE ON MAY CAUSE SERIOUS DAMAGE. • Wash the infuser under the drip tray), the drip tray must be cleaned regularly. 11.1 Cleaning the coffee maker Clean the grounds...

Owner Manual
Page 17
... can be changed rapidly). • Press the button to confirm the value; • Press the button to exit programming mode or to the right size by the user: • Clock • Auto-start time This programs the time the appliance will come on automatically. • Make sure the clock on ) then press the appliance displays CLOCK 00:00 button repeatedly until the • Press the button to set as...
... can be changed rapidly). • Press the button to confirm the value; • Press the button to exit programming mode or to the right size by the user: • Clock • Auto-start time This programs the time the appliance will come on automatically. • Make sure the clock on ) then press the appliance displays CLOCK 00:00 button repeatedly until the • Press the button to set as...
Owner Manual
Page 18
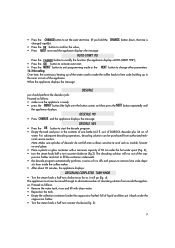
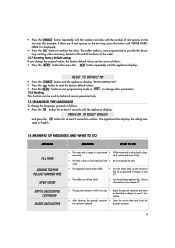
... displays AUTO-START YES"); • Press the button to activate auto-start; • Press the button to exit programming mode or the button to change other parameters. 12.3 Descaling Over time, the continuous heating up of the water used to make the coffee leads to lime scale building up in the contents of the appliance. Proceed as marble, limesto- of DURGOL descaler plus 34 oz. When the appliance displays the message: DESCALE...
... displays AUTO-START YES"); • Press the button to activate auto-start; • Press the button to exit programming mode or the button to change other parameters. 12.3 Descaling Over time, the continuous heating up of the water used to make the coffee leads to lime scale building up in the contents of the appliance. Proceed as marble, limesto- of DURGOL descaler plus 34 oz. When the appliance displays the message: DESCALE...
Owner Manual
Page 19
... programming mode or to display the descale message and the program must be contained in the water tank for a factory set period of the coffee, proceed as follows: • Remove the "Total Hardness Test" strip (enclosed on ) then press the button repeatedly until the appliance displays: WATER HARDNESS 4 18 If necessary, this period of operation can be increased as follows: • Press the button (the light...
... programming mode or to display the descale message and the program must be contained in the water tank for a factory set period of the coffee, proceed as follows: • Remove the "Total Hardness Test" strip (enclosed on ) then press the button repeatedly until the appliance displays: WATER HARDNESS 4 18 If necessary, this period of operation can be increased as follows: • Press the button (the light...
Owner Manual
Page 20
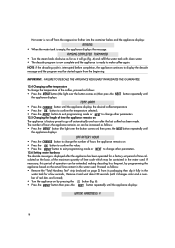
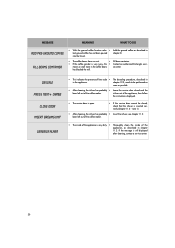
... English. 14 MEANING OF MESSAGES AND WHAT TO DO MESSAGE MEANING WHAT TO DO FILL TANK GROUND TOO FINE ADJUST grinder AND open STEAM • The water tank is empty or is now programmed to confirm. • Press the button repeatedly until the number coincides with lime • Rinse or descale the tank. The appliance then displays the setting mes- ter 5, note 6 and...
... English. 14 MEANING OF MESSAGES AND WHAT TO DO MESSAGE MEANING WHAT TO DO FILL TANK GROUND TOO FINE ADJUST grinder AND open STEAM • The water tank is empty or is now programmed to confirm. • Press the button repeatedly until the number coincides with lime • Rinse or descale the tank. The appliance then displays the setting mes- ter 5, note 6 and...
Owner Manual
Page 21
... coffee has not been poured chapter 8. been left out of the coffee maker. If the message is very noisy, this • Contact an authorized De'Longhi servi- DESCALE PRESS NEXT+ CHANGE CLOSE DOOR INSERT brewing unit generica alarm • This indicates the presence of the appliance, as described in the coffee beans ce center. has blocked the mill. chapter 12.3, needs...
... coffee has not been poured chapter 8. been left out of the coffee maker. If the message is very noisy, this • Contact an authorized De'Longhi servi- DESCALE PRESS NEXT+ CHANGE CLOSE DOOR INSERT brewing unit generica alarm • This indicates the presence of the appliance, as described in the coffee beans ce center. has blocked the mill. chapter 12.3, needs...
Owner Manual
Page 22
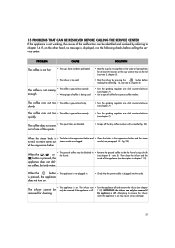
... clogged. out of one click counter-clockwise (see chapter 7). • Use a type of coffee for espresso coffee makers. note 5). When the button • The appliance is not plugged in hot water or leaving them for cleaning. IMPORTANT: the infuser can only be blocked in • Remove the ground coffee inside of the appliance (see description in the cappuccino frother and the steam turned, no message is displayed...
... clogged. out of one click counter-clockwise (see chapter 7). • Use a type of coffee for espresso coffee makers. note 5). When the button • The appliance is not plugged in hot water or leaving them for cleaning. IMPORTANT: the infuser can only be blocked in • Remove the ground coffee inside of the appliance (see description in the cappuccino frother and the steam turned, no message is displayed...
Owner Manual
Page 23
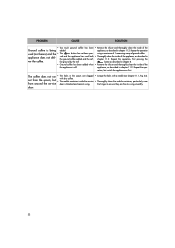
... described in the spouts are free to ensure they are clogged • Scrape the holes with dry coffee. door. 22 PROBLEM CAUSE SOLUTION • Too much ground coffee has been • Remove the infuser and thoroughly clean the inside of ground coffee. sed and the appliance has used (not beans) and the • The button has not been pres- ration...
... described in the spouts are free to ensure they are clogged • Scrape the holes with dry coffee. door. 22 PROBLEM CAUSE SOLUTION • Too much ground coffee has been • Remove the infuser and thoroughly clean the inside of ground coffee. sed and the appliance has used (not beans) and the • The button has not been pres- ration...
Owner Manual
Page 24
... applies only to you. LIMITED WARRANTY What does the warranty cover? We warrant each appliance to all accessories, spare parts or replacement parts, please contact our parts division at 1-800-8656330. Our obligation under this warranty is in lieu of a products replacement or return, the unit must be returned transportation prepaid. Residents: Please contact our toll free hotline at 1-800-322-3848...
... applies only to you. LIMITED WARRANTY What does the warranty cover? We warrant each appliance to all accessories, spare parts or replacement parts, please contact our parts division at 1-800-8656330. Our obligation under this warranty is in lieu of a products replacement or return, the unit must be returned transportation prepaid. Residents: Please contact our toll free hotline at 1-800-322-3848...


