
Product Manual
Page 1
... the unit changes ownership, be sure the manual accompanies this product. Danby Products Ltd, Guelph, Ontario Canada N1H 6Z9 Danby Products Inc, Findlay, Ohio USA 45840 V1.09.11 PrbthYmiem. Owner's Use and Care Guide Model DPAC12012P PORTABLE AIR CONDITIONER Owner's Use and Care Guide • Welcome • Important Safety Information • Features • Installation • Operation • Care and Maintenance • Troubleshooting CAUTION: Read and follow all safety rules and operating instructions before first use...
... the unit changes ownership, be sure the manual accompanies this product. Danby Products Ltd, Guelph, Ontario Canada N1H 6Z9 Danby Products Inc, Findlay, Ohio USA 45840 V1.09.11 PrbthYmiem. Owner's Use and Care Guide Model DPAC12012P PORTABLE AIR CONDITIONER Owner's Use and Care Guide • Welcome • Important Safety Information • Features • Installation • Operation • Care and Maintenance • Troubleshooting CAUTION: Read and follow all safety rules and operating instructions before first use...
Product Manual
Page 2
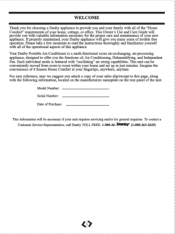
... Danby TOLL FREE: 1-800-26- This Owner's Use and Care Guide will be conveniently moved from room to room within your fingertips, anywhere, anytime. Air Conditioning, Dehumidifying, and Independent Fan. For easy reference, may we suggest you the functions of; Your Danby Portable Air-Conditioner is featured with all of the "Home Comfort" requirements of your new appliance. Please take a few moments to read the instructions...
... Danby TOLL FREE: 1-800-26- This Owner's Use and Care Guide will be conveniently moved from room to room within your fingertips, anywhere, anytime. Air Conditioning, Dehumidifying, and Independent Fan. For easy reference, may we suggest you the functions of; Your Danby Portable Air-Conditioner is featured with all of the "Home Comfort" requirements of your new appliance. Please take a few moments to read the instructions...
Product Manual
Page 3
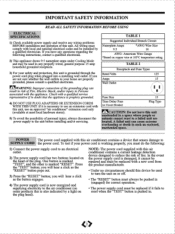
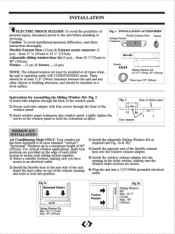
... instructions, contact a qualified electrician. 2) This appliance draws 9.5 nameplate amps under Cooling Mode and may be installed by a light on some products this unit unattended in doubt that senses damage to reduce the risk of the plug. In the event the power supply cord is necessary to use an approved "air conditioner" extension cord only (available at 105°C temperature rating. If you will hear a click as the "RESET" button...
... instructions, contact a qualified electrician. 2) This appliance draws 9.5 nameplate amps under Cooling Mode and may be installed by a light on some products this unit unattended in doubt that senses damage to reduce the risk of the plug. In the event the power supply cord is necessary to use an approved "air conditioner" extension cord only (available at 105°C temperature rating. If you will hear a click as the "RESET" button...
Product Manual
Page 4
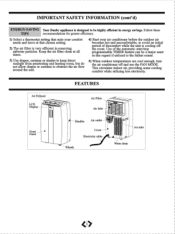
... circulates indoor air, providing some cooling comfort while utilizing less electricity. FEATURES Air Exhaust LCD [11 Display Front Panel Air Filter Air inlet Handles Air outlet Cover Electricity cable Wheels Air inlet O Water drain IMPORTANT SAFETY INFORMATION (cont'd) ENERGY-SAVING Your Danby appliance is designed to be a major asset in this regard if utilized to the fullest extent. 5) When outdoor temperatures are cool enough, turn the air conditioner off the room. Keep the air filter clean at all times. 3) Use...
... circulates indoor air, providing some cooling comfort while utilizing less electricity. FEATURES Air Exhaust LCD [11 Display Front Panel Air Filter Air inlet Handles Air outlet Cover Electricity cable Wheels Air inlet O Water drain IMPORTANT SAFETY INFORMATION (cont'd) ENERGY-SAVING Your Danby appliance is designed to be a major asset in this regard if utilized to the fullest extent. 5) When outdoor temperatures are cool enough, turn the air conditioner off the room. Keep the air filter clean at all times. 3) Use...
Product Manual
Page 5
...) (t) Water hose (79"/ 200cm) Instructions for Assembling the Sliding Window Kit- Lightly tighten the screws in the window panel to fit most standard "vertical"! There should be at least 11.8" (30cm) clearance between the unit and any other objects or building structures, and should be installed at all times when the unit is operating under AIR CONDITIONING mode. Fig. 2 Back of window panel 44 4$ Thbe Adapters WINDOW KIT INSTALLATION Air Conditioning Mode ONLY: Your window kit...
...) (t) Water hose (79"/ 200cm) Instructions for Assembling the Sliding Window Kit- Lightly tighten the screws in the window panel to fit most standard "vertical"! There should be at least 11.8" (30cm) clearance between the unit and any other objects or building structures, and should be installed at all times when the unit is operating under AIR CONDITIONING mode. Fig. 2 Back of window panel 44 4$ Thbe Adapters WINDOW KIT INSTALLATION Air Conditioning Mode ONLY: Your window kit...
Product Manual
Page 6
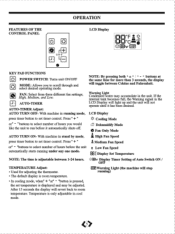
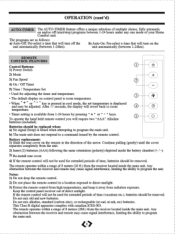
... full, the Warning signal in cool mode. FEATURES OF THE CONTROL PANEL Igo OPERATION LCD Display OnnOe0Fcakg 0 8B1-tr STOP KEY PAD FUNCTIONS sa POWER SWITCH: Turns unit ON/OFF MODE: Allows you would like the unit to scroll through and select desired operating mode. Warning Light Condensed water may be adjusted. Cooling Mode dl Dehumidify Mode Fan Only Mode AUTO TURN ON- Z High Fan Speed Medium Fan Speed Low Fan Speed Bag Display Set Temperature NOTE: The time is adjustable...
... full, the Warning signal in cool mode. FEATURES OF THE CONTROL PANEL Igo OPERATION LCD Display OnnOe0Fcakg 0 8B1-tr STOP KEY PAD FUNCTIONS sa POWER SWITCH: Turns unit ON/OFF MODE: Allows you would like the unit to scroll through and select desired operating mode. Warning Light Condensed water may be adjusted. Cooling Mode dl Dehumidify Mode Fan Only Mode AUTO TURN ON- Z High Fan Speed Medium Fan Speed Low Fan Speed Bag Display Set Temperature NOTE: The time is adjustable...
Product Manual
Page 7
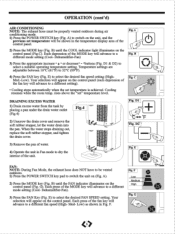
....4 2) Unscrew the drain cover and remove the soft rubber stopper, let the water drain into the pan. FAN: NOTE: During Fan Mode, the exhaust hose does NOT have to be properly vented outdoors during air conditioning mode. 1) Press the POWER SWITCH key (Fig. G). F. G 414 B) until the FAN indicator illuminates on the control panel (Fig. B different mode setting (Cool- Dehumidifier-Fan) 3) Press the appropriate increase " " or decrease" - B) until the COOL indicator light illuminates on the control panel (Fig.C). Your...
....4 2) Unscrew the drain cover and remove the soft rubber stopper, let the water drain into the pan. FAN: NOTE: During Fan Mode, the exhaust hose does NOT have to be properly vented outdoors during air conditioning mode. 1) Press the POWER SWITCH key (Fig. G). F. G 414 B) until the FAN indicator illuminates on the control panel (Fig. B different mode setting (Cool- Dehumidifier-Fan) 3) Press the appropriate increase " " or decrease" - B) until the COOL indicator light illuminates on the control panel (Fig.C). Your...
Product Manual
Page 8
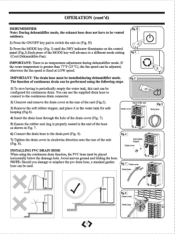
... drain hose, a standard garden hose can be configured for safe keeping (Fig.6). H Note: During dehumidifier mode, the exhaust hose does not have to be vented outdoors. 1) Press the ON/OFF key pad to a different mode setting .I ) until the DRY indicator illuminates on (Fig. Drain cover 4) Insert the drain hose through the hole of the MODE key will advance to switch the unit on the control panel (Fig.J).Each press of the drain cover...
... drain hose, a standard garden hose can be configured for safe keeping (Fig.6). H Note: During dehumidifier mode, the exhaust hose does not have to be vented outdoors. 1) Press the ON/OFF key pad to a different mode setting .I ) until the DRY indicator illuminates on (Fig. Drain cover 4) Insert the drain hose through the hole of the MODE key will advance to switch the unit on the control panel (Fig.J).Each press of the drain cover...
Product Manual
Page 9
... room temperature. • Timer setting is displayed and may cause signal interference, limiting the ability to direct sunlight. 3) Protect the remote control from high temperatures, and keep it away from the unit. 2) Insert (2) batteries (AAA) following the same orientation (polarity) depicted inside the battery chamber (+ / -). 3) Re-install rear cover. 4) If the remote control will turn on the remote in cool mode, the set temperature is available from the receiver located inside the main unit...
... room temperature. • Timer setting is displayed and may cause signal interference, limiting the ability to direct sunlight. 3) Protect the remote control from high temperatures, and keep it away from the unit. 2) Insert (2) batteries (AAA) following the same orientation (polarity) depicted inside the battery chamber (+ / -). 3) Re-install rear cover. 4) If the remote control will turn on the remote in cool mode, the set temperature is available from the receiver located inside the main unit...
Product Manual
Page 10
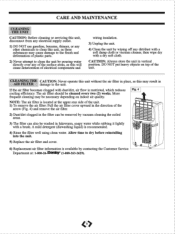
... time to dry before reinstalling into the unit. 5) Replace the air filter and cover. 6) Replacement air filter information is available by wiping off any dirt/dust with a soft damp cloth or vacuum cleaner, then wipe dry with dust/dirt, air flow is restricted, which reduces cooling efficiency. Fig. 4 NOTE: The air filter is recommended. 4) Rinse the filter well using clean water. DO NOT put heavy objects on indoor air quality.
... time to dry before reinstalling into the unit. 5) Replace the air filter and cover. 6) Replacement air filter information is available by wiping off any dirt/dust with a soft damp cloth or vacuum cleaner, then wipe dry with dust/dirt, air flow is restricted, which reduces cooling efficiency. Fig. 4 NOTE: The air filter is recommended. 4) Rinse the filter well using clean water. DO NOT put heavy objects on indoor air quality.
Product Manual
Page 11
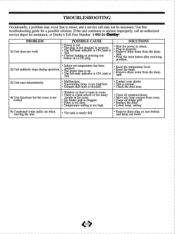
Use this troubleshooting guide for a possible solution. setting. 5) Condensed water spills out when moving the unit. • The tank is nearly full. • Remove drain plug on LCEll plug. If the unit continues to in properly.. • The fulgtank indicator is ON,. return. • Remove drain water from room. • Clean air intake grill. • Replace the filter. • Lower temp. SOLUTIONS . • Wait Plug for power to operate improperly, call may not be necessary. is...
Use this troubleshooting guide for a possible solution. setting. 5) Condensed water spills out when moving the unit. • The tank is nearly full. • Remove drain plug on LCEll plug. If the unit continues to in properly.. • The fulgtank indicator is ON,. return. • Remove drain water from room. • Clean air intake grill. • Replace the filter. • Lower temp. SOLUTIONS . • Wait Plug for power to operate improperly, call may not be necessary. is...
Product Manual
Page 12
..., Danby, there are the responsibility of "In Home Service" ,it will be repaired or replaced, at warrantor's option, at their own expense) to the ORIGINAL purchaser. Building-in a location that the unit is warranted to be free from manufacturers defects in the room or abnormal operating conditions (extremely high or low room temperature). 5) Use for commercial or industrial purposes (ie. If the appliance is installed...
..., Danby, there are the responsibility of "In Home Service" ,it will be repaired or replaced, at warrantor's option, at their own expense) to the ORIGINAL purchaser. Building-in a location that the unit is warranted to be free from manufacturers defects in the room or abnormal operating conditions (extremely high or low room temperature). 5) Use for commercial or industrial purposes (ie. If the appliance is installed...
Product Manual
Page 13
... a depot in China (P.R.C.) Danby Products Ltd, Guelph, Ontario Canada N1H 6Z9 Danby Products Inc, Findlay, Ohio USA 45840 All repair parts are available for purchase or special order when you , call : 1-800-26- PORTABLE AIR CONDITIONER The model number can be found on the serial plate located on the back panel of the service depot nearest you visit your nearest service depot. DPAC12012P For service, contact your area...
... a depot in China (P.R.C.) Danby Products Ltd, Guelph, Ontario Canada N1H 6Z9 Danby Products Inc, Findlay, Ohio USA 45840 All repair parts are available for purchase or special order when you , call : 1-800-26- PORTABLE AIR CONDITIONER The model number can be found on the serial plate located on the back panel of the service depot nearest you visit your nearest service depot. DPAC12012P For service, contact your area...


