Product Manual
Page 2
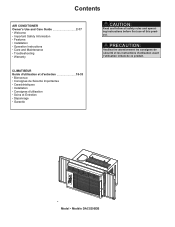
Contents AIR CONDITIONER Owner's Use and Care Guide 2-17 • Welcome • Important Safety Information • Features • Installation • Operation Instructions • Care and Maintenance • Troubleshooting &#...é Importantes • Caractéristiques • Installation • Consignes d'utilisation • Soins et Entretien • Dépannage • Garantie Model • Modèle DAC5200DB
Contents AIR CONDITIONER Owner's Use and Care Guide 2-17 • Welcome • Important Safety Information • Features • Installation • Operation Instructions • Care and Maintenance • Troubleshooting &#...é Importantes • Caractéristiques • Installation • Consignes d'utilisation • Soins et Entretien • Dépannage • Garantie Model • Modèle DAC5200DB
Product Manual
Page 4
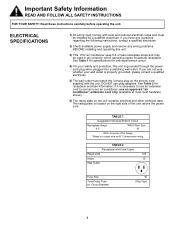
...into a matching wall outlet. See Table 2 for individual branch circuit. 4) For your safety and protection, this unit. 3) This 115V air conditioner uses 5.4 or less nameplate amps and may be installed by a qualified electrician. TABLE 2 Receptacle and Fuse Types Rated Volts 125 Amps...stores). 6) The rating plate on the unit contains electrical and other technical data. If you are not sure whether your air conditioner, use plug adapters. Important Safety Information READ AND FOLLOW ALL SAFETY INSTRUCTIONS FOR YOUR SAFETY: Read these instructions carefully before operating...
...into a matching wall outlet. See Table 2 for individual branch circuit. 4) For your safety and protection, this unit. 3) This 115V air conditioner uses 5.4 or less nameplate amps and may be installed by a qualified electrician. TABLE 2 Receptacle and Fuse Types Rated Volts 125 Amps...stores). 6) The rating plate on the unit contains electrical and other technical data. If you are not sure whether your air conditioner, use plug adapters. Important Safety Information READ AND FOLLOW ALL SAFETY INSTRUCTIONS FOR YOUR SAFETY: Read these instructions carefully before operating...
Product Manual
Page 5
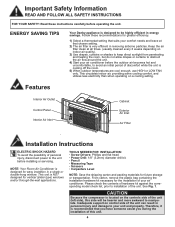
... penetrating and heating the room, but do not allow drapes or curtains to obstruct the air flow around the unit. 4) Start your air conditioner before the outdoor air becomes hot and uncomfortable, to avoid an initial period of discomfort while the unit is ...Air Outlet Control Panel Interior Air Inlet Cabinet Exterior Air Inlet Air FIlter Installation Instructions ELECTRIC SHOCK HAZARD To avoid the possibility of personal injury, disconnect power to installation of this side will be highly efficient in personal injury and damage to your air conditioner. ENERGY SAVING TIPS Your Danby...
... penetrating and heating the room, but do not allow drapes or curtains to obstruct the air flow around the unit. 4) Start your air conditioner before the outdoor air becomes hot and uncomfortable, to avoid an initial period of discomfort while the unit is ...Air Outlet Control Panel Interior Air Inlet Cabinet Exterior Air Inlet Air FIlter Installation Instructions ELECTRIC SHOCK HAZARD To avoid the possibility of personal injury, disconnect power to installation of this side will be highly efficient in personal injury and damage to your air conditioner. ENERGY SAVING TIPS Your Danby...
Product Manual
Page 6
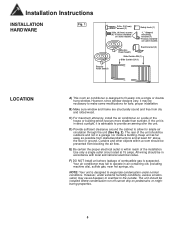
...necessary to make some models Adhesive Foam Seal(1) Sash bracket (2) Side Curtain RH (1) Side Curtain LH (1) Regular Foam Seal(1) LOCATION A) This room air conditioner is designed to provide an awning over the unit. D) Provide sufficient clearance around the cabinet to fit easily into a single or double hung window....The rear of the installation. Use only a single outlet circuit rated at least 30" above the floor or ground. Your air conditioner may cause basepan to overflow to operate in accordance with local and national electrical codes. However, under normal conditions.
...necessary to make some models Adhesive Foam Seal(1) Sash bracket (2) Side Curtain RH (1) Side Curtain LH (1) Regular Foam Seal(1) LOCATION A) This room air conditioner is designed to provide an awning over the unit. D) Provide sufficient clearance around the cabinet to fit easily into a single or double hung window....The rear of the installation. Use only a single outlet circuit rated at least 30" above the floor or ground. Your air conditioner may cause basepan to overflow to operate in accordance with local and national electrical codes. However, under normal conditions.
Product Manual
Page 7
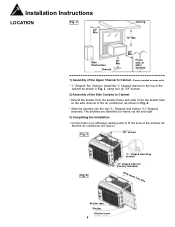
.... • Extend the shutter from the shutter frame and slide it into the shutter tabs on the side channel of the window sill that the air conditioner will rest on some units) • "L" Shaped Top Channel: Install the "L" shaped channel to the top of the cabinet as shown in Fig.... 3, using four (4) 3/8" screws. 2) Assembly of the Side Curtains to fit the area of the air conditioner, as shown in Fig. 4. • Slide the shutters into tabs Shutter tabs Shutter Shutter frame 6 Installation Instructions LOCATION Fig. 2 20" Min Awning 12"...
.... • Extend the shutter from the shutter frame and slide it into the shutter tabs on the side channel of the window sill that the air conditioner will rest on some units) • "L" Shaped Top Channel: Install the "L" shaped channel to the top of the cabinet as shown in Fig.... 3, using four (4) 3/8" screws. 2) Assembly of the Side Curtains to fit the area of the air conditioner, as shown in Fig. 4. • Slide the shutters into tabs Shutter tabs Shutter Shutter frame 6 Installation Instructions LOCATION Fig. 2 20" Min Awning 12"...
Product Manual
Page 8
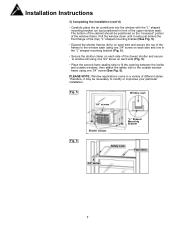
.... 6). Fig. 5 Window sash 3/4" screws Fig. 6 Shutter clamps "L" Shaped Mounting Bracket Safety Lock Foam Seal 3/4" screw 7 Installation Instructions 3) Completing the Installation (cont'd) • Carefully place the air conditioner into the window with the "L" shaped mounting bracket (on each side of the (lower) shutter and secure to window sill using one 3/4" screw on top...
.... 6). Fig. 5 Window sash 3/4" screws Fig. 6 Shutter clamps "L" Shaped Mounting Bracket Safety Lock Foam Seal 3/4" screw 7 Installation Instructions 3) Completing the Installation (cont'd) • Carefully place the air conditioner into the window with the "L" shaped mounting bracket (on each side of the (lower) shutter and secure to window sill using one 3/4" screw on top...
Product Manual
Page 9
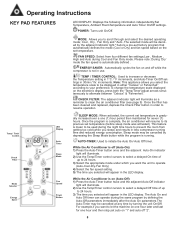
...cleaned and replaced, depress the Check Filter button in use. Please note: During 'Dry' mode the fan speed is complete, the air conditioner will illuminate as a reminder to operate (Auto-Cool-Dry-Fan Only) 4) Select the fan speed setting. 5) The time you ... appear in less compressor running . This feature is on the set temperature (before sleep mode was activated). increments. While the Air Conditioner is running time and reduced energy consumption. Operating Instructions KEY PAD FEATURES LED DISPLAY: Displays the following information independently;Set Temperature, ...
...cleaned and replaced, depress the Check Filter button in use. Please note: During 'Dry' mode the fan speed is complete, the air conditioner will illuminate as a reminder to operate (Auto-Cool-Dry-Fan Only) 4) Select the fan speed setting. 5) The time you ... appear in less compressor running . This feature is on the set temperature (before sleep mode was activated). increments. While the Air Conditioner is running time and reduced energy consumption. Operating Instructions KEY PAD FEATURES LED DISPLAY: Displays the following information independently;Set Temperature, ...
Product Manual
Page 10
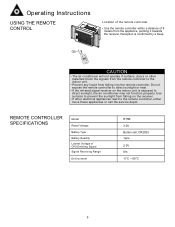
...confirmed by a beep. 8m O N /O FF TUEMPP MO D E TDEOMWP N SW IN G TIMER FA N SLEEP CAUTION • The air conditioner will not operate if curtains, doors or other electrical appliances react to the remote controller, either move these appliances or call the service depot. ...the infrared signal receiver on the receiver. • If other materials block the signals from the remote controller to direct sunlight, the air conditioner may not function properly. Operating Instructions USING THE REMOTE CONTROL Location of the remote controller. • Use the remote controller within ...
...confirmed by a beep. 8m O N /O FF TUEMPP MO D E TDEOMWP N SW IN G TIMER FA N SLEEP CAUTION • The air conditioner will not operate if curtains, doors or other electrical appliances react to the remote controller, either move these appliances or call the service depot. ...the infrared signal receiver on the receiver. • If other materials block the signals from the remote controller to direct sunlight, the air conditioner may not function properly. Operating Instructions USING THE REMOTE CONTROL Location of the remote controller. • Use the remote controller within ...
Product Manual
Page 12
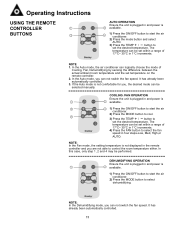
...Fan mode, the setting temperature is not displayed in and power is 1 2 available. 1) Press the ON/OFF button to start the air conditioner. 2) Press the MODE button to select dehumidifying. It has already been automatically controlled. 11 Operating Instructions USING THE REMOTE CONTROLLER 1 BUTTONS 3...NOTE 1. COOLING /FAN OPERATION Ensure the unit is plugged in and power is 2 available. 1) Press the ON/OFF button to start the air 3 conditioner. 2) Press the mode button and select AUTO. 3) Press the TEMP / button to control the room temperature either. It has already been ...
...Fan mode, the setting temperature is not displayed in and power is 1 2 available. 1) Press the ON/OFF button to start the air conditioner. 2) Press the MODE button to select dehumidifying. It has already been automatically controlled. 11 Operating Instructions USING THE REMOTE CONTROLLER 1 BUTTONS 3...NOTE 1. COOLING /FAN OPERATION Ensure the unit is plugged in and power is 2 available. 1) Press the ON/OFF button to start the air 3 conditioner. 2) Press the mode button and select AUTO. 3) Press the TEMP / button to control the room temperature either. It has already been ...
Product Manual
Page 13
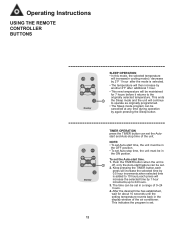
... hours. 4. Operating Instructions USING THE REMOTE CONTROLLER BUTTONS SLEEP OPERATION • In this mode, the selected temperature will increase(in the display window of the air conditioner.
... hours. 4. Operating Instructions USING THE REMOTE CONTROLLER BUTTONS SLEEP OPERATION • In this mode, the selected temperature will increase(in the display window of the air conditioner.
Product Manual
Page 14
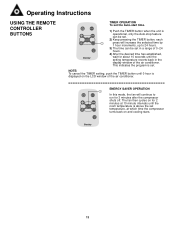
... setting, push the TIMER button until 0 hour is set temperature, at which time the compressor turns back on the LCD window of the air conditioner. Operating Instructions USING THE REMOTE CONTROLLER BUTTONS TIMER OPERATION To set the Auto-start time. 1) Push the TIMER button when the unit is operational.... 2) Keep pressing the TIMER button, each 1 press will continue to 24 hours. 3) The time can be set in the display window of the air conditioner. ENERGY SAVER OPERATION 1 In this mode, the fan will increase the selected time by 1 hour increments, up to run for 3 minutes after the...
... setting, push the TIMER button until 0 hour is set temperature, at which time the compressor turns back on the LCD window of the air conditioner. Operating Instructions USING THE REMOTE CONTROLLER BUTTONS TIMER OPERATION To set the Auto-start time. 1) Push the TIMER button when the unit is operational.... 2) Keep pressing the TIMER button, each 1 press will continue to 24 hours. 3) The time can be set in the display window of the air conditioner. ENERGY SAVER OPERATION 1 In this mode, the fan will increase the selected time by 1 hour increments, up to run for 3 minutes after the...
Product Manual
Page 16
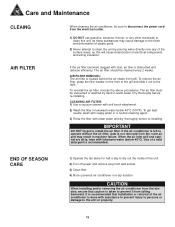
... grill and cabinet are dirty, wipe with clean water and dry thoroughly before re-installing. Care and Maintenance CLEAING When cleaning the air conditioner, be sure to disconnect the power cord from the electrical outlet. 1) DO NOT use gasoline, benzene, thinner, or any of the surface areas, as ... the window, ensure that installation or removal of the gril and slide it from wall socket. 3) Clean filter. 4) Store (covered) air conditioner in lukewarm water below 40°C (104°F): To get best results, wash with soapy water or a neutral cleaning agent. 3) Rinse the filter with ...
... grill and cabinet are dirty, wipe with clean water and dry thoroughly before re-installing. Care and Maintenance CLEAING When cleaning the air conditioner, be sure to disconnect the power cord from the electrical outlet. 1) DO NOT use gasoline, benzene, thinner, or any of the surface areas, as ... the window, ensure that installation or removal of the gril and slide it from wall socket. 3) Clean filter. 4) Store (covered) air conditioner in lukewarm water below 40°C (104°F): To get best results, wash with soapy water or a neutral cleaning agent. 3) Rinse the filter with ...

Product Manual
Page 17
...conditions. • Unit is not properly angled to the unit. PPRROOBBLLEEMM 1) Air conditioner will not operate. 2) Inefficient or no cooling. 3) Noisy unit. 4) Odors. 5) Water dripping outside temperature. • Unit air filter is dirty. • When outdoor temperature is approximately 18.3°C (65...unit off . Troubleshooting Occasionally a problem may arise that is minor in nature, and a service call an authorized service depot or Danby's Toll Free Number 1-800-263-2629 for a possible solution. Use this troubleshooting guide for assistance. If the unit continues to ...
...conditions. • Unit is not properly angled to the unit. PPRROOBBLLEEMM 1) Air conditioner will not operate. 2) Inefficient or no cooling. 3) Noisy unit. 4) Odors. 5) Water dripping outside temperature. • Unit air filter is dirty. • When outdoor temperature is approximately 18.3°C (65...unit off . Troubleshooting Occasionally a problem may arise that is minor in nature, and a service call an authorized service depot or Danby's Toll Free Number 1-800-263-2629 for a possible solution. Use this troubleshooting guide for assistance. If the unit continues to ...


