Product Manual
Page 2
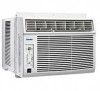
...éristiques • Installation • Consignes d'utilisation • Soins et Entretien • Dépannage • Garantie Model • Modèle DAC5200DB Contents AIR CONDITIONER Owner's Use and Care Guide 2-17 • Welcome • Important Safety Information • Features • Installation • Operation Instructions • Care and Maintenance • Troubleshooting • Warranty CAUTION: Read and follow all safety rules and operating instructions before first use of this product.
...éristiques • Installation • Consignes d'utilisation • Soins et Entretien • Dépannage • Garantie Model • Modèle DAC5200DB Contents AIR CONDITIONER Owner's Use and Care Guide 2-17 • Welcome • Important Safety Information • Features • Installation • Operation Instructions • Care and Maintenance • Troubleshooting • Warranty CAUTION: Read and follow all safety rules and operating instructions before first use of this product.
Product Manual
Page 3
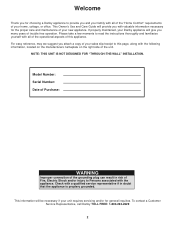
... information necessary for the proper care and maintenance of trouble free operation. Model Number: Serial Number: Date of Purchase: WARNING Improper connection of the grounding plug can result in doubt that the appliance is proplery grounded. NOTE: THIS UNIT IS NOT DESIGNED FOR "THROUGH-THE-WALL" INSTALLATION. This information will provide you with the following information, located on the manufacturers nameplate on the...
... information necessary for the proper care and maintenance of trouble free operation. Model Number: Serial Number: Date of Purchase: WARNING Improper connection of the grounding plug can result in doubt that the appliance is proplery grounded. NOTE: THIS UNIT IS NOT DESIGNED FOR "THROUGH-THE-WALL" INSTALLATION. This information will provide you with the following information, located on the manufacturers nameplate on the...
Product Manual
Page 4
... unit. 3) This 115V air conditioner uses 5.4 or less nameplate amps and may be installed by a qualified electrician. American Wire Gauge *Based on copper wire at most local hardware stores). 6) The rating plate on the unit contains electrical and other technical data. TABLE 2 Receptacle and Fuse Types Rated Volts 125 Amps 15 Wall Outlet Fuse Size Time Delay Fuse (or Circuit Breaker) 15 Plug Type 3 Important Safety Information READ AND FOLLOW ALL SAFETY INSTRUCTIONS FOR...
... unit. 3) This 115V air conditioner uses 5.4 or less nameplate amps and may be installed by a qualified electrician. American Wire Gauge *Based on copper wire at most local hardware stores). 6) The rating plate on the unit contains electrical and other technical data. TABLE 2 Receptacle and Fuse Types Rated Volts 125 Amps 15 Wall Outlet Fuse Size Time Delay Fuse (or Circuit Breaker) 15 Plug Type 3 Important Safety Information READ AND FOLLOW ALL SAFETY INSTRUCTIONS FOR...
Product Manual
Page 5
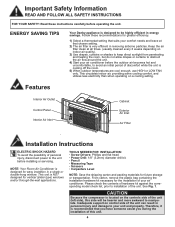
...-the-wall applications. This unit is cooling off the room. 5) When outdoor temperatures are cool enough, use HIGH or LOW FAN only. Follow these instructions carefully before operating the unit. Please check the contents of hardware kit against the corresponding model check list, prior to installation of personal injury, disconnect power to the unit before the outdoor air becomes hot and uncomfortable, to obstruct the air flow around the unit. 4) Start your air conditioner. ENERGY SAVING...
...-the-wall applications. This unit is cooling off the room. 5) When outdoor temperatures are cool enough, use HIGH or LOW FAN only. Follow these instructions carefully before operating the unit. Please check the contents of hardware kit against the corresponding model check list, prior to installation of personal injury, disconnect power to the unit before the outdoor air becomes hot and uncomfortable, to obstruct the air flow around the unit. 4) Start your air conditioner. ENERGY SAVING...
Product Manual
Page 6
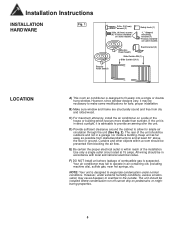
... in direct sunlight, it may be outdoors and not in a garage nor inside a building. Curtains and other objects within reach of the unit should be prevented from blocking the air flow. However, under normal conditions. All wiring should be necessary to make some models Adhesive Foam Seal(1) Sash bracket (2) Side Curtain RH (1) Side Curtain LH (1) Regular Foam Seal(1) LOCATION A) This room air conditioner...
... in direct sunlight, it may be outdoors and not in a garage nor inside a building. Curtains and other objects within reach of the unit should be prevented from blocking the air flow. However, under normal conditions. All wiring should be necessary to make some models Adhesive Foam Seal(1) Sash bracket (2) Side Curtain RH (1) Side Curtain LH (1) Regular Foam Seal(1) LOCATION A) This room air conditioner...
Product Manual
Page 7
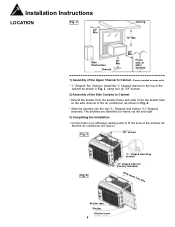
.... 4 "L" shaped mounting bracket "U" shaped Channel (Factory Installed) Slide down into the shutter tabs on the side channel of the window sill that the air conditioner will rest on. Installation Instructions LOCATION Fig. 2 20" Min Awning 12" Min Side 30" Min Obstruction Ground 20" Min Fence, wall, or other obstacle 1) Assembly of the Upper Channel to Cabinet. (Factory installed on some units) •...
.... 4 "L" shaped mounting bracket "U" shaped Channel (Factory Installed) Slide down into the shutter tabs on the side channel of the window sill that the air conditioner will rest on. Installation Instructions LOCATION Fig. 2 20" Min Awning 12" Min Side 30" Min Obstruction Ground 20" Min Fence, wall, or other obstacle 1) Assembly of the Upper Channel to Cabinet. (Factory installed on some units) •...
Product Manual
Page 8
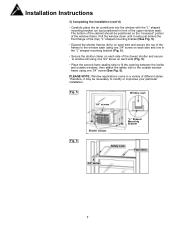
... "recessed" portion of the frames to modify or improvise your particular installation. The bottom of the cabinet should be necessary to the window sash using one 3/4" screw on each side and one in a variety of the upper window sash. Installation Instructions 3) Completing the Installation (cont'd) • Carefully place the air conditioner into the window with the "L" shaped mounting bracket (on top) positioned in...
... "recessed" portion of the frames to modify or improvise your particular installation. The bottom of the cabinet should be necessary to the window sash using one 3/4" screw on each side and one in a variety of the upper window sash. Installation Instructions 3) Completing the Installation (cont'd) • Carefully place the air conditioner into the window with the "L" shaped mounting bracket (on top) positioned in...
Product Manual
Page 9
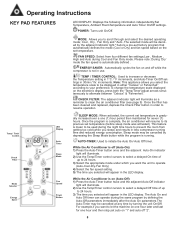
Temp / Timer Control Check Filter Mode Selector Energy Saver LED Display Auto Timer Sleep Mode Fan Speed Power Button MODE: Allows you sleep) and results in less compressor running . FAN SPEED: Select from four different fan settings;Low , Medium , High and Auto during the night time hours to prevent the room from getting too cold (while you to resume operation. CHECK FILTER: The adjacent indicator light will resume to increase or decrease the Temperature setting in 1°C / °F increments, and...
Temp / Timer Control Check Filter Mode Selector Energy Saver LED Display Auto Timer Sleep Mode Fan Speed Power Button MODE: Allows you sleep) and results in less compressor running . FAN SPEED: Select from four different fan settings;Low , Medium , High and Auto during the night time hours to prevent the room from getting too cold (while you to resume operation. CHECK FILTER: The adjacent indicator light will resume to increase or decrease the Temperature setting in 1°C / °F increments, and...
Product Manual
Page 10
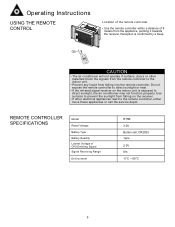
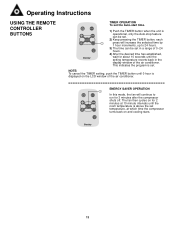
... the service depot. REMOTE CONTROLLER SPECIFICATIONS Model Rated Voltage Battery Type Battery Quantity Lowest Voltage of 8 meters from falling on the indoor unit is confirmed by a beep. 8m O N /O FF TUEMPP MO D E TDEOMWP N SW IN G TIMER FA N SLEEP CAUTION • The air conditioner will not operate if curtains, doors or other electrical appliances react to direct sunlight, the air conditioner may not function properly. Operating Instructions USING THE REMOTE CONTROL Location of the remote controller. • Use the remote controller...
... the service depot. REMOTE CONTROLLER SPECIFICATIONS Model Rated Voltage Battery Type Battery Quantity Lowest Voltage of 8 meters from falling on the indoor unit is confirmed by a beep. 8m O N /O FF TUEMPP MO D E TDEOMWP N SW IN G TIMER FA N SLEEP CAUTION • The air conditioner will not operate if curtains, doors or other electrical appliances react to direct sunlight, the air conditioner may not function properly. Operating Instructions USING THE REMOTE CONTROL Location of the remote controller. • Use the remote controller...

Product Manual
Page 11
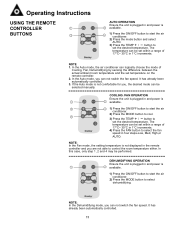
... again to AUTO. TEMP DOWN button Push this button is pressed and stops when the button is pressed again. Operating Instructions REMOTE CONTROLLER BUTTONS ON/OFF button Operation starts when this button to decrease the indoor temperature setting in 1°C increments to 17°C. Models: R15B MODE button Each time you . 10 TIMER button Push this button to activate the "Auto Start" or "Auto Stop" program from 0-24 hours (0.5/1 hour increments) SLEEP button Press this button, a mode is available on COOL, AUTO mode only and...
... again to AUTO. TEMP DOWN button Push this button is pressed and stops when the button is pressed again. Operating Instructions REMOTE CONTROLLER BUTTONS ON/OFF button Operation starts when this button to decrease the indoor temperature setting in 1°C increments to 17°C. Models: R15B MODE button Each time you . 10 TIMER button Push this button to activate the "Auto Start" or "Auto Stop" program from 0-24 hours (0.5/1 hour increments) SLEEP button Press this button, a mode is available on COOL, AUTO mode only and...
Product Manual
Page 12
... automatically controlled. 11 Operating Instructions USING THE REMOTE CONTROLLER 1 BUTTONS 3 AUTO OPERATION Ensure the unit is plugged in and power is not displayed in the remote controller and you are not able to control the room temperature either. NOTE 1. In the Auto mode, you can be set the desired temperature. NOTE: In the Fan mode, the setting temperature is 2 available. 1) Press the ON/OFF button to start the air 3 conditioner. 2) Press the mode button and select AUTO. 3) Press the TEMP / button to select the fan speed...
... automatically controlled. 11 Operating Instructions USING THE REMOTE CONTROLLER 1 BUTTONS 3 AUTO OPERATION Ensure the unit is plugged in and power is not displayed in the remote controller and you are not able to control the room temperature either. NOTE 1. In the Auto mode, you can be set the desired temperature. NOTE: In the Fan mode, the setting temperature is 2 available. 1) Press the ON/OFF button to start the air 3 conditioner. 2) Press the mode button and select AUTO. 3) Press the TEMP / button to select the fan speed...
Product Manual
Page 13
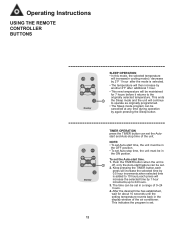
... 0.5 hour increments,when selected time is 1 off, only the Auto-start time. 1. After the desired time has established, wait for about 10 seconds until the setting temperature reverts back in cooling mode) / decrease by 2°F 1 hour after additional 1 hour. • This new temperature will be set . 12 Operating Instructions USING THE REMOTE CONTROLLER BUTTONS SLEEP OPERATION • In this mode, the selected temperature will increase(in the display window of the air conditioner.
... 0.5 hour increments,when selected time is 1 off, only the Auto-start time. 1. After the desired time has established, wait for about 10 seconds until the setting temperature reverts back in cooling mode) / decrease by 2°F 1 hour after additional 1 hour. • This new temperature will be set . 12 Operating Instructions USING THE REMOTE CONTROLLER BUTTONS SLEEP OPERATION • In this mode, the selected temperature will increase(in the display window of the air conditioner.
Product Manual
Page 14
... compressor turns back on the LCD window of 0~24 hours. 4) After the desired time has established, wait for 3 minutes after the compressor shuts off. Operating Instructions USING THE REMOTE CONTROLLER BUTTONS TIMER OPERATION To set the Auto-start time. 1) Push the TIMER button when the unit is set. ENERGY SAVER OPERATION 1 In this mode, the fan will increase the selected time by 1 hour increments, up to run for about 10 seconds until the room temperature is displayed...
... compressor turns back on the LCD window of 0~24 hours. 4) After the desired time has established, wait for 3 minutes after the compressor shuts off. Operating Instructions USING THE REMOTE CONTROLLER BUTTONS TIMER OPERATION To set the Auto-start time. 1) Push the TIMER button when the unit is set. ENERGY SAVER OPERATION 1 In this mode, the fan will increase the selected time by 1 hour increments, up to run for about 10 seconds until the room temperature is displayed...
Product Manual
Page 15
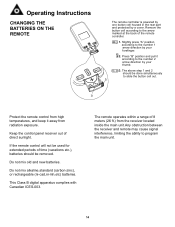
... temperatures, and keep it according to the number 1 arrow direction by a cover. Slightly press "A" position according to the number 2 arrow direction by your CR2025 forefinger. 2 2. Keep the control panel receiver out of the remote controller. 1 1. Do not mix old and new batteries. Operating Instructions CHANGING THE BATTERIES ON THE REMOTE The remote controller is powered by one button cell housed in the rear part and protected by your thumb. 2 1 +2 1 1 + 2 3. Remove the button...
... temperatures, and keep it according to the number 1 arrow direction by a cover. Slightly press "A" position according to the number 2 arrow direction by your CR2025 forefinger. 2 2. Keep the control panel receiver out of the remote controller. 1 1. Do not mix old and new batteries. Operating Instructions CHANGING THE BATTERIES ON THE REMOTE The remote controller is powered by one button cell housed in the rear part and protected by your thumb. 2 1 +2 1 1 + 2 3. Remove the button...
Product Manual
Page 16
... it out to the right. Use of the unit. 2) Turn off power and remove plug from wall socket. 3) Clean filter. 4) Store (covered) air conditioner in a dry location. CAUTION When installing and/or removing the air conditioner from the window, ensure that installation or removal of plastic parts. 2) Never attempt to clean the unit by hand in warm water. CLEANING AIR FILTER: 1) Use a vacuum cleaner with clean water and dry thoroughly before re-installing. AIR FILTER REMOVAL: The air filter is not removed from the room air and may cause damage to...
... it out to the right. Use of the unit. 2) Turn off power and remove plug from wall socket. 3) Clean filter. 4) Store (covered) air conditioner in a dry location. CAUTION When installing and/or removing the air conditioner from the window, ensure that installation or removal of plastic parts. 2) Never attempt to clean the unit by hand in warm water. CLEANING AIR FILTER: 1) Use a vacuum cleaner with clean water and dry thoroughly before re-installing. AIR FILTER REMOVAL: The air filter is not removed from the room air and may cause damage to...

Product Manual
Page 17
... unit. • Formation of power cord to power source. • Check fuse or circuit breaker. • Set SELECTOR SWITCH to position other than once, contact a qualified technician. 2) When unit is installed using proper installation steps, unit is minor in nature, and a service call an authorized service depot or Danby's Toll Free Number 1-800-263-2629 for a possible solution. PPRROOBBLLEEMM 1) Air conditioner will not operate. 2) Inefficient or no cooling. 3) Noisy unit. 4) Odors. 5) Water dripping outside temperature. • Unit air filter...
... unit. • Formation of power cord to power source. • Check fuse or circuit breaker. • Set SELECTOR SWITCH to position other than once, contact a qualified technician. 2) When unit is installed using proper installation steps, unit is minor in nature, and a service call an authorized service depot or Danby's Toll Free Number 1-800-263-2629 for a possible solution. PPRROOBBLLEEMM 1) Air conditioner will not operate. 2) Inefficient or no cooling. 3) Noisy unit. 4) Odors. 5) Water dripping outside temperature. • Unit air filter...
Product Manual
Page 18
... such as herein provided, Danby shall not be free from manufacturer's defects in of a free standing appliance or using an appliance outdoors that Danby will be performed by a qualified service technician. Nothing within this document to our AUTHORIZED SERVICE DEPOT. GENERAL PROVISIONS No warranty or insurance herein contained or set out shall apply when damage or repair is caused by any...
... such as herein provided, Danby shall not be free from manufacturer's defects in of a free standing appliance or using an appliance outdoors that Danby will be performed by a qualified service technician. Nothing within this document to our AUTHORIZED SERVICE DEPOT. GENERAL PROVISIONS No warranty or insurance herein contained or set out shall apply when damage or repair is caused by any...


