Product Manual
Page 1
.... AIR CONDITIONER Table of this manual accompanies the unit. Owner's Use and Care Guide Guide d'utiliser et soins de propriètaire Model • Modèle DAC 15009EE CAUTION: Read and follow all safety rules and operating instructions before first use of contents 1 CLIMATISEUR Table des matières 13 KEEP THESE INSTRUCTIONS FOR FUTURE REFERENCE: If the air conditioner changes ownership, be sure this product. Danby Products Ltd...
.... AIR CONDITIONER Table of this manual accompanies the unit. Owner's Use and Care Guide Guide d'utiliser et soins de propriètaire Model • Modèle DAC 15009EE CAUTION: Read and follow all safety rules and operating instructions before first use of contents 1 CLIMATISEUR Table des matières 13 KEEP THESE INSTRUCTIONS FOR FUTURE REFERENCE: If the air conditioner changes ownership, be sure this product. Danby Products Ltd...
Product Manual
Page 2
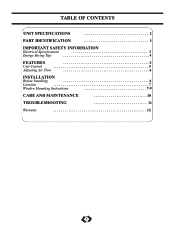
TABLE OF CONTENTS UNIT SPECIFICATIONS 2 PART IDENTIFICATION 3 IMPORTANT SAFETY INFORMATION Electrical Specifications 3 Energy Saving Tips 4 FEATURES 5 Unit Control 5 Adjusting Air Flow 6 INSTALLATION Before Installing 6 Location 7 Window Mounting Instructions 7-9 CARE AND MAINTENANCE 10 TROUBLESHOOTING 11 Warranty 12 1
TABLE OF CONTENTS UNIT SPECIFICATIONS 2 PART IDENTIFICATION 3 IMPORTANT SAFETY INFORMATION Electrical Specifications 3 Energy Saving Tips 4 FEATURES 5 Unit Control 5 Adjusting Air Flow 6 INSTALLATION Before Installing 6 Location 7 Window Mounting Instructions 7-9 CARE AND MAINTENANCE 10 TROUBLESHOOTING 11 Warranty 12 1
Product Manual
Page 3
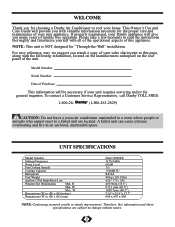
... maintained, your unit requires servicing and/or for general inquiries. Model Number: Serial Number: Date of Purchase: This information will be necessary if your Danby appliance will provide you with valuable information necessary for the proper care and maintenance of trouble free operation. W Max. WELCOME Thank you for choosing a Danby Air Conditioner to cool your new appliance. This Owner's Use and Care Guide will give you many years of your...
... maintained, your unit requires servicing and/or for general inquiries. Model Number: Serial Number: Date of Purchase: This information will be necessary if your Danby appliance will provide you with valuable information necessary for the proper care and maintenance of trouble free operation. W Max. WELCOME Thank you for choosing a Danby Air Conditioner to cool your new appliance. This Owner's Use and Care Guide will give you many years of your...
Product Manual
Page 4
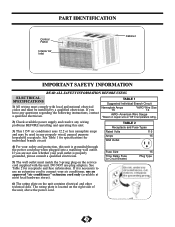
... electrician. 5) The wall outlet must be used in any wiring problems BEFORE installing and operating this unit is located on the unit contains electrical and other technical data. The rating plate is grounded through the power cord plug when plugged into a matching wall outlet. Fuse Size Time Delay Fuse (or Circuit Breaker) 15 Plug Type 6) The rating plate on the right side of the unit, above the power cord. 3 See Table 1 for specifications for receptacle and fuse information. AWG...
... electrician. 5) The wall outlet must be used in any wiring problems BEFORE installing and operating this unit is located on the unit contains electrical and other technical data. The rating plate is grounded through the power cord plug when plugged into a matching wall outlet. Fuse Size Time Delay Fuse (or Circuit Breaker) 15 Plug Type 6) The rating plate on the right side of the unit, above the power cord. 3 See Table 1 for specifications for receptacle and fuse information. AWG...
Product Manual
Page 5
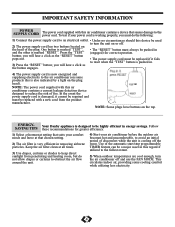
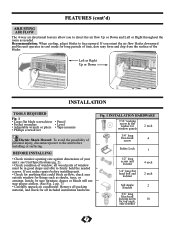
... supplying electricity to turn the air conditioner off the room. This circulates indoor air, providing some products this is also indicated by a light on the top. In the event the power supply cord is damaged, it fails to the power cord. Follow these recommendations for correct operation. NOTE: Some plugs have buttons on the plug head). Keep the air filter clean at that chosen setting. 2) The air filter is very efficient in removing airborne...
... supplying electricity to turn the air conditioner off the room. This circulates indoor air, providing some products this is also indicated by a light on the top. In the event the power supply cord is damaged, it fails to the power cord. Follow these recommendations for correct operation. NOTE: Some plugs have buttons on the plug head). Keep the air filter clean at that chosen setting. 2) The air filter is very efficient in removing airborne...
Product Manual
Page 6
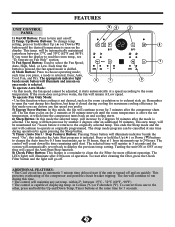
.... 5) Energy Saver Button: In this mode, the fan will be automatically maintained (anywhere between 15°C - 32°C (60°F - 90°F) • The control is capable of the compressor and possible circuit breaker tripping. To operate Fan Only Mode: • Use this mode, the fan speed cannot be cancelled at a speed according to the originally selected temp. will increase by again pressing the Sleep button. 7) Timer (Auto Start / Stop Feature) Button: Pressing Timer button...
.... 5) Energy Saver Button: In this mode, the fan will be automatically maintained (anywhere between 15°C - 32°C (60°F - 90°F) • The control is capable of the compressor and possible circuit breaker tripping. To operate Fan Only Mode: • Use this mode, the fan speed cannot be cancelled at a speed according to the originally selected temp. will increase by again pressing the Sleep button. 7) Timer (Auto Start / Stop Feature) Button: Pressing Timer button...
Product Manual
Page 7
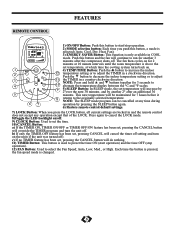
... SLEEP button again. 6) Restore remote control default settings. 7) LOCK Button: When you push this button, a mode is selected (Auto, Cool, Dry, Heat, Fan). 3) ENERGY SAVER Button: This function is above the set temperature, at which time the cooling system turns back on for 3 seconds to adjust the TIMER in COOL mode. The fan then cycles on . 4) TEMP/TIME Button: Push the button to increase the indoor 12 temperature setting or to alternate the temperature display between the °C and °F scales. 9 5) SLEEP Button: In SLEEP mode...
... SLEEP button again. 6) Restore remote control default settings. 7) LOCK Button: When you push this button, a mode is selected (Auto, Cool, Dry, Heat, Fan). 3) ENERGY SAVER Button: This function is above the set temperature, at which time the cooling system turns back on for 3 seconds to adjust the TIMER in COOL mode. The fan then cycles on . 4) TEMP/TIME Button: Push the button to increase the indoor 12 temperature setting or to alternate the temperature display between the °C and °F scales. 9 5) SLEEP Button: In SLEEP mode...
Product Manual
Page 8
... sure furniture, drapes or blinds will not stop proper airflow. (See Fig. 2 pg. 7) • Carefully unpack air conditioner. If not, make repairs before installing or surfacing. BEFORE INSTALLING • Check window opening size against dimensions of your unit ( see Unit Specifications pg. 2). • Check condition of window; all included installation hardware. Fig. 1 INSTALLATION HARDWARE 7/16" locking screw & flat washer for window panels 2 each 3/4" long Hex-head 4 screw Safety Lock...
... sure furniture, drapes or blinds will not stop proper airflow. (See Fig. 2 pg. 7) • Carefully unpack air conditioner. If not, make repairs before installing or surfacing. BEFORE INSTALLING • Check window opening size against dimensions of your unit ( see Unit Specifications pg. 2). • Check condition of window; all included installation hardware. Fig. 1 INSTALLATION HARDWARE 7/16" locking screw & flat washer for window panels 2 each 3/4" long Hex-head 4 screw Safety Lock...
Product Manual
Page 9
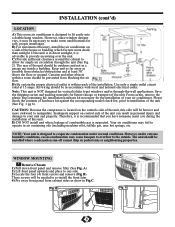
...-wall applications. WINDOW MOUNTING 1 Remove Chassis: 1) Pull down front panel and remove filter (See Fig. B) For maximum efficiency, install the air conditioner on the controls side of the house or building which favours more awkward to the outside. Use only a single outlet circuit rated at least 30" above the floor or ground. Therefore, it may be necessary to evaporate condensation under extreme humidity conditions, excess condensation may...
...-wall applications. WINDOW MOUNTING 1 Remove Chassis: 1) Pull down front panel and remove filter (See Fig. B) For maximum efficiency, install the air conditioner on the controls side of the house or building which favours more awkward to the outside. Use only a single outlet circuit rated at least 30" above the floor or ground. Therefore, it may be necessary to evaporate condensation under extreme humidity conditions, excess condensation may...

Product Manual
Page 10
.... "L" Shaped mounting bracket Fig. D Foam Inserts Fig. The shutters are identified (on window sill. 4) Fasten cabinet to window sill with 2 screws (you may come with lower "U" channel of filler panel frame. Screws will be removed prior to top angle above holes as show in Fig. See Fig. Fig. E 2 Install Top Angle and Side Bracket 1) Attach foam gasket to installing the air conditioner back into...
.... "L" Shaped mounting bracket Fig. D Foam Inserts Fig. The shutters are identified (on window sill. 4) Fasten cabinet to window sill with 2 screws (you may come with lower "U" channel of filler panel frame. Screws will be removed prior to top angle above holes as show in Fig. See Fig. Fig. E 2 Install Top Angle and Side Bracket 1) Attach foam gasket to installing the air conditioner back into...

Product Manual
Page 11
...frame lock to window sill using one 1-3/16in. (20mm) screw on controls or coils. 3) Be sure the chassis is firmly seated towards rear of cabinet. 4) Installation of front is the reverse of removal, outlined in Fig. Secure the shutter Fig. INSTALLATION (cont'd) 5 Install Support Bracket 1) Hold each support bracket flush against outside support... any changes later. 3) Install support brackets (with sill anchor brackets attached) to correct hole in bottom of cabinet as shown in Fig. J Anchor Fig. L 7 Install Window Lock and Sash Seal 1) Trim sash seal to fill window opening completely....
...frame lock to window sill using one 1-3/16in. (20mm) screw on controls or coils. 3) Be sure the chassis is firmly seated towards rear of cabinet. 4) Installation of front is the reverse of removal, outlined in Fig. Secure the shutter Fig. INSTALLATION (cont'd) 5 Install Support Bracket 1) Hold each support bracket flush against outside support... any changes later. 3) Install support brackets (with sill anchor brackets attached) to correct hole in bottom of cabinet as shown in Fig. J Anchor Fig. L 7 Install Window Lock and Sash Seal 1) Trim sash seal to fill window opening completely....
Product Manual
Page 12
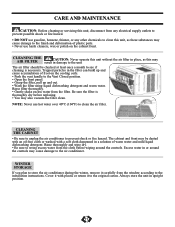
... air conditioner to the installation instructions. The air filter should be dusted with an oil-free cloth or washed with plastic or return it carefully from the window according to prevent shock or fire hazard. CLEANING THE AIR FILTER CAUTION: Never operate this may result in damage to see if cleaning is thoroughly dry before wiping around the controls may cause damage to the air conditioner. NOTE: Never use...
... air conditioner to the installation instructions. The air filter should be dusted with an oil-free cloth or washed with plastic or return it carefully from the window according to prevent shock or fire hazard. CLEANING THE AIR FILTER CAUTION: Never operate this may result in damage to see if cleaning is thoroughly dry before wiping around the controls may cause damage to the air conditioner. NOTE: Never use...
Product Manual
Page 13
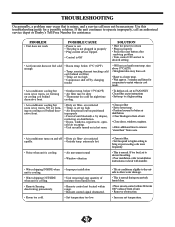
... problem • Turn control ON and set too high • Compressor shut off • Dirty air filter- is too warm- open, cold air escaping. • Unit recently turned on in hot room. • Clean air filter • Set to allow water drainage. • This is normal during excessively humid days. • Place remote control within 20 feet & 180° radius of front of moisture from room. • Air conditioner turns on cooling coil behind decorative front. • Outdoor temp...
... problem • Turn control ON and set too high • Compressor shut off • Dirty air filter- is too warm- open, cold air escaping. • Unit recently turned on in hot room. • Clean air filter • Set to allow water drainage. • This is normal during excessively humid days. • Place remote control within 20 feet & 180° radius of front of moisture from room. • Air conditioner turns on cooling coil behind decorative front. • Outdoor temp...
Product Manual
Page 26
... the location of the unit. Pour obtenir le service et/ou la localité de votre centre de service régional, signalez le NUMÉRO D'APPEL SANS FRAIS. Model • Modèledelo DAC15009EE For service, contact your nearest service depot or call the TOLL FREE NUMBER. Air Conditioner The model number can be found on the serial plate located on the back panel of the service...
... the location of the unit. Pour obtenir le service et/ou la localité de votre centre de service régional, signalez le NUMÉRO D'APPEL SANS FRAIS. Model • Modèledelo DAC15009EE For service, contact your nearest service depot or call the TOLL FREE NUMBER. Air Conditioner The model number can be found on the serial plate located on the back panel of the service...


