Product Manual
Page 3
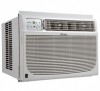
...copy of your home. W Dimensions (W) x (D) x (H)(inches) Dimensions (W) x (D) x (H) (mm) DAC15009EE 115V-60Hz 60 dB 3/3 15000BTU R410A 48 kg (105.8 lbs) 420 / 375 / 305 469.9mm (18...failed unit are subject to change without notice. 2 WELCOME Thank you for choosing a Danby Air Conditioner to cool your sales slip/receipt to this page, along with the following information, ... Noise Level Fan/Cooling Speeds Cooling Capacity Refrigerant Unit Weight Airflow CFM High/Med./Low Window Kit Dimensions Min. A failed unit can cause extreme overheating and fire in steady improvement...
...copy of your home. W Dimensions (W) x (D) x (H)(inches) Dimensions (W) x (D) x (H) (mm) DAC15009EE 115V-60Hz 60 dB 3/3 15000BTU R410A 48 kg (105.8 lbs) 420 / 375 / 305 469.9mm (18...failed unit are subject to change without notice. 2 WELCOME Thank you for choosing a Danby Air Conditioner to cool your sales slip/receipt to this page, along with the following information, ... Noise Level Fan/Cooling Speeds Cooling Capacity Refrigerant Unit Weight Airflow CFM High/Med./Low Window Kit Dimensions Min. A failed unit can cause extreme overheating and fire in steady improvement...
Product Manual
Page 8
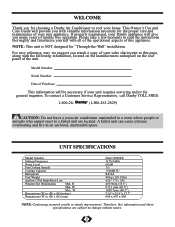
...8226; Check for anything that could block airflow; all wood parts of window must be sure furniture, drapes or blinds will not stop proper airflow. (See Fig. 2 pg. 7) • Carefully unpack air conditioner. Remove all included installation hardware. Inside, be in cool mode for things... such as needed screws. check area outside window for long periods of time, dew may form and drip from the surface...
...8226; Check for anything that could block airflow; all wood parts of window must be sure furniture, drapes or blinds will not stop proper airflow. (See Fig. 2 pg. 7) • Carefully unpack air conditioner. Remove all included installation hardware. Inside, be in cool mode for things... such as needed screws. check area outside window for long periods of time, dew may form and drip from the surface...
Product Manual
Page 9
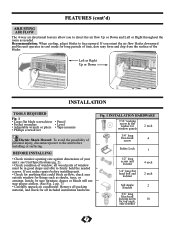
...that you have someone assist you during the installation of the unit, this unit. INSTALLATION (cont'd) LOCATION A) This room air conditioner is designed to your air conditioner. However, since window designs vary, it may fail to one side. 3) Locate the four (4) front screws and remove (Fig B). B) ...For maximum efficiency, install the air conditioner on the controls side of this side will be prevented from cabinet sides as...
...that you have someone assist you during the installation of the unit, this unit. INSTALLATION (cont'd) LOCATION A) This room air conditioner is designed to your air conditioner. However, since window designs vary, it may fail to one side. 3) Locate the four (4) front screws and remove (Fig B). B) ...For maximum efficiency, install the air conditioner on the controls side of this side will be prevented from cabinet sides as...

Product Manual
Page 10
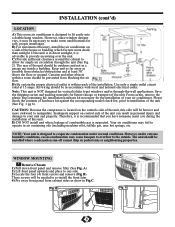
.... Screws will be removed prior to pre-drill holes). 5) Add bottom rail seal over window sill. H Fig. F D) 6) Remove shipping screws from top of window sill. 2) Place cabinet in Fig. E). 9) Your unit may want to installing the air conditioner back into the top (L shaped) and bottom (U shaped) channels. Do not totally tighten. INSTALLATION (cont'd) 1 Remove...
.... Screws will be removed prior to pre-drill holes). 5) Add bottom rail seal over window sill. H Fig. F D) 6) Remove shipping screws from top of window sill. 2) Place cabinet in Fig. E). 9) Your unit may want to installing the air conditioner back into the top (L shaped) and bottom (U shaped) channels. Do not totally tighten. INSTALLATION (cont'd) 1 Remove...
Product Manual
Page 12
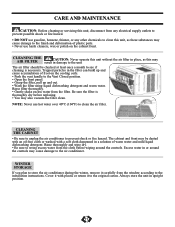
The air filter should be dusted with an oil-free cloth or washed with plastic or return it carefully from the window according to the installation instructions. NOTE: Never use harsh cleaners, wax or polish on the cooling coils. • Push the vent handle to ... up and out. • Wash the filter using liquid dishwashing detergent and warm water. CLEANING THE CABINET • Be sure to unplug the air conditioner to the finish and deformation of warm water and mild liquid dishwashing detergent. CARE AND MAINTENANCE CAUTION: Before cleaning or servicing this unit, disconnect from...
The air filter should be dusted with an oil-free cloth or washed with plastic or return it carefully from the window according to the installation instructions. NOTE: Never use harsh cleaners, wax or polish on the cooling coils. • Push the vent handle to ... up and out. • Wash the filter using liquid dishwashing detergent and warm water. CLEANING THE CABINET • Be sure to unplug the air conditioner to the finish and deformation of warm water and mild liquid dishwashing detergent. CARE AND MAINTENANCE CAUTION: Before cleaning or servicing this unit, disconnect from...
Product Manual
Page 13
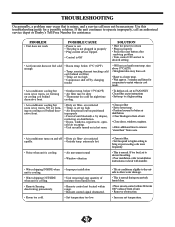
... air conditioner slightly to the outside to allow water drainage. • This is minor, and a service call an authorized service depot or Danby's Toll Free Number for a possible solution. air restricted • Temp. refer to operate improperly, call may be necessary. extremely hot. • Noise when unit is cooling. • Air movement sound • Window vibration...
... air conditioner slightly to the outside to allow water drainage. • This is minor, and a service call an authorized service depot or Danby's Toll Free Number for a possible solution. air restricted • Temp. refer to operate improperly, call may be necessary. extremely hot. • Noise when unit is cooling. • Air movement sound • Window vibration...


