User Manual
Page 2
... AV2 Codes 10 Verifying the Codes 11 Changing Volume Lock 11 Locking Volume to AV1, AV2 or TV 11 Restoring Factory Default Settings 12 Troubleshooting 12 DIRECTV Setup Codes 13 Setup Codes for DIRECTV® Receivers 13 Setup Codes for DIRECTV® HD Receivers 13 Setup Codes for DIRECTV® DVRs 14 Setup Codes, Other Devices...
... AV2 Codes 10 Verifying the Codes 11 Changing Volume Lock 11 Locking Volume to AV1, AV2 or TV 11 Restoring Factory Default Settings 12 Troubleshooting 12 DIRECTV Setup Codes 13 Setup Codes for DIRECTV® Receivers 13 Setup Codes for DIRECTV® HD Receivers 13 Setup Codes for DIRECTV® DVRs 14 Setup Codes, Other Devices...
User Manual
Page 5
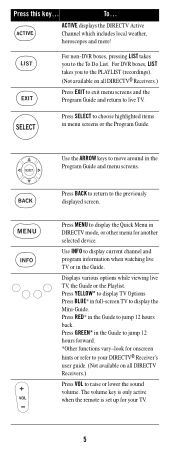
...display TV Options Press BLUE* in the Program Guide and menu screens. Press YELLOW* to choose highlighted items in DIRECTV mode, or other menu for another selected device. The volume key is only active when the remote is set up for onscreen hints or refer to live TV. To... For...display the Mini-Guide. Use INFO to raise or lower the sound volume. Press GREEN* in the Guide to jump 12 hours forward. *Other functions vary-look for your DIRECTV® Receiver's user guide. (Not available on all DIRECTV Receivers.) Press VOL to display current channel and program information when ...
...display TV Options Press BLUE* in the Program Guide and menu screens. Press YELLOW* to choose highlighted items in DIRECTV mode, or other menu for another selected device. The volume key is only active when the remote is set up for onscreen hints or refer to live TV. To... For...display the Mini-Guide. Use INFO to raise or lower the sound volume. Press GREEN* in the Guide to jump 12 hours forward. *Other functions vary-look for your DIRECTV® Receiver's user guide. (Not available on all DIRECTV Receivers.) Press VOL to display current channel and program information when ...
User Manual
Page 11
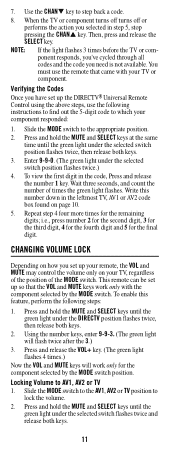
... for the fourth digit and 5 for the component selected by the MODE switch. Verifying the Codes Once you need is not available. CHANGING VOLUME LOCK Depending on how you selected in step 5, stop pressing the CHANS key. This remote can be set up so that came with the... hold the MUTE and SELECT keys until the green light under the selected switch position flashes twice.) 4. Enter 9-9-0. (The green light under the DIRECTV position flashes twice, then release both keys. 3. Write this feature, perform the following instructions to find out the 5-digit code to which your component...
... for the fourth digit and 5 for the component selected by the MODE switch. Verifying the Codes Once you need is not available. CHANGING VOLUME LOCK Depending on how you selected in step 5, stop pressing the CHANS key. This remote can be set up so that came with the... hold the MUTE and SELECT keys until the green light under the selected switch position flashes twice.) 4. Enter 9-9-0. (The green light under the DIRECTV position flashes twice, then release both keys. 3. Write this feature, perform the following instructions to find out the 5-digit code to which your component...
User Manual
Page 12
... release both a TV code and a VCR code for your brand. For Sharp, use TV code 10000 and VCR code 20032. PROBLEM: The DIRECTV Universal Remote Control does not control component or commands are within 15 feet of -the-box settings), follow these steps: 1. PROBLEM: Changing channels ...does not work for full operation (see page 7). 3. Press and release the SELECT key. (The green light flashes twice.) NOTE: DIRECTV® Receivers don't have volume control, so the remote will operate these products require setting up . SOLUTION 2: Make sure you are aiming the...
... release both a TV code and a VCR code for your brand. For Sharp, use TV code 10000 and VCR code 20032. PROBLEM: The DIRECTV Universal Remote Control does not control component or commands are within 15 feet of -the-box settings), follow these steps: 1. PROBLEM: Changing channels ...does not work for full operation (see page 7). 3. Press and release the SELECT key. (The green light flashes twice.) NOTE: DIRECTV® Receivers don't have volume control, so the remote will operate these products require setting up . SOLUTION 2: Make sure you are aiming the...

