
User Guide
Page 2
... Contents Introduction 3 Features 4 About XM Satellite Radio 5 About Delphi 5 Safety and Care information 6 What's in the box 8 XpressRC functions 9 Remote control functions 10 5-way navigation knob 11 Vehicle Installation 12 Step 1: Mount the XM Antenna 13 Step 2: Install the vent or swivel mount . . 16 Step 3: Connect your XpressRC 18 Step 4: Turning on your XpressRC 20 Activation 21 Using your...
... Contents Introduction 3 Features 4 About XM Satellite Radio 5 About Delphi 5 Safety and Care information 6 What's in the box 8 XpressRC functions 9 Remote control functions 10 5-way navigation knob 11 Vehicle Installation 12 Step 1: Mount the XM Antenna 13 Step 2: Install the vent or swivel mount . . 16 Step 3: Connect your XpressRC 18 Step 4: Turning on your XpressRC 20 Activation 21 Using your...

User Guide
Page 13
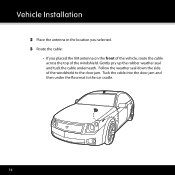
Magnet We recommend mounting the antenna just above either the front windshield or the back window as shown. 13 Pay particular attention to any accessories that you may have like luggage racks and how frequently you may use them. Vehicle Installation Step 1: Mount the XM Antenna The XM antenna contains a strong magnet which will stick to any metal parts of your vehicle. 1 Choose the best location for your XM antenna considering your own personal situation.
Magnet We recommend mounting the antenna just above either the front windshield or the back window as shown. 13 Pay particular attention to any accessories that you may have like luggage racks and how frequently you may use them. Vehicle Installation Step 1: Mount the XM Antenna The XM antenna contains a strong magnet which will stick to any metal parts of your vehicle. 1 Choose the best location for your XM antenna considering your own personal situation.
User Guide
Page 14
Tuck the cable into the door jam and then under the floormat to the door jam. Gently pry up the rubber weather seal and tuck the cable underneath. Follow the weather seal down the side of the windshield. Vehicle Installation 2 Place the antenna in the location you selected. 3 Route the cable: • If you placed the XM antenna on the front of the vehicle, route the cable across the top of the windshield to the car cradle. 14
Tuck the cable into the door jam and then under the floormat to the door jam. Gently pry up the rubber weather seal and tuck the cable underneath. Follow the weather seal down the side of the windshield. Vehicle Installation 2 Place the antenna in the location you selected. 3 Route the cable: • If you placed the XM antenna on the front of the vehicle, route the cable across the top of the windshield to the car cradle. 14
User Guide
Page 16
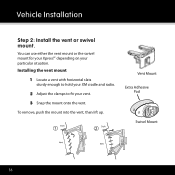
To remove, push the mount into the vent, then lift up. Vehicle Installation Step 2: Install the vent or swivel mount. You can use either the vent mount or the swivel mount for your XpressRC depending on your vent. 3 Snap the mount onto the vent. Vent Mount Extra Adhesive Pad Swivel Mount 16 Installing the vent mount 1 Locate a vent with horizontal slats sturdy enough to hold your XM cradle and radio. 2 Adjust the clamps to fit your particular situation.
To remove, push the mount into the vent, then lift up. Vehicle Installation Step 2: Install the vent or swivel mount. You can use either the vent mount or the swivel mount for your XpressRC depending on your vent. 3 Snap the mount onto the vent. Vent Mount Extra Adhesive Pad Swivel Mount 16 Installing the vent mount 1 Locate a vent with horizontal slats sturdy enough to hold your XM cradle and radio. 2 Adjust the clamps to fit your particular situation.
User Guide
Page 17
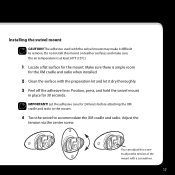
Let the adhesive cure for 30 seconds. Do not install this screw to adjust the tension of the mount with a screwdriver. 17 The adhesive used with the preparation kit and let it difficult to accommodate the XM cradle and radio. Adjust the tension via the center screw. Position, press, ... this mount on leather surfaces and make it dry thoroughly. 3 Peel off the adhesive liner. Make sure there is ample room for the XM cradle and radio when installed. 2 Clean the surface with the swivel mount may make sure the air temperature is at least 60°F (15°C). 1 Locate...
Let the adhesive cure for 30 seconds. Do not install this screw to adjust the tension of the mount with a screwdriver. 17 The adhesive used with the preparation kit and let it difficult to accommodate the XM cradle and radio. Adjust the tension via the center screw. Position, press, ... this mount on leather surfaces and make it dry thoroughly. 3 Peel off the adhesive liner. Make sure there is ample room for the XM cradle and radio when installed. 2 Clean the surface with the swivel mount may make sure the air temperature is at least 60°F (15°C). 1 Locate...
User Guide
Page 18
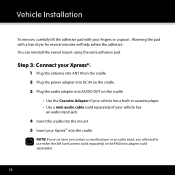
... the mount. 5 Insert your fingers or a spoon. Step 3: Connect your XpressRC. 1 Plug the antenna into ANT IN on the cradle. 2 Plug the power adapter into DC IN on the cradle. 3 Plug the audio adapter into AUDIO ... (sold separately). 18 NOTE! You can reinstall the swivel mount using the extra adhesive pad. Vehicle Installation To remove, carefully lift the adhesive pad with a hair dryer for several minutes will need to use either the XM SureConnect (sold separately) or the FM Direct adapter (sold separately) if your vehicle has an...
... the mount. 5 Insert your fingers or a spoon. Step 3: Connect your XpressRC. 1 Plug the antenna into ANT IN on the cradle. 2 Plug the power adapter into DC IN on the cradle. 3 Plug the audio adapter into AUDIO ... (sold separately). 18 NOTE! You can reinstall the swivel mount using the extra adhesive pad. Vehicle Installation To remove, carefully lift the adhesive pad with a hair dryer for several minutes will need to use either the XM SureConnect (sold separately) or the FM Direct adapter (sold separately) if your vehicle has an...
User Guide
Page 20
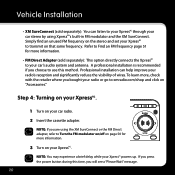
..." message. 20 NOTE: You may experience a brief delay while your car radio. 2 Insert the cassette adapter. If you bought your radio or go to xmradio.com/shop and click on "Accessories." Vehicle Installation • XM SureConnect (sold separately): This option directly connects the XpressRC to your car's audio system and antenna. Refer to Find an...
..." message. 20 NOTE: You may experience a brief delay while your car radio. 2 Insert the cassette adapter. If you bought your radio or go to xmradio.com/shop and click on "Accessories." Vehicle Installation • XM SureConnect (sold separately): This option directly connects the XpressRC to your car's audio system and antenna. Refer to Find an...
User Guide
Page 22
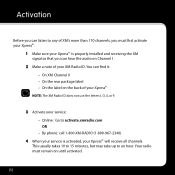
... the label on the back of your XpressRC NOTE: The XM Radio ID does not use the letters I, O, S, or F. 3 Activate your service: • Online: Go to activate.xmradio.com OR • By phone: call 1-800-XM-RADIO (1-800-967-2346) 4 When your service is properly installed and receiving the XM signal so that you can hear the...
... the label on the back of your XpressRC NOTE: The XM Radio ID does not use the letters I, O, S, or F. 3 Activate your service: • Online: Go to activate.xmradio.com OR • By phone: call 1-800-XM-RADIO (1-800-967-2346) 4 When your service is properly installed and receiving the XM signal so that you can hear the...

User Guide
Page 72
...not installed and used in a particular installation. This equipment has been tested and found to comply with the ferrite bead The user is connected. • Consult the dealer or an experienced radio/TV technician for a Class B digital device, pursuant to Part 15 of the affected receiver. • Increase the separation between the XM ... of the following two conditions: • This device may not cause harmful interference. • This device must accept any aircraft (neither portable nor permanent installation). WARNING! Therefore, XM Satellite Radio cannot support this device.
...not installed and used in a particular installation. This equipment has been tested and found to comply with the ferrite bead The user is connected. • Consult the dealer or an experienced radio/TV technician for a Class B digital device, pursuant to Part 15 of the affected receiver. • Increase the separation between the XM ... of the following two conditions: • This device may not cause harmful interference. • This device must accept any aircraft (neither portable nor permanent installation). WARNING! Therefore, XM Satellite Radio cannot support this device.

User Guide
Page 73
Warranty Delphi Limited Consumer Warranty Delphi Product and Service Solutions ("Delphi") warrants all XM Satellite Radio Products sold by Delphi (each Product is inconsistent with Delphi's written instructions, (iii) alteration 73 Products may be repaired or replaced with new or with ... a manner which is limited to one (1) year from any (i) deviation of Delphi's operating instructions as its option, any packaging, labels or other literature provided with a Product, (ii) installation of warranty. These remedies are the customer's exclusive remedies for damage resulting from...
Warranty Delphi Limited Consumer Warranty Delphi Product and Service Solutions ("Delphi") warrants all XM Satellite Radio Products sold by Delphi (each Product is inconsistent with Delphi's written instructions, (iii) alteration 73 Products may be repaired or replaced with new or with ... a manner which is limited to one (1) year from any (i) deviation of Delphi's operating instructions as its option, any packaging, labels or other literature provided with a Product, (ii) installation of warranty. These remedies are the customer's exclusive remedies for damage resulting from...

User Guide
Page 74
...on the duration of implied warranties, or the exclusion or the limitation of incidental or consequential damages. NO PERSON IS AUTHORIZED BY DELPHI TO MODIFY OR ADD TO THIS LIMITED WARRANTY. 74 How state law relates to the original place of purchase. How you ... limited warranty period, you . So the above limitations or exclusions may also have other improper application, installation or operation of this Product, or (xiv) defects or malfunctions of which Delphi is needed at 1.877.GO DELPHI (1.877.463.3574). or modification of a Product, (iv) misuse, (v) neglect, (vi) abuse...
...on the duration of implied warranties, or the exclusion or the limitation of incidental or consequential damages. NO PERSON IS AUTHORIZED BY DELPHI TO MODIFY OR ADD TO THIS LIMITED WARRANTY. 74 How state law relates to the original place of purchase. How you ... limited warranty period, you . So the above limitations or exclusions may also have other improper application, installation or operation of this Product, or (xiv) defects or malfunctions of which Delphi is needed at 1.877.GO DELPHI (1.877.463.3574). or modification of a Product, (iv) misuse, (v) neglect, (vi) abuse...