Product Manual
Page 12
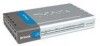
Check to see if the status LED light is now complete. 12 Getting Started (continued) Connecting the DVG-1402S Directly to the main screen. Once the unit reboots you will be returned to a Modem and Computer (No Router) Select Save changes and reboot system now. Click Save. Setup of the DVG-1402S with a DSL modem is blinking green on the front panel of the DVG-1402S.
Check to see if the status LED light is now complete. 12 Getting Started (continued) Connecting the DVG-1402S Directly to the main screen. Once the unit reboots you will be returned to a Modem and Computer (No Router) Select Save changes and reboot system now. Click Save. Setup of the DVG-1402S with a DSL modem is blinking green on the front panel of the DVG-1402S.

Product Manual
Page 17
Getting Started (continued) Connecting the DVG-1402S in Front of the DVG-1402S. Once the unit reboots you will be returned to see if the status LED light is now complete. 17 Setup of the DVG-1402S with a DSL modem is blinking green on the front panel of a Router Select Save changes and reboot system now. Click Save. Check to the main screen.
Getting Started (continued) Connecting the DVG-1402S in Front of the DVG-1402S. Once the unit reboots you will be returned to see if the status LED light is now complete. 17 Setup of the DVG-1402S with a DSL modem is blinking green on the front panel of a Router Select Save changes and reboot system now. Click Save. Check to the main screen.
Product Manual
Page 42
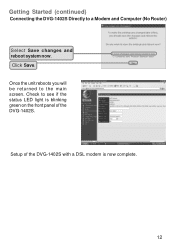
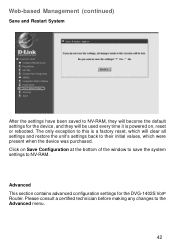
Click on , reset or rebooted. Please consult a certified technician before making any changes to the Advanced menu. 42 Advanced This section contains advanced configuration settings for the device, and they .... Web-based Management (continued) Save and Restart System After the settings have been saved to NV-RAM, they will become the default settings for the DVG-1402S VoIP Router.
Click on , reset or rebooted. Please consult a certified technician before making any changes to the Advanced menu. 42 Advanced This section contains advanced configuration settings for the device, and they .... Web-based Management (continued) Save and Restart System After the settings have been saved to NV-RAM, they will become the default settings for the DVG-1402S VoIP Router.

Product Manual
Page 45
...IP address: 192.168.15.1 in the fields. 5) Once the DVG-1420S has rebooted, select Configure LAN Port. 6) Select Dynamic IP assignment. 7) In the "State" field, make sure that "Enabled" is selected. 8) Select "Save" and choose to reboot the DVG-1402S (not the PC). 9) Verify that the Ethernet cable from the... PC is plugged into the WAN port of the following: a. User will be prompted to reboot (not the PC). Choose "Save changes and reboot system now" and wait for the unit ...
...IP address: 192.168.15.1 in the fields. 5) Once the DVG-1420S has rebooted, select Configure LAN Port. 6) Select Dynamic IP assignment. 7) In the "State" field, make sure that "Enabled" is selected. 8) Select "Save" and choose to reboot the DVG-1402S (not the PC). 9) Verify that the Ethernet cable from the... PC is plugged into the WAN port of the following: a. User will be prompted to reboot (not the PC). Choose "Save changes and reboot system now" and wait for the unit ...

Product Manual
Page 46
A: No, DVG-1402S is NOT 10.1.1.1. (It must be done in the "Firewall Rules". 1) Select Firewall Rules in the Web GUI menu. 2) Select "Edit" in Set# 1. 3) In line # 1, ... entering more changes need to open certain ports, where do I go to make this screen. 5) Be sure to be made, click "Save Changes and Reboot." 46 Q: I use my DVG-1402S on the lower left side. 7) If no more than 1 rule, click "Edit" in handling all of the telephony elements. Click "Exit." Frequently Asked...
A: No, DVG-1402S is NOT 10.1.1.1. (It must be done in the "Firewall Rules". 1) Select Firewall Rules in the Web GUI menu. 2) Select "Edit" in Set# 1. 3) In line # 1, ... entering more changes need to open certain ports, where do I go to make this screen. 5) Be sure to be made, click "Save Changes and Reboot." 46 Q: I use my DVG-1402S on the lower left side. 7) If no more than 1 rule, click "Edit" in handling all of the telephony elements. Click "Exit." Frequently Asked...