Product Manual
Page 2
... 6 Installation Overview 8 Hardware Installation 9 Wireless Installation Considerations 12 Connect to a Wireless Network 13 Enabling UPnP 15 Accessing the DSM-G600 in Windows® XP with UPnP 17 Accessing the DSM-G600 in XP/2000 by mapping a drive 18 Accessing the DSM-G600 in Mac OS X 20 Using the ... Time Server 35 System Settings 36 Firmware Upgrade 37 Format Internal Hard Drive 38 Device Information 39 Logs 40 Help 41 Networking Basics 42 Troubleshooting 58 Technical Specifications 60 Contacting Technical Support 62 Warranty 63 Registration 66 D-Link Systems,...
... 6 Installation Overview 8 Hardware Installation 9 Wireless Installation Considerations 12 Connect to a Wireless Network 13 Enabling UPnP 15 Accessing the DSM-G600 in Windows® XP with UPnP 17 Accessing the DSM-G600 in XP/2000 by mapping a drive 18 Accessing the DSM-G600 in Mac OS X 20 Using the ... Time Server 35 System Settings 36 Firmware Upgrade 37 Format Internal Hard Drive 38 Device Information 39 Logs 40 Help 41 Networking Basics 42 Troubleshooting 58 Technical Specifications 60 Contacting Technical Support 62 Warranty 63 Registration 66 D-Link Systems,...
Product Manual
Page 3
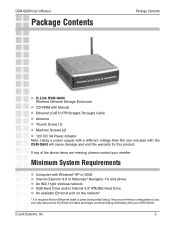
...'s Manual Package Contents Package Contents D-Link DSM-G600 Wireless Network Storage Enclosure CD-ROM with Manual Ethernet (CAT5 UTP/Straight-Through) Cable Antenna Thumb Screw (1) Machine Screws (2) 12V DC 3A Power Adapter Note: Using a power supply with a different voltage than the one included with Windows® XP or 2000 Internet...
...'s Manual Package Contents Package Contents D-Link DSM-G600 Wireless Network Storage Enclosure CD-ROM with Manual Ethernet (CAT5 UTP/Straight-Through) Cable Antenna Thumb Screw (1) Machine Screws (2) 12V DC 3A Power Adapter Note: Using a power supply with a different voltage than the one included with Windows® XP or 2000 Internet...

Product Manual
Page 4
... to the network. Computers running Windows® XP or Mac OS® X v10.2/ v10.3 will vary. Save on your digital content faster with two additional high-speed USB 2.0 ports, expand your storage capabilities even further as an Access Point. DSM-G600 User's Manual Introduction Introduction D-Link, an industry leader in networking, introduces the DSM-G600 Wireless Network Storage Enclosure. In addition, the DSM-G600 also...
... to the network. Computers running Windows® XP or Mac OS® X v10.2/ v10.3 will vary. Save on your digital content faster with two additional high-speed USB 2.0 ports, expand your storage capabilities even further as an Access Point. DSM-G600 User's Manual Introduction Introduction D-Link, an industry leader in networking, introduces the DSM-G600 Wireless Network Storage Enclosure. In addition, the DSM-G600 also...
Product Manual
Page 5
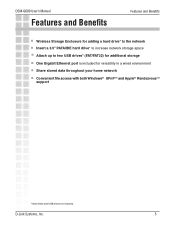
DSM-G600 User's Manual Features and Benefits Features and Benefits Wireless Storage Enclosure for adding a hard drive* to the network Insert a 3.5" PATA/IDE hard drive* to increase network storage space Attach up to two USB drives* (FAT/FAT32) for additional storage One Gigabit Ethernet port is included for versatility in a wired environment...
DSM-G600 User's Manual Features and Benefits Features and Benefits Wireless Storage Enclosure for adding a hard drive* to the network Insert a 3.5" PATA/IDE hard drive* to increase network storage space Attach up to two USB drives* (FAT/FAT32) for additional storage One Gigabit Ethernet port is included for versatility in a wired environment...
Product Manual
Page 15
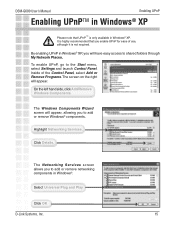
...or remove Windows® components. Highlight Networking Services. On the left hand side, click Add/Remove Windows Components. By enabling UPnP in Windows® XP, you will have easy access to the Start menu, select Settings and launch Control Panel. DSM-G600 User's Manual... Enabling UPnP Enabling UPnPTM in Windows® XP Please note that you enable UPnP for ease of the Control Panel, select Add or Remove Programs. The screen on the right will appear. It is highly recommended that TM UPnP is not required. Select Universal Plug and Play Click OK D-Link...
...or remove Windows® components. Highlight Networking Services. On the left hand side, click Add/Remove Windows Components. By enabling UPnP in Windows® XP, you will have easy access to the Start menu, select Settings and launch Control Panel. DSM-G600 User's Manual... Enabling UPnP Enabling UPnPTM in Windows® XP Please note that you enable UPnP for ease of the Control Panel, select Add or Remove Programs. The screen on the right will appear. It is highly recommended that TM UPnP is not required. Select Universal Plug and Play Click OK D-Link...

Product Manual
Page 16
D-Link Systems, Inc. 16 DSM-G600 User's Manual Enabling UPnP Enabling UPnPTM in Windows® XP (continued) Click Next. UPnPTM is now enabled! Click Finish.
D-Link Systems, Inc. 16 DSM-G600 User's Manual Enabling UPnP Enabling UPnPTM in Windows® XP (continued) Click Next. UPnPTM is now enabled! Click Finish.
Product Manual
Page 17
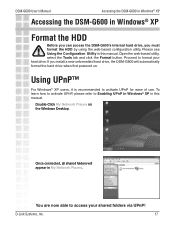
... Windows Desktop. DSM-G600 User's Manual Accessing the DSM-G600 in Windows® XP Accessing the DSM-G600 in Windows® XP Format the HDD Before you can access the DSM-G600's internal hard drive, you install a new unformatted hard drive, the DSM-G600 will appear in My Network ...Network Places on . If you must format the HDD by using the web-based configuration utility. Open the web-based utility, select the Tools tab and click the Format button. Using UPnP™ For Windows® XP users, it is recommended to Enabling UPnP in Windows® XP in this manual. D-Link...
... Windows Desktop. DSM-G600 User's Manual Accessing the DSM-G600 in Windows® XP Accessing the DSM-G600 in Windows® XP Format the HDD Before you can access the DSM-G600's internal hard drive, you install a new unformatted hard drive, the DSM-G600 will appear in My Network ...Network Places on . If you must format the HDD by using the web-based configuration utility. Open the web-based utility, select the Tools tab and click the Format button. Using UPnP™ For Windows® XP users, it is recommended to Enabling UPnP in Windows® XP in this manual. D-Link...
Product Manual
Page 18
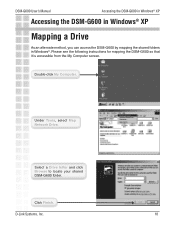
Click Finish. DSM-G600 User's Manual Accessing the DSM-G600 in Windows® XP Accessing the DSM-G600 in Windows® XP Mapping a Drive As an alternate method, you can access the DSM-G600 by mapping the shared folders in Windows®. D-Link Systems, Inc. 18 Select a Drive letter and click Browse to locate your shared DSM-G600 folder. Double-click My Computer. Under Tools, select Map Network Drive. Please see the following instructions for mapping the DSM-G600 so that it is accessible from the My Computer screen.
Click Finish. DSM-G600 User's Manual Accessing the DSM-G600 in Windows® XP Accessing the DSM-G600 in Windows® XP Mapping a Drive As an alternate method, you can access the DSM-G600 by mapping the shared folders in Windows®. D-Link Systems, Inc. 18 Select a Drive letter and click Browse to locate your shared DSM-G600 folder. Double-click My Computer. Under Tools, select Map Network Drive. Please see the following instructions for mapping the DSM-G600 so that it is accessible from the My Computer screen.
Product Manual
Page 19
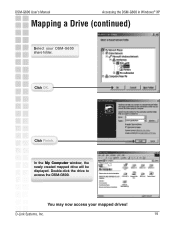
Click OK. Double-click the drive to access the DSM-G600. In the My Computer window, the newly created mapped drive will be displayed. You may now access your DSM-G600 share folder. DSM-G600 User's Manual Accessing the DSM-G600 in Windows® XP Mapping a Drive (continued) Select your mapped drives! D-Link Systems, Inc. 19 Click Finish.
Click OK. Double-click the drive to access the DSM-G600. In the My Computer window, the newly created mapped drive will be displayed. You may now access your DSM-G600 share folder. DSM-G600 User's Manual Accessing the DSM-G600 in Windows® XP Mapping a Drive (continued) Select your mapped drives! D-Link Systems, Inc. 19 Click Finish.
Product Manual
Page 21
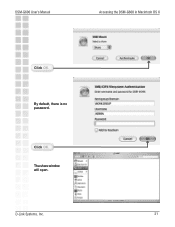
The share window will open. D-Link Systems, Inc. 21 Click OK. DSM-G600 User's Manual Accessing the DSM-G600 in Macintosh OS X Click OK. By default, there is no password.
The share window will open. D-Link Systems, Inc. 21 Click OK. DSM-G600 User's Manual Accessing the DSM-G600 in Macintosh OS X Click OK. By default, there is no password.
Product Manual
Page 23
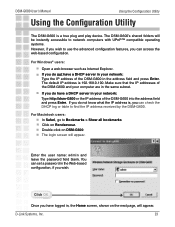
... Using the Configuration Utility Using the Configuration Utility The DSM-G600 is 192.168.0.100. Enter the user name: admin and leave the password field blank. D-Link Systems, Inc. 23 The default IP address is a true plug and play device. Once you have logged in ... DHCP log or table to use the advanced configuration features, you do not have a DHCP server in your network: Type the IP address of the DSM-G600 into the address field and press Enter. For Windows® users: Open a web browser such as Internet Explorer. If you do ...
... Using the Configuration Utility Using the Configuration Utility The DSM-G600 is 192.168.0.100. Enter the user name: admin and leave the password field blank. D-Link Systems, Inc. 23 The default IP address is a true plug and play device. Once you have logged in ... DHCP log or table to use the advanced configuration features, you do not have a DHCP server in your network: Type the IP address of the DSM-G600 into the address field and press Enter. For Windows® users: Open a web browser such as Internet Explorer. If you do ...

Product Manual
Page 34
...Click to share the folder on the network. Share: Click to select write privileges for the folder. Unplug USB: Click to safely unplug the USB drive from the DSM-G600. Read privileges are included when the folder is safe to remove the USB device. D-Link Systems, Inc. 34 If you want... and provide writing and sharing privileges for the folder. A message will appear Name: in and then click Create. DSM-G600 User's Manual Advanced > Share Using the Configuration Utility In this window you want to create a sub-folder, click on an existing folder that it is shared.
...Click to share the folder on the network. Share: Click to select write privileges for the folder. Unplug USB: Click to safely unplug the USB drive from the DSM-G600. Read privileges are included when the folder is safe to remove the USB device. D-Link Systems, Inc. 34 If you want... and provide writing and sharing privileges for the folder. A message will appear Name: in and then click Create. DSM-G600 User's Manual Advanced > Share Using the Configuration Utility In this window you want to create a sub-folder, click on an existing folder that it is shared.
Product Manual
Page 36
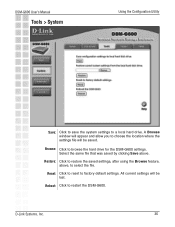
Save: Click to save the system settings to restart the DSM-G600. D-Link Systems, Inc. 36 A Browse window will appear and allow you to choose the location where the settings file will be saved. Select the same file that was saved ...by clicking Save above , to restore the saved settings, after using the Browse feature, above . Reboot: Click to a local hard drive. DSM-G600 User's Manual...
Save: Click to save the system settings to restart the DSM-G600. D-Link Systems, Inc. 36 A Browse window will appear and allow you to choose the location where the settings file will be saved. Select the same file that was saved ...by clicking Save above , to restore the saved settings, after using the Browse feature, above . Reboot: Click to a local hard drive. DSM-G600 User's Manual...
Product Manual
Page 37
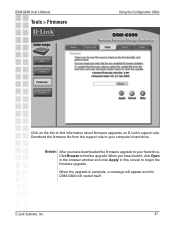
...the upgrade is complete, a message will appear and the DSM-G600 will restart itself. Download the firmware file from the support site to your computer's hard drive. When you have found it, click Open in the browser window and click Apply in this screen to begin the fi...;rmware upgrade. DSM-G600 User's Manual Tools > Firmware Using the Configuration Utility Click on the link to find the upgrade.
...the upgrade is complete, a message will appear and the DSM-G600 will restart itself. Download the firmware file from the support site to your computer's hard drive. When you have found it, click Open in the browser window and click Apply in this screen to begin the fi...;rmware upgrade. DSM-G600 User's Manual Tools > Firmware Using the Configuration Utility Click on the link to find the upgrade.

Product Manual
Page 40
In this window, select the log type that you have made your logs and log settings here. D-Link Systems, Inc. 40 Click Log Settings and the screen below will appear. Apply: Click Apply after you wish to view. DSM-G600 User's Manual Status > Logs Using the Configuration Utility You can manage your selections.
In this window, select the log type that you have made your logs and log settings here. D-Link Systems, Inc. 40 Click Log Settings and the screen below will appear. Apply: Click Apply after you wish to view. DSM-G600 User's Manual Status > Logs Using the Configuration Utility You can manage your selections.
Product Manual
Page 42
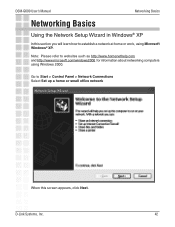
Go to Start > Control Panel > Network Connections Select Set up a home or small office network When this section you will learn how to websites such as http://www.homenethelp.com and http://www.microsoft.com/windows2000 for information about networking computers using Microsoft Windows® XP. D-Link Systems, Inc. 42 Note: Please refer to establish a network at home or work, using Windows 2000. DSM-G600 User's Manual Networking Basics Networking Basics Using the Network Setup Wizard in Windows® XP In this screen appears, click Next.
Go to Start > Control Panel > Network Connections Select Set up a home or small office network When this section you will learn how to websites such as http://www.homenethelp.com and http://www.microsoft.com/windows2000 for information about networking computers using Microsoft Windows® XP. D-Link Systems, Inc. 42 Note: Please refer to establish a network at home or work, using Windows 2000. DSM-G600 User's Manual Networking Basics Networking Basics Using the Network Setup Wizard in Windows® XP In this screen appears, click Next.

Product Manual
Page 43
In the following window, select the best description of your computer connects to the internet through a gateway/router, select the second option as shown. D-Link Systems, Inc. 43 DSM-G600 User's Manual Please follow all the instructions in this window: Networking Basics Click Next. Click Next. If your computer.
In the following window, select the best description of your computer connects to the internet through a gateway/router, select the second option as shown. D-Link Systems, Inc. 43 DSM-G600 User's Manual Please follow all the instructions in this window: Networking Basics Click Next. Click Next. If your computer.
Product Manual
Page 46
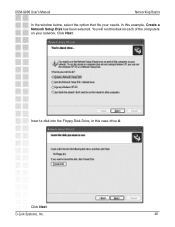
You will run this disk on each of the computers on your needs. D-Link Systems, Inc. 46 Click Next. In this case drive A. Insert a disk into the Floppy Disk Drive, in this example, Create a Network Setup Disk has been selected. Click Next. DSM-G600 User's Manual Networking Basics In the window below, select the option that fits your network.
You will run this disk on each of the computers on your needs. D-Link Systems, Inc. 46 Click Next. In this case drive A. Insert a disk into the Floppy Disk Drive, in this example, Create a Network Setup Disk has been selected. Click Next. DSM-G600 User's Manual Networking Basics In the window below, select the option that fits your network.

Product Manual
Page 49
DSM-G600 User's Manual Naming Your Computer Networking Basics To name your computer n Windows® XP, please follow these directions. Click Start (in the lower left corner of the screen). Right-click on My Computer. Select Properties and click. Select the Computer Name Tab in the System Properties window. You may enter a Computer Description if you wish; D-Link Systems, Inc. 49 this field is optional. To rename the computer and join a domain, Click Change.
DSM-G600 User's Manual Naming Your Computer Networking Basics To name your computer n Windows® XP, please follow these directions. Click Start (in the lower left corner of the screen). Right-click on My Computer. Select Properties and click. Select the Computer Name Tab in the System Properties window. You may enter a Computer Description if you wish; D-Link Systems, Inc. 49 this field is optional. To rename the computer and join a domain, Click Change.

Product Manual
Page 50
D-Link Systems, Inc. 50 DSM-G600 User's Manual Networking Basics In this window, enter the Computer name. Select Workgroup and enter the name of the Workgroup. All computers on your network must have the same Workgroup name. Click OK.
D-Link Systems, Inc. 50 DSM-G600 User's Manual Networking Basics In this window, enter the Computer name. Select Workgroup and enter the name of the Workgroup. All computers on your network must have the same Workgroup name. Click OK.