Manual
Page 2
... OLED Screen 8 Rear Panel (Connections 10 Rear Panel (Levers 11 Getting Started 12 Hardware Setup 12 D-Link Storage Utility 14 Installation 16 Setup Wizard 16 Mapping a Drive 33 Configuration 36 Managing your DNS-345 36 Web UI Login 37 Web UI General Layout 38 Home 38 Applications 39 Management 40... Management 41 Setup Wizard (Web UI 41 D-Link ShareCenter DNS-345 User Manual Disk Management 45 Hard Drive Configuration 45 Hard Drive Configuration Wizard 46 JBOD 52 RAID 0 57 RAID 1 61 RAID ...
... OLED Screen 8 Rear Panel (Connections 10 Rear Panel (Levers 11 Getting Started 12 Hardware Setup 12 D-Link Storage Utility 14 Installation 16 Setup Wizard 16 Mapping a Drive 33 Configuration 36 Managing your DNS-345 36 Web UI Login 37 Web UI General Layout 38 Home 38 Applications 39 Management 40... Management 41 Setup Wizard (Web UI 41 D-Link ShareCenter DNS-345 User Manual Disk Management 45 Hard Drive Configuration 45 Hard Drive Configuration Wizard 46 JBOD 52 RAID 0 57 RAID 1 61 RAID ...

Manual
Page 3
...Quotas 139 Network Shares 144 Add/Modify Network Shares Wizard........ 145 Deleting a Network Share 152 Resetting the Network Shares 154 ISO Shares Setup Wizard 155 Creating an ISO Image 159 ISO image Creation Wizard 160 ISO Name and File Path Settings 161 ISO Tree Editing 164...168 Network Management 173 LAN Setup 173 Link Aggregation 176 IPv6 Settings 177 IPv6 Setup 178 Link Speed and LLTD Settings 180 DDNS 181 Port Forwarding 182 Application Management 186 FTP server 186 UPnP AV Server 190 iTunes Server 193 Add-Ons 194 D-Link ShareCenter DNS-345 User Manual AFP Service ...
...Quotas 139 Network Shares 144 Add/Modify Network Shares Wizard........ 145 Deleting a Network Share 152 Resetting the Network Shares 154 ISO Shares Setup Wizard 155 Creating an ISO Image 159 ISO image Creation Wizard 160 ISO Name and File Path Settings 161 ISO Tree Editing 164...168 Network Management 173 LAN Setup 173 Link Aggregation 176 IPv6 Settings 177 IPv6 Setup 178 Link Speed and LLTD Settings 180 DDNS 181 Port Forwarding 182 Application Management 186 FTP server 186 UPnP AV Server 190 iTunes Server 193 Add-Ons 194 D-Link ShareCenter DNS-345 User Manual AFP Service ...
Manual
Page 17
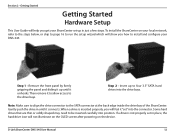
Getting Started Getting Started Hardware Setup This User Guide will help you get your ShareCenter set up in place, the hard...Some hard drives that are thin or oddly shaped may need to run the setup wizard which will show you will not illuminate on the OLED screen after powering on your DNS-345. To install the ShareCenter on the device. Step 2 - Insert up until... the SATA connector at the back edge inside the drive bay of the ShareCenter. D-Link ShareCenter DNS-345 User Manual 12 Section 2 - Then remove it unhooks. When a drive is not properly set " into the connector.
Getting Started Getting Started Hardware Setup This User Guide will help you get your ShareCenter set up in place, the hard...Some hard drives that are thin or oddly shaped may need to run the setup wizard which will show you will not illuminate on the OLED screen after powering on your DNS-345. To install the ShareCenter on the device. Step 2 - Insert up until... the SATA connector at the back edge inside the drive bay of the ShareCenter. D-Link ShareCenter DNS-345 User Manual 12 Section 2 - Then remove it unhooks. When a drive is not properly set " into the connector.

Manual
Page 21
Select the Language of your CD-ROM drive. Click Unblock to give your computer access to unblock the device. D-Link ShareCenter DNS-345 User Manual 16 When the autorun screen appears, click Install Note: Windows Firewall presents you with a warning message to the NAS. Step 1 - Section 3 - Installation Installation Setup Wizard To run the Setup Wizard, insert the ShareCenter CD into your choice and then click the Start button. Step 2 -
Select the Language of your CD-ROM drive. Click Unblock to give your computer access to unblock the device. D-Link ShareCenter DNS-345 User Manual 16 When the autorun screen appears, click Install Note: Windows Firewall presents you with a warning message to the NAS. Step 1 - Section 3 - Installation Installation Setup Wizard To run the Setup Wizard, insert the ShareCenter CD into your choice and then click the Start button. Step 2 -

Manual
Page 26
Installation Networking Setup Step 11 - Section 3 - Click Next to configure the IP network settings of the ShareCenter. D-Link ShareCenter DNS-345 User Manual 21 If you select Static IP, then enter the IP parameters as listed. You may either use Static IP or DHCP to continue.
Installation Networking Setup Step 11 - Section 3 - Click Next to configure the IP network settings of the ShareCenter. D-Link ShareCenter DNS-345 User Manual 21 If you select Static IP, then enter the IP parameters as listed. You may either use Static IP or DHCP to continue.

Manual
Page 28
Click No skips the DDNS account setup wizard and transfers you back to obtain a free DDNS account. Installation Dynamic DNS Account Setup Step 14 - Click Yes to go to a Wizard with instructions and links on how to the ShareCenter Setup Wizard. Enter the DDNS parameters requested in this window so that your ShareCenter can be accessed by a URL over the Internet. Section 3 - Step 15 - Click Next to continue. D-Link ShareCenter DNS-345 User Manual 23
Click No skips the DDNS account setup wizard and transfers you back to obtain a free DDNS account. Installation Dynamic DNS Account Setup Step 14 - Click Yes to go to a Wizard with instructions and links on how to the ShareCenter Setup Wizard. Enter the DDNS parameters requested in this window so that your ShareCenter can be accessed by a URL over the Internet. Section 3 - Step 15 - Click Next to continue. D-Link ShareCenter DNS-345 User Manual 23

Manual
Page 30
... alerting you do not want to configure your e-mail settings, click Skip to continue. This step is informational and shows any currently configured Volumes previously setup on the ShareCenter®. Click Next to continue. D-Link ShareCenter DNS-345 User Manual 25 Section 3 -
... alerting you do not want to configure your e-mail settings, click Skip to continue. This step is informational and shows any currently configured Volumes previously setup on the ShareCenter®. Click Next to continue. D-Link ShareCenter DNS-345 User Manual 25 Section 3 -
Manual
Page 37
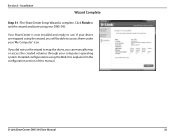
..., you can manually map or access the created volumes through your computers operating system. D-Link ShareCenter DNS-345 User Manual 32 Click Finish to access them under your DNS-345. Detailed configurations using the Web UI is complete. Section 3 - The ShareCenter Setup Wizard is explained in the configuration section of this manual. If your drives are...
..., you can manually map or access the created volumes through your computers operating system. D-Link ShareCenter DNS-345 User Manual 32 Click Finish to access them under your DNS-345. Detailed configurations using the Web UI is complete. Section 3 - The ShareCenter Setup Wizard is explained in the configuration section of this manual. If your drives are...
Manual
Page 41
... by step guide through social networking sites, and slideshows Share, stream, and manage files on your NAS via mydlink portal. D-Link ShareCenter DNS-345 User Manual 36 The Web UI is a browser-based utility that allows you to manage and configure the different tools and services.... My Folder SECTION Management SECTION Applications OPTION My Photos My Files mydlink Cloud OPTION Setup Wizard Disk Management Account Management Network...
... by step guide through social networking sites, and slideshows Share, stream, and manage files on your NAS via mydlink portal. D-Link ShareCenter DNS-345 User Manual 36 The Web UI is a browser-based utility that allows you to manage and configure the different tools and services.... My Folder SECTION Management SECTION Applications OPTION My Photos My Files mydlink Cloud OPTION Setup Wizard Disk Management Account Management Network...

Manual
Page 42
The following screen will automatically be on the front of your ShareCenter, and log in the IP address of the DNS-345. If your NAS by pressing the Next button on the same subnet as the ShareCenter. You can find the IP address of your ... System Administrator and enter the password created during the Setup Wizard. Click Login. Note: The computer used to access the ShareCenter web-based configuration manager must be in the same subnet. Configuration Web UI Login To access the Web UI, open a web browser, type in . D-Link ShareCenter DNS-345 User Manual 37 Section 4 -
The following screen will automatically be on the front of your ShareCenter, and log in the IP address of the DNS-345. If your NAS by pressing the Next button on the same subnet as the ShareCenter. You can find the IP address of your ... System Administrator and enter the password created during the Setup Wizard. Click Login. Note: The computer used to access the ShareCenter web-based configuration manager must be in the same subnet. Configuration Web UI Login To access the Web UI, open a web browser, type in . D-Link ShareCenter DNS-345 User Manual 37 Section 4 -

Manual
Page 45
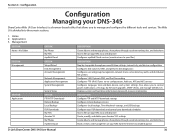
Section 4 - Configuration Management The Management tab contains the Setup Wizard, Disk Management, Account Management, Network Management, Application Management, System Management, and Status icons. Click on each icon to see the submenus. D-Link ShareCenter DNS-345 User Manual 40
Section 4 - Configuration Management The Management tab contains the Setup Wizard, Disk Management, Account Management, Network Management, Application Management, System Management, and Status icons. Click on each icon to see the submenus. D-Link ShareCenter DNS-345 User Manual 40

Manual
Page 46
Click the Run Wizard button to start the setup wizard. Section 4 - Click the Setup Wizard icon to start the Setup Wizard. Click Next to quickly configure some of the basic device settings. D-Link ShareCenter DNS-345 User Manual 41 Step 2 - Configuration Management Setup Wizard (Web UI) The ShareCenter has a Setup Wizard that allows you to continue. Step 1 -
Click the Run Wizard button to start the setup wizard. Section 4 - Click the Setup Wizard icon to start the Setup Wizard. Click Next to quickly configure some of the basic device settings. D-Link ShareCenter DNS-345 User Manual 41 Step 2 - Configuration Management Setup Wizard (Web UI) The ShareCenter has a Setup Wizard that allows you to continue. Step 1 -
Manual
Page 50
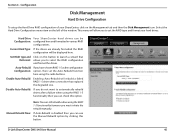
...Set RAID type and Click on this button to launch a wizard that Reformat: allows you must initiate the rebuild manually. D-Link ShareCenter DNS-345 User Manual 45 Hard Drive Your ShareCenter hard drives can still rebuild a drive using the RAID 1-5 functionality however you to set...If you do not want to automatically rebuild drives after a failure when using the radio buttons. Configuration Disk Management Hard Drive Configuration To setup the Hard Drive RAID configuration of your hard drives. Current Raid Type: If the drives are already formatted the RAID configuration will rebuild ...
...Set RAID type and Click on this button to launch a wizard that Reformat: allows you must initiate the rebuild manually. D-Link ShareCenter DNS-345 User Manual 45 Hard Drive Your ShareCenter hard drives can still rebuild a drive using the RAID 1-5 functionality however you to set...If you do not want to automatically rebuild drives after a failure when using the radio buttons. Configuration Disk Management Hard Drive Configuration To setup the Hard Drive RAID configuration of your hard drives. Current Raid Type: If the drives are already formatted the RAID configuration will rebuild ...

Manual
Page 94
... hard drive in Standard mode during the initial setup and upgrade to RAID 1 or RAID 5 with RAID migration: yyMigrate the system from Non-RAID mode to RAID 1 or RAID 5 yyMigrate the system from RAID 1 to the RAID Migration How-To for more options. D-Link ShareCenter DNS-345 User Manual 89 The migration process can...
... hard drive in Standard mode during the initial setup and upgrade to RAID 1 or RAID 5 with RAID migration: yyMigrate the system from Non-RAID mode to RAID 1 or RAID 5 yyMigrate the system from RAID 1 to the RAID Migration How-To for more options. D-Link ShareCenter DNS-345 User Manual 89 The migration process can...

Manual
Page 116
Up to continue. By default, all users have read and write access to create and manage user and group accounts. Click Users/Groups on the left side and then click Create. The User Setup Wizard will appear. Configuration Account Management Users / Groups Creating a Single User The Users/Groups menu is used to all folders. Click Management > Account Management. Section 4 - D-Link ShareCenter DNS-345 User Manual 111 Click Next to 512 users and 64 groups can be created. However access rules can be created and edited in the Network Shares menu.
Up to continue. By default, all users have read and write access to create and manage user and group accounts. Click Users/Groups on the left side and then click Create. The User Setup Wizard will appear. Configuration Account Management Users / Groups Creating a Single User The Users/Groups menu is used to all folders. Click Management > Account Management. Section 4 - D-Link ShareCenter DNS-345 User Manual 111 Click Next to 512 users and 64 groups can be created. However access rules can be created and edited in the Network Shares menu.

Manual
Page 125
D-Link ShareCenter DNS-345 User Manual 120 Click Modify to continue. Section 4 - The User Setup Wizard will be highlighted in red. The user will appear. Step 2 - Click Next to continue. Configuration Modify Users Step 1 - Click the user you wish to modify.
D-Link ShareCenter DNS-345 User Manual 120 Click Modify to continue. Section 4 - The User Setup Wizard will be highlighted in red. The user will appear. Step 2 - Click Next to continue. Configuration Modify Users Step 1 - Click the user you wish to modify.

Manual
Page 133
Click Account Management > Users/Groups. Click New to Group Settings and settings window will now start. Click the blue arrow next to create a new Group. Step 2 - D-Link ShareCenter DNS-345 User Manual 128 Configuration Creating a Group Step 1 - Click Next to continue. The Group Setup Wizard will appear. Section 4 -
Click Account Management > Users/Groups. Click New to Group Settings and settings window will now start. Click the blue arrow next to create a new Group. Step 2 - D-Link ShareCenter DNS-345 User Manual 128 Configuration Creating a Group Step 1 - Click Next to continue. The Group Setup Wizard will appear. Section 4 -

Manual
Page 139
Section 4 - Click Next to continue. Make the necessary modifications to the group and then click Next to continue. Step 4 - D-Link ShareCenter DNS-345 User Manual 134 The Group Setup Wizard will now start. Configuration Step 3 -
Section 4 - Click Next to continue. Make the necessary modifications to the group and then click Next to continue. Step 4 - D-Link ShareCenter DNS-345 User Manual 134 The Group Setup Wizard will now start. Configuration Step 3 -

Manual
Page 150
... to the setup wizard for creating a new network share. Configuration Add/Modify Network Shares Wizard The following section will launch. Step 1 - This window welcomes the user to continue. Step 2 - Select the Share Folder from one of the configuration before completing. To add a Network Share click on the ShareCenter. D-Link ShareCenter DNS-345 User Manual...
... to the setup wizard for creating a new network share. Configuration Add/Modify Network Shares Wizard The following section will launch. Step 1 - This window welcomes the user to continue. Step 2 - Select the Share Folder from one of the configuration before completing. To add a Network Share click on the ShareCenter. D-Link ShareCenter DNS-345 User Manual...

Manual
Page 160
Configuration ISO Shares Setup Wizard The following section will describe how to configure wizard will launch. An easy to add a new ISO mount on the New button. To add an ISO Mount, click on the ShareCenter. Click Next to continue. Check the box to the left of the .iso file to select it and click Next to continue. Section 4 - D-Link ShareCenter DNS-345 User Manual 155 Select the ISO file to mount.
Configuration ISO Shares Setup Wizard The following section will describe how to configure wizard will launch. An easy to add a new ISO mount on the New button. To add an ISO Mount, click on the ShareCenter. Click Next to continue. Check the box to the left of the .iso file to select it and click Next to continue. Section 4 - D-Link ShareCenter DNS-345 User Manual 155 Select the ISO file to mount.
