DNS-320L Manual
Page 3
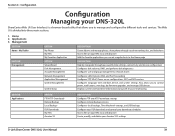
... Name and File Path Settings 130 ISO Tree Editing 133 Verifying the ISO image 134 Admin Password 135 Network Management 136 LAN Setup 136 IPv6 Settings 139 IPv6 Setup 140 Link Speed and LLTD Settings 142 DDNS 143 Port Forwarding 144 Application Management 148 FTP server 148 ...Language 157 Time and Date 158 Device 159 System Settings 160 Power Management 161 Notifications 163 Email Settings 163 SMS Settings 164 D-Link ShareCenter DNS-320L User Manual Adding an SMS Service Provider 165 Event Settings 166 Logs 167 Firmware Upgrade 168 USB Devices 169 UPS Settings 169 USB...
... Name and File Path Settings 130 ISO Tree Editing 133 Verifying the ISO image 134 Admin Password 135 Network Management 136 LAN Setup 136 IPv6 Settings 139 IPv6 Setup 140 Link Speed and LLTD Settings 142 DDNS 143 Port Forwarding 144 Application Management 148 FTP server 148 ...Language 157 Time and Date 158 Device 159 System Settings 160 Power Management 161 Notifications 163 Email Settings 163 SMS Settings 164 D-Link ShareCenter DNS-320L User Manual Adding an SMS Service Provider 165 Event Settings 166 Logs 167 Firmware Upgrade 168 USB Devices 169 UPS Settings 169 USB...
DNS-320L Manual
Page 25
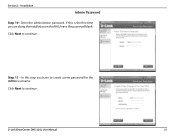
D-Link ShareCenter DNS-320L User Manual 21 Click Next to continue. Section 3 - In this NAS, leave the password blank. Enter the administrator password. If this is the first time you are doing the installation on this step you have to create a new password for the Admin username. Step 11 - Click Next to continue. Installation Admin Password Step 10 -
D-Link ShareCenter DNS-320L User Manual 21 Click Next to continue. Section 3 - In this NAS, leave the password blank. Enter the administrator password. If this is the first time you are doing the installation on this step you have to create a new password for the Admin username. Step 11 - Click Next to continue. Installation Admin Password Step 10 -
DNS-320L Manual
Page 37
Click Next to continue. Then retype the password, enter your email address and password. D-Link ShareCenter DNS-320L User Manual 33 Installation Step 30 - Alternatively, you select "No, I accept the mydlink terms and conditions." Enter your First Name and Last Name. Step 31 - ...
Click Next to continue. Then retype the password, enter your email address and password. D-Link ShareCenter DNS-320L User Manual 33 Installation Step 30 - Alternatively, you select "No, I accept the mydlink terms and conditions." Enter your First Name and Last Name. Step 31 - ...
DNS-320L Manual
Page 43
...Management Account Management Network Management Application Management System Management System Status DESCRIPTION Create albums and manage photos, share photos through password & time settings, connectivity, and device configuration Configures disk volumes, RAID, and performs disk diagnostics Configures user and group ...DESCRIPTION Step by step guide through social networking sites, and slideshows Access files on your Amazon S3© settings D-Link ShareCenter DNS-320L User Manual 39 The Web UI is a browser-based utility that allows you to manage and configure the different ...
...Management Account Management Network Management Application Management System Management System Status DESCRIPTION Create albums and manage photos, share photos through password & time settings, connectivity, and device configuration Configures disk volumes, RAID, and performs disk diagnostics Configures user and group ...DESCRIPTION Step by step guide through social networking sites, and slideshows Access files on your Amazon S3© settings D-Link ShareCenter DNS-320L User Manual 39 The Web UI is a browser-based utility that allows you to manage and configure the different ...
DNS-320L Manual
Page 44
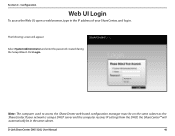
Note: The computer used to access the ShareCenter web-based configuration manager must be in . D-Link ShareCenter DNS-320L User Manual 40 The following screen will automatically be on the same subnet as the ShareCenter. Click Login. If your ShareCenter, and log in the ... network is using a DHCP server and the computer receives IP settings from the DHCP, the ShareCenter™ will appear: Select System Administrator and enter the password created during the Setup Wizard.
Note: The computer used to access the ShareCenter web-based configuration manager must be in . D-Link ShareCenter DNS-320L User Manual 40 The following screen will automatically be on the same subnet as the ShareCenter. Click Login. If your ShareCenter, and log in the ... network is using a DHCP server and the computer receives IP settings from the DHCP, the ShareCenter™ will appear: Select System Administrator and enter the password created during the Setup Wizard.
DNS-320L Manual
Page 49
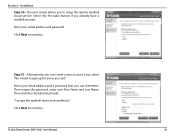
Update the administrator account password here and confirm the password. Set the time zone from the drop-down menu to the appropriate geographical zone closest to continue. D-Link ShareCenter DNS-320L User Manual 45 Section 4 - Click Next to your location. Click Next to continue or click Skip to ignore these settings. Step 4 - Configuration Step 3 -
Update the administrator account password here and confirm the password. Set the time zone from the drop-down menu to the appropriate geographical zone closest to continue. D-Link ShareCenter DNS-320L User Manual 45 Section 4 - Click Next to your location. Click Next to continue or click Skip to ignore these settings. Step 4 - Configuration Step 3 -

DNS-320L Manual
Page 85
Select Create a Single User and then click Next to continue. D-Link ShareCenter DNS-320L User Manual 81 Section 4 - Configuration Step 1 - Enter the user name and password for the new user and then click Next to continue. Step 2 -
Select Create a Single User and then click Next to continue. D-Link ShareCenter DNS-320L User Manual 81 Section 4 - Configuration Step 1 - Enter the user name and password for the new user and then click Next to continue. Step 2 -
DNS-320L Manual
Page 89
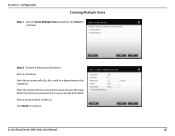
Enter a password and confirm it. Enter the amount of users you want to the NAS. D-Link ShareCenter DNS-320L User Manual 85 Step 2 - Section 4 - Click Next to continue. Next to the input field is the remaining amount of users you can add to create. Enter the account prefix (Eg. Select Create Multiple Users and then click Next to continue. this could be a department in the company). Enter the following information: Enter a username. Configuration Creating Multiple Users Step 1 -
Enter a password and confirm it. Enter the amount of users you want to the NAS. D-Link ShareCenter DNS-320L User Manual 85 Step 2 - Section 4 - Click Next to continue. Next to the input field is the remaining amount of users you can add to create. Enter the account prefix (Eg. Select Create Multiple Users and then click Next to continue. this could be a department in the company). Enter the following information: Enter a username. Configuration Creating Multiple Users Step 1 -

DNS-320L Manual
Page 94
Step 4 - Change the username or password. Click Next to continue. Click Next to continue. D-Link ShareCenter DNS-320L User Manual 90 Configuration Step 3 - Change the Network Share Settings. Section 4 -
Step 4 - Change the username or password. Click Next to continue. Click Next to continue. D-Link ShareCenter DNS-320L User Manual 90 Configuration Step 3 - Change the Network Share Settings. Section 4 -
DNS-320L Manual
Page 139
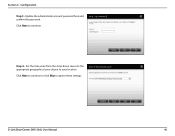
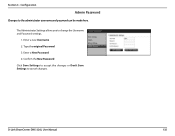
Configuration Admin Password Changes to change the Username and Password settings. 1. Type the original Password 3. Enter a New Password 4. Enter a new Username 2. D-Link ShareCenter DNS-320L User Manual 135 Section 4 - The Administrator Settings allows you to the administrator username and password can be made here. Confirm the New Password Click Save Settings to accept the changes or Don't Save Settings to cancel changes.
Configuration Admin Password Changes to change the Username and Password settings. 1. Type the original Password 3. Enter a New Password 4. Enter a new Username 2. D-Link ShareCenter DNS-320L User Manual 135 Section 4 - The Administrator Settings allows you to the administrator username and password can be made here. Confirm the New Password Click Save Settings to accept the changes or Don't Save Settings to cancel changes.
DNS-320L Manual
Page 147
... the user to Network Management and then Dynamic DNS. Username or Key: Enter your DDNS host name. When the user clicks on the right hand-side, or type in this configuration. D-Link ShareCenter DNS-320L User Manual 143 Host Name: Enter your DDNS... username or key. Using a DDNS service provider, your friends can create or modify a D-Link DDNS account to use in the server address manually. Go to host a server (Web, FTP, Game Server, etc...) using a domain name that you have purchased (www. Password...
... the user to Network Management and then Dynamic DNS. Username or Key: Enter your DDNS host name. When the user clicks on the right hand-side, or type in this configuration. D-Link ShareCenter DNS-320L User Manual 143 Host Name: Enter your DDNS... username or key. Using a DDNS service provider, your friends can create or modify a D-Link DDNS account to use in the server address manually. Go to host a server (Web, FTP, Game Server, etc...) using a domain name that you have purchased (www. Password...
DNS-320L Manual
Page 159
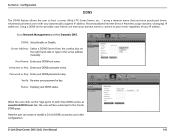
...a specific folders. Click the Refresh All button to enable or disable the iTunes Server. Configuration iTunes Server The DNS-320L features an iTunes Server. D-Link ShareCenter DNS-320L User Manual Media stored on all the shared files and folder lists. If the server is set to stream ...enter in the specified directory will be automatically detected by the iTunes program and the music and videos contained in the iTunes server password. Currently the Codepage is enabled, the device will be available for the iTunes server. (Optional) MP3 Tag Codepage: Here the...
...a specific folders. Click the Refresh All button to enable or disable the iTunes Server. Configuration iTunes Server The DNS-320L features an iTunes Server. D-Link ShareCenter DNS-320L User Manual Media stored on all the shared files and folder lists. If the server is set to stream ...enter in the specified directory will be automatically detected by the iTunes program and the music and videos contained in the iTunes server password. Currently the Codepage is enabled, the device will be available for the iTunes server. (Optional) MP3 Tag Codepage: Here the...

DNS-320L Manual
Page 167
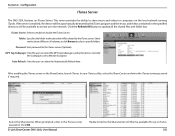
Choosing Anonymous does not require a User Name or Password. Password: Enter the appropriate password for your e-mail account. Username: Enter the appropriate user name for your e-mail account. Sender E-mail: Enter the "from the drop-down menu... with the SMTP server configured above. However, if your e-mail client is Connection: required by your settings are unsure of your e-mail provider. D-Link ShareCenter DNS-320L User Manual 163 Receiver E-mail: Enter the e-mail address you allow this value, contact your outgoing mail server. This field does not require a ...
Choosing Anonymous does not require a User Name or Password. Password: Enter the appropriate password for your e-mail account. Username: Enter the appropriate user name for your e-mail account. Sender E-mail: Enter the "from the drop-down menu... with the SMTP server configured above. However, if your e-mail client is Connection: required by your settings are unsure of your e-mail provider. D-Link ShareCenter DNS-320L User Manual 163 Receiver E-mail: Enter the e-mail address you allow this value, contact your outgoing mail server. This field does not require a ...

DNS-320L Manual
Page 210
... source files are located on a FTP server. D-Link ShareCenter DNS-320L User Manual 206 If you wish to specify that you must specify the exact file in the URL path, including the file extension. (e.g. URL: Enter the FTP/HTTP site address for downloading. If no password is required, choose Account and enter the user...
... source files are located on a FTP server. D-Link ShareCenter DNS-320L User Manual 206 If you wish to specify that you must specify the exact file in the URL path, including the file extension. (e.g. URL: Enter the FTP/HTTP site address for downloading. If no password is required, choose Account and enter the user...
DNS-320L Manual
Page 212
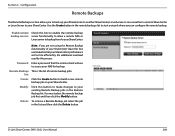
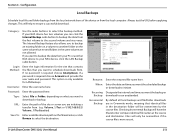
...new remote backup job on your ShareCenter. You must select the remote backup job first and then click the Modify button. D-Link ShareCenter DNS-320L User Manual 208 Section 4 - Enable remote Check this button to make changes to access your ShareCenter leave this box unchecked... Backup functionality of remote backup jobs. Configuration Remote Backups The Remote Backups section allows you can configure the remote backup. Password: Enter a password that your ShareCenter's performance will use to your ShareCenter. Delete: To remove a Remote Backup job select the job in...
...new remote backup job on your ShareCenter. You must select the remote backup job first and then click the Modify button. D-Link ShareCenter DNS-320L User Manual 208 Section 4 - Enable remote Check this button to make changes to access your ShareCenter leave this box unchecked... Backup functionality of remote backup jobs. Configuration Remote Backups The Remote Backups section allows you can configure the remote backup. Password: Enter a password that your ShareCenter's performance will use to your ShareCenter. Delete: To remove a Remote Backup job select the job in...
DNS-320L Manual
Page 214
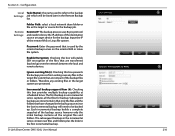
... destination source or target device for backup. The first backup in the incremental series contain new files and folders plus the links to know the IP address of the files that are transferred (backed up . Input the IP of the backup source... the local and remote devices. The subsequent backups in an incremental series captures all the original files and folders. D-Link ShareCenter DNS-320L User Manual 210 Password: Enter the password that are preserved. Enable Encryption: Checking this box provides multiple backup-capability at scheduled times. Section 4 - Folder ...
... destination source or target device for backup. The first backup in the incremental series contain new files and folders plus the links to know the IP address of the files that are transferred (backed up . Input the IP of the backup source... the local and remote devices. The subsequent backups in an incremental series captures all the original files and folders. D-Link ShareCenter DNS-320L User Manual 210 Password: Enter the password that are preserved. Enable Encryption: Checking this box provides multiple backup-capability at scheduled times. Section 4 - Folder ...
DNS-320L Manual
Page 217
...will have the ShareCenter compare identical file names at the source and destination. If no password is required choose Account and provide the user name and password. Password: Enter the password here. When: Enter the date and time you want the scheduled backup or download... Volume_1\Test\test.txt). If a password is required choose Anonymous. Category: Use the radio buttons to run unattended. Username: Enter the user name here. Section 4 - URL: Enter the path of the device or from . (e.g. D-Link ShareCenter DNS-320L User Manual 213 Recurring Designate the interval ...
...will have the ShareCenter compare identical file names at the source and destination. If no password is required choose Account and provide the user name and password. Password: Enter the password here. When: Enter the date and time you want the scheduled backup or download... Volume_1\Test\test.txt). If a password is required choose Anonymous. Category: Use the radio buttons to run unattended. Username: Enter the user name here. Section 4 - URL: Enter the path of the device or from . (e.g. D-Link ShareCenter DNS-320L User Manual 213 Recurring Designate the interval ...

DNS-320L Manual
Page 239
Configuration After the Java Runtime machine is installed, run the mydlink application and enter the password of the device (admin's password). Section 4 - D-Link ShareCenter DNS-320L User Manual 235
Configuration After the Java Runtime machine is installed, run the mydlink application and enter the password of the device (admin's password). Section 4 - D-Link ShareCenter DNS-320L User Manual 235

DNS-320L Manual
Page 244
Click Delete Device to verify your admin password to confirm the deletion. Section 4 - D-Link ShareCenter DNS-320L User Manual 240 Configuration Deleting the device from mydlink account Uder Settings, click Remove Device. A warning message appears for you to proceed. Enter your deletion. An acknowledgement message appears to delete the device.
Click Delete Device to verify your admin password to confirm the deletion. Section 4 - D-Link ShareCenter DNS-320L User Manual 240 Configuration Deleting the device from mydlink account Uder Settings, click Remove Device. A warning message appears for you to proceed. Enter your deletion. An acknowledgement message appears to delete the device.
DNS-320L Manual
Page 245
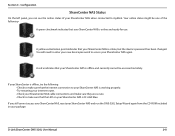
...LED on your ShareCenter NAS is lit solid blue. If your ShareCenter is online, but the device's password has been changed. You will need to enter your new device password to access your package. A red x indicates that your ShareCenter NAS is offline, try the following ... your internet router. • Check your ShareCenter NAS cable connections and make sure they are secure. • Check to mydlink. D-Link ShareCenter DNS-320L User Manual 241 Section 4 - Configuration ShareCenter NAS Status On the left panel, you still cannot access your ShareCenter NAS, reset your ...
...LED on your ShareCenter NAS is lit solid blue. If your ShareCenter is online, but the device's password has been changed. You will need to enter your new device password to access your package. A red x indicates that your ShareCenter NAS is offline, try the following ... your internet router. • Check your ShareCenter NAS cable connections and make sure they are secure. • Check to mydlink. D-Link ShareCenter DNS-320L User Manual 241 Section 4 - Configuration ShareCenter NAS Status On the left panel, you still cannot access your ShareCenter NAS, reset your ...
