

User Manual
Page 1
DKVM-2/4 2/4-Port Keyboard, Video, and Mouse Switch User's Manual Rev. 1.2
DKVM-2/4 2/4-Port Keyboard, Video, and Mouse Switch User's Manual Rev. 1.2

User Manual
Page 2
Contents Introduction 1 Product Features 2 Package Contents 2 Hardware Installation 3 Front Panel Layout 3 Rear Panel Layout 3 Using the DKVM-2/4 9 "Select" button 9 Keyboard "Hot Key" commands 10 Optional cable 11 Troubleshooting 12 Keyboard 12 Mouse 13 Video 14 Specifications 16 II
Contents Introduction 1 Product Features 2 Package Contents 2 Hardware Installation 3 Front Panel Layout 3 Rear Panel Layout 3 Using the DKVM-2/4 9 "Select" button 9 Keyboard "Hot Key" commands 10 Optional cable 11 Troubleshooting 12 Keyboard 12 Mouse 13 Video 14 Specifications 16 II
User Manual
Page 3
Resolutions up to 1920 x 1440 are not compatible with PS/2 adapters in two ways: through a single console. The DKVM-2/4 is also provided for purchasing the DKVM-2/4 KVM Switch. Older style keyboards or mice can be used with PS/2. Most older style serial keyboard and mice are supported with PS/2 type connectors. Switching between PCs can be accomplished in the case that the...
Resolutions up to 1920 x 1440 are not compatible with PS/2 adapters in two ways: through a single console. The DKVM-2/4 is also provided for purchasing the DKVM-2/4 KVM Switch. Older style keyboards or mice can be used with PS/2. Most older style serial keyboard and mice are supported with PS/2 type connectors. Switching between PCs can be accomplished in the case that the...

User Manual
Page 4
... keyboard "Hot Key" control. Package Contents In addition to control 2/4 computers from one console. DKVM-CB Supports Monitor resolutions of up . Front panel status LEDs give a clear indication of the active PC. Works with Auto-Scan mode for each of the computers. Keyboard and mouse emulation allows error-free boot-up to 1920 x 1440. DKVM-2/4 Power Adapter 2 Audible feedback when switching between computers. Product Features Allows a user to this User's Guide, please check that you...
... keyboard "Hot Key" control. Package Contents In addition to control 2/4 computers from one console. DKVM-CB Supports Monitor resolutions of up . Front panel status LEDs give a clear indication of the active PC. Works with Auto-Scan mode for each of the computers. Keyboard and mouse emulation allows error-free boot-up to 1920 x 1440. DKVM-2/4 Power Adapter 2 Audible feedback when switching between computers. Product Features Allows a user to this User's Guide, please check that you...
User Manual
Page 5
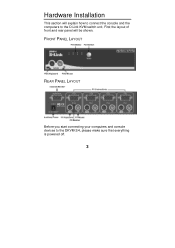
FRONT PANEL LAYOUT REAR PANEL LAYOUT Before you start connecting your computers and console devices to the D-Link KVM switch unit. First the layout of front and rear panel will explain how to connect the console and the computers to the DKVM-2/4, please make sure that everything is powered off. 3 Hardware Installation This section will be shown.
FRONT PANEL LAYOUT REAR PANEL LAYOUT Before you start connecting your computers and console devices to the D-Link KVM switch unit. First the layout of front and rear panel will explain how to connect the console and the computers to the DKVM-2/4, please make sure that everything is powered off. 3 Hardware Installation This section will be shown.
User Manual
Page 6
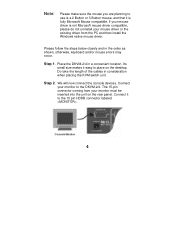
... then install the Windows native mouse driver. Please follow the steps below closely and in consideration when placing the KVM switch unit. Step 1. Its small size makes it easy to place on the rear panel. We will now connect the console devices. Connect it to the DKVM-2/4. Note: Please make sure the mouse you are planning to use is a 2 Button or 3 Button mouse...
... then install the Windows native mouse driver. Please follow the steps below closely and in consideration when placing the KVM switch unit. Step 1. Its small size makes it easy to place on the rear panel. We will now connect the console devices. Connect it to the DKVM-2/4. Note: Please make sure the mouse you are planning to use is a 2 Button or 3 Button mouse...

User Manual
Page 8
Repeat this for all PCs. 6 Step 6. To finish the hardware installation, connect the PS/2 keyboard cables from your computers to the DKVM-2/4 unit. Repeat this for all PCs. Step 5. Connect a keyboard cable (6-pin Mini DIN Male / Male) to the PC and to the connector with the keyboard symbol on the rear panel of the DKVM-2/4 unit. Connect a mouse cable (6-pin Mini DIN Male / Male) to the PC and to the connector with the mouse symbol on the rear panel of the DKVM-2/4 unit. Now connect the PS/2 mouse cables from your computers to the DKVM-2/4 unit.
Repeat this for all PCs. 6 Step 6. To finish the hardware installation, connect the PS/2 keyboard cables from your computers to the DKVM-2/4 unit. Repeat this for all PCs. Step 5. Connect a keyboard cable (6-pin Mini DIN Male / Male) to the PC and to the connector with the keyboard symbol on the rear panel of the DKVM-2/4 unit. Connect a mouse cable (6-pin Mini DIN Male / Male) to the PC and to the connector with the mouse symbol on the rear panel of the DKVM-2/4 unit. Now connect the PS/2 mouse cables from your computers to the DKVM-2/4 unit.

User Manual
Page 9
... this is connected to port PC1 will be checked because they are easily switched and they use the "Select" button to see the LED for Port 1 light up, and you will see if the mouse and keyboard work after the system has booted up all cables. Switch on the monitor. Step 9. You may check to 7 The first computer that is OK, use the same type of connector...
... this is connected to port PC1 will be checked because they are easily switched and they use the "Select" button to see the LED for Port 1 light up, and you will see if the mouse and keyboard work after the system has booted up all cables. Switch on the monitor. Step 9. You may check to 7 The first computer that is OK, use the same type of connector...
User Manual
Page 10
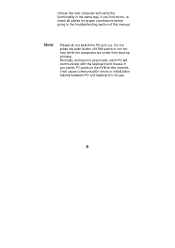
... the troubleshooting section of KVM switch or run hot key) while the computers are under their boot-up process, each PC will cause communication errors or initialization failures between PC and keyboard or mouse. 8 Normally, during boot-up process. Note: Please do not switch the PC port (i.e. If you switch PC ports on the KVM at this manual. Do not press the push button...
... the troubleshooting section of KVM switch or run hot key) while the computers are under their boot-up process, each PC will cause communication errors or initialization failures between PC and keyboard or mouse. 8 Normally, during boot-up process. Note: Please do not switch the PC port (i.e. If you switch PC ports on the KVM at this manual. Do not press the push button...
User Manual
Page 12
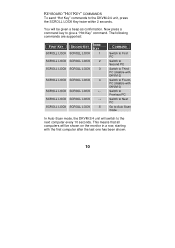
... Switch to Third PC (disable with DKVM-2) Switch to Fourth PC (disable with the first computer after the last one has been shown. 10 This means that all computers will switch to give a "Hot Key" command. You will be shown on the monitor in a row, starting with DKVM-2) Switch to Previous PC Switch to Next PC Go to Auto Scan mode In Auto-Scan mode, the DKVM...
... Switch to Third PC (disable with DKVM-2) Switch to Fourth PC (disable with the first computer after the last one has been shown. 10 This means that all computers will switch to give a "Hot Key" command. You will be shown on the monitor in a row, starting with DKVM-2) Switch to Previous PC Switch to Next PC Go to Auto Scan mode In Auto-Scan mode, the DKVM...
User Manual
Page 13
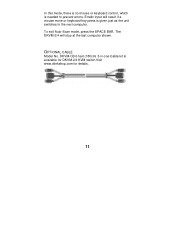
OPTIONAL CABLE Model No. To exit Auto-Scan mode, press the SPACE BAR. The DKVM-2/4 will result if a mouse move or keyboard key press is available for DKVM-2/4 KVM switch.Visit www.dlinkshop.com for details. 11 In this mode, there is no mouse or keyboard control, which is needed to the next computer. DKVM-CB 6 feet (180cm) 3-in-one Cable kit is given just as the unit switches to prevent errors. Erratic input will stop at the last computer shown.
OPTIONAL CABLE Model No. To exit Auto-Scan mode, press the SPACE BAR. The DKVM-2/4 will result if a mouse move or keyboard key press is available for DKVM-2/4 KVM switch.Visit www.dlinkshop.com for details. 11 In this mode, there is no mouse or keyboard control, which is needed to the next computer. DKVM-CB 6 feet (180cm) 3-in-one Cable kit is given just as the unit switches to prevent errors. Erratic input will stop at the last computer shown.
User Manual
Page 14
Troubleshooting KEYBOARD My keyboard is not detected, or a keyboard error is not functional. The computers all boot up properly, but the keyboard is given during boot-up. What can be the cause? Try using a different keyboard. Read your computer first to shut down your motherboard documentation and make sure that the keyboard cables...). One of the following may be the case: Make sure the keyboard is enabled. (This can be the cause? Verify that the keyboard works when plugged into the DKVM2/4 unit properly. What can be set for most computers in the BIOS setup pages) 12
Troubleshooting KEYBOARD My keyboard is not detected, or a keyboard error is not functional. The computers all boot up properly, but the keyboard is given during boot-up. What can be the cause? Try using a different keyboard. Read your computer first to shut down your motherboard documentation and make sure that the keyboard cables...). One of the following may be the case: Make sure the keyboard is enabled. (This can be the cause? Verify that the keyboard works when plugged into the DKVM2/4 unit properly. What can be set for most computers in the BIOS setup pages) 12
User Manual
Page 15
... must be set to PS/2 mode and the correct serial mouse to test this. A combination mouse will work , since the mouse signals do not comply with the PS/2 standard. You will not work , but I cannot use the mouse. Try using a different mouse. Its rating must be the cause? A serial mouse with the PS/2 standard. PS/2 adapter will need to reboot the...
... must be set to PS/2 mode and the correct serial mouse to test this. A combination mouse will work , since the mouse signals do not comply with the PS/2 standard. You will not work , but I cannot use the mouse. Try using a different mouse. Its rating must be the cause? A serial mouse with the PS/2 standard. PS/2 adapter will need to reboot the...
User Manual
Page 16
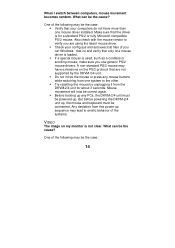
...mouse. Try resetting the mouse by the DKVM-2/4 unit. A non-standard PS/2 mouse may be the case: Verify that only one mouse driver is ) and verify that your config.sys and autoexec.bat files (if you use generic PS/2 mouse drivers. Before booting up any mouse buttons while switching from this power-up , the...driver is not clear. Do not move the mouse or press any PCs, the DKVM-2/4 unit must be powered-up. Any deviation from one mouse driver installed. One of the following may lead to the other. Mouse movement will now be the cause? What can be the case: 14 Check...
...mouse. Try resetting the mouse by the DKVM-2/4 unit. A non-standard PS/2 mouse may be the case: Verify that only one mouse driver is ) and verify that your config.sys and autoexec.bat files (if you use generic PS/2 mouse drivers. Before booting up any mouse buttons while switching from this power-up , the...driver is not clear. Do not move the mouse or press any PCs, the DKVM-2/4 unit must be powered-up. Any deviation from one mouse driver installed. One of the following may lead to the other. Mouse movement will now be the cause? What can be the case: 14 Check...

User Manual
Page 18
Specifications Physical Properties: DKVM-2 Width: 119mm Height: 46mm Depth: 105mm Weight: 478g DKVM-4 Width: 185mm Height: 46mm Depth: 105mm Weight: 684g Operation and Storage parameters: Operating Temperature: Storage Temperature: Humidity: 0~40 Degrees C (32 to 104 Degrees F) -20~60 Degrees C (-4~140 Degrees F) 0~80% RH non condensing PC port connections Keyboard: Mouse: Monitor: Mini DIN 6 pin Female Mini DIN 6 pin Female HDDB 15 pin Female Console connections Keyboard: Mini DIN 6 pin Female Mouse: Mini DIN 6 pin Female Monitor: HDDB 15 pin Female 16
Specifications Physical Properties: DKVM-2 Width: 119mm Height: 46mm Depth: 105mm Weight: 478g DKVM-4 Width: 185mm Height: 46mm Depth: 105mm Weight: 684g Operation and Storage parameters: Operating Temperature: Storage Temperature: Humidity: 0~40 Degrees C (32 to 104 Degrees F) -20~60 Degrees C (-4~140 Degrees F) 0~80% RH non condensing PC port connections Keyboard: Mouse: Monitor: Mini DIN 6 pin Female Mini DIN 6 pin Female HDDB 15 pin Female Console connections Keyboard: Mini DIN 6 pin Female Mouse: Mini DIN 6 pin Female Monitor: HDDB 15 pin Female 16
User Manual
Page 20
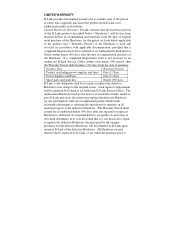
... (excluding power supplies and fans) One (1) Year Power Supplies and Fans One (1) Year Spare parts and spare kits Ninety (90) days D-Link's sole obligation shall be refunded by D-Link upon return to D-Link of correction, or if D-Link determines in accordance with any reconditioned product that is replaced by an authorized D-Link Service Office within ninety (90) days after any part thereof) with applicable documentation; If...
... (excluding power supplies and fans) One (1) Year Power Supplies and Fans One (1) Year Spare parts and spare kits Ninety (90) days D-Link's sole obligation shall be refunded by D-Link upon return to D-Link of correction, or if D-Link determines in accordance with any reconditioned product that is replaced by an authorized D-Link Service Office within ninety (90) days after any part thereof) with applicable documentation; If...
User Manual
Page 21
... (90) days after any Software for which D-Link delivers the Software will be submitted in the applicable documentation, from the date of original delivery of the Software for a period of the nearest Authorized D-Link Service Office is given automatically terminates. Submitting A Claim. The license granted respecting any replacement Software is first returned to D-Link. The addresses/telephone/fax list of ninety (90) days...
... (90) days after any Software for which D-Link delivers the Software will be submitted in the applicable documentation, from the date of original delivery of the Software for a period of the nearest Authorized D-Link Service Office is given automatically terminates. Submitting A Claim. The license granted respecting any replacement Software is first returned to D-Link. The addresses/telephone/fax list of ninety (90) days...
User Manual
Page 22
..., or for the product, or if the model or serial number has been altered, tampered with all shipping costs prepaid. Operational adjustments covered in the documentation for which an RMA number is not contemplated in the operating manual for repair, and shipping costs; and Any hardware, software, firmware or other products or services provided by anyone other suitable shipping package to...
..., or for the product, or if the model or serial number has been altered, tampered with all shipping costs prepaid. Operational adjustments covered in the documentation for which an RMA number is not contemplated in the operating manual for repair, and shipping costs; and Any hardware, software, firmware or other products or services provided by anyone other suitable shipping package to...

User Manual
Page 24
..., or adaptation without prior notice. limited warranty provides specific legal rights and the product owner may also have other trademarks belong to part 15 of the FCC Rules. FCC Warning This equipment has been tested and found to comply with the instructions, may be determined by turning the equipment off and on, the user is encouraged...
..., or adaptation without prior notice. limited warranty provides specific legal rights and the product owner may also have other trademarks belong to part 15 of the FCC Rules. FCC Warning This equipment has been tested and found to comply with the instructions, may be determined by turning the equipment off and on, the user is encouraged...
User Manual
Page 26
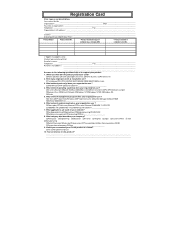
.../Year Product Model Product Serial No. * Product installed in type of computer (e.g., Compaq 486) * Product installed in computer serial No. (* Applies to adapters only) Product was purchased from: Reseller's name Telephone Fax Reseller's full address Answers to the following questions help us to a friend? XNS/IPX TCP/IP DECnet Others 4. Fiber-optics Thick coax Ethernet Thin coax Ethernet 10BASE-T UTP/STP 100BASE...
.../Year Product Model Product Serial No. * Product installed in type of computer (e.g., Compaq 486) * Product installed in computer serial No. (* Applies to adapters only) Product was purchased from: Reseller's name Telephone Fax Reseller's full address Answers to the following questions help us to a friend? XNS/IPX TCP/IP DECnet Others 4. Fiber-optics Thick coax Ethernet Thin coax Ethernet 10BASE-T UTP/STP 100BASE...


