Product Manual
Page 4
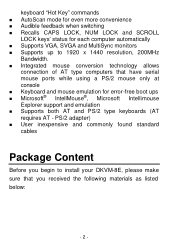
... conversion technology allows connection of AT type computers that have serial mouse ports while using a PS/2 mouse only at console n Keyboard and mouse emulation for each computer automatically n Supports VGA, SVGA and MultiSync monitors n Supports up to install your DKVM-8E, please make sure that you begin to 1920 x 1440 resolution, 200MHz Bandwidth.
... conversion technology allows connection of AT type computers that have serial mouse ports while using a PS/2 mouse only at console n Keyboard and mouse emulation for each computer automatically n Supports VGA, SVGA and MultiSync monitors n Supports up to install your DKVM-8E, please make sure that you begin to 1920 x 1440 resolution, 200MHz Bandwidth.

Product Manual
Page 6
Front Panel Layout Current Active Bank Display Current Active Port Display Bank Select Port Select Power Switch - 4 - First the layout of front and rear panel will explain how to connect the console and the computers to the DKVM-4 switch unit. Hardware Installation This section will be shown.
Front Panel Layout Current Active Bank Display Current Active Port Display Bank Select Port Select Power Switch - 4 - First the layout of front and rear panel will explain how to connect the console and the computers to the DKVM-4 switch unit. Hardware Installation This section will be shown.
Product Manual
Page 7
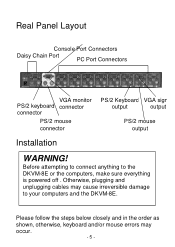
Before attempting to connect anything to your computers and the DKVM-8E. Please follow the steps below closely and in the order as shown, otherwise, keyboard and/or mouse errors may cause irreversible damage to the DKVM-8E or the computers, make sure everything is powered off . Otherwise, plugging and unplugging cables may occur. - 5 - Real Panel Layout Console Port Connectors Daisy Chain Port PC Port Connectors VGA monitor PS/2 keyboard connector connector PS/2 mouse connector PS/2 Keyboard VGA signal output output PS/2 mouse output Installation WARNING!
Before attempting to connect anything to your computers and the DKVM-8E. Please follow the steps below closely and in the order as shown, otherwise, keyboard and/or mouse errors may cause irreversible damage to the DKVM-8E or the computers, make sure everything is powered off . Otherwise, plugging and unplugging cables may occur. - 5 - Real Panel Layout Console Port Connectors Daisy Chain Port PC Port Connectors VGA monitor PS/2 keyboard connector connector PS/2 mouse connector PS/2 Keyboard VGA signal output output PS/2 mouse output Installation WARNING!
Product Manual
Page 8
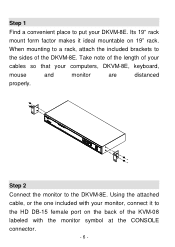
When mounting to a rack, attach the included brackets to the DKVM-8E. Step 2 Connect the monitor to the sides of the DKVM-8E. Its 19" rack mount form factor makes it ideal mountable on the back of your cables so that your DKVM-8E. Using the attached cable, or the one included with the monitor symbol at the CONSOLE connector. - 6 - Take note of the length of the KVM-08 labeled with your monitor, connect it to put your computers, DKVM-8E, keyboard, mouse and monitor are distanced properly. Step 1 Find a convenient place to the HD DB-15 female port on 19" rack.
When mounting to a rack, attach the included brackets to the DKVM-8E. Step 2 Connect the monitor to the sides of the DKVM-8E. Its 19" rack mount form factor makes it ideal mountable on the back of your cables so that your DKVM-8E. Using the attached cable, or the one included with the monitor symbol at the CONSOLE connector. - 6 - Take note of the length of the KVM-08 labeled with your monitor, connect it to put your computers, DKVM-8E, keyboard, mouse and monitor are distanced properly. Step 1 Find a convenient place to the HD DB-15 female port on 19" rack.
Product Manual
Page 17
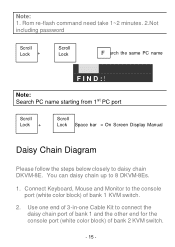
... and Monitor to connect the daisy chain port of bank 1 and the other end for the console port (white color block) of bank 1 KVM switch. 2. Use one end of 3-in-one Cable Kit to the console port (white color block) of bank 2 KVM switch. - 15 - Rom re-flash command need take 1~2 minutes... starting from 1st PC port Scroll Lock + Scroll Lock + Space bar = On Screen Display Manual Daisy Chain Diagram Please follow the steps below closely to 8 DKVM-8Es. 1. You can daisy chain up to daisy chain...
... and Monitor to connect the daisy chain port of bank 1 and the other end for the console port (white color block) of bank 1 KVM switch. 2. Use one end of 3-in-one Cable Kit to the console port (white color block) of bank 2 KVM switch. - 15 - Rom re-flash command need take 1~2 minutes... starting from 1st PC port Scroll Lock + Scroll Lock + Space bar = On Screen Display Manual Daisy Chain Diagram Please follow the steps below closely to 8 DKVM-8Es. 1. You can daisy chain up to daisy chain...

Product Manual
Page 19
NOTE: Some O.S. (Operation Systems) like SCO Unix are unable to this kind of the DKVM-8E without having to power it off as long as it is active and selected, you must switch to a different port before you change the configuration, ... O.S. same or different port of O.S., it will cause unpredictable behavior or shut down the PC. You may unplug the mouse or the keyboard from the console port and plug it back in at any time. and software driver supports the "Hot Plug" function. - 17 - When the pass through port is not...
NOTE: Some O.S. (Operation Systems) like SCO Unix are unable to this kind of the DKVM-8E without having to power it off as long as it is active and selected, you must switch to a different port before you change the configuration, ... O.S. same or different port of O.S., it will cause unpredictable behavior or shut down the PC. You may unplug the mouse or the keyboard from the console port and plug it back in at any time. and software driver supports the "Hot Plug" function. - 17 - When the pass through port is not...

Product Manual
Page 20
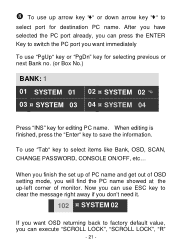
... 03 0 ¤ SYSTEM 02 0 w E ¤ SYSTEM 04 0 ¤ SYSTEM 05 0 SYSTEM 06 0 SYSTEM 07 0 ¤ SYSTEM 08 xOSD: 10 SEC. zCHANGE PASSWORD ySCAN:10 SEC.{CONSOLE ON/OFF |ESC: QUIT ENTER: TAB: NEXT INSERT: EDIT Ç/È: SELECT PORT PgDn / PgUp: BANK SELECT u The 1ST line bar is your PC name...
... 03 0 ¤ SYSTEM 02 0 w E ¤ SYSTEM 04 0 ¤ SYSTEM 05 0 SYSTEM 06 0 SYSTEM 07 0 ¤ SYSTEM 08 xOSD: 10 SEC. zCHANGE PASSWORD ySCAN:10 SEC.{CONSOLE ON/OFF |ESC: QUIT ENTER: TAB: NEXT INSERT: EDIT Ç/È: SELECT PORT PgDn / PgUp: BANK SELECT u The 1ST line bar is your PC name...
Product Manual
Page 22
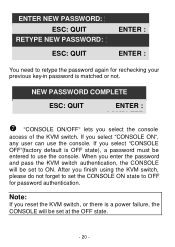
...or not. If you reset the KVM switch, or there is a power failure, the CONSOLE will be entered to use the console. After you enter the password and pass the KVM switch authentication, the CONSOLE will be set the CONSOLE ON state to OFF for rechecking your previous key-in password is OFF state... set to ON. When you finish using the KVM switch, please do not forget to set at the OFF state. - 20 - If you select the console access of the KVM switch. ENTER NEW PASSWORD: ¦ ESC: QUIT ENTER : RETYPE NEW PASSWORD: ¦ COMPLETE ESC: QUIT ENTER : COMPLETE You need to retype...
...or not. If you reset the KVM switch, or there is a power failure, the CONSOLE will be entered to use the console. After you enter the password and pass the KVM switch authentication, the CONSOLE will be set the CONSOLE ON state to OFF for rechecking your previous key-in password is OFF state... set to ON. When you finish using the KVM switch, please do not forget to set at the OFF state. - 20 - If you select the console access of the KVM switch. ENTER NEW PASSWORD: ¦ ESC: QUIT ENTER : RETYPE NEW PASSWORD: ¦ COMPLETE ESC: QUIT ENTER : COMPLETE You need to retype...
Product Manual
Page 23
... of PC name and get out of monitor. When editing is finished, press the "Enter" key to select items like Bank, OSD, SCAN, CHANGE PASSWORD, CONSOLE ON/OFF, etc... When you finish the set up -left corner of OSD setting mode, you can use "Tab" key to save the information.
... of PC name and get out of monitor. When editing is finished, press the "Enter" key to select items like Bank, OSD, SCAN, CHANGE PASSWORD, CONSOLE ON/OFF, etc... When you finish the set up -left corner of OSD setting mode, you can use "Tab" key to save the information.

Product Manual
Page 28
... either your computer's PS/2 mouse port has a problem. A serial-only mouse with the correct adapter. Make sure the power switch is on this . A : Switch the console port to the problem PC port and power on . A: ?Check the cables and make sure that the power adapter is plugged in the correct ports...
... either your computer's PS/2 mouse port has a problem. A serial-only mouse with the correct adapter. Make sure the power switch is on this . A : Switch the console port to the problem PC port and power on . A: ?Check the cables and make sure that the power adapter is plugged in the correct ports...

Product Manual
Page 29
... serial mouse signals. Problems with computers using serial mouse output Note: The DKVM-8E has integrated mouse conversion technology. This technology converts the PS/2 mouse signals at the console to Microsoft® Intellimouse® or Microsoft® Intellimouse® Explorer®. ?DKVM-8E does not support special wheel function of PC does not work on...
... serial mouse signals. Problems with computers using serial mouse output Note: The DKVM-8E has integrated mouse conversion technology. This technology converts the PS/2 mouse signals at the console to Microsoft® Intellimouse® or Microsoft® Intellimouse® Explorer®. ?DKVM-8E does not support special wheel function of PC does not work on...

