
Product Manual
Page 3
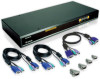
OSD (On-Screen Display) menu provides human friendly interface for naming each channel ... No DIP-switch setting needed and auto detect daisy chain bank. To expand control ability, the Daisy-Chain allows eight DKVM-8E stack up transparently and simultaneously. Product Feature n Allows users to name and select computers n Supports eight characters password protection...required, each PCs and selecting one of 8 PCs from one keyboard, mouse and monitor. Introduction The DKVM-8E gives you the ultimate in control of them. n Daisy-Chain ports allows control over as many as 64 computers through...
OSD (On-Screen Display) menu provides human friendly interface for naming each channel ... No DIP-switch setting needed and auto detect daisy chain bank. To expand control ability, the Daisy-Chain allows eight DKVM-8E stack up transparently and simultaneously. Product Feature n Allows users to name and select computers n Supports eight characters password protection...required, each PCs and selecting one of 8 PCs from one keyboard, mouse and monitor. Introduction The DKVM-8E gives you the ultimate in control of them. n Daisy-Chain ports allows control over as many as 64 computers through...

Product Manual
Page 13
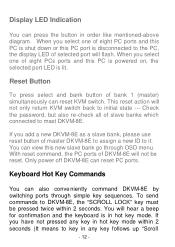
...Link) to have set the password and unfortunately forget the password, you will ask for the password, the default password value is eight zero -" 00000000 ". The Push Buttons Pressing the button cyclically through all the ports. 1 2 3 4 5 6 7 8 Port Status Port Select - 11 - Usage The power on state of DKVM-8E... When you are not familiar with the operation of OSD manual, please don't change the password - Please key in eight zero and enter the same value at retype field. Otherwise...
...Link) to have set the password and unfortunately forget the password, you will ask for the password, the default password value is eight zero -" 00000000 ". The Push Buttons Pressing the button cyclically through all the ports. 1 2 3 4 5 6 7 8 Port Status Port Select - 11 - Usage The power on state of DKVM-8E... When you are not familiar with the operation of OSD manual, please don't change the password - Please key in eight zero and enter the same value at retype field. Otherwise...
Product Manual
Page 14
... is powered on, the selected port LED is lit. If you select one of selected port will not only return KVM switch back to mast DKVM-8E. Display LED Indication You can reset PC ports. Keyboard Hot Key Commands You can reset KVM switch. Reset Button To press select and bank button... of slave banks which connected to initial state --- Check the password, but also re-check all of bank 1 (master) simultaneously can also conve niently command DKVM-8E by switching ports through OSD menu. When you have not pressed any key follows up "Scroll - 12 -
... is powered on, the selected port LED is lit. If you select one of selected port will not only return KVM switch back to mast DKVM-8E. Display LED Indication You can reset PC ports. Keyboard Hot Key Commands You can reset KVM switch. Reset Button To press select and bank button... of slave banks which connected to initial state --- Check the password, but also re-check all of bank 1 (master) simultaneously can also conve niently command DKVM-8E by switching ports through OSD menu. When you have not pressed any key follows up "Scroll - 12 -
Product Manual
Page 16
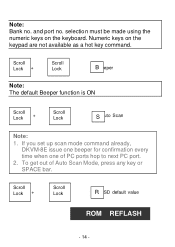
and port no . Scroll Lock + Scroll Lock + =BBeeper Note: The default Beeper function is ON Scroll Lock + Scroll Lock + =S Auto Scan Note: 1. If you set up scan mode command already, DKVM-8E issue one beeper for confirmation every time when one of Auto Scan Mode, press any key or SPACE bar. Scroll Lock + Scroll Lock + R= OSD default value ROM REFLASH - 14 - To get out of PC ports hop to next PC port. 2. Note: Bank no . selection must be made using the numeric keys on the keypad are not available as a hot key command. Numeric keys on the keyboard.
and port no . Scroll Lock + Scroll Lock + =BBeeper Note: The default Beeper function is ON Scroll Lock + Scroll Lock + =S Auto Scan Note: 1. If you set up scan mode command already, DKVM-8E issue one beeper for confirmation every time when one of Auto Scan Mode, press any key or SPACE bar. Scroll Lock + Scroll Lock + R= OSD default value ROM REFLASH - 14 - To get out of PC ports hop to next PC port. 2. Note: Bank no . selection must be made using the numeric keys on the keypad are not available as a hot key command. Numeric keys on the keyboard.

Product Manual
Page 20
... PORT PgDn / PgUp: BANK SELECT u The 1ST line bar is your PC name in maximum 8 characters. On Screen Display Operation When you pop up the OSD manual window go through the hot key, you will find the system number list from 01 to 08. The factory - 18 - You will see the...
... PORT PgDn / PgUp: BANK SELECT u The 1ST line bar is your PC name in maximum 8 characters. On Screen Display Operation When you pop up the OSD manual window go through the hot key, you will find the system number list from 01 to 08. The factory - 18 - You will see the...

Product Manual
Page 21
... default SCAN time is 10 sec and the maximum scan time is 10 sec. w The sun symbol "¤ " beside the PC name shows that the OSD windows display or PC system name exists 10 sec. ENTER PASSWORD : ¦ ESC: QUIT ENTER : There is an enter password window showed out when you... key in the password and press the Enter key, there is another window for confirming your monitor. x The "OSD: 10 SEC" means that the respective PC system is powered on your typed password. - 19 - The factory default value is 99 sec. You can modify...
... default SCAN time is 10 sec and the maximum scan time is 10 sec. w The sun symbol "¤ " beside the PC name shows that the OSD windows display or PC system name exists 10 sec. ENTER PASSWORD : ¦ ESC: QUIT ENTER : There is an enter password window showed out when you... key in the password and press the Enter key, there is another window for confirming your monitor. x The "OSD: 10 SEC" means that the respective PC system is powered on your typed password. - 19 - The factory default value is 99 sec. You can modify...
Product Manual
Page 23
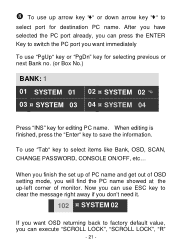
... 03 ¤ SYSTEM 03 02 ¤ SYSTEM 02 E 04 ¤ SYSTEM 04 Press "INS" key for destination PC name. | To use up -left corner of OSD setting mode, you will find the PC name showed at the up arrow key "-" or down arrow key "˜" to factory default value, you want...
... 03 ¤ SYSTEM 03 02 ¤ SYSTEM 02 E 04 ¤ SYSTEM 04 Press "INS" key for destination PC name. | To use up -left corner of OSD setting mode, you will find the PC name showed at the up arrow key "-" or down arrow key "˜" to factory default value, you want...

Product Manual
Page 24
ROM REFLASH When the OSD value back to default setting, the Display LEDs on the front panel will stop flashing - 22 - keys in order. The Display LEDs on the front panel will be flashed during the refresh process.
ROM REFLASH When the OSD value back to default setting, the Display LEDs on the front panel will stop flashing - 22 - keys in order. The Display LEDs on the front panel will be flashed during the refresh process.
Product Manual
Page 25
Using hot key to access the OSD menu again and it should have re-detected all slave unit first and then reset master unit to get the lost slave unit. ?Although a power ... to the Installation section for information on a channel where a computer is connected and powered up. A: ?DKVM-8E will not guarantee proper operation or video quality. ?Reset the all the active channels. Trouble Shooting General Problems Q: The OSD menu does not display a "¤ " on how to properly connect the daisy-chain cable. ?Make sure...
Using hot key to access the OSD menu again and it should have re-detected all slave unit first and then reset master unit to get the lost slave unit. ?Although a power ... to the Installation section for information on a channel where a computer is connected and powered up. A: ?DKVM-8E will not guarantee proper operation or video quality. ?Reset the all the active channels. Trouble Shooting General Problems Q: The OSD menu does not display a "¤ " on how to properly connect the daisy-chain cable. ?Make sure...