Manual
Page 3
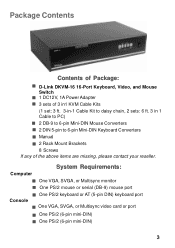
Manual ! 2 Rack Mount Brackets 8 Screws If any of 3 in1 KVM Cable Kits (1 set: 3 ft. 3-in-1 Cable Kit to daisy chain, 2 sets: 6 ft. 3 in 1 Cable to PC) ! 2 DB-9 to 6-pin Mini-DIN Mouse Converters ! 2 DIN 5-pin ... PS/2 (6-pin mini-DIN) 3 System Requirements: Computer ! One VGA, SVGA, or Multisync monitor ! One VGA, SVGA, or Multisync video card or port ! D-Link DKVM-16 16-Port Keyboard, Video, and Mouse Switch ! 1 DC12V, 1A Power Adapter ! 3 sets of the above items are missing, please contact your reseller. One PS/2 keyboard or AT (5-pin DIN) keyboard...
Manual ! 2 Rack Mount Brackets 8 Screws If any of 3 in1 KVM Cable Kits (1 set: 3 ft. 3-in-1 Cable Kit to daisy chain, 2 sets: 6 ft. 3 in 1 Cable to PC) ! 2 DB-9 to 6-pin Mini-DIN Mouse Converters ! 2 DIN 5-pin ... PS/2 (6-pin mini-DIN) 3 System Requirements: Computer ! One VGA, SVGA, or Multisync monitor ! One VGA, SVGA, or Multisync video card or port ! D-Link DKVM-16 16-Port Keyboard, Video, and Mouse Switch ! 1 DC12V, 1A Power Adapter ! 3 sets of the above items are missing, please contact your reseller. One PS/2 keyboard or AT (5-pin DIN) keyboard...
Manual
Page 4
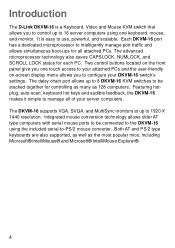
Introduction The D-Link DKVM-16 is easy to use, powerful, and scalable. Two control buttons located on -screen display menu allows you to control up to 16 server computers using the included serial-to-PS/2 mouse converter. The daisy chain port allows up to ...server computers. It is a Keyboard, Video and Mouse KVM switch that allows you to be stacked together for each PC. Integrated mouse conversion technology allows older AT type computers with serial mouse ports to configure your DKVM-16 switch's settings. The advanced microprocessor technology also saves CAPSLOCK, NUMLOCK...
Introduction The D-Link DKVM-16 is easy to use, powerful, and scalable. Two control buttons located on -screen display menu allows you to control up to 16 server computers using the included serial-to-PS/2 mouse converter. The daisy chain port allows up to ...server computers. It is a Keyboard, Video and Mouse KVM switch that allows you to be stacked together for each PC. Integrated mouse conversion technology allows older AT type computers with serial mouse ports to configure your DKVM-16 switch's settings. The advanced microprocessor technology also saves CAPSLOCK, NUMLOCK...
Manual
Page 5
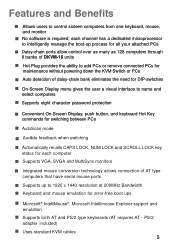
... mode ! Integrated mouse conversion technology allows connection of DKVM-16 units ! PS/2 adapter included) ! No software is required; Auto detection of daisy-chain bank eliminates the need for switching between PCs ! Supports VGA, SVGA and MultiSync monitors ! Supports up process for maintenance without powering down the KVM Switch or PCs ! Supports eight character password protection...
... mode ! Integrated mouse conversion technology allows connection of DKVM-16 units ! PS/2 adapter included) ! No software is required; Auto detection of daisy-chain bank eliminates the need for switching between PCs ! Supports VGA, SVGA and MultiSync monitors ! Supports up process for maintenance without powering down the KVM Switch or PCs ! Supports eight character password protection...

Manual
Page 11
... computers simultaneously. Note: Please do not press the "push" button of this manual. do not switch the PC ports (i.e. Hardware Installation (Continued) Step 11 Now power up process, each PC will be shown on the KVM at this is OK, use the "Select" button to choose the next computer and verify the... communicate with the keyboard and mouse. Normally, during the boot-up all cables for proper connections before going to the trouble-shooting section of the KVM switch or run Hot Key) while the computers are in the same manner.
... computers simultaneously. Note: Please do not press the "push" button of this manual. do not switch the PC ports (i.e. Hardware Installation (Continued) Step 11 Now power up process, each PC will be shown on the KVM at this is OK, use the "Select" button to choose the next computer and verify the... communicate with the keyboard and mouse. Normally, during the boot-up all cables for proper connections before going to the trouble-shooting section of the KVM switch or run Hot Key) while the computers are in the same manner.
Manual
Page 12
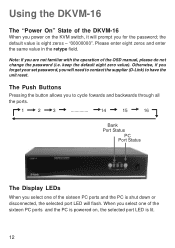
... Using the DKVM-16 The "Power On" State of the DKVM-16 When you power on , the selected port LED is eight zeros - The Push Buttons Pressing the button allows you select one of the sixteen PC ports and the PC is powered on the KVM switch, it will need to contact the supplier (D-Link) to cycle... fowards and backwards through all the ports. 1 2 3 14 15 16 Bank Port Status PC Port Status The Display LEDs When you to have the unit ...
... Using the DKVM-16 The "Power On" State of the DKVM-16 When you power on , the selected port LED is eight zeros - The Push Buttons Pressing the button allows you select one of the sixteen PC ports and the PC is powered on the KVM switch, it will need to contact the supplier (D-Link) to cycle... fowards and backwards through all the ports. 1 2 3 14 15 16 Bank Port Status PC Port Status The Display LEDs When you to have the unit ...

Manual
Page 13
... the keyboard is now in the OSD menu. This reset action returns the KVM switch back to the initial state and will also recheck all of the master DKVM-16 to assign a new ID to it. If you add a new DKVM-16 as a slave bank, please use the reset button of the slave banks ...You will revert back to the master DKVM-16. To send commands to select the destination port. 13 The new slave bank will now appear in hot key mode. With the reset command, the PC ports of the master switch simultaneously will reset the KVM switch. Using the DKVM-16 (Continued) The Reset Button Pressing the ...
... the keyboard is now in the OSD menu. This reset action returns the KVM switch back to the initial state and will also recheck all of the master DKVM-16 to assign a new ID to it. If you add a new DKVM-16 as a slave bank, please use the reset button of the slave banks ...You will revert back to the master DKVM-16. To send commands to select the destination port. 13 The new slave bank will now appear in hot key mode. With the reset command, the PC ports of the master switch simultaneously will reset the KVM switch. Using the DKVM-16 (Continued) The Reset Button Pressing the ...

Manual
Page 16
... 2) Bank 3 Slave (Bank 3) Bank 8 Slave (Bank 8) 16 Daisy-Chaining the DKVM-16 Please closely follow the steps below to daisy-chain your keyboard, mouse, and monitor to the console port (white color block) of the 2nd KVM switch. Step 1 Connect your DKVM-16 units. Step 2 Please repeat step 2 to daisy-chain up to... as many as 8 DKVM-16s. Step 2 Use the 3-in -one Cable Kit to connect the daisy-chain port of...
... 2) Bank 3 Slave (Bank 3) Bank 8 Slave (Bank 8) 16 Daisy-Chaining the DKVM-16 Please closely follow the steps below to daisy-chain your keyboard, mouse, and monitor to the console port (white color block) of the 2nd KVM switch. Step 1 Connect your DKVM-16 units. Step 2 Please repeat step 2 to daisy-chain up to... as many as 8 DKVM-16s. Step 2 Use the 3-in -one Cable Kit to connect the daisy-chain port of...
Manual
Page 18
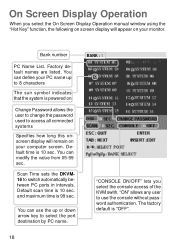
... the up to 8 characters The sun symbol indicates that the system is powered on Change Password allows the user to change the password used to switch automatically between PC ports in intervals. The factory default is 99 sec. On Screen Display Operation When you select the console access of the... KVM swith. You can modify the value from 05-99 sec. BANK : 1 "CONSOLE ON/OFF" lets you select the On Screen Display Operation manual window using ...
... the up to 8 characters The sun symbol indicates that the system is powered on Change Password allows the user to change the password used to switch automatically between PC ports in intervals. The factory default is 99 sec. On Screen Display Operation When you select the console access of the... KVM swith. You can modify the value from 05-99 sec. BANK : 1 "CONSOLE ON/OFF" lets you select the On Screen Display Operation manual window using ...
Manual
Page 19
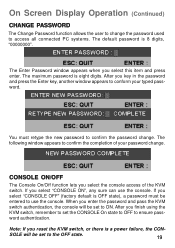
... window appears to use the console. The Enter Password window appears when you reset the KVM switch, or there is OFF state), a password must retype the new password to confirm the completion of the KVM switch. After you select "CONSOLE OFF" (factory default is a power failure, the CON...ON", any sure can use the console. After you enter the password and pass the KVM switch authentication, the console will be set to ensure password authentication. When you finish using the KVM switch, remember to set to access all connected PC systems. The default password is eight digits...
... window appears to use the console. The Enter Password window appears when you reset the KVM switch, or there is OFF state), a password must retype the new password to confirm the completion of the KVM switch. After you select "CONSOLE OFF" (factory default is a power failure, the CON...ON", any sure can use the console. After you enter the password and pass the KVM switch authentication, the console will be set to ensure password authentication. When you finish using the KVM switch, remember to set to access all connected PC systems. The default password is eight digits...


