Manual
Page 3
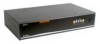
... ! One PS/2 mouse or serial (DB-9) mouse port ! D-Link DKVM-16 16-Port Keyboard, Video, and Mouse Switch ! 1 DC12V, 1A Power Adapter ! 3 sets of Package: ! One PS/2 (6-pin mini-DIN) ! Package Contents Contents of 3 in1 KVM Cable Kits (1 set: 3 ft. 3-in-1 Cable Kit to daisy chain, 2 sets: 6 ft. 3 in 1 Cable to PC) ! 2 DB-9 to 6-pin Mini-DIN Mouse Converters...
... ! One PS/2 mouse or serial (DB-9) mouse port ! D-Link DKVM-16 16-Port Keyboard, Video, and Mouse Switch ! 1 DC12V, 1A Power Adapter ! 3 sets of Package: ! One PS/2 (6-pin mini-DIN) ! Package Contents Contents of 3 in1 KVM Cable Kits (1 set: 3 ft. 3-in-1 Cable Kit to daisy chain, 2 sets: 6 ft. 3 in 1 Cable to PC) ! 2 DB-9 to 6-pin Mini-DIN Mouse Converters...
Manual
Page 5
...ports ! Integrated mouse conversion technology allows connection of DKVM-16 units ! Hot Plug provides the ability to add... SCROLL LOCK key status for maintenance without powering down the KVM Switch or PCs ! Supports up process for error-free boot ups...sixteen computers from one keyboard, mouse, and monitor ! Audible feedback when switching ! Microsoft® IntelliMouse®, Microsoft Intellimouse Explorer support and emulation ... commands for DIP-switches ! No software is required; Auto detection of daisy-chain bank eliminates the need for switching between PCs ! Supports...
...ports ! Integrated mouse conversion technology allows connection of DKVM-16 units ! Hot Plug provides the ability to add... SCROLL LOCK key status for maintenance without powering down the KVM Switch or PCs ! Supports up process for error-free boot ups...sixteen computers from one keyboard, mouse, and monitor ! Audible feedback when switching ! Microsoft® IntelliMouse®, Microsoft Intellimouse Explorer support and emulation ... commands for DIP-switches ! No software is required; Auto detection of daisy-chain bank eliminates the need for switching between PCs ! Supports...

Manual
Page 7
Its 19" rack mount form factor makes it mountable on the back of your cables so that all of the DKVM-16. When mounting to a rack, attach the included brackets to the side panels of your computers are distanced properly. Step 2 Connect the monitor ... WARNING Make sure that your computers, DKVM-16, keyboard, mouse, and monitor are powered off before attempting to connect the cabling to avoid damage to your DKVM-16 Step 1 Find a convenient place to place your DKVM-16. Connect the attached cable, or the one included with your monitor, to the DKVM-16. Take note of the length of ...
Its 19" rack mount form factor makes it mountable on the back of your cables so that all of the DKVM-16. When mounting to a rack, attach the included brackets to the side panels of your computers are distanced properly. Step 2 Connect the monitor ... WARNING Make sure that your computers, DKVM-16, keyboard, mouse, and monitor are powered off before attempting to connect the cabling to avoid damage to your DKVM-16 Step 1 Find a convenient place to place your DKVM-16. Connect the attached cable, or the one included with your monitor, to the DKVM-16. Take note of the length of ...

Manual
Page 9
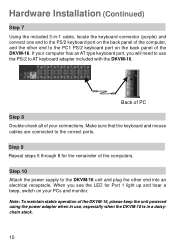
...back of the PC. Back of PC Step 6 Using the included 3-in -1 cable to the computer. Back of PC 9 Be sure to add a serial to PS/2 converter included with the DKVM-16 before connecting the 3-in -1 cable, locate the mouse connector (green) and connect one end of the included VGA... cable (15-pin HDDB Male / Male) to the female connectors on the back panel of the DKVM-16. Hardware Installation (Continued) Step 5 Connect one ...
...back of the PC. Back of PC Step 6 Using the included 3-in -1 cable to the computer. Back of PC 9 Be sure to add a serial to PS/2 converter included with the DKVM-16 before connecting the 3-in -1 cable, locate the mouse connector (green) and connect one end of the included VGA... cable (15-pin HDDB Male / Male) to the female connectors on the back panel of the DKVM-16. Hardware Installation (Continued) Step 5 Connect one ...
Manual
Page 10
... the DKVM-16 is in -1 cable, locate the keyboard connector (purple) and connect one end to AT keyboard adapter included with the DKVM-16. Hardware Installation (Continued) Step 7 Using the included 3-in a daisychain stack. 10 Back of PC Step 8 Double-check all of the DKVM-16. Step 9 Repeat steps 5 through 8 for Port 1 light up and hear a beep, switch...
... the DKVM-16 is in -1 cable, locate the keyboard connector (purple) and connect one end to AT keyboard adapter included with the DKVM-16. Hardware Installation (Continued) Step 7 Using the included 3-in a daisychain stack. 10 Back of PC Step 8 Double-check all of the DKVM-16. Step 9 Repeat steps 5 through 8 for Port 1 light up and hear a beep, switch...

Manual
Page 11
... 11 Now power up process, each PC will communicate with the keyboard and mouse. If you switch PC ports on the monitor. do not switch the PC ports (i.e. If this time, it will be shown on the KVM at this is OK, use the "Select" button to see if the mouse, keyboard, and... up process. Note: Please do not press the "push" button of this manual. Normally, during the boot-up all cables for proper connections before going to the trouble-shooting section of the KVM switch or run Hot Key) while the computers are in the same manner. If you find errors, recheck all computers...
... 11 Now power up process, each PC will communicate with the keyboard and mouse. If you switch PC ports on the monitor. do not switch the PC ports (i.e. If this time, it will be shown on the KVM at this is OK, use the "Select" button to see if the mouse, keyboard, and... up process. Note: Please do not press the "push" button of this manual. Normally, during the boot-up all cables for proper connections before going to the trouble-shooting section of the KVM switch or run Hot Key) while the computers are in the same manner. If you find errors, recheck all computers...

Manual
Page 16
...2 Please repeat step 2 to daisy-chain up to daisy chain the KVM Switches. Please use the attached 3 feet 3-in -one Cable Kit to 8 DKVM-16s. You can daisy chain up to the console port (white color block) of the 2nd KVM switch. Step 1 Connect your DKVM-16 units. Bank 1 MASTER (Bank 1) Bank 2 Slave (Bank 2) ...Bank 3 Slave (Bank 3) Bank 8 Slave (Bank 8) 16 Step 2 Use the 3-in -one Cable Kit to connect the daisy-chain port of bank 1 to ...
...2 Please repeat step 2 to daisy-chain up to daisy chain the KVM Switches. Please use the attached 3 feet 3-in -one Cable Kit to 8 DKVM-16s. You can daisy chain up to the console port (white color block) of the 2nd KVM switch. Step 1 Connect your DKVM-16 units. Bank 1 MASTER (Bank 1) Bank 2 Slave (Bank 2) ...Bank 3 Slave (Bank 3) Bank 8 Slave (Bank 8) 16 Step 2 Use the 3-in -one Cable Kit to connect the daisy-chain port of bank 1 to ...
Manual
Page 21
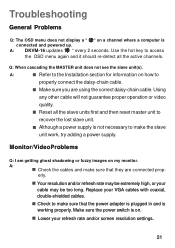
.... Make sure the power switch is connected and powered up. Use the hot key to properly connect the daisy-chain cable. ! Your resolution and/or refresh rate may be extremely high, or your VGA cables with coaxial, double-shielded cables. ! Lower your refresh rate and/or screen resolution settings. 21 A: DKVM-16 updates " " every 2 seconds. Refer...
.... Make sure the power switch is connected and powered up. Use the hot key to properly connect the daisy-chain cable. ! Your resolution and/or refresh rate may be extremely high, or your VGA cables with coaxial, double-shielded cables. ! Lower your refresh rate and/or screen resolution settings. 21 A: DKVM-16 updates " " every 2 seconds. Refer...
Manual
Page 22
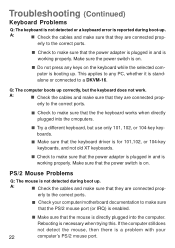
... switch is a problem with your computer/motherboard documentation to make sure that they are connected prop- Check your 22 computer's PS/2 mouse port. Check to make sure that the power adapter is plugged in and is not detected during boot-up . Check the cables ... Try a different keyboard, but the keyboard does not work. If the computer still does not detect the mouse, then there is on. Check to a DKVM-16. Rebooting is standalone or connected to make sure that they are connected prop- A: ! erly to any keys on . ! This applies to the correct...
... switch is a problem with your computer/motherboard documentation to make sure that they are connected prop- Check your 22 computer's PS/2 mouse port. Check to make sure that the power adapter is plugged in and is not detected during boot-up . Check the cables ... Try a different keyboard, but the keyboard does not work. If the computer still does not detect the mouse, then there is on. Check to a DKVM-16. Rebooting is standalone or connected to make sure that they are connected prop- A: ! erly to any keys on . ! This applies to the correct...
Manual
Page 23
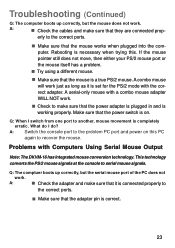
... is set for the PS/2 mode with the correct adapter. A combo mouse will work just as long as it is on this . A: Switch the console port to the problem PC port and power on . Problems with a combo mouse adapter WILL NOT work. ! Check to the correct...! A serial-only mouse with Computers Using Serial Mouse Output Note: The DKVM-16 has integrated mouse conversion technology. Make sure that the mouse is completely erratic. Make sure that the adapter pin is working properly. Check the cables and make sure that the mouse works when plugged into the computer. A:...
... is set for the PS/2 mode with the correct adapter. A combo mouse will work just as long as it is on this . A: Switch the console port to the problem PC port and power on . Problems with a combo mouse adapter WILL NOT work. ! Check to the correct...! A serial-only mouse with Computers Using Serial Mouse Output Note: The DKVM-16 has integrated mouse conversion technology. Make sure that the mouse is completely erratic. Make sure that the adapter pin is working properly. Check the cables and make sure that the mouse works when plugged into the computer. A:...


