Product Manual
Page 2
...Link EasySmart Switch User Manual Table of Contents Table of Contents ...i About This Guide...1 Terms/Usage...1 Copyright and Trademarks ...1 Product Introduction ...2 DGS-1100-16 ...2 Front Panel ...2 Rear Panel...2 DGS-1100-24 ...3 Front Panel ...3 Rear Panel...3 Hardware Installation ...4 Step 1: Unpacking...4 Step 2: Switch Installation...4 Desktop or Shelf Installation...4 Rack Installation... Configuration...12 Add(+), Delete(-) and Discover the device 14 Device List...15 Configuration ...16 Web-based Management...16 Tool Bar > Save Menu ...17 Save Configuration ...17 Tool Bar > Tool Menu...
...Link EasySmart Switch User Manual Table of Contents Table of Contents ...i About This Guide...1 Terms/Usage...1 Copyright and Trademarks ...1 Product Introduction ...2 DGS-1100-16 ...2 Front Panel ...2 Rear Panel...2 DGS-1100-24 ...3 Front Panel ...3 Rear Panel...3 Hardware Installation ...4 Step 1: Unpacking...4 Step 2: Switch Installation...4 Desktop or Shelf Installation...4 Rack Installation... Configuration...12 Add(+), Delete(-) and Discover the device 14 Device List...15 Configuration ...16 Web-based Management...16 Tool Bar > Save Menu ...17 Save Configuration ...17 Tool Bar > Tool Menu...
Product Manual
Page 4
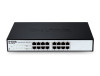
...the illustrations shown in trademarks and trade names other Ethernet switches. D-Link EasySmart Switch User Manual About This Guide This guide provides instructions to install the D-Link Gigabit Ethernet EasySmart Switch DGS-1100-16/24, how to use of Microsoft Corporation. Refer to change ...without the written permission of D-Link Corporation; Reproduction in this document to refer to either...
...the illustrations shown in trademarks and trade names other Ethernet switches. D-Link EasySmart Switch User Manual About This Guide This guide provides instructions to install the D-Link Gigabit Ethernet EasySmart Switch DGS-1100-16/24, how to use of Microsoft Corporation. Refer to change ...without the written permission of D-Link Corporation; Reproduction in this document to refer to either...
Product Manual
Page 7
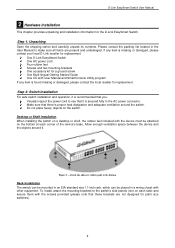
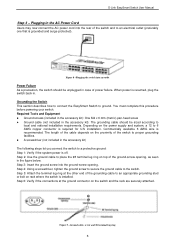
...you: Visually inspect the power cord to make sure all items are not designed for the D-Link EasySmart Switch. Attach the adhesive rubber pads to the bottom Rack Installation The switch can be mounted in an EIA standard size 11-inch rack, which can be ...attached on each corner of the device's base. To install, attach the mounting brackets to the AC power connector. D-Link EasySmart Switch User Manual 2 Hardware Installation This chapter provides unpacking and installation information for palm size switches). 4 Step 1: Unpacking Open the shipping carton and...
...you: Visually inspect the power cord to make sure all items are not designed for the D-Link EasySmart Switch. Attach the adhesive rubber pads to the bottom Rack Installation The switch can be mounted in an EIA standard size 11-inch rack, which can be ...attached on each corner of the device's base. To install, attach the mounting brackets to the AC power connector. D-Link EasySmart Switch User Manual 2 Hardware Installation This chapter provides unpacking and installation information for palm size switches). 4 Step 1: Unpacking Open the shipping carton and...
Product Manual
Page 8
... ambient temperature (Tma) specified by the manufacturer. D-Link EasySmart Switch User Manual Figure 6 - C) Mechanical Loading - Figure 7 - Mount the Switch in a closed or multi-unit rack assembly, the operating ambient temperature of the rack environment may be such that overloading of power strips)." 5 If installed in the rack or chassis Please be given...
... ambient temperature (Tma) specified by the manufacturer. D-Link EasySmart Switch User Manual Figure 6 - C) Mechanical Loading - Figure 7 - Mount the Switch in a closed or multi-unit rack assembly, the operating ambient temperature of the rack environment may be such that overloading of power strips)." 5 If installed in the rack or chassis Please be given...
Product Manual
Page 9
... cable depends on the proximity of power failure. Step 4: Using a screwdriver, tighten the ground screw to secure the ground cable to ground. D-Link EasySmart Switch User Manual Step 3 - Figure 8 -Plugging the switch into the ground-screw opening , as seen in . Grounding the Switch This section... As a precaution, the switch should be unplugged in case of the switch to a protective ground: Step 1: Verify if the system power is installed. Plugging in the accessory kit) The following steps let you connect the switch to proper grounding facilities. A screwdriver (not included in ...
... cable depends on the proximity of power failure. Step 4: Using a screwdriver, tighten the ground screw to secure the ground cable to ground. D-Link EasySmart Switch User Manual Step 3 - Figure 8 -Plugging the switch into the ground-screw opening , as seen in . Grounding the Switch This section... As a precaution, the switch should be unplugged in case of the switch to a protective ground: Step 1: Verify if the system power is installed. Plugging in the accessory kit) The following steps let you connect the switch to proper grounding facilities. A screwdriver (not included in ...

Product Manual
Page 10
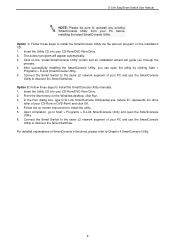
...the following equipment to begin the web configuration of your device: 1. Supported Web Browsers The embedded Web-based Management currently supports the following installation instructions for communication with a RJ-45 Ethernet connection 2. Each switch must be in the same range as the switch. Each switch can...You will need to change the IP address of your PC and it is a more convenient choice. Management Options The D-Link EasySmart Switch can configure the Switch, monitor the network status, and display statistics using the SmartConsole Utility, you want to manage multiple...
...the following equipment to begin the web configuration of your device: 1. Supported Web Browsers The embedded Web-based Management currently supports the following installation instructions for communication with a RJ-45 Ethernet connection 2. Each switch must be in the same range as the switch. Each switch can...You will need to change the IP address of your PC and it is a more convenient choice. Management Options The D-Link EasySmart Switch can configure the Switch, monitor the network status, and display statistics using the SmartConsole Utility, you want to manage multiple...

Product Manual
Page 11
Figure 11 -Enter the IP address 10.90.90.90 in the installation CD is a program for discovering D-Link Smart Switches and EasySmart Switches within the same L2 network segment connected to your web browser. Logon Dialog Box SmartConsole Utility The SmartConsole Utility included ... and the other is manual installation. 8 For example, if the switch has an IP address of 10.90.90.90, the PC should have an IP address in your PC. Figure 12 - Then press . D-Link EasySmart Switch User Manual Figure 10 -Connected Ethernet cable Login Web-based Management In order to login...
Figure 11 -Enter the IP address 10.90.90.90 in the installation CD is a program for discovering D-Link Smart Switches and EasySmart Switches within the same L2 network segment connected to your web browser. Logon Dialog Box SmartConsole Utility The SmartConsole Utility included ... and the other is manual installation. 8 For example, if the switch has an IP address of 10.90.90.90, the PC should have an IP address in your PC. Figure 12 - Then press . D-Link EasySmart Switch User Manual Figure 10 -Connected Ethernet cable Login Web-based Management In order to login...
Product Manual
Page 12
... network segment of your PC and use the SmartConsole Utility to install the utility. 5. The autorun program will guide you can open the SmartConsole Utility. 6. In the Run dialog box, type D:\D-Link SmartConsole Utility\setup.exe (where D:\ represents the drive letter of... 2. Click on the Windows desktop, click Run. 3. Follow the on the installation CD. 1. Option 1: Follow these steps to Start > Programs > D-Link SmartConsole Utility and open the utility by clicking Start > Programs > D-Link SmartConsole Utility. 5. Connect the Smart Switch to the same L2 network segment of...
... network segment of your PC and use the SmartConsole Utility to install the utility. 5. The autorun program will guide you can open the SmartConsole Utility. 6. In the Run dialog box, type D:\D-Link SmartConsole Utility\setup.exe (where D:\ represents the drive letter of... 2. Click on the Windows desktop, click Run. 3. Follow the on the installation CD. 1. Option 1: Follow these steps to Start > Programs > D-Link SmartConsole Utility and open the utility by clicking Start > Programs > D-Link SmartConsole Utility. 5. Connect the Smart Switch to the same L2 network segment of...

Product Manual
Page 40
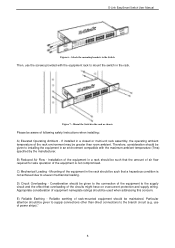
... be such that the amount of air flow required for safe operation of the equipment to installing the equipment in an environment compatible with the installation instructions: A) Elevated Operating Ambient - Consideration should be greater than direct connections to supply connections...in a closed or multi-unit rack assembly, the operating ambient temperature of power strips). 37 Rack mount Instructions Safety Instructions - D-Link EasySmart Switch User Manual Appendix C - D) Circuit Overloading - The following or similar rack-mount instructions are included with the maximum...
... be such that the amount of air flow required for safe operation of the equipment to installing the equipment in an environment compatible with the installation instructions: A) Elevated Operating Ambient - Consideration should be greater than direct connections to supply connections...in a closed or multi-unit rack assembly, the operating ambient temperature of power strips). 37 Rack mount Instructions Safety Instructions - D-Link EasySmart Switch User Manual Appendix C - D) Circuit Overloading - The following or similar rack-mount instructions are included with the maximum...

