

User Manual
Page 2
... of Contents Product Overview 4 Package Contents 4 Installation 5 Hardware Overview 5 Camera Enclosure Disassembly and SD Card Installation 6 Hardware Reset 7 Preparing for Installation 8 Adjusting the Zoom/Focus 10 Flush Mount (DCS-33-1 11 Surface Mount (DCS-33-2 13 Pendant Mount (DCS-33-3 15 Bent Mount (DCS-33-4 17 Network and Power Connections 19 Configuration 21 Configuration with Wizard... Backup and Restore 55 Firmware Upgrade 56 Status 57 Device Info 57 Logs 58 Help 59 Appendix 60 DI/DO Schematics 60 Technical Specifications 61 D-Link DCS-6510 User Manual 2
... of Contents Product Overview 4 Package Contents 4 Installation 5 Hardware Overview 5 Camera Enclosure Disassembly and SD Card Installation 6 Hardware Reset 7 Preparing for Installation 8 Adjusting the Zoom/Focus 10 Flush Mount (DCS-33-1 11 Surface Mount (DCS-33-2 13 Pendant Mount (DCS-33-3 15 Bent Mount (DCS-33-4 17 Network and Power Connections 19 Configuration 21 Configuration with Wizard... Backup and Restore 55 Firmware Upgrade 56 Status 57 Device Info 57 Logs 58 Help 59 Appendix 60 DI/DO Schematics 60 Technical Specifications 61 D-Link DCS-6510 User Manual 2
User Manual
Page 4
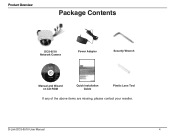
D-Link DCS-6510 User Manual 4 Product Overview Package Contents DCS-6510 Network Camera Power Adapter Security Wrench Manual and Wizard on CD-ROM Quick Installation Guide Plastic Lens Tool If any of the above items are missing, please contact your reseller.
D-Link DCS-6510 User Manual 4 Product Overview Package Contents DCS-6510 Network Camera Power Adapter Security Wrench Manual and Wizard on CD-ROM Quick Installation Guide Plastic Lens Tool If any of the above items are missing, please contact your reseller.
User Manual
Page 11
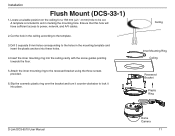
... floor. 5. Attach the inner mounting ring to be cut. Ceiling Inner Mounting Ring Ceiling Recessed Bracket Plastic Ring D-Link DCS-6510 User Manual Dome Camera 11 A template is included to power, network, and A/V cables. 2. Installation Flush Mount (DCS-33-1) 1. Slip the cosmetic plastic ring over the bracket and turn it counter-clockwise to the template. 3. Insert...
... floor. 5. Attach the inner mounting ring to be cut. Ceiling Inner Mounting Ring Ceiling Recessed Bracket Plastic Ring D-Link DCS-6510 User Manual Dome Camera 11 A template is included to power, network, and A/V cables. 2. Installation Flush Mount (DCS-33-1) 1. Slip the cosmetic plastic ring over the bracket and turn it counter-clockwise to the template. 3. Insert...
User Manual
Page 19
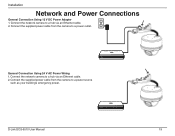
Connect the network camera to a power source such as your building's emergency power. D-Link DCS-6510 User Manual 19 Installation Network and Power Connections General Connection Using 12 V DC Power Adapter 1. Connect the supplied power cable from the camera to a hub via an Ethernet cable. 2. Connect the supplied power cable from the camera to a hub via an Ethernet cable. 2. General Connection Using 24 V AC Power Wiring 1. Connect the network camera to a power outlet.
Connect the network camera to a power source such as your building's emergency power. D-Link DCS-6510 User Manual 19 Installation Network and Power Connections General Connection Using 12 V DC Power Adapter 1. Connect the supplied power cable from the camera to a hub via an Ethernet cable. 2. Connect the supplied power cable from the camera to a hub via an Ethernet cable. 2. General Connection Using 24 V AC Power Wiring 1. Connect the network camera to a power outlet.

User Manual
Page 24
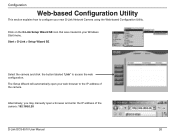
Configuration The Setup Wizard will appear and display the MAC address and IP address of your network does not use a DHCP server, the network camera's default static IP address 192.168.0.20 will be displayed. If your camera(s). Click Next, to proceed to continue. Enter the Admin ID and password. D-Link DCS-6510 User Manual 24 When logging in for the first time, the default Admin ID is admin with the password left blank. If you have a DHCP server on your network, a valid IP Address will be displayed. Click the Wizard button to the next page.
Configuration The Setup Wizard will appear and display the MAC address and IP address of your network does not use a DHCP server, the network camera's default static IP address 192.168.0.20 will be displayed. If your camera(s). Click Next, to proceed to continue. Enter the Admin ID and password. D-Link DCS-6510 User Manual 24 When logging in for the first time, the default Admin ID is admin with the password left blank. If you have a DHCP server on your network, a valid IP Address will be displayed. Click the Wizard button to the next page.
User Manual
Page 26
... your web browser to the IP address of the camera: 192.168.0.20 D-Link DCS-6510 User Manual 26 The Setup Wizard will automatically open a browser and enter the IP address of the camera. Click on the D-Link Setup Wizard SE icon that was created in your new D-Link Network Camera using the Web-based Configuration Utility. Configuration Web...
... your web browser to the IP address of the camera: 192.168.0.20 D-Link DCS-6510 User Manual 26 The Setup Wizard will automatically open a browser and enter the IP address of the camera. Click on the D-Link Setup Wizard SE icon that was created in your new D-Link Network Camera using the Web-based Configuration Utility. Configuration Web...

User Manual
Page 29
D-Link DCS-6510 User Manual 29 Configuration Setup Wizard To configure your Network Camera's motion detection settings, click Motion Detection Setup Wizard. Internet Connection Setup Wizard This wizard will guide you want to enter your settings without running...Next to continue. If you through a step-by-step process to configure your Network Camera and skip to choose. Note: Select DHCP if you may click Manual Internet Connection Setup to manually configure your new D-Link Camera and connect the camera to page 27. Click Next to continue. Alternatively, you are unsure of ...
D-Link DCS-6510 User Manual 29 Configuration Setup Wizard To configure your Network Camera's motion detection settings, click Motion Detection Setup Wizard. Internet Connection Setup Wizard This wizard will guide you want to enter your settings without running...Next to continue. If you through a step-by-step process to configure your Network Camera and skip to choose. Note: Select DHCP if you may click Manual Internet Connection Setup to manually configure your new D-Link Camera and connect the camera to page 27. Click Next to continue. Alternatively, you are unsure of ...

User Manual
Page 30
... and enter your host information. Click Next to continue. Enter a name for your camera and click Next to continue. D-Link DCS-6510 User Manual 30 Enter the correct configuration information and click Next to set a static address within your home network. Configuration Select Static IP if your Internet Service Provider has provided you with connection...
... and enter your host information. Click Next to continue. Enter a name for your camera and click Next to continue. D-Link DCS-6510 User Manual 30 Enter the correct configuration information and click Next to set a static address within your home network. Configuration Select Static IP if your Internet Service Provider has provided you with connection...

User Manual
Page 34
... address automatically. D-Link DCS-6510 User Manual 34 Invalid gateway settings may simplify access to your camera in this field. A static IP address may cause the failure of transmissions to a different subnet. Enable UPnP Port Enabling this setting allows the camera to add port forwarding entries into the router automatically on your network and would like...
... address automatically. D-Link DCS-6510 User Manual 34 Invalid gateway settings may simplify access to your camera in this field. A static IP address may cause the failure of transmissions to a different subnet. Enable UPnP Port Enabling this setting allows the camera to add port forwarding entries into the router automatically on your network and would like...

User Manual
Page 35
... is 80. The default port number is 554. The default port number is 443. D-Link DCS-6510 User Manual 35 Configuration Enable PPPoE: Enable this setting if your ISP. Maximum Upload/Download Specifying ...to the specified number of a particular stream. RTSP Port: The port number that the camera should not monitor bandwidth. Access Name for RTSP streaming to the HTTPS port of your ... mobile devices, such as mobile phones or PDAs. User Name: The unique name of the camera. You may specify the address of Kilobytes per second. For instance, live1.sdp can be...
... is 80. The default port number is 554. The default port number is 443. D-Link DCS-6510 User Manual 35 Configuration Enable PPPoE: Enable this setting if your ISP. Maximum Upload/Download Specifying ...to the specified number of a particular stream. RTSP Port: The port number that the camera should not monitor bandwidth. Access Name for RTSP streaming to the HTTPS port of your ... mobile devices, such as mobile phones or PDAs. User Name: The unique name of the camera. You may specify the address of Kilobytes per second. For instance, live1.sdp can be...

User Manual
Page 40
... your camera. D-Link DCS-6510 User Manual 40 Configuration Time and Date This section allows you to automatically or manually configure, update, and maintain the internal system clock for your camera to configure the Daylight Saving settings automatically. Time Zone: Select your time zone from your location. NTP Server: Network Time Protocol (NTP) synchronizes the DCS-6510 with...
... your camera. D-Link DCS-6510 User Manual 40 Configuration Time and Date This section allows you to automatically or manually configure, update, and maintain the internal system clock for your camera to configure the Daylight Saving settings automatically. Time Zone: Select your time zone from your location. NTP Server: Network Time Protocol (NTP) synchronizes the DCS-6510 with...

User Manual
Page 42
...Condition Action ex. Snapshot, Video Clips Server (where to configure server and media columns first so that the Network Camera will be triggered by many sources, such as notifications. D-Link DCS-6510 User Manual 42 When an event is triggered, a specified action will know what to send) ex. As... shown in the illustration below, an event can configure the Network Camera to send snapshots or videos to your e-mail ...
...Condition Action ex. Snapshot, Video Clips Server (where to configure server and media columns first so that the Network Camera will be triggered by many sources, such as notifications. D-Link DCS-6510 User Manual 42 When an event is triggered, a specified action will know what to send) ex. As... shown in the illustration below, an event can configure the Network Camera to send snapshots or videos to your e-mail ...

User Manual
Page 43
Configuration Add Server Configure up to 5 servers to store media. FTP: Enter the configuration for the target e-mail server account. E-mail: Enter the configuration for the target FTP server account. SD Card: Use the camera's onboard SD card storage. D-Link DCS-6510 User Manual 43 Server Name: Enter the unique name of your server. Network Storage: Specify a network storage device. Only one network storage device is supported.
Configuration Add Server Configure up to 5 servers to store media. FTP: Enter the configuration for the target e-mail server account. E-mail: Enter the configuration for the target FTP server account. SD Card: Use the camera's onboard SD card storage. D-Link DCS-6510 User Manual 43 Server Name: Enter the unique name of your server. Network Storage: Specify a network storage device. Only one network storage device is supported.

User Manual
Page 46
VIDEOS20080104_100341 File name prefix Date and time suffix The format is activated. 1 sec. 2 sec. 3 sec. 4 sec. 5 sec. 6 sec. 7 sec. 8 sec. 9 sec. 10 sec. File name prefix Enter the text that will be added at the beginning of the file name. Configuration If the Pre-event recording is set to five seconds and the Maximum duration is set to ten seconds, the Network Camera continues to record for another four seconds after a trigger is : YYYYMMDD_HHMMSS D-Link DCS-6510 User Manual 46 The moment the trigger is activated.
VIDEOS20080104_100341 File name prefix Date and time suffix The format is activated. 1 sec. 2 sec. 3 sec. 4 sec. 5 sec. 6 sec. 7 sec. 8 sec. 9 sec. 10 sec. File name prefix Enter the text that will be added at the beginning of the file name. Configuration If the Pre-event recording is set to five seconds and the Maximum duration is set to ten seconds, the Network Camera continues to record for another four seconds after a trigger is : YYYYMMDD_HHMMSS D-Link DCS-6510 User Manual 46 The moment the trigger is activated.

User Manual
Page 53
... users with IPs located between 171.0.0.0 and 192.255.255.255 can set from 1.1.1.0 to the camera. Configuration Access List Here you can access the Network Camera. End IP address: The ending IP Address of the devices (such as a computer) that have permission to access the video... the changes made. Alowed List Denied List D-Link DCS-6510 User Manual 53 Click Add to view your DCS-6510. For example: When the range of the Allowed List is set access permissions for both columns. Allow list: The list of the camera. Delete allow list: Remove the customized setting ...
... users with IPs located between 171.0.0.0 and 192.255.255.255 can set from 1.1.1.0 to the camera. Configuration Access List Here you can access the Network Camera. End IP address: The ending IP Address of the devices (such as a computer) that have permission to access the video... the changes made. Alowed List Denied List D-Link DCS-6510 User Manual 53 Click Add to view your DCS-6510. For example: When the range of the Allowed List is set access permissions for both columns. Allow list: The list of the camera. Delete allow list: Remove the customized setting ...


