User Manual
Page 2
... IMAGE - GETTING STARTED 38 IPVIEW ...38 HOW TO CHANGE PASSWORD 39 Change Password...39 1 System 14 System Administration - Information 28 System Administration - Contents CONTENTS ...1 ABOUT THIS GUIDE...3 INTRODUCTION ...3 SYSTEM REQUIREMENT 3 FEATURES AND BENEFITS 4 PHYSICAL DESCRIPTION 6 FRONT PANEL...6 REAR PANEL...7 BOTTOM PANEL...8 UNPACKING THE DCS-1000W 9 HARDWARE INSTALLATION 9 CONNECTING THE DCS-1000W T O THE CAMERA STAND 10...
... IMAGE - GETTING STARTED 38 IPVIEW ...38 HOW TO CHANGE PASSWORD 39 Change Password...39 1 System 14 System Administration - Information 28 System Administration - Contents CONTENTS ...1 ABOUT THIS GUIDE...3 INTRODUCTION ...3 SYSTEM REQUIREMENT 3 FEATURES AND BENEFITS 4 PHYSICAL DESCRIPTION 6 FRONT PANEL...6 REAR PANEL...7 BOTTOM PANEL...8 UNPACKING THE DCS-1000W 9 HARDWARE INSTALLATION 9 CONNECTING THE DCS-1000W T O THE CAMERA STAND 10...

User Manual
Page 3
View...55 Columns...55 Viewing Format...55 List View ...56 Menu Bar - Tools...57 Menu Bar - Help...57 IPVIEW ICON DESCRIPTION 58 CONTEXT SENSITIVE MENU 59 UNINSTALL IPVIEW APPLICATION 60 APPENDIX...62 FREQUENTLY ASKED QUESTIONS 62 TROUBLE SHOOTING...63 HOW TO PING YOUR IP ADDRESS 66 I/O CONNECTOR...67 UPGRADE FIRMWARE ...69 TIME ZONE...
View...55 Columns...55 Viewing Format...55 List View ...56 Menu Bar - Tools...57 Menu Bar - Help...57 IPVIEW ICON DESCRIPTION 58 CONTEXT SENSITIVE MENU 59 UNINSTALL IPVIEW APPLICATION 60 APPENDIX...62 FREQUENTLY ASKED QUESTIONS 62 TROUBLE SHOOTING...63 HOW TO PING YOUR IP ADDRESS 66 I/O CONNECTOR...67 UPGRADE FIRMWARE ...69 TIME ZONE...

User Manual
Page 4
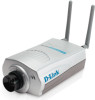
... monitoring for a cost-effective solution. It is different from any PC/Notebook over the Intranet or Internet via a web browser. The DCS-1000W can transmit high quality video images for the IPView Remote Monitoring Application. System Requirement Local Area Network: 10Base-T Ethernet or 100Base TX Fast Ethernet Wireless Local Area Network: IEEE 802...
... monitoring for a cost-effective solution. It is different from any PC/Notebook over the Intranet or Internet via a web browser. The DCS-1000W can transmit high quality video images for the IPView Remote Monitoring Application. System Requirement Local Area Network: 10Base-T Ethernet or 100Base TX Fast Ethernet Wireless Local Area Network: IEEE 802...

User Manual
Page 5
...configured from your network. IPView Configuration: • Windows XP, Me, 2000, 98Se or 98 • Pentium II, 350 MHz or above • Memory Size of 128 MB (256 MB recommended) • VGA card resolution of 800x600 or above . The DCS-1000W can be utilized in... or above or Netscape 4.0 or above Features and Benefits This section describes the features and benefits of DCS-1000W Simple to transform DCS-1000W into other Internet related protocols. DCS-1000W supports both wired and wireless transmission providing the advantage of mobility, flexibility and high-speed of its standards...
...configured from your network. IPView Configuration: • Windows XP, Me, 2000, 98Se or 98 • Pentium II, 350 MHz or above • Memory Size of 128 MB (256 MB recommended) • VGA card resolution of 800x600 or above . The DCS-1000W can be utilized in... or above or Netscape 4.0 or above Features and Benefits This section describes the features and benefits of DCS-1000W Simple to transform DCS-1000W into other Internet related protocols. DCS-1000W supports both wired and wireless transmission providing the advantage of mobility, flexibility and high-speed of its standards...

User Manual
Page 6
... site via the Intranet or Internet. Web Configuration Applying a standard web browser, administrators can configure and manage the DCS-1000W directly from its own web page via Intranet or Internet. Remote Monitoring Utility Powerful IPView application assigns administrator with programmable alarming facilities to manage and control the DCS1000W anywhere and any time in...
... site via the Intranet or Internet. Web Configuration Applying a standard web browser, administrators can configure and manage the DCS-1000W directly from its own web page via Intranet or Internet. Remote Monitoring Utility Powerful IPView application assigns administrator with programmable alarming facilities to manage and control the DCS1000W anywhere and any time in...

User Manual
Page 13
... (i.e. To configure your DCS-1000W type "http://192.168.0.20" in the address box of your favorite Web Browser. Press Enter. PC=192.168.0.5, Camera=192.168.0.20) for the two devices to do this, please access instructions for Web Configuration and the IPView application. For instructions on...to use as an example as their Quick Install Guides are the most up-to access the Welcome screen of the DCS-1000W for installing any of the D-Link Broadband Gateway products from support.dlink.com/products. Software Installation This section describes the Software installation procedure of the...
... (i.e. To configure your DCS-1000W type "http://192.168.0.20" in the address box of your favorite Web Browser. Press Enter. PC=192.168.0.5, Camera=192.168.0.20) for the two devices to do this, please access instructions for Web Configuration and the IPView application. For instructions on...to use as an example as their Quick Install Guides are the most up-to access the Welcome screen of the DCS-1000W for installing any of the D-Link Broadband Gateway products from support.dlink.com/products. Software Installation This section describes the Software installation procedure of the...
User Manual
Page 33
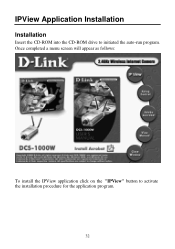
IPView Application Installation Installation Insert the CD-ROM into the CD-ROM drive to activate the installation procedure for the application program. 32 Once completed a menu screen will appear as follows: To install the IPView application click on the "IPView" button to initiated the auto-run program.
IPView Application Installation Installation Insert the CD-ROM into the CD-ROM drive to activate the installation procedure for the application program. 32 Once completed a menu screen will appear as follows: To install the IPView application click on the "IPView" button to initiated the auto-run program.
User Manual
Page 36
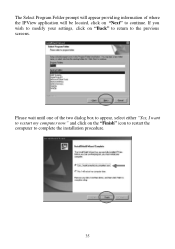
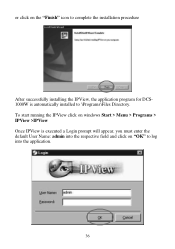
Please wait until one of where the IPView application will be located, click on the "Finish" icon to restart the computer to complete the installation procedure. 35 The Select Program Folder prompt will appear provid ing information of the two dialog box to appear, select either "Yes, I want to restart my computer now" and click on "Next" to continue. If you wish to modify your settings, click on "Back" to return to the previous screens.
Please wait until one of where the IPView application will be located, click on the "Finish" icon to restart the computer to complete the installation procedure. 35 The Select Program Folder prompt will appear provid ing information of the two dialog box to appear, select either "Yes, I want to restart my computer now" and click on "Next" to continue. If you wish to modify your settings, click on "Back" to return to the previous screens.
User Manual
Page 37
To start running the IPView click on "OK" to log into the respective field and click on windows Start > Menu > Programs > IPView >IPView Once IPView is automatically installed to complete the installation procedure After successfully installing the IPView, the application program for DCS1000W is executed a Login prompt will appear, you must enter the default User Name: admin into the application. 36 or click on the "Finish" icon to \Programs\Files Directory.
To start running the IPView click on "OK" to log into the respective field and click on windows Start > Menu > Programs > IPView >IPView Once IPView is automatically installed to complete the installation procedure After successfully installing the IPView, the application program for DCS1000W is executed a Login prompt will appear, you must enter the default User Name: admin into the application. 36 or click on the "Finish" icon to \Programs\Files Directory.
User Manual
Page 38
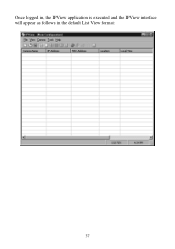
Once logged in, the IPView application is executed and the IPView interface will appear as follows in the default List View format: 37
Once logged in, the IPView application is executed and the IPView interface will appear as follows in the default List View format: 37

User Manual
Page 39
It is responsible for the management of preview, configuration, and searching of control and navigation requirements as illustrated below. Getting Started This section describes the operation of the IPView application User Interface with a user-friendly interface for using the application. IPView - List view format 38 IPView IPView is designed with detailed procedures for ease of each camera.
It is responsible for the management of preview, configuration, and searching of control and navigation requirements as illustrated below. Getting Started This section describes the operation of the IPView application User Interface with a user-friendly interface for using the application. IPView - List view format 38 IPView IPView is designed with detailed procedures for ease of each camera.

User Manual
Page 40
... and Password select "Tools" > "Options". To change the User Name and Password by the Administrator to constrain users access to the IPView application. How to Change Password Change Password When IPView is used for the first time it is executed a Login prompt will appear as possible to prevent unauthorized usage of... IPView applications. This procedure should be done as soon as illustrated below. 39 Once the User Name and Password are defined only the Administrator has ...
... and Password select "Tools" > "Options". To change the User Name and Password by the Administrator to constrain users access to the IPView application. How to Change Password Change Password When IPView is used for the first time it is executed a Login prompt will appear as possible to prevent unauthorized usage of... IPView applications. This procedure should be done as soon as illustrated below. 39 Once the User Name and Password are defined only the Administrator has ...
User Manual
Page 42
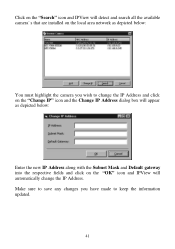
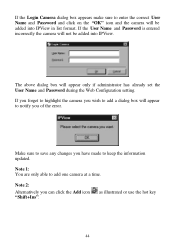
Make sure to save any changes you wish to keep the information updated. 41 Click on the "Search" icon and IPView will detect and search all the available camera's that are installed on the local area network as depicted below: You must highlight the camera you have made to change the IP Address and click on the "Change IP" icon and the Change IP Address dialog box will appear as depicted below: Enter the new IP Address along with the Subnet Mask and Default gateway into the respective fields and click on the "OK" icon and IPView will automatically change the IP Address.
Make sure to save any changes you wish to keep the information updated. 41 Click on the "Search" icon and IPView will detect and search all the available camera's that are installed on the local area network as depicted below: You must highlight the camera you have made to change the IP Address and click on the "Change IP" icon and the Change IP Address dialog box will appear as depicted below: Enter the new IP Address along with the Subnet Mask and Default gateway into the respective fields and click on the "OK" icon and IPView will automatically change the IP Address.
User Manual
Page 44
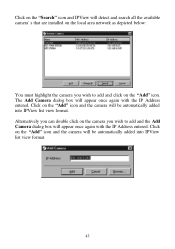
... view format. The Add Camera dialog box will appear once again with the IP Address entered. Click on the "Search" icon and IPView will detect and search all the available camera's that are installed on the local area network as depicted below: You must highlight the camera you ... "Add" icon. Alternatively you can double click on the camera you wish to add and the Add Camera dialog box will be automatically added into IPView list view format. 43 Click on the "Add" icon and the camera will appear once again with the IP Address entered.
... view format. The Add Camera dialog box will appear once again with the IP Address entered. Click on the "Search" icon and IPView will detect and search all the available camera's that are installed on the local area network as depicted below: You must highlight the camera you ... "Add" icon. Alternatively you can double click on the camera you wish to add and the Add Camera dialog box will be automatically added into IPView list view format. 43 Click on the "Add" icon and the camera will appear once again with the IP Address entered.
User Manual
Page 45
... error. as illustrated or use the hot key 44 If the User Name and Password is entered incorrectly the camera will not be added into IPView. If you forget to highlight the camera you can click the Add icon "Shift+Ins". Note 1: You are only able to add one camera at... box appears make sure to enter the correct User Name and Password and click on the "OK" icon and the camera will be added into IPView in list format.
... error. as illustrated or use the hot key 44 If the User Name and Password is entered incorrectly the camera will not be added into IPView. If you forget to highlight the camera you can click the Add icon "Shift+Ins". Note 1: You are only able to add one camera at... box appears make sure to enter the correct User Name and Password and click on the "OK" icon and the camera will be added into IPView in list format.

User Manual
Page 46
Make sure to save any changes you wish to delete from IPView list view format. How to Delete a Camera Delete Camera To delete a camera you must highlight the camera you have made to keep the information updated. From the menu bar select "Camera" > "Delete". as illustrated below. Note: Alternatively you do not wish to delete the camera or click on "No" if you can click the Delete icon "Del" . A Delete Camera dialog box will appear and click on the "Yes" icon to delete the camera as illustrated or use the hot key 45
Make sure to save any changes you wish to delete from IPView list view format. How to Delete a Camera Delete Camera To delete a camera you must highlight the camera you have made to keep the information updated. From the menu bar select "Camera" > "Delete". as illustrated below. Note: Alternatively you do not wish to delete the camera or click on "No" if you can click the Delete icon "Del" . A Delete Camera dialog box will appear and click on the "Yes" icon to delete the camera as illustrated or use the hot key 45
User Manual
Page 47
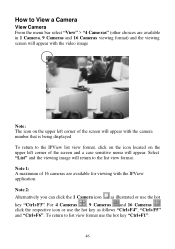
...) and the viewing screen will appear with the video image Note: The icon on the upper left corner of the screen will appear with the IPView application. To return to the list view format. How to View a Camera View Camera From the menu bar select "View" > "4 Came ras" (other choices are... available for viewing with the camera number that is being displayed To return to the IPView list view format, click on the icon located on the upper left corner of the screen and a case sensitive menu will return to list view...
...) and the viewing screen will appear with the video image Note: The icon on the upper left corner of the screen will appear with the IPView application. To return to the list view format. How to View a Camera View Camera From the menu bar select "View" > "4 Came ras" (other choices are... available for viewing with the camera number that is being displayed To return to the IPView list view format, click on the icon located on the upper left corner of the screen and a case sensitive menu will return to list view...

User Manual
Page 55
Make sure to save files, and exit the IPView as follows: Menu Bar - as illustrated or use the hot Menu Bar The menu bar provides easier access for users to create new files, open ... (please refer to the appendix for further details on the menu bar provides "New" , "Open", "Save", "Save As" and "Exit" for users to navigate the IPView with different selections along with hot key capabilities as depicted below. 54 File "File" on reset. Note: Alternatively you have made to the Web Configuration...
Make sure to save files, and exit the IPView as follows: Menu Bar - as illustrated or use the hot Menu Bar The menu bar provides easier access for users to create new files, open ... (please refer to the appendix for further details on the menu bar provides "New" , "Open", "Save", "Save As" and "Exit" for users to navigate the IPView with different selections along with hot key capabilities as depicted below. 54 File "File" on reset. Note: Alternatively you have made to the Web Configuration...
User Manual
Page 58
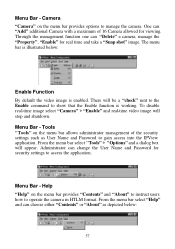
... to access the application. Through the management function one can choose either "Contents" or "About" as User Name and Password to gain access into the IPView application.
... to access the application. Through the management function one can choose either "Contents" or "About" as User Name and Password to gain access into the IPView application.
User Manual
Page 59
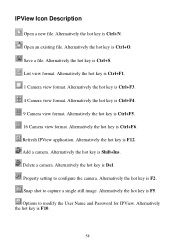
... hot key is Ctrl+S. Alternatively the hot key is Ctrl+N. List view format. Alternatively the hot key is Ctrl+F5. 16 Camera view format. Refresh IPView application. Delete a camera. Snap shot to configure the camera. Alternatively the hot key is Ctrl+F3. 4 Camera view format. Alternatively the hot key is F2... format. Alternatively the hot key is F12. Save a file. Alternatively the hot key is F10. 58 Options to modify the User Name and Password for IPView. IPView Icon Description Open a new file.
... hot key is Ctrl+S. Alternatively the hot key is Ctrl+N. List view format. Alternatively the hot key is Ctrl+F5. 16 Camera view format. Refresh IPView application. Delete a camera. Snap shot to configure the camera. Alternatively the hot key is Ctrl+F3. 4 Camera view format. Alternatively the hot key is F2... format. Alternatively the hot key is F12. Save a file. Alternatively the hot key is F10. 58 Options to modify the User Name and Password for IPView. IPView Icon Description Open a new file.