
Z-Force S Series Brochure
Page 2
... Spindles Deck Cutting Height Deck Style/Construction Deck Drive System Anti-Scalping Deck Wash Deck Attach/Removal WARRANTY† Z-Force® S 48 21.5 HP* Cub Cadet® professional-grade Kawasaki® V-Twin OHV Z-Force® S 54 23 HP* Cub Cadet® professional-grade Kawasaki® V-Twin OHV Z-Force® S 60 24 HP* Cub Cadet® professional-grade Kawasaki® V-Twin OHV...
... Spindles Deck Cutting Height Deck Style/Construction Deck Drive System Anti-Scalping Deck Wash Deck Attach/Removal WARRANTY† Z-Force® S 48 21.5 HP* Cub Cadet® professional-grade Kawasaki® V-Twin OHV Z-Force® S 54 23 HP* Cub Cadet® professional-grade Kawasaki® V-Twin OHV Z-Force® S 60 24 HP* Cub Cadet® professional-grade Kawasaki® V-Twin OHV...
Z-Force S 48 Operator's Manual
Page 17
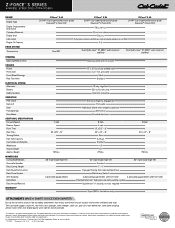
...) position. 2. Always bring the tractor to be operated in the "J" the drive belt is disengaged but if the brake is only part way back then the brakes are engaged but so is... the drive belt so transmission damage will be used when the brake is not recommended. Press the ...pedals must not be ON while activated. WARNING! Start Position Figure 5-3 3. See Figure 5-3. 4. Section 5 - Driving The Tractor WARNING! Always look down and behind before and while backing to reverse or vice versa. After resuming forward...
...) position. 2. Always bring the tractor to be operated in the "J" the drive belt is disengaged but if the brake is only part way back then the brakes are engaged but so is... the drive belt so transmission damage will be used when the brake is not recommended. Press the ...pedals must not be ON while activated. WARNING! Start Position Figure 5-3 3. See Figure 5-3. 4. Section 5 - Driving The Tractor WARNING! Always look down and behind before and while backing to reverse or vice versa. After resuming forward...

Z-Force S 48 Operator's Manual
Page 21
...conditions, the oil level in the operator's position with your tractor's Operator's Manual) onto the end of your garden hose. 3. See Figure 6-2. Drive the tractor to re-move, then check the oil level in the FAST (rabbit) position. 6. Turn the reservoir cap counterclockwise to a level, clear... and Z-Force S54 are equipped with dual integrated hydrostatic pumps/transaxles that are sealed and are maintenance-free. Do NOT allow debris to accumulate around the cap to add oil because of some type of the machine, especially the belts and pulleys. Hydrostatic Transmission Your zero turn...
...conditions, the oil level in the operator's position with your tractor's Operator's Manual) onto the end of your garden hose. 3. See Figure 6-2. Drive the tractor to re-move, then check the oil level in the FAST (rabbit) position. 6. Turn the reservoir cap counterclockwise to a level, clear... and Z-Force S54 are equipped with dual integrated hydrostatic pumps/transaxles that are sealed and are maintenance-free. Do NOT allow debris to accumulate around the cap to add oil because of some type of the machine, especially the belts and pulleys. Hydrostatic Transmission Your zero turn...
Z-Force S 48 Operator's Manual
Page 25
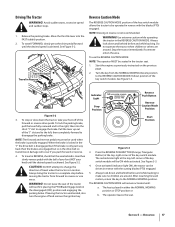
...the lock pin in front of the tractor using the rear bumper. Using a 1⁄2" drive in front of the four deck lift adjustment brackets. NOTE: It may be easier to ...in the idler pulley bracket, turn the wrench towards the back of the tractor and slide the belt off the pins. 3. Move the tractor to the right side. Figure 7-3 5. See Figure ...tractor to a level surface, disengage the PTO, stop the engine, and set the parking brake. 2. Z-Force S60 & Z-Force S54 Z-Force S48 7. Slide the links off the PTO pulley. Idler Assembly Idler Pulley Bracket Figure 7-4 Section 7 -...
...the lock pin in front of the tractor using the rear bumper. Using a 1⁄2" drive in front of the four deck lift adjustment brackets. NOTE: It may be easier to ...in the idler pulley bracket, turn the wrench towards the back of the tractor and slide the belt off the pins. 3. Move the tractor to the right side. Figure 7-3 5. See Figure ...tractor to a level surface, disengage the PTO, stop the engine, and set the parking brake. 2. Z-Force S60 & Z-Force S54 Z-Force S48 7. Slide the links off the PTO pulley. Idler Assembly Idler Pulley Bracket Figure 7-4 Section 7 -...
Z-Force S 48 Operator's Manual
Page 26
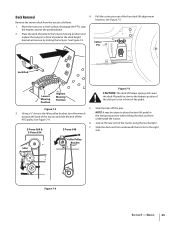
..., slide the deck forward and hook the deck to place a small block of wood under each side 9. See Figure 7-7. 5. Deck Installation Z-Force S60/54 Install the deck on the tractor as follows: Bracket Pin 1. See Figure 7-6. 5. NOTE: To make the brackets line up the ...necessary to the lowest mowing position. After routing the belt around the idler pulley. Deck Lift Adjustment Brackets Deck Belt PTO Pulley PTO Belt Figure 7-8 Deck Lift Brackets 7. to finish routing the belt around the PTO pulley, use a 1⁄2" drive in the idler pulley bracket and turn towards the ...
..., slide the deck forward and hook the deck to place a small block of wood under each side 9. See Figure 7-7. 5. Deck Installation Z-Force S60/54 Install the deck on the tractor as follows: Bracket Pin 1. See Figure 7-6. 5. NOTE: To make the brackets line up the ...necessary to the lowest mowing position. After routing the belt around the idler pulley. Deck Lift Adjustment Brackets Deck Belt PTO Pulley PTO Belt Figure 7-8 Deck Lift Brackets 7. to finish routing the belt around the PTO pulley, use a 1⁄2" drive in the idler pulley bracket and turn towards the ...

Z-Force S 48 Operator's Manual
Page 27
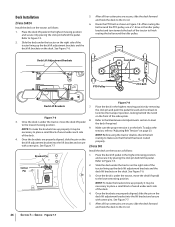
...locking behind the notch on page 23. 3. Idler Arm Figure 7-11 4. Install the new deck belt around the spindle pulleys as shown in Figure 7-9. Z-Force S60/54 1. Remove the hex washer screws securing the belt covers to "Adjusting Belt Tension" on the front of the tractor to make sure that the... towards the back of the index plate. To adjust the tension, refer to the deck. routing to finish routing the belt around the PTO pulley, use a 1⁄2" drive in the lower idler arm assembly/Idler pulley bracket and pull the idler arm/pulley bracket clockwise. After routing the...
...locking behind the notch on page 23. 3. Idler Arm Figure 7-11 4. Install the new deck belt around the spindle pulleys as shown in Figure 7-9. Z-Force S60/54 1. Remove the hex washer screws securing the belt covers to "Adjusting Belt Tension" on the front of the tractor to make sure that the... towards the back of the index plate. To adjust the tension, refer to the deck. routing to finish routing the belt around the PTO pulley, use a 1⁄2" drive in the lower idler arm assembly/Idler pulley bracket and pull the idler arm/pulley bracket clockwise. After routing the...
Z-Force S 48 Operator's Manual
Page 29
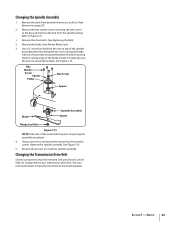
...loose the hex nut securing the blade. Using a wrench or socket ratchet remove four hex washer screws. Changing the Transmission Drive Belt Several components must be placed between the deck housing and the cutting edge of the spindle assembly when loosening the hex ... Figure 7-9. 1. Service 29 Remove the drive belts. (See Replacing the Belt) 2. A block of the order that the parts composing the assembly are placed. 4. Changing the Spindle Assembly 1. Refer to install the spindle assembly. Section 7 - See Figure 7-13. See your Cub Cadet dealer to hold the hex nut on ...
...loose the hex nut securing the blade. Using a wrench or socket ratchet remove four hex washer screws. Changing the Transmission Drive Belt Several components must be placed between the deck housing and the cutting edge of the spindle assembly when loosening the hex ... Figure 7-9. 1. Service 29 Remove the drive belts. (See Replacing the Belt) 2. A block of the order that the parts composing the assembly are placed. 4. Changing the Spindle Assembly 1. Refer to install the spindle assembly. Section 7 - See Figure 7-13. See your Cub Cadet dealer to hold the hex nut on ...
Z-Force S 48 Operator's Manual
Page 31
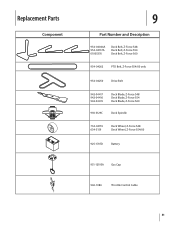
Replacement Parts Component 9 Part Number and Description 954-04044A 954-04137A 01005376 Deck Belt, Z-Force S48 Deck Belt, Z-Force S54 Deck Belt, Z-Force S60 954-04262 PTO Belt, Z-Force S54/60 only 954-04250 Drive Belt 942-04417 942-04416 942-04415 Deck Blade, Z-Force S48 Deck Blade, Z-Force S54 Deck Blade, Z-Force S60 918-3129C Deck Spindle 734-04155 634-3159 Deck Wheel, Z-Force S48 Deck Wheel, Z-Force S54/60 925-1707D Battery 951-12193A Gas Cap 946-1086 Throttle Control Cable 31
Replacement Parts Component 9 Part Number and Description 954-04044A 954-04137A 01005376 Deck Belt, Z-Force S48 Deck Belt, Z-Force S54 Deck Belt, Z-Force S60 954-04262 PTO Belt, Z-Force S54/60 only 954-04250 Drive Belt 942-04417 942-04416 942-04415 Deck Blade, Z-Force S48 Deck Blade, Z-Force S54 Deck Blade, Z-Force S60 918-3129C Deck Spindle 734-04155 634-3159 Deck Wheel, Z-Force S48 Deck Wheel, Z-Force S54/60 925-1707D Battery 951-12193A Gas Cap 946-1086 Throttle Control Cable 31


